Often, people underestimate the preparatory work, paying maximum attention to the decorating process. However, there is no point in buying expensive finishing materials if you have not prepared the ground properly. Decorating rooms always starts with the walls. They need to be aligned and preferably as well as possible. Of course, there are some finishing materials that hide minor imperfections in the walls, for example, decorative plaster or thick wallpaper, but you still need to prepare the base for them.
Regardless of what finishing option you choose for interior walls (paint, wallpaper), you need to achieve maximum loyalty from your walls. When the walls are even and smooth, then the work will be built much better in the future. Today we will talk about cement putty - a material that is used to level walls.
Main characteristics of cement putty
Cement putty is considered one of the best materials for sealing cracks, surface differences and various irregularities. The use of putty is advisable both in dry and damp rooms, and for facade work - this is precisely its advantage over other finishing materials. The mixture is not afraid of moisture, frost, or sudden temperature changes. For exterior work, only cement facade putty is used.
Cement putty, which you can buy today at any hardware store, depending on the area of application, can be:
- thermal insulation;
- façade;
- basement;
- decorative.
Depending on the binding materials, there are cement-lime putty, gypsum and other types.
Recommended for use:
- In any rooms with normal and high humidity - bathrooms, showers, swimming pools, rooms that are not heated (garages, summer cottages).
- On brick, stone, concrete and other surfaces.
Depending on the type of work, cement putty can be:
- starting cement putty - used at the initial stages of finishing work in cases where it is necessary to seal large cracks and holes. The thickness of the putty can reach up to 1.5 cm. The grain size of the quartz sand included in the composition is from 0.5 to 0.8 mm. The surface covered with the starting putty looks perfectly smooth, but is rough precisely because of the coarse-grained component;
- finishing cement putty – used at the final stages of work. The grain size of quartz sand is no more than 0.2 mm, which makes the surface smooth. Does not mask uncorrected unevenness and does not hide large gaps and cracks.
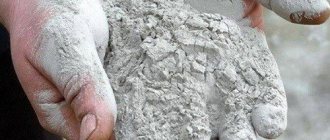
The shade of the putty depends on what kind of cement was used in production. White cement putty is obtained by using white cement, and the gray color is given to the material by ordinary cement.
Cement putty is available in two types:
- dry putty - the advantage is that you can independently control the process of diluting with water to the required consistency. Dry putty has excellent adhesion and does not crack after drying, but only if it is diluted and applied correctly;
- liquid putty - comes in plastic buckets and is ready for use. It has a number of disadvantages - the shelf life is shorter than dry and hardens faster, which is not always convenient for work. In addition, ready-made putties exhibit some shrinkage - after drying, they decrease in volume. If you apply it in a thick layer, then after drying, cracks will certainly appear on the surface. And the price of liquid putty is much higher. Most often, ready-made putty is used for small and shallow cracks.
When choosing a putty, consider what surfaces you will use it on and what layer you plan to apply. Be sure to find out what kind of cement was used in the manufacture of this putty.
How not to make a mistake with your choice
Tool for work
Cement putty can be easily applied to the walls with your own hands.
When carrying out the work, no special equipment will be required; everything necessary for this is sold at any hardware store.
When choosing a composition, it is recommended to pay attention to the period of time during which the material can retain its plasticity in an open container. As a rule, it only takes 2 to 5 hours for cement putty to harden.
The finishing putty is applied after treating the wall with starting compounds; it must have good compatibility with the bottom layer. The basis of the surface should be a material with higher grade strength. For this reason, cement putty should not be applied to plastic surfaces, nor should it be used over gypsum bases.
It is best to follow a rule that has helped experienced builders more than once:
if you buy the base from one manufacturer, the finishing putty must be from the same company.
It is not recommended to experiment in such an important matter and change the manufacturer; it is better to use materials from one company for all stages of the work, even if it is done with your own hands.
It is advisable to prepare the finishing putty with your own hands in exactly the amount needed for the work. We should not forget that the composition gradually hardens in the container. The dry mixture is poured into a bowl and mixed with water.
The finishing putty with special additives should sit for a while, after which it should be thoroughly stirred once. If non-woven or vinyl wallpaper serves as the final coating, one layer is sufficient. When the walls are painted at the next stage of work, the putty is applied with your own hands in two or three layers.
Advantages and disadvantages of cement putty
Cement-based putty has the following advantages and disadvantages:
- Lightweight and easy to use. Working with the mixture will be easy even for those who do not have special training or experience in construction work, and all the tools necessary for puttying are available for free sale.
- Each package contains instructions for preparing the mixture and its use.
- Cement guarantees the highest reliability of the treated surface - it is not afraid of precipitation, frost, or changes in air temperature.
- Eliminates unevenness of walls with differences from 5 to 15 mm.
- Cement putty is in great demand not only because of its reliability, but also because of its availability - its price is much lower than that of other similar finishing materials.
For all its advantages, cement putty has a number of minor disadvantages:
- Unfortunately, even the finishing putty has a grainier texture than latex and acrylic putties. But if you consider that it is 2-3 times cheaper than its analogues, then this drawback cannot be considered significant.
- Even white putty has a slight yellowish tint, which some users don't really like. But, if you consider that walls and ceilings are painted or wallpapered over putty, then this drawback is also insignificant.
Important: cement putty is not recommended to be mixed with paints, varnishes, glue and other building materials so that it does not lose its quality. If something accidentally gets into the mixture, it can be considered unsuitable for use.
Popular brands
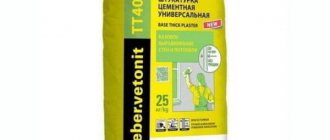
Developers and repairmen who do not want to bother with purchasing cement, sand and other components for making their own cement putty can purchase ready-made dry mixes from the following popular brands in Russia:
- Founded by Bazsilk Putty. A universal material that can be used for exterior and interior use. Packing: paper bag weighing 20 kg. Average price – 340 rubles per bag;
- VOLMA-Aquastandard. Starting putty for wide application. Packing – paper bag weighing 22 kg. Average price – 260 rubles per bag;
- Cement putty Ceresit ST-225. Finishing putty for wide application. Packing – paper bag weighing 25 kg. Average price – 756 rubles per bag;
- Cement putty “Magma”. Universal putty for external and internal work. Packing – paper bag weighing 25 kg. The average price is 385 rubles per bag.
Work with putty
To achieve a perfectly flat surface, puttying work must be performed in strict sequence. The whole process consists of several stages.
For work you will need the following tools:
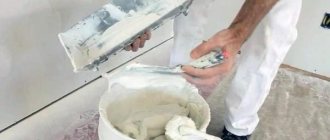
- A drill with a mixer attachment, with which you will mix the solution. It will be difficult to knead the solution with your hands so that it is homogeneous and without lumps.
- Several spatulas - wide (40-50 cm) and narrower (20-10 cm). You will need wide spatulas for large areas, and narrow spatulas for puttying hard-to-reach areas.
- Special rollers and brushes with which you will prime the work surface.
- You need a level to check the evenness of the surface.
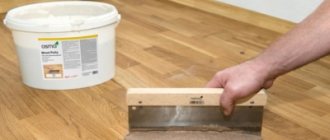
- You will need sandpaper or a metal float to clean the putty surface. Most often, paper No. 240 is used for finishing putty; it will help to obtain a perfectly smooth and even surface. A metal float is more suitable for starting putty.
- The rule may be needed for puttying very uneven walls with large and deep depressions. The most convenient would be the metal rule; it is used on thick layers of putty.
- Container for mixing putty. A plastic bucket is most suitable for this.
Preparation and application of the solution
The putty is prepared according to the instructions indicated on the packaging. The main nuances that you will encounter are periodic stirring of the solution, as well as its production within five hours.
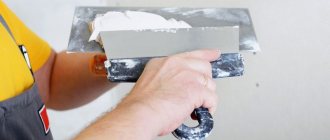
The putty is applied to the walls with special spatulas. Each subsequent layer of putty is applied only when the previous one has set sufficiently. Do not rush to apply the entire layer at once, otherwise your putty will float and you will not get the result you need.
It is also worth distinguishing between starting and finishing putties. There are not many differences in them, but you need to understand that the finishing putty contains finer sand, which helps make the walls smooth, while the starting putty is used to seal cracks and other wall defects.
Preparing the surface for work
Before you start puttingty, you need to properly prepare the working base:
- The surface that is planned for putty must be clean and there should not be any large irregularities on it. All stains of paint, chalk, varnish, any grease and soot must be removed. It is also not allowed to apply putty to old wallpaper and falling pieces of plaster.
- Mold stains are removed with a special antifungal agent.
- If the base has damaged areas, they must be cleaned and sealed with a special solution and only after complete drying proceed to the next stage.
- After this, the finished surface must be treated with a special deep-penetrating primer. This treatment reduces the absorption of porous areas and increases the adhesion of finishing materials. It is recommended to carry out such work in dry weather to speed up drying time.
Application technology
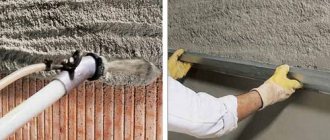
The surface on which cement putty will be applied must be prepared for the appropriate work. To do this, it is cleaned of old materials. Remains of wallpaper, paint and varnish should be removed using special means. Irregularities and blockages on the walls are removed and cleaned. If there is a fungal infection of the surface, it is necessary to treat it with a solution with antifungal and antibacterial activity. The next step is to saturate with primer to ensure better adhesion and protection of the base coat.
Important! Each layer must be allowed to dry thoroughly in order to preserve the properties of the finishing materials as much as possible.
It is better to carry out work in the warm season, taking into account optimal weather conditions.
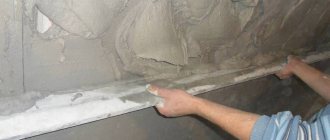
For further work, prepare a solution of sufficient consistency. Using spatulas, apply the mixture to the walls and level it. Each stage is applied diagonally at an angle to the previous one, and then leveled. To repair facades, the composition is applied in a thicker layer.
Attention! Before using the finishing solution, it is better to re-prime the surface.
After treating with starting putty, you should wait about a day for the mixture to harden. Between several stages of finishing the time interval is about 12 hours. After final drying, the surface must be rubbed and sanded until smooth.
Putty work
After preparing the surface, you can proceed directly to puttying work.
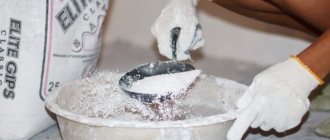
Dry cement putty is prepared as follows:
- Pour a small amount of water into a plastic container.
- Pour dry putty into the water.
- Mix the mass with any convenient object (you can use a spatula).
- Now beat the mixture with a mixer or drill with a special attachment.
- Check the consistency of the putty with a spatula - if it does not flow from it, but sticks, and feels elastic to the touch, it means it has been prepared correctly.
- If the mixture turns out to be liquid, add a little dry putty. If lumps have formed in the putty, dilute it with water.
Starting putty of surfaces:
- At the first stage, work is carried out with starting putty. After mixing, the composition will not dry out for 1-2 hours - that is how much time you have to use it. If the surface to be treated is voluminous, do not dilute a large amount of solution at once.
- Write down the proportion in which you dilute the putty so that the consistency of the next portion is the same as the first.
- If you plan to apply more than one coat of putty, you will need a special paint mesh. With its use, the surface will be more durable and smooth. The mesh can be coarser or less. The rougher it is, the smoother the surface is.
- The putty is applied diagonally with a large spatula, which is smoothed at an angle of 30 degrees. The next layer is applied as if overlapping the previous one. This is done to prevent bumps and bumps from appearing.
- If you still have traces from the spatula, don’t worry, they will definitely be hidden with finishing putty.
- The corners are puttied using a corner spatula. The putty mass is applied to the joints with a regular spatula, then smoothed with an angular spatula.
- It will take about a day for the starting putty to dry completely.
Finishing putty of surfaces:
- The next stage after the starting putty has completely dried is the finishing putty. Work is also carried out using metal spatulas. The finishing putty is applied more carefully to ensure a smooth surface.
- After puttying, the surface is checked with a level. If necessary, apply additional leveling.
- If you plan to apply two layers of finishing putty, be sure to wait until the first layer has completely dried. This will take about 12 hours.
- It is recommended to prime the surface before reapplying the finishing putty.
- After the putty has completely dried, it can be cleaned using a metal float or sandpaper in a circular motion.
- After work, all tools can be easily washed with running cold water.
- The cleaned surface can be painted, wallpapered or any other decorative work can be carried out.
Important: until the putty surface has dried, it must be protected from moisture. This especially applies to outdoor work. In case of unexpected precipitation, the surface must be covered with film.
Lighthouse putty of surfaces
For this type of work, the same materials and tools are used as for regular starting putty, but beacons are additionally used. Beacons are slats made of wood, plaster or metal. They are used to check the vertical level of surface evenness. First, the beacons are attached to the walls or ceiling using any adhesive, and then you can begin to putty. The walls are aligned horizontally in the same way, but a rule is used for this. If you do everything correctly, then the walls after puttying will be even and smooth, and you can check this with a level.
Important: the surface for painting requires more careful leveling than for wallpaper, since the paint reveals even the slightest unevenness. Sometimes you have to apply 3-4 layers of putty until completely leveled.
Safety precautions when working with putty
Since the putty contains cement, and when combined with water an alkaline reaction occurs, try not to allow the solution to come into contact with exposed parts of the body. In case of contact with eyes, rinse them immediately and then contact an ophthalmologist. Do not taste the putty.
The shelf life of dry mixtures is 1 year. It is necessary to store in dry rooms and prevent moisture from entering the bags. Opened packaging must be additionally insulated to protect it from moisture.