How to cover walls with your own hands?
No special skills are required to apply decorative plaster; of course, practical experience will not hurt, and understanding the process will help save effort and time. It is best to first read an article about it or watch a training video.
The preliminary preparation of the wall plays an important role; the better it is leveled and the finer the grain, the easier it is to apply the plaster.
The smoother the wall, the easier it is to apply plaster.
Read our separate article on how to choose decorative plaster for interior wall decoration.
Surface preparation
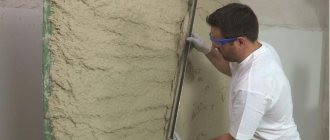
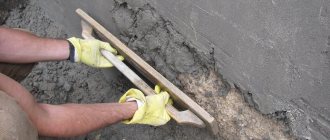
Before starting work, you should properly prepare the base on which decorative plaster will be applied. First, the old layer of finishing is removed, then an audit is carried out. If any defects are identified, measures are taken to eliminate them.
Cracks are sealed with cement or other mortar , depending on their size and type of wall material, unevenness is eliminated, since the finishing material will be applied in a thin layer, all flaws will be clearly visible on the finished surface.
Cracks in the wall need to be repaired
But, if textured, relief or structural plaster is performed, then some errors are allowed, since the technique of applying them allows you to hide small defects in the wall.
To improve the adhesive characteristics of the surface, it is necessary to treat it with primer compounds, with the exception of cases of working with Venetian plasters.
For it, a special base layer is made, which serves as a substrate. Before this, the surface is thoroughly cleaned of dust, and it is especially effective to do this with a vacuum cleaner.
Primer of walls
What tools will you need?
In order to carry out work on applying decorative plaster, you will need to prepare the necessary tools, the range of which is largely determined by the chosen technique. The obligatory ones will be useful:
- trowels;
- graters and graters;
- applicators,
- brushes;
- sandpaper;
- foam sponges;
- rollers for decorative plaster;
- brushes of two types: for decoration and ordinary;
- stamps for forming a pattern;
- stencils (if necessary);
- To apply flock coating you will need a sprayer.
Plastering tools
You should definitely purchase a set of spatulas of different sizes and two types: stainless steel and rubber .
Minimum set
To make decorative plaster yourself, you will need special tools. A worker cannot do without a spatula and a roller - this is the minimum set; a bucket will come in handy. You will also need:
- Ironing iron.
- Trowel.
- Grater.
- Brush.
There are also a number of tools for various types of decorative plaster finishing.
Different types of spatulas
Attention! You can do it yourself at home, then you can save money and create a product with the required structure, without worrying about possible misunderstandings.
Rollers
To create decorative plaster, structural rollers made of silicone or rubber are used. They already have three-dimensional patterns, thanks to such rollers it is much easier to apply a pattern to the wall. Application will be easier and more symmetrical.
Rollers with different patterns
This does not mean that without a roller you cannot achieve a beautiful and unique result. You should not necessarily purchase such solutions, since an unusual ornament can be created using a rag, mitten and other improvised means, for example, if you apply shells or stones to the surface.
In this video, watch how to properly apply decorative plaster with a roller.
Original ideas for finishing walls with plaster
Applying decorative plaster to walls means not only leveling the surface, but also showing your imagination. With simple tools you can create a truly original interior.
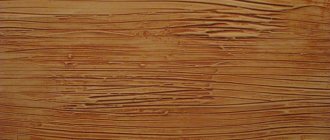
Using a brush
This application method involves the use of fine-grained plaster. First, the walls are prepared as described above. Then the starting layer is applied. After it sets, you need to take a brush with stiff bristles and moisten it in water. Using this tool you can create the following texture elements:
- Furrows. To do this, you need to lean the tool against the wall and draw vertical lines. It is important to press with medium force.
- Fabric effect. The brush is pressed forcefully onto the surface to be treated and vertical relief stripes are drawn. After this, perpendicular horizontal lines are drawn with medium pressure. After this, vertical stripes are drawn again, pressing the tool even weaker. This should be continued until the bristles of the brush barely touch the surface.
- Waves. The simplest element is applied with a brush. To do this, draw zigzag lines with a vertical orientation, after which the resulting corners are rounded.
Paint roller
Is it possible to apply decorative plaster with such a tool - the answer is yes. This familiar tool can also be used to apply decorative plaster with your own hands. Depending on the type of attachment of this tool, you can get different textures:
Rollers to create a decorative effect
- Rubber rollers are used to create three-dimensional textures that look like natural patterns, such as the surface of leaves or the skin of reptiles.
- Foam rubber with various relief patterns is used for drawing abstract relief coatings.
- Fur attachments are great for creating a “Fur Coat” texture.
This decorative wall plaster requires subsequent painting; in most cases, the first layer is used to remove surface defects, and the second is decorative. It can be applied with either a dry brush or shaded.
VIDEO:
Plaster finishing using stencils
The use of these elements is a simple, but at the same time original and effective way to create various textured surfaces for decorating rooms. They can be used with any type of material. But if we are talking about small areas, then fine-grained decorative plaster is more suitable.
First of all, the walls are prepared, after which the starting layer is applied. This can be plaster made in any style: from specially aged surfaces to ordinary ornaments. A layer of paint is applied to the finished layer, which should differ from it by several tones. After the first layer has completely dried, a stencil is applied to the wall, after which a finishing layer of plaster is applied on top of it, which is subsequently covered with wax.
You can easily create a three-dimensional pattern of decorative plaster using special stencils
Using stamps
This technique requires certain skills, so it is recommended to first practice a little on a “draft”. First, apply a base layer with a thickness of no more than 3 mm. The solution for this layer is initially painted over with color; it is also allowed to apply paint after the procedure is completed. After this, apply a second layer approximately 1 mm thick. To do this, use a more liquid plaster with a rich color. Finally, the surface is pressed with a special rubber tool. As a result, the layers mix, forming a rather interesting texture for the walls.
An excellent option for creating an unusual and unique texture would be to use stamps
Do-it-yourself plastering is at the same time a simple but detail-demanding procedure, therefore, before applying decorative plaster to walls or other surfaces, you need to study the above instructions and manufacturers' recommendations.
Technology and basic techniques
It should be noted that the basic techniques when working with different types of decorative plasters are general and, first of all, this applies to applying the material to the surface. Also, in general, the number of stages is the same, but the technique of working with different materials, of course, has its differences.
Different techniques for applying decorative plaster
Decorative plaster for interior wall decoration is applied to the surface using a trowel and spatulas, and using the latter it is leveled.
Most often, craftsmen use the “bottom-up” technique. But there are exceptions: you can also use “radial”, “runaway” or “horizontal” leveling.
For work, you can use either a spatula with a smooth edge or a serrated one. It should be noted that decorative plaster for interior wall decoration can be applied in several layers, but it is necessary: each subsequent one is carried out only after the previous one has completely dried.
Applying decorative plaster with a trowel
The timing depends on several parameters:
- layer thickness;
- type of plaster;
- air temperature;
- humidity.
In addition, it is necessary to ensure ventilation of the room and limit access to sunlight , including installing protective screens on the windows.
Variety of textures of decorative plaster
You should not try to shorten the drying time, for example, by using heating devices, as this will lead to cracking of the plaster.
On average, the drying time of one layer ranges from 2-3 hours to one day. But if the technique of applying plaster involves the “wet on wet” , then the maximum period is no more than 10-15 hours.
Watch in this video the technique of applying decorative plaster under a stone.
To achieve the required artistic effect, the following techniques are widely used:
- tinting or tinting , the essence of which is to apply a thin layer of plaster to the surface with a roller, differing in color or tone from the main layer;
- modeling , for which stamps, rollers or even the fingers of one’s own hands are used, serves to create the necessary relief or pattern on the surface;
- rubbing is necessary in several cases: to prepare the surface for applying the next layer, for finishing, or on the finished surface to obtain the required pattern. Most often, this method is used when working with structural and textured types of materials.
The final stage of working with decorative plasters is glazing , with the help of which the surface receives a completed look and the necessary protection.
Glazing of decorative plaster
To perform it wax if mineral or silicate types of plasters or varnish , which is most often used on acrylic or silicone surfaces.
Decorative plaster with wax
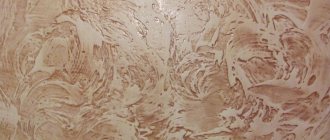
Kinds
Decorative plaster has several differences, the materials of which differ from each other in that they give a different effect when obtaining the result from the applied plaster and the composition of its chemical mixture. There are three types of plaster.
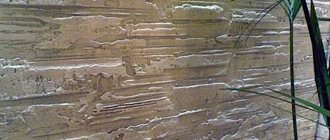
Textured
Its peculiarity lies in the fact that its use creates not only a unique decoration of the wall, but also a relief surface, which can combine, for example, watercolor paintings and the outlines of falling, crumbling leaves and blowing wind or any other pattern at your request.
Textured
Due to the unevenness of its surface, textured plaster gives uniqueness to the interior of the room. Its composition includes: mica, inert gypsum, fine-grained sand, flax and cotton fibers and other materials. Their choice depends on the appearance of the applied plaster.
For more information about textured decorative plaster, watch the video:
Structural
It can be made from synthetic latexes, potassium silicate and used on aqueous and organic bases. Structural plaster is best made water-based , as it does not emit odors. Find out which is better, drywall or plaster, at this link.
It does not need to be diluted and mixed with anything before finishing the walls, because you can buy it in an already prepared state for making repairs.
Structural
At first glance, structural plaster appears to be a continuous granular layer on the surface of the wall, because it contains small pebbles, quartz elements, and wood fibers.
The size of the pebbles can be different: some of them, those that are larger, give the wall a curved appearance of its surface, and those that are smaller, on the contrary, make it smooth and even. Thanks to synthetic latex, all parts of the structural plaster composition are well connected to each other.
Instead of synthetic latex, potassium silicate and a cement-lime mixture are also used.
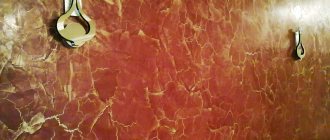
Venetian
It looks like marble stone on the wall because it is made from marble flour, slaked lime and water emulsion. The advantage of Venetian plaster is its water resistance , which makes it possible in case of unforeseen situations to maintain its appearance in an unchanged condition.
When finishing walls, it dries quickly and has no odor. Venetian plaster is characterized by good flexibility and strength of the material.
Venetian
Each type of plaster has its own advantages. To choose the plaster you need, you need to determine what you like best - a grainy surface of the plaster or, on the contrary, a smooth surface with a combination of curves in some of its areas, or absolutely smooth plaster of different shades.
It is also important to take into account the resistance of the plaster to external factors that can damage it.
Polymer
Polymer plaster is characterized by plasticity, frost resistance, water resistance, environmental friendliness, hydrophobicity and contains epoxy resins, dispersions, and polyurethane.
Polymer
They can be used for application to concrete and drywall.
Mineral
The mineral mixture is inexpensive.
Mineral
It is environmentally friendly and resists water well , but unfortunately is not durable.
Silicone
Silicone plaster is made from silicone resin. The peculiarity of silicone plaster is that it is resistant to ultraviolet radiation , can be cleaned itself and is quite expensive.
Methods and techniques
To apply decorative coatings, not only finishing materials of different compositions are used, but also various techniques. They may differ in the tool used, the specifics of application, and the most common of them are:
- Textured method.
- Fur coat technique.
- Hatching stripes.
- The "bark beetle" method.
- Imitation of brickwork.
Each option requires certain skill during application and the use of additional tools. There are features of application and drying for each method. The wall surface must be prepared. The work does not involve long breaks or stops in work; the material hardens quickly.
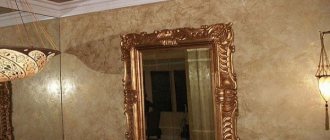
Decorative plaster in the interior
Textured
The roller can create a textured and structural surface . The difference is the way to achieve the pattern; in the first case, this is influenced by the roller itself, and in the second, by the structure of the putty material and its features.
Structural surface
To create a surface using a roller, you need to apply a layer of the mixture to a previously prepared and cleaned wall, and use a roller to create the necessary pattern. Such a tool will not cause any difficulties, just go over the entire wall with it, you can also use a creative approach and achieve a unique result by applying strokes in different directions.
Textured surface
You can use special stencils to create a design; they are simply pressed into the plaster.
Fur coat
For the exterior decoration of buildings, a method called “fur coat” is often used. It also looks great on indoor walls. The cost of such an application will be small. There are several options for creating such a decoration:
- One of the most popular ways to obtain a “fur coat” is using a broom and stick . To do this, the broom is dipped into the solution and, as a result of hitting the stick, it splashes onto the wall, due to which the necessary relief appears.
- Using a textured roller , you can also get the same result; to do this, you need to apply a thin layer of solution, and then go over it with a tool that leaves lint. If the mixture is applied in different layers, then after passing the difference in texture will be noticeable. To level, excess plaster is removed from one place and applied to an area where there is not enough of it.
- Using a compressor will help save time, but such equipment is only necessary if purchased for professional use.
Technique for applying decorative plaster “fur coat”
Plaster with small drops and liquid mortar will be more durable.
Important! The difficulty of this method is the uneven application, and therefore you need to ensure that the solution is applied with the same density.
Hatching stripes
To apply decorative stripes to the wall, you will need an ordinary brush. Before using it, it is advisable to thin out the bristles. On a separate piece of plywood it is worth testing how the brush behaves with the solution. If the rows are too wide, then in these places it still needs to be thinned out.
The stripes are applied to the wall from top to bottom or back, a maximum of two times. On adjacent lines you cannot make stops in one place, the gap is at least half a meter. The mixture that has collected on the brush should be thrown into the solution with a sharp shake, so it can be reused.
Method of applying decorative plaster: strip shading
On each adjacent strip, the brush should be turned over to make the pattern more beautiful. After 10 minutes, you need to walk along the wall with a trowel, pressing lightly. The movements should be the same as when working with a brush - from top to bottom.
After another hour, repeat the procedure using a trowel, but with more pressure. Opposite walls should be done on the same day, and adjacent walls only after complete drying. Then the texture will not be smeared, and fresh plaster can be easily removed if it accidentally gets on the finished wall.
Bark beetle method
The bark beetle technique is made from a special mixture that can be sold in liquid or dry form. The acrylic version is already diluted and ready to be applied to the wall, and the gypsum version is only in the form of a dry mixture. To prepare a solution from it, you must strictly follow the instructions on the package.
Method of applying decorative plaster "bark beetle"
The bark beetle solution is applied thinly to the wall, using a large spatula 80 or 100 cm long. The thickness of the layer depends on the crumb of the mixture, i.e., a crumb of 2 mm - the thickness is also 2 mm. Use a spatula to level the surface and leave for up to half an hour. Until it stops shining or becomes weathered. The duration depends on the ambient temperature and humidity.
"Bark beetle" in the interior
Afterwards the drawing is rubbed over with a trowel. Grouting methods can be different, as well as the resulting result:
- Vertical movements.
- Chaotic, with a circular pattern.
- Vertical and horizontal to obtain a cross-shaped result.
Finally, use a clean trowel to walk over the surface to smooth out the pattern; this should be done no later than 40 minutes after applying the mortar to the wall.
Under the brick
“brick” plaster is especially popular . There are tricks and techniques for performing such work. The wall looks impressive and, with a creative approach, is very unusual.
Decorative plaster imitation brickwork
Application
The plaster is applied to the walls, after a deep penetration primer, in layers several times. To apply the first layer you need to make a liquid solution, the thickness of which should be up to five millimeters. This layer is called splash. After applying it, wait until it dries.
Then, on its dry surface, you need to apply and level another layer of a solution called primer. It is this that makes up the bulk of all layers. After the second layer has dried, a covering is applied - the third layer.
Application
It is also always used to level some sections of wall layers, since its thickness is quite thin and is about two millimeters. Grouting is carried out so that the wall surface is smooth and even. The solution for applying grout to the wall is taken with the end or side of a trowel and smoothly and evenly leveled with it. This article will tell you about warm plaster for facades.
When applying plaster, do not rush to apply the next layer of mortar and make sure that it is completely dry. This is very important because any wrong action can ruin everything and the time spent will be wasted.
You need to understand that applying each layer of plaster is the basis for successful repairs when finishing walls.
Panel
Panels made using decorative plaster have deservedly taken their place in the design of the premises. They look very impressive and help create entire pictures and unusual scenes on the wall. The difficulty of performing such work lies in the time. It will take several days to create a drawing; the larger it is, the longer the work will take. Each subsequent layer is applied only after the previous one has dried.
Decorative plaster panel
How to properly apply decorative plaster with a roller
It is most convenient to pour paint onto cling film placed on any suitable horizontal surface. So the width of the latter can be adjusted, adapting to the parameters of the working part of the tool. To apply paint to the roller, it is enough to press it and roll it a couple of times through the liquid. If a soft material is chosen (cotton, sponge), then it must be completely saturated with paint.
Often a single application of paint on the wall is not enough, especially if the decor is large. Professionals carry out 2-3 times in places that look least “filled”.
Common Mistakes
The main mistake can safely be called insufficient preparation of the wall for applying decorative plaster . The surface must be perfectly flat. Proper dilution of the dry mixture also affects the result and ease of use.
It is important to apply the solution evenly on the wall ; if applied unevenly, the pattern will look unnatural and errors will be visible to the naked eye. Work must be carried out before the material has time to harden, otherwise further work will be impossible.
It is necessary to apply an even layer of plaster
Applying too thin a layer leads to the fact that over time, “bald spots” appear and the wall becomes visible. If you use the wrong tool or plaster that is not intended for a specific technology, the texture will not work and will look unnatural.
Tools and materials required for preparation
Before preparing the walls for decorative plaster, you need to select the following tools:
- scraper for cleaning old wallpaper, paint;
- chisel;
- set of spatulas;
- construction knife;
- brush with metal bristles;
- hammer;
- chisel;
- bit;
- needle roller;
- sheets of sandpaper;
- Sander;
- electric drill;
- containers for diluting solutions;
- roller;
- set of brushes;
- plumb line;
- building level.
The work is carried out wearing a protective mask, respirator, seals, and a special cloth is also required to protect the floor covering.
How to delete?
Removing decorative plaster is difficult and the process takes a lot of time. So, let's look at the steps:
- The entire surface is wetted with hot water.
- Tap the wall with a hammer; parts that do not hold well will fall off on their own.
- Using a chisel and hammer, remove the remaining elements.
The procedure for removing decorative plaster is done from top to bottom. It is necessary to pry up the layers of coating and separate them from the base. In rare cases where the bond is too tight, a hammer drill may be needed.
Removing plaster
You can “erase” the coating using a grinder with an abrasive disc. The plaster should be constantly moistened. After removing the decorative coating, go over the surface of the wall with a wire brush and then wash it.
Important! Only after all these procedures can you begin new decorative work.