The wide supply of finishing materials on the market makes us think seriously about new ways to bring your interior to life. The usual wallpaper may have become boring and no longer attracts the eye, but textured plaster for walls compares favorably with other design options with a completely new decorative level. Photos using it always look fresh and impressive, but in reality the material looks even more beautiful. Our focus today is on the best examples of using textured plaster in a wide variety of interiors. We also advise you to get acquainted with another original way of finishing walls using 3D panels, which you can learn about from the article: “3D panels for walls: the most interesting and new ideas.”
- Pros and cons of use;
- Existing species;
- Useful tips for quality application;
- 4 popular relief textures;
- A selection of photos in the interior;
- Conclusion.
What is textured plaster and what is it used for?
Textured plaster is a special type of finishing coating that creates a decorative relief on the surface of the walls. The depth of the relief of such finishing varies from 1 to 5-7 mm. It is created thanks to fillers of various sizes and shapes included in the plaster, as well as special application techniques.
Currently, textured finishes have gained immense popularity as a finishing coating for walls. It is popular not only for interior work, but also for exterior plastering of facades.
The material differs in structure, composition and color, which means it allows you to choose the most appropriate option for a textured pattern in each specific case.
The textured mixture helps create a unique interior without requiring any special effort. It is easy to work with the solution yourself; in most cases there is no need to involve professional workers.
Textured plaster is widely used for interior decoration
Properties
The use of plasters has become very popular; it is difficult to imagine an interior without textured plaster. It became in demand due to its interesting texture. In every house there are fragments made in different styles.
Consumers are increasingly choosing this material due to its unique advantages:
- Easy to care for;
- Coating strength;
- Resistant to ultraviolet radiation;
- Moisture resistant;
- Good sound insulation;
- Non-toxic;
- Does not absorb odor;
- Resistant to fire.
Methods for applying plaster can be divided into three main methods:
- Spraying, a special apparatus is used;
- Stretching, using a grater, distribute the solution from bottom to top;
- Application by roller or spatula.
Using the Internet, you can watch a large number of videos and video lessons about applying textured plaster and giving it various textures. The video lesson will clearly and in detail show all the subtleties and secrets of achieving a successful result.
Advantages and disadvantages
Let's consider the positive qualities of the finishing material:
- textured coating looks good and contributes to better interior design;
- the surface relief can be designed in different styles, creating beautiful patterns by choosing a special technique for moving the tool;
- the material is durable, the surface retains its original appearance for a very long time;
- the mixtures are resistant to ultraviolet radiation, so they do not gradually fade in the sun, maintaining their original attractiveness;
- the finishing coating improves the thermal insulation qualities of the base;
- mixtures for interior decoration do not contain aggressive chemical components, therefore they are considered environmentally friendly for people;
- The color of the finish can be changed as desired by adding dyes to the solution.
On a note!
The finished mixture can be supplemented with other components to create original visual effects.
The disadvantages include:
- the coating does not withstand strong impacts, gets scratched, chips;
- a textured surface is more difficult to clean from dust;
- for high-quality materials you will have to pay an impressive amount;
- in order for the surface to look holistic, the mixture is applied without delay or interruption;
- surface defects are very difficult to correct.
If the application technology is violated, cracks may appear on the surface. The material often peels off and swells. Therefore, you need to choose a mixture suitable for the specific type of base and follow the manufacturers’ recommendations when performing finishing work.
Kinds
Before you begin the process of creating exterior or interior decoration of the room, you must select the appropriate finishing material option.
The main types of textured plaster include:
Acrylic. It is based on acrylic resin. It is presented on the market in plastic containers of various sizes. Does not require dilution, as it is completely suitable for use. It is recommended to use the entire mixture at once, but if necessary, it can be stored in a closed container.
There are different types of decorative plaster on the modern market, each of which has its own characteristics. Among the large assortment there is both liquid and dry textured mixture. It can be volumetric, roller or structural, since the texture composition of each type is developed individually. VGT textured plaster is in great demand, which is characterized by economical consumption and a high level of efficiency.
Packing
All texture mixtures are supplied in the form of a dry powder or ready-made solution. The standard is a package weighing 25 kg, but other weight categories are also available. Dry options are relatively cheaper in cost and can also be stored for a long time in a closed container. Preparing a solution with the desired consistency will not be difficult if you strictly follow the instructions. At the same time, transporting these mixtures is much more difficult due to possible damage and inconvenience of packaging.
A more convenient option is considered to be textured plaster in the form of ready-made solutions. It is packaged in special plastic containers, which are equipped with handles for easy transportation. By weight, the most common containers with the finished mixture are 25 and 16 kg. Products in this form are resistant to moisture, and their shelf life is 12 months.
Colors
For the correct and beautiful design of the space, it is important to be as careful as possible in the choice of colors used in the process of finishing the room. It is worth noting that textured plaster is presented on the world market in a wide variety of colors, including both white and colored mixtures
During the selection process, it is recommended to take into account the fact that the same finishing color may look different on different textures.
Decorative plaster can have the following texture options:
- Matte. Creates a rough and finely porous surface on which the color of the texture is equally beautifully displayed on all sides.
- Brilliant. The smoothest possible surface, the clarity of which is visible only in one direction. From other angles, the color of the wall or ceiling will look somewhat distorted.
- Glossy. It is distinguished by the presence of glare, which can affect the perception of the color scheme of the finish.
Types of textured plaster
There are a large number of types of textured plaster. The special components included in the composition allow you to create different visual effects. For ease of use, the plaster is sold ready-made or as a dry mixture. Decorative finishing of surfaces is carried out under various conditions. Therefore, the requirements for plaster mixtures are also changing.
The market range of textured plaster is quite wide
According to delivery form
The material is sold as a ready-made mixture in buckets or in paper bags with a powdery substance. Dry solutions are mixed with water and dyes. The average weight of the bags is 25-30 kg.
Ready-mixes are often colored during production and do not require the addition of any components before finishing. The solution is applied to the base without difficulty, since the number of components in it is perfectly balanced.
It is better to use the finished material when finishing small areas, but the limited choice of colors often forces you to choose a dry mixture.
By application
The composition of plaster mixtures differs because interior finishing requires skillful execution. Necessary properties for indoor work:
- ease of application;
- good decorative properties;
- vapor permeability;
- ease of cleaning.
The bathroom walls and ceiling should have a waterproof coating. In the bedroom and living room, the plaster should allow oxygen to pass through well. The covering of kitchen walls should not absorb odors. Staircase openings require the strongest cladding that can withstand impacts.
According to operating conditions
Textured mixtures are used for interior and exterior decoration of buildings. The requirements for building mixtures differ in different places. Therefore, decorative plasters are divided into:
- façade;
- materials for interior work;
- universal.
The mixtures differ in composition. To create facade finishing, toxic or less safe components are used. The special composition increases the resistance of the coating to external influences. The finishing coating is used in extreme conditions.
Mixtures for interior decoration are often more expensive, since substances that are harmless to humans are added to them to maintain good performance. These components are more difficult to manufacture and therefore cost more.
Manufacturers offer all textured mixtures in the form of a ready-made solution or powder
By gloss level
There are different types of textured mixture for walls, depending on the degree of gloss:
- Matte. The color of the coating does not change tone depending on the direction of view; the surface will be the same from any angle.
- Glossy. The coating of such plaster “shimmers” in the light. As a rule, reflections of a glossy surface affect the perception of tone, which must be taken into account when selecting a color tone.
- Intermediate. This textured plaster has average gloss values between matte and glossy plaster. The effect of tone depending on angle is less pronounced.
Important!
When tinting glossy plaster, professionals recommend choosing a color several shades lighter, because... The glossy finish makes the color darker.
By appearance and resulting effects
Finishing walls with textured plaster allows you to achieve different visual effects. The desired pattern or pattern can be achieved using additional components or filler in the texture mixture. The method of application also plays a significant role. Next, let's talk about the most popular effects of textured plaster (types of textures).
Bark beetle
Rolling solution is also known as "Bark Beetle". The appearance of the coating resembles “eaten wood”. The solution contains marble chips measuring 0.1 - 4 mm. A pattern with a uniform texture is made with a plastic grater, grinding the surface with chaotic movements. Thanks to the grater, the marble grains roll, leaving grooves behind them, and the semblance of woodworm “passages” are formed.
To achieve this effect, a material thickness of 3-7 mm is required. It is used for finishing both outside and indoors.
You can get other patterns from the roller mixture by changing the direction of grouting: the “Lamb” pattern (circular movements with a grater), “Rain” (vertical movements), “Carpet” (horizontal movements).
Bark beetle plaster is riddled with numerous passages
Fur coat
This name is explained by its visual resemblance to fur. The solution has been widely used since Soviet times, mainly used for facades. Supplied in white and can be painted after application and drying. This is one of the most affordable finishing options for exterior use.
An affordable and budget-friendly way to decorate a facade - creating a “fur coat”
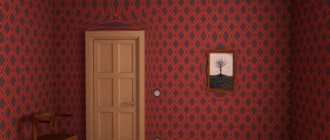
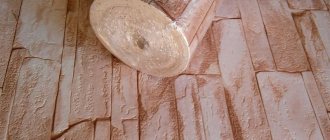
Under the brick
Imitation of brickwork is one of the most popular solutions when decorating rooms. The brick cladding technology is not complicated; anyone can master it. Brick finishing is carried out mainly indoors.
Brickwork in the interior today is one of the leading trends
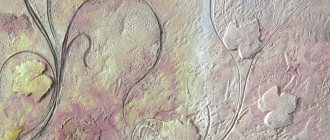
Silk
A material that gives the feeling of a fabric covering both to the touch and visually. This effect is achieved due to the presence of natural silk fibers in the finishing coating. Thanks to special additives, you can obtain a characteristic pearlescent shine.
Silk plaster adds special sophistication to the room
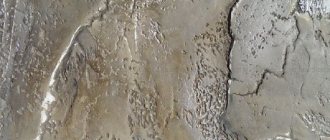
Travertine
As the name suggests, this plaster imitates porous rock, the so-called calcareous tuff (travertine). Travertine finishing is quite expensive, but its natural appearance and practical properties are fully justified. Used for interior decoration. There are application technologies for polished and unpolished stone, as well as for masonry made of stone blocks.
Travertine plaster is used to imitate natural stone
Venetian
Unlike the smooth classic Venetian, the textured variety has a relief, which makes the surface more voluminous. This is a rather capricious and difficult to work material, the use of which cannot be done without the help of professionals. It is often used to decorate rich interiors with chic, royal touches.
“Venetian” has no competitors in terms of durability and decorativeness
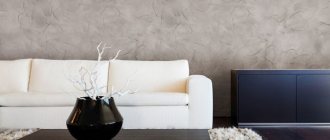
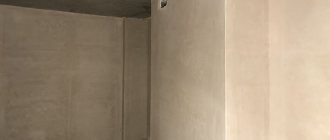
Concrete
Decorating walls to look like concrete is popular in styles such as loft, minimalism, gothic, etc. The textured coating not only imitates gray concrete, it allows you to get a more expressive and rich texture, which looks great in the interior.
Lightweight and durable material will successfully replace real concrete
Tree
Using this solution, an imitation of natural wood is achieved. The application process is labor-intensive; skill in using special tools and stencils is required. The thickness of the plaster usually reaches 4-5 mm. Wood finishes can be used for both interior and exterior walls.
Wood-like plaster - a budget way of interior and exterior decoration
Textile
A special coating on the wall imitates the properties of natural fabric. This allows you to decorate the room in an oriental or classic style. The material does not wear off over time, withstands ultraviolet radiation well, and can last a long time with proper care. Imitation of natural suede or silk is the most popular.
Plaster imitating fabric is an ideal alternative to draping walls with expensive fabrics
Crack effect
Another name for plaster is craquelure. Creates a cracking effect on the walls, thereby “aging” the interior, filling the room with comfort. The coating turns out to be original, because The pattern of cracks is always unique. Used for interior decoration.
Craquelure plaster is an opportunity to give walls a cracking effect
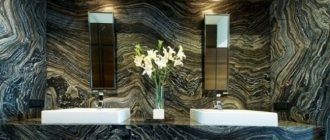
Stone
The coatings resemble the texture of natural stone. Various application technologies make it possible to achieve imitation of granite, marble, malachite and other rocks.
Among the most durable compositions, stone plaster is highly valued
Imitation leather
An impressive version of textured plaster that adds exoticism to the design of wall decoration
premises. The design is obtained by extruding it with a special roller or stamp with indentations. There are a wide variety of color solutions; there are technologies for painting realistic skin with a fading effect.
To achieve the effect of wrinkled Turkish leather, plastic film or special paper is used. Simple application technology will allow you to carry out the work without the involvement of specialists.
Modern decorative plasters can imitate leather
"Lamb"
The second name for this type of textured plaster is “pebble”. It is a grainy coating reminiscent of lamb's wool. The composition includes marble or quartz chips, the sizes of which range from 1 to 4 mm. The coating can be made on a mineral, silicate, acrylic or silicone base. Using this type of plaster allows you to hide minor irregularities. It is used primarily for facade work, as well as inside buildings for finishing corridors.
Lamb plaster has excellent performance characteristics
"Sand"
A popular type of textured plaster, in which the texture is formed by river or quartz sand. Various texture options are possible: sand swirls, dunes, diagonals, breeze, etc. Great for most modern styles.
Sand effect plaster is a popular alternative to wallpaper
"Moroccan"
Allows you to obtain a wall surface in the spirit of North African countries. The uniqueness of Moroccan plaster lies in its water-repellent properties, which allows it to be used in bathrooms. The application process is quite complex, it is recommended to entrust the application to professionals. Moroccan plaster is by no means cheap.
Moroccan decorative plaster is one of the easiest to apply
"Sea wave"
Depending on the application technique, the design may resemble waves rolling onto the shore, the effect of a raging sea or ripples on the water. After application, the plaster is painted in the desired shade. The special composition of the plaster allows it to be used for exterior decoration on sea coasts.
Further tinting and glazing will help to emphasize the effect.
"Vintage effect"
Gives the interior a noble, aristocratic look. The effect of antiquity is achieved due to the property of the latex mixture to become lighter in places of friction, relative to the main shade. Widely used in themed interiors, restaurants, hotels and other public spaces.
Vintage style is inventive and elegant
By base type
Depending on the type of base included in the composition of textured plaster, the following varieties are distinguished.
Mineral
The composition of such plaster includes a cement mixture, as well as additives that increase the plasticity of the composition. Mineral plaster is most often applied to an already prepared surface coated with a quartz primer. The mixture is white, but thanks to pigments it can have any shade. Produced by Ceresit, Kreisel, Bolars, Vetonit.
Silicate
Made of silicate glass. A feature of silicate plaster is its rapid hardening and the need to quickly create the desired pattern. Silicate plaster has high vapor permeability and resistance to external influences. That is why it is most often used for facade work. Produced by Ceresit, Caparol.
Silicone
Silicone plaster is one of the most expensive and reliable plasters. It does not require additional mixing, has high vapor permeability, is highly elastic, and is excellent for application to complex shapes. This type of plaster is the most popular and versatile. Produced by Baumit, Caparol, Bolix.
Acrylic
This plaster is based on acrylic resins, which are quite plastic, but very unstable to open fire. Sold ready-made in buckets. An excellent option for textured plaster for interior use. Produced by Ceresit, TAMBOUR, Kreisel.
Acrylic plaster mixtures are available in ready-made form
Pros and cons of textured mixtures
The material has many positive aspects. Knowing them, everyone will be able to choose plaster in cases where other materials are not suitable. List of advantages:
- Attractive appearance. The finished wall will look beautiful and unusual. The application technique allows you to create a unique, individual pattern.
- Ease of use. Having the tools and the desire to work, even a beginner can cope with applying textured plaster as a cladding.
- Speed of work completion. The wall practically does not need to be prepared. With sufficient skill, the work can be completed within a day.
- Long service life. The material can withstand minor mechanical impacts typical of walls, so you can count on a service life of tens of years.
- The components in the composition are resistant to the negative effects of UV rays. They will not fade or lose their original appearance, even if the wall is on the sunny side.
- Versatility of use. Textured plaster for walls is used both outside and inside. It resists well the negative influence of the external environment: moisture, wind loads, temperature fluctuations.
- The material has slight heat-insulating properties. Insulate the walls with mineral wool or polystyrene foam, and apply textured plaster on top of the walls, it will improve the properties of the insulation and protect it.
- Most of the compounds are environmentally friendly and do not harm human health. They will not emit harmful substances during operation.
- The textured mixture for walls is well decorated using dyes. If desired, the walls can be repainted in any of the available colors.
- A variety of textures and types of material allows you to implement any design ideas. In addition, additional components can be added to the composition to improve performance and appearance. For example, adding mother-of-pearl will create a beautiful resemblance to Venetian plaster.
- The decorative layer will not be smooth and glossy, but textured and matte. This allows you to hide wall imperfections, small irregularities, cracks, rather than wasting money, time and effort on creating a perfectly flat surface.
But there are also some disadvantages of the product:
- Although textured plaster for walls is not afraid of small mechanical loads, with strong impact or impact there is a risk of splitting it. Scratches may appear on the surface. True, they are not always noticeable on a textured surface.
- Maintaining the finish will be difficult. Dirt and dust accumulate in the recesses, and removing it will take a long time. Smooth surfaces are much easier to clean.
- You will have to pay for a high-quality textured mixture. There is an option to save money by making it yourself. To do this, you will need to buy regular plaster and the desired components.
- It is difficult to process a large wall. The work cannot be delayed, so the mixture must be applied quickly. Otherwise, places with joints will be visually visible.
- The maintainability of textured plaster for walls is poor. If an area is damaged, it will be difficult to replace it. You need to choose the perfect shade, pattern, etc.
- The application of textured plaster must be carried out according to technology. Any violation will lead to cracking, swelling and peeling.
Color range of textured plasters
More often, paints that imitate natural materials and wood textures of different shades are used. White is used in office spaces or public reception areas. This type of finish can be used in small bedrooms.
A room with white walls will appear brighter, cleaner and fresher. This color serves as the basis for a variety of color additions.
On a note!
Gray shades are suitable for modern style, for finishing under concrete. Pearlescent colors give each room an oriental flavor.
Decorative plaster: names of types with photo examples
The main types are structural, textured and Venetian plaster. However, do not forget about types that imitate expensive materials. These include marble, flock (silk) or marbled putty. Each of these types is special in its own way, and therefore we will consider them in detail, having familiarized ourselves with photographs of walls plastered with different mixtures and methods.
The properties of all types are identical and depend on the components of the mixture (we will discuss this in detail below), but the appearance is different.
Textured finishing material and its appearance
The name of the type already indicates that the applied finishing material has a clearly defined texture. Applying such a coating is not difficult, the cost is relatively low, which makes the mixture popular among finishing craftsmen.
There are 3 main textures - “lamb” (the coating resembles animal hair with curls), “fur coat” (gradually losing popularity) and “bark beetle” (more difficult to apply, has the appearance of a tree with grooves similar to the result of the work of a bark beetle).
A photo of textured decorative plaster for interior work can be seen below:
Related article:
What is the difference between structural putty
The peculiarity of this mixture is that the master never knows what the surface structure will be after complete drying. It will not be possible to set a specific direction for the patterns. Such mixtures cannot be applied in damp areas. If you want to decorate your bathroom walls with this material, you need to ensure low air humidity until the putty dries completely. We invite you to see photos of wall decoration with structural decorative plaster:
Venetian plaster and its features
Applying this putty requires experience and skill. A home handyman who has not performed such work is unlikely to be able to do everything correctly. This smooth decorative plaster, after application, looks like marble, which becomes matte or glossy, depending on the finish coating. Another difficulty in using it is that the surface requires careful preparation before application.
Related article:
Plaster consumption
The thickness of the layer and the features of the textured pattern determine the consumption of the plaster mixture per 1 square meter. m. Packages of plaster indicate the average weight consumed per 1 square meter. m.
What is the cost:
- The bark beetle is applied in a layer of 2 mm, so per 1 sq. m. you will have to spend 2.7-3 kg. This means that 1 bucket of 25 kg covers 8.5-9 square meters. m.
- Relief treatment with a 3 mm layer of gypsum mixture will require 2.5-3 kg per 1 square meter. m.
- The cement mixture for textured finishing consumes 5-5.5 kg per 1 square meter. m. with a thickness of 3 mm.
Important!
For the most accurate calculation of consumption, you need to lay the plaster on the wall in an even layer. During the work process, it is more convenient to make calculations in the number of buckets per 1 square meter. m.
Before buying a tool for decorative plaster, you need to decide on its type
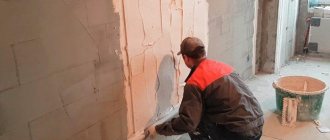
Stages of plastering work
It is recommended to study the application of textured plaster composition step by step in order to understand all the features and avoid common mistakes.
Before applying textured plaster with your own hands, you will have to carry out preparatory measures in order to ultimately obtain an even and beautiful coating. The following work needs to be done:
- remove the old covering layer - paint, wallpaper, facing tiles, plaster;
- carefully examine the wall surface, determine the type and quantity of starting materials needed for preparation;
- cut down the tubercles, repair uneven areas, cracks and chips. If the damage is minor, it is recommended to use putty or starting material;
- Having leveled the surface, grinding is carried out on it to achieve maximum evenness;
- remove dust accumulated during work.
It's time to use a primer that has deep penetration. The composition should be selected taking into account the type of wall surface. It must have maximum penetrating power to bind small particles, align cracks and the overall structure of the base. The treatment should be carried out with a mixture containing quartz sand in order to increase the level of adhesion of the plaster solution to the wall surface.
The primer solution is applied with a roller; in hard-to-reach places, a brush is used.
Once the first layer of soil has dried, it is recommended to re-treat it to strengthen the crystalline structure formed on the wall surface.
To prepare the base, use a white primer to visually track which areas remain untreated. In addition, the shade of the primer will not change the color palette of the textured solution.
How to apply textured plaster on walls? The work is simple, but requires some attention. Study the manufacturer's instructions and prepare a solution.
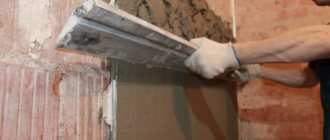
Apply it with a spatula. Uniformity may not be observed; the main requirement is to cover the entire wall. Using a trowel, smooth the solution, forming a layer about one and a half millimeters thick.
All that remains is to create the texture using the appropriate tools and using a certain technique. This is best done with a roller, trowel and stencil.
How to make textured plaster yourself
You can make textured plaster for walls yourself. Materials available in the market are used to make a suitable mixture.
With PVA glue
Regular putty is mixed with PVA or wood glue or drywall putty.
With primer
The main component is a fine-grained white mixture. A primer is added to it in a ratio of 6:2. The consistency of the mixture should resemble thick sour cream. Color pigment is added to create a tint.
With plaster
Gypsum plaster is mixed with wood glue or PVA and left for 5-10 minutes. Then it is mixed again and applied to the wall.
With baby
If you add marble chips to the putty, you can imitate natural stone. You need to stir the ingredients with water until the mixture becomes thick, like sour cream. Color pigments are not added to the solution, so the plaster can be painted only after it has dried.
Making decorative plaster from putty
All of the above materials are quite convenient to use, but they have one common drawback - high cost. Decorative plaster made from ordinary putty will cost much less.
If you want to save money, the decorative surface can be made from ordinary putty
To carry out this operation you will need the following:
- putty (manufacturer is not important);
- Venetian relief spatula (you can also use a trowel, but in this case the design will not be so original);
- regular spatula;
- sandpaper.
First of all, apply the putty in an even layer over the entire wall, after which the surface is treated with a Venetian spatula using random movements and left to dry. After 3-4 hours, using a regular narrow spatula, remove fragments that stick out too much, and the entire surface is cleaned with fine-grain sandpaper. Finally, the surface is treated with primer, paint and varnish, as is the case with ready-made plasters. This method allows you to save money, but the result will be the same.
Video: DIY textured plaster master class
How to apply textured plaster
There are many ways to apply textured plaster. To create an original relief, various tools are used, and special techniques for applying the mixture are mastered. The textured surface is created by imprinting, brush strokes, trimming, and various stencils. A relief on the wall can be created using the modeling technique.
Roller
Let's figure out how to apply textured plaster with a roller. You can use different types of this tool:
- rubber embossed with patterns that leave imprints on fresh plaster;
- rollers for loosening the mixture on the wall and creating a fur coat effect.
Note!
The roller can be rolled over fresh plaster 10-15 minutes after application. To prevent excess mixture from sticking to the roller, you need to moisten it with water.
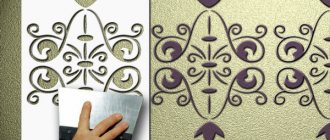
Stamps, stencils
To imitate wood texture or masonry, stencils or stamps made of elastic and rigid materials are used. The surface of the tool is moistened before contact with fresh plaster. The stamp is pressed into the surface so that a print remains on the wall without defects.
Stencils are used differently. You can use them to create three-dimensional patterns or designs, the thickness of which does not extend beyond the boundaries of the general layer. The stencil is attached to the wall, then decorative plaster is applied on top. The surface is visually modified with other tools and materials. Then the stencil is carefully removed. Such tools allow you to create patterns on the wall from plasters of different colors.
Trowel
The trowel allows you to give the surface a varied texture and smooth out sharp ridges left after the roller. You can move along the surface only with the corners or the entire plane of the trowel horizontally, vertically, or make circular movements. It all depends on what exactly the pattern should be.
Venetian style - two-color application technique
The technology for applying Venetian plaster only seems complicated.
Let's look at a simple instruction:
- plaster the wall, prime it;
- After complete drying, apply a thin layer of tint;
- after 6-8 hours, prepare a light and dark mixture;
- the components are applied to the trowel, then arc-shaped strokes are made on the wall;
- the first strokes should be at a distance, then you need to close the empty area between them;
- then you can mix 2 different colors with a trowel and fill all the empty spaces with the mixture to completely cover the wall and imitate a marble surface;
- after the plaster has dried, the surface is rubbed with a spatula or sandpaper, and protruding pieces of the mixture are removed;
The surface is then varnished or waxed.
The stencil allows you to create complex patterns even without experience
Versailles reception
First, the wall is treated with a quartz-primer mixture several times. Then the model composition with a thickness of 2-3 mm is applied with a trowel. The mixture is worked with a plastic trowel to create an arched pattern. You need to make short passes with the tool, constantly changing the direction of its movement.
The trowel is lightly pressed against the surface and pulled upward in an arched manner. The result should be sinuous indentations. Wall cladding in the Versailles style is made from ordinary putty.
If the layer is too thick, you need to wait until it dries completely. This often takes several days. After drying, sharp protrusions and protruding mixture are removed. The surface is dust-free and primed. Then the coating is painted with a mixture of tinted primer and silver. For this work, a hard foam roller is used. In this case, the color of the recesses does not change. Then the entire surface is covered with a mixture of varnish, glitter and plain water.
Using improvised means
The textured surface is created using various available means:
- chopped fragments of foam rubber;
- pieces of fabric gathered together;
- crumpled polyethylene;
- cutlery;
- combs.
An original pattern can be created with any object. The main task is to show imagination.
How to apply plaster: a creative approach
To apply decorative coatings, spatulas, trowels, trowels, brushes, scrapers, applicators, sponges, stamps, palette knives and, of course, rollers of various shapes and sizes are used.
- Stainless steel trowels are used for applying Venetian plasters.
- Plastic trowels are indispensable when applying “fur coat” and “bark beetle”.
- Decorative brushes are convenient for leaving scratches, pits, furrows, and “drawing” arcs and other patterns.
- Textured applicators are convenient for recreating an imitation of a wooden surface.
- Palette knives are used by artists who create elegant bas-reliefs.
- For linear effects, combs are used.
- It's easy to create a marble effect with natural sea sponges.
We will separately consider different types of mittens and their use.
| Type of mittens | What effect does it give? | Surface texture |
| Long pile polyester | Cloudiness, linear textures, complex chaotic lines. It is also used for polishing Venetian coatings. | Small |
| With polyester bristles and sponge | Reptile skin, python skin, cloudiness, circular blurs, foam, linear and radial textures. | Average |
| Hard plush, short pile | Imitation fabrics - denim, jute, linen. | Small, smooth |
| Polyester with medium pile | Imitation of aged surfaces, brush strokes, blurriness. For applying metallized coatings like gold, platinum, etc. | Small, smooth |
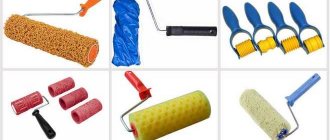
Rollers are used to create impressions on large-textured coatings and relief plasters.
Rollers for decorative plaster
When using rollers, a repeating pattern is formed on the walls. Using a roller you can quickly create the effect of a brick wall for a Loft interior, a stone effect for an ethnic style, or a real wood effect for Country and Provence.
Roller for imitation stoneCreating the effect of a brick wall with a roller
You can make rollers yourself, even from scrap materials.
- Roller made of rolling pin, foam rubber and wire. The gradient effect is achieved by pouring small amounts of paint in two different shades and rolling the roller over two shades at the same time.
- Roller made from an old woolen sweater. The roller roller is placed in the sleeve, the fabric is cut off with a margin. To prevent the cut sleeve from sliding off the roller and unraveling, it is better to secure the end with an elastic band.
- Corrugated cardboard roller. The textured part of the cardboard is used. The roller is simply wrapped with a piece of suitable size. You can fasten the cardboard with double-sided tape, and the adhesive tape should be glued on the wrong side. The disadvantage of such a homemade product is that it wears out quickly. You will have to change the corrugated cardboard several times to get clear stripes.
Interesting surface effects can be achieved using homemade stamps.
- Stamp made from a block and rubber bands. Leaves short streaks on the surface of the walls. The main thing when working is not to dip the stamp deep into the paint.
- A stamp made from a regular sponge. The easiest way to imitate brickwork. The sponge is simply dipped in paint and “stamped into bricks” on the dried plaster.
- You can replace the factory stamp with a crumpled plastic bag. It is simply dipped in paint and leaves chaotic spots and a light crumpled texture on the fresh plaster.
Don’t forget about stencils for decorative plaster. They are thick sheets with slots. Using a stencil, you can apply the plaster mixture itself or just paint, for example, over Venetian coatings. To fix the stencil, use masking tape.
Decoration
After drying, the finished surface is covered with wax, varnish or paint. These materials give the plaster strength. The treated surface is easier to care for. For decorative plaster, special varnish and paint are used. Their components are compatible with the materials from which the mixture is made. To reduce varnish consumption, you can pre-prime the wall.
One of the original types of ceiling finishing is decorative plaster.
Painting plastered relief walls
A textured surface makes painting more difficult; a textured wall requires more finishing coat. When applying, you need to ensure that the paint gets into even the smallest crack. For this, in addition to a roller, you can use thin brushes, sponges or a spray. To prevent drips from appearing, excess paint must be smeared. The 2nd layer is applied to visually separate the convex parts of the surface.
Advice!
The paint can be tinted before use. Experts recommend adding a little black to the color to make the painted surface look natural and less irritating to the eyes.
Bas-reliefs
The surface is decorated with bas-reliefs using the method of self-sculpting or fixing ready-made plaster products. For manual work we use:
- spatulas;
- rollers;
- chisels;
- various tools for woodworking.
Fine-grained plaster or gypsum mixtures are used to make bas-reliefs. They are quite elastic, retain their shape and are easy to sand. Before applying bas-reliefs, the base cannot be pre-primed or varnished, so as not to deteriorate the connection with the surface. For modeling, you can use special templates. With their help, it is easier to leave patterns on horizontal and vertical stripes.
The style of Venetian plaster
Special skill is required when applying Venetian plaster - this multi-layer coating, originally from the romantic city of lovers, is made by adding marble chips and slaked lime to a dry mixture. During the construction of buildings and the use of marble for their decoration, many small pieces remained, and in order not to waste the goods, they began to be used as a material for wall cladding.
Externally, the coating looks like marble, or made of precious onyx, so it should be done by an experienced plasterer. Apply a solution of Venetian plaster with a rubber spatula and apply the thinnest layer - each layer requires complete drying. The dry mixture is quite expensive, and the work of creating a plaster layer is quite painstaking, but the effect of translucent matte layers justifies all the effort. Most often, Venetian plaster is used to recreate a classical and antique style - it looks especially impressive in the Baroque style.
Different directions of movement of the spatula and methods of applying plaster allow you to achieve a matte and glossy surface of the walls. In addition to stone surfaces, Venetian plaster can imitate the shine of precious metals - thus achieving the effect of expanding the room and complex reflection of light on the wall surface. The dry mixture is produced in bags of 8 and 16 kilograms, and color can be added to it. Before plastering work, the wall must be dry, clean and treated with a deep-action primer, and before priming it must be reinforced and puttied. If the technology for working with Venetian plaster is not followed, cracks may appear, which will then be difficult to get rid of. Often, this coating is used as a basis for bas-reliefs, frescoes and complex panels.
Popular manufacturers
In Russia, the most popular manufacturers are:
- Cerezit;
- LPINA;
- San Marco;
- VGT;
- Bolars;
- Optimist;
- Bilix;
- Bayramix.
Fact!
German, Italian and Polish brands are the most popular.
Today there are many manufacturers of decorative plaster on the market.
Textured wall made of ordinary putty
The next method is more suitable for creative people, since here you can work hard and get a very beautiful result. At the same time, it is also very cheap, since we will use ordinary putty and color. Let's start with her selection.
Imitation of old concrete
To create a concrete wall like the one in the photo above, we will need white and gray putty. The first will have its natural shade, and the second will be made so after adding color.
Advice! If you want to save money, you can buy dry putty in bags, but keep in mind that it will not be white, but yellowish. It is unrealistic to use gypsum, as it sets very quickly. Therefore, the ideal solution would be to use a ready-made latex mixture. You can take the cheapest option, just make sure its color is correct.
Table 4. Creation of simulated concrete.
| Steps, photo | Description |
| Thoroughly mix one bucket of putty with the color. We need to get the same shade as pure cement. |
| There are two techniques for applying coatings from multi-colored mixtures. In the first, you will need to apply both mixtures – white and gray – in equal quantities to the main working spatula. Take a spatula at least 35 cm wide to make it more convenient to work. |
| Step 3 – puttying | We spread everything on the wall and begin to smooth the mixture in different directions. The movements should be made wavy to make the texture more chaotic and beautiful. At the same time, we alternate overlaps from white to gray and from gray to white. The putty will be applied in layers. The main thing here is not to overdo it and not completely mix both colors. |
| The second method is somewhat faster in execution, but requires some experience. It involves applying putty of different colors in small strokes to the base. Then take a large spatula and begin the same work as described earlier. The main thing here is to have time to walk over the entire treated area, without allowing the material to set. Again, drying time will be increased if you used high-quality primer when preparing the wall. If you are not confident in your speed, start with small sections, gradually increasing the speed as you master the technique. |
| Next we need to create a relief surface. To do this we need a simple trowel or a special trowel. When the putty adheres to the base, but its surface is still fresh, we begin to apply the tool flat to the wall and remove it back, creating a kind of ragged effect |
| After walking a couple of square meters, we begin to smooth out the resulting bulges. We do this with a light tangential movement to maintain the relief of the surface. Pull in different directions so as not to lose the effect of some chaos. |
Repair of texture defects
Plaster with a relief surface is difficult to restore. It’s easy to reproduce the texture so that it blends with the wall. However, choosing the right color is almost impossible. The outdated coating gradually fades in the sun, and the new paint will still stand out against the general background. Therefore, you have to paint the entire wall.
The peeled areas are determined with a rubber mallet. The loose plaster is completely removed, the exposed area is dust-free, primed and restored.
Preparing the base
Step 1 – plaster the base.
- In order for the result to be of high quality, the base must be plastered with gypsum or cement-sand mixture. This is done along the beacons so that all the walls are strictly vertical.
- It is also important that you accurately mark the outer and inner corners of the room - they need to be reinforced with a special perforated corner, which will create additional protection from damage.
A smooth plastered base is the key to high-quality finishing
Textured plaster is the finishing coating. Its tasks do not include leveling the walls; it is not applied in very thick layers, since the material is not cheap.
Step 2 – get rid of defects.
The surface of the plaster must first be prepared. It can have such untidy sagging in the corners, and on the main plane too. All this will interfere with the application of the finish, so using a spatula, float and abrasive mesh, all this must be cleaned off. There is no need to treat the entire surface of the walls - only protruding areas.
Stuck and frozen putty on the corner
Interesting to know! Minor surface defects in the form of depressions do not need to be covered separately; we will hide them with our textured plaster.
Step 3 – covering the trim with masking tape.
If doors have not yet been installed in the room, but they will be there sooner or later, then it is necessary to install them at this stage. We also immediately install the platbands, which we cover with masking tape at the next stage so as not to stain them. Why such difficulties you ask? The thing is, if there are no trims and you plaster the wall, the relief will not allow the part to adhere tightly to the wall surface, and as a result, noticeable gaps may remain.
Taping trims with masking tape
Step 4 – priming the walls.
Now we need to thoroughly prime the walls. We will use acrylic deep penetration primer from the company Ceresit, ST-17. This is a high-quality composition that significantly reduces the absorbency of the base. If you use inexpensive primers, we recommend re-processing, but this is extra time for application and drying, so we don’t see any point in such savings.
Ceresit CT 17
Prices for deep penetration primer
Deep penetration primer
The primer is applied with a roller, which must first be squeezed out a little in the ditch so that it does not flow down the wall abundantly. We start from the bottom and move up, thoroughly saturating the entire surface of the wall without gaps. If the roller only superficially wets the wall, you need to dip it into the ground again, otherwise there will be no benefit from such treatment.
The corners of the room must be coated with a brush.
Priming the walls
Step 5 – applying adhesive primer.
At the next stage, we will again apply primer to the wall, but now it will be of a different type. An adhesive composition with quartz filler is used. It will create a strong, rough film on the surface of the walls, with which our plaster will have very good adhesion. Another name for such soil is concrete contact.
Application of adhesive primer
The material is applied with a brush, which allows for better filling of small cracks and depressions on the surface. After application, the walls are left to dry for at least a day - for more precise times, see the instructions for use on the packaging of the purchased composition.
This concludes the preparation of the foundation; in the future we will not return to it. Now let's see how a relief plaster surface is applied.
What to choose – liquid wallpaper or textured plaster
Working with liquid wallpaper is easier and faster. However, decorative plaster is reliable. The textured mixture is applied to the inner surface of the walls and to the facades. It withstands moisture and sudden temperature changes.
Liquid wallpaper does not add strength to walls and is used only to create a visual effect. This material cannot be applied to ceilings and other horizontal surfaces. However, liquid wallpaper is presented in a wider range. You can choose the appropriate coating from a variety of colors and textures.
Preparation of various surfaces
The surface to be plastered with finishing mixtures must be properly prepared. Not only the service life of the decorative plaster coating, but also its aesthetic qualities depend on this. But the technology of work may vary depending on the material from which the walls are built.
Brick
The preparation of brick walls is carried out in the following sequence:
- Cleaning the surface with a metal brush to remove dirt, as well as residues and build-up of solution.
- Dust removal - for this, the walls can simply be washed with water.
- After drying, treatment is carried out with a deep penetration primer. Instead, you can spray the pre-moistened base with a liquid solution.
- After the primer layer has dried (from several hours to a day) or sprayed (2-3 days), leveling is carried out - applying the main (base) layer of plaster with a thickness of 7-10 mm or more, depending on the quality of the surface. On thick layers, reinforcement with plaster mesh will be required.
- After drying, decorative compositions can be applied.
Photo 8. Cleaning brick walls with a metal brush
Concrete
The technology for preparing concrete walls for applying finishing material requires the following work:
- Cleaning the surface of dirt, debris and mortar.
- Checking the vertical and horizontal level. If vertical deviations exceed 10 mm when leveling walls with plaster, it is advisable to use a metal plaster mesh for additional reinforcement.
- To ensure high adhesion strength of the plaster to the base, the concrete must be additionally treated with a “Betonokontakt” type primer.
Photo 9. Priming concrete walls before plastering
Porous and lightweight concrete
The technique for preparing facades made of cellular concrete depends on the method of production of the masonry material. Non-autoclaved blocks are formed in special molds, the walls of which may be coated with oily compounds to facilitate their removal. To ensure high adhesion strength to such a surface, oil contaminants must be thoroughly washed off with water or special means.
Cladding the external walls of a house made of autoclaved cellular concrete with decorative plaster is simpler, since blocks of the required dimensions are formed by sawing. But they are characterized by high moisture absorption, so before plastering the walls must be carefully treated with a primer. Such products not only increase adhesion, but also additionally strengthen the surface.
Photo 10. Priming walls made of aerated blocks before applying plaster mortar
Tree
Wooden houses are usually lined with siding and other finishing materials, which involve the arrangement of a ventilation gap. But with proper preparation, plastering is also possible. The difficulties are caused by the fact that wood is prone to absorbing moisture from the air and subsequent swelling, and this can cause cracking of the façade plaster layer. This disadvantage can be neutralized using special impregnations with hydrophobic and antiseptic properties.
An equally important task is to ensure a high level of adhesion of the mixture to the wooden base. To do this, the facade is upholstered with shingles.
Photo 11. Installation of shingles on a wooden facade for subsequent plastering
Thermal insulation materials
The most common types of insulation used in construction are polystyrene foam or ultra-dense polystyrene foam and vapor-permeable mineral wool. Insulation is usually carried out using the “wet facade” technology, where after installing the heat-insulating material, the surface is plastered.
A special plaster mixture (also called “basic reinforcing composition”) is applied to the walls, after which a fiberglass mesh is embedded in it and the coating is carefully smoothed. After hardening, the facade is sanded and you can begin to apply the decorative mixture.
Tips and tricks from experts
Experts give tips to make your work easier:
- when decorating spacious rooms, it is better to save on purchasing a powder mixture;
- the purpose of the finished mixture is always indicated on the packaging; you cannot ignore the manufacturer’s recommendations and use the plaster in the wrong places;
- to choose the mixture correctly, you need to study the features of its application and the conditions of upcoming operation;
- material is taken with reserve, since sometimes it is necessary to redo defective areas.
By following simple recommendations you can create a truly unique interior.
Leading manufacturers produce various styles of textured plasters. Some types for interior decoration are also suitable for exterior use. Exterior plaster is often used indoors if it has a low toxicity rating.
Was this information useful to you? Share in the comments!
Main varieties
There are 4 main types:
Acrylic. The key component is acrylic resin. To prepare for use, simply stir the contents of the container. There are practically no differences in quality between different manufacturers. The only difference is the price.
Silicone. The main component is synthetic polymer resins. It has a long service life and high resistance to temperature changes, so it is often used for exterior decoration.
Mineral. It is made on the basis of lime hydrate. Supplied dry. Before use, the material must be diluted with water and mixed thoroughly.
Silicate. The dominant binding component is liquid glass. This material has proven itself well due to the possibility of application to almost any surface. Due to these factors, it has a fairly high cost.
Application technique
There are many methods for applying textured plaster. They are based on the properties of the material (mainly the size and shape of the filler particles).
The most popular options are:
The “bark beetle” surface is made by rubbing the material with a flat grater. First, apply a layer using a spatula, then spread it over the plane with a grater. At the same time, the stone chips form grooves and depressions similar to insect passages;- “fur coat” or “lamb” is made in different ways. This can be spraying, spraying with a brush or a regular broom. It is necessary to have the skill to ensure that the material is applied to the wall and not to the floor or surrounding objects;
- some types of relief are formed from a layer of plaster that has already set slightly. Use a crumpled piece of paper or polyethylene, a roller tied with a rolled-up cloth, or a special paint roller with a textured surface;
- a pattern on the surface of the plaster can be created using a gear rack (this is how they imitate the texture of wood or create a geometric pattern);
- Some specialists perform complex surface treatment, manually carving stonework patterns on it, or creating various types of images. This is the most complex technique, requiring the master to have skills and developed artistic flair.
Any technology requires preliminary preparation. It is recommended to start work from inconspicuous areas in order to gain some experience and gain the skill of making relief.