It will be useful for beginners to learn how to properly apply decorative plaster on walls, primarily from a financial point of view. Having mastered the finishing technique, you can significantly reduce the cost of decorating all premises. So the cost of repairs will be much lower than when involving third-party specialists.
In our article we will tell you what decorative plasters are and also describe the basic techniques for applying them.
There are many processing techniques
Material overview
Decorative plaster is a mass that is used to decorate various surfaces. It is called decorative because of its appearance: after application, a rather attractive coating with high aesthetic potential is formed on the wall.
Textured coating
All materials that are used for plastering walls can be divided into two groups:
- textured plasters - made on a lime, gypsum or polymer base. When finished, they are a plastic mass that changes its shape quite easily. Using different tools, you can get a coating with a wide variety of relief;
Note! Typically, coloring agents are introduced into the base of the material, but after texturing and polymerization of the surface, the wall can be additionally painted or tinted. Particularly popular is the treatment of textured plaster with metallics or pearlescent pigments.
- structural compositions differ from textured ones in less plasticity. Mineral granules - grains of quartz, marble, granite, etc. - are responsible for the formation of texture in them. The mineral grain is either located on the surface of the plastered object, or is located in the thickness of the material, providing the creation of a relief surface.
Structural surfaces
In principle, there are other types of materials on the market - fiber products, translucent plaster mixtures, etc. However, they are used quite rarely, so it would be more advisable to focus on more common finishing techniques.
Types of plaster solutions
Depending on the purpose and conditions of further use, plaster has several common types:
- Cement-sand mortar can be used to plaster external (facade) and internal walls, as well as ceilings exposed to moisture, low and high temperatures, and sunlight. This plaster can be used for the basement part of the wall from the outside. In addition, it can be used indoors: in bathrooms, kitchens, toilets, etc.
- The cement-lime binder component is used similarly to the previous composition, but has higher ductility.
- Lime-sand, lime-gypsum-sand and lime-clay-sand mortar are used as plaster indoors with low humidity.
- A mixture of clay mortar with cement or gypsum, clay-sand mortar can be used as plaster on the internal walls of utility and outbuildings.
By correctly selecting the proportions of the binder and filler, it is possible to ensure different fat contents of the solution. Thus, greasy mortar has a higher content of cement or other binder compared to sand. The solution has greater density and mechanical strength, but without the addition of plasticizers there is a risk of rapid cracking. In addition, such a solution has an increased cost due to excess consumption of cement. Lean mortars are considered economical compositions: they have a higher aggregate content and savings due to a reduction in the amount of cement. This composition will not crack, but has low mechanical strength. It is intended for non-critical work. Optimal proportions of cement and sand ensure normal fat content of the solution.
https://youtube.com/watch?v=hHaZ8uJvw7g
Preparing for work
Required Tools
Now we need to figure out how to apply decorative plaster. In fact, you can do it with just one spatula, but in this case the work will take quite a lot of time, and the skill of the finisher will be very impressive.
Basic equipment for a plasterer
As a rule, the following set of tools is used to perform decorative plastering of walls:
- containers for plaster (large volume for mixing, smaller volume for direct work);
- drill with mixer attachment;
- plaster trowel;
- trowel;
- plastic and metal graters;
- spatulas of different sizes;
- flat brushes with hard bristles (among them there should be at least one paint brush for priming);
- Quite a hard sponge.
- special rollers with a pattern to form a relief surface.
The shape and size of the rollers can be very different
Naturally, to perform pre-processing of the wall we will need other tools, but we will talk about this in the next section.
Surface treatment
Now we need to prepare the base so that the decorative composition sticks to it firmly enough. The question of what surface decorative plaster is applied to has been resolved by professionals a long time ago: if the preparation is done correctly, then it can be applied to almost any surface.
General scheme of work performed
Of course, most often we will work with concrete, brick and drywall. Here the list of preliminary work will be as follows:
- We remove the old finish, leaving a bare base. It is also advisable to remove the old plaster layer, as it may fall off over time.
Note! Deciding whether decorative plaster can be applied to plaster must be done individually in each case. The best option would be to tap the entire surface with a fairly heavy hammer: if the material does not crumble and no voids are revealed underneath (their presence is indicated by a characteristic dull sound), then it can be left.
Applied primer improves adhesion
- We check the condition of the surface, identifying all cracks, cracks and other defects. We fill the voids with a cement-based repair composition.
- After polymerization of the repair mixture, prime the surface with a penetrating agent. It is advisable to apply at least two layers of primer, each time pausing for 5-6 hours to allow the material to dry.
Rough plastering
- Next, it is advisable to apply a primer layer of plaster about 20 mm thick. It will create a reliable foundation and help level the surface, eliminating large differences in the plane.
Important! When processing gypsum board, basic plastering can be replaced by applying putty. Naturally, after drying the material does not need to be sanded, as this will reduce adhesion.
As for walls made of other materials, before applying decorative plaster to the walls, you need to keep the following in mind:
- Wood and materials based on it (chipboard, OSB and analogues) are hygroscopic. On the one hand, this can lead to soaking of the base and its deformation, on the other hand, to disruption of the drying regime of the plaster mass. So before processing, wooden walls must be impregnated with a primer with a moisture-proof component.
Wooden surfaces must be carefully prepared
- Smooth surfaces like plastic or laminated plywood must be sanded with a coarse abrasive, otherwise most plasters will simply slide off them under their own weight.
- Metal elements (for example, embedded parts in walls) after treatment with decorative compounds can cause rust stains. To avoid unpleasant consequences, it is worth using anti-corrosion coatings.
Structural compositions
Spraying a “fur coat”
So, what to apply decorative plaster on, we have studied how to prepare the surface for work - also, now let's move on to the finishing technologies themselves. Structural coatings are easier to apply, so we’ll start the description with them.
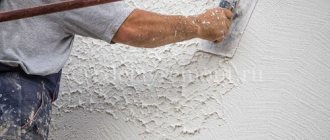
Photo: mechanized wall covering
Decorative “fur coat” is one of the most popular coatings based on cement-sand mortar.
The material is mixed in a ratio of 1:3 (1 mass part cement to 3 parts sand), and then applied to the wall by spraying:
- The easiest way to apply the “fur coat” is to use a special plastering machine. It releases a solution under pressure, which sticks to the wall, forming the relief we need.
Three methods of applying a “fur coat”
- If you don’t have a machine at hand, you can use a broom. We take the broom in our right hand and lower it into the solution, picking up a small amount of liquid material. We bring a broom with plaster to the wall and hit it against a stick, which we hold in our left hand.
- Another technique is brushing. We take a long-haired brush and place it on a small portion of the solution. We pass the board along the pile, pushing it forcefully towards us. When straightened, the bristles will throw the solution onto the wall in small portions.
- Finally, you can use metal mesh on a wooden frame. We place the structure against the wall, level it and press it with bricks, and then use a trowel to throw the mortar onto the wall. After the mesh is removed, all we have to do is eliminate minor defects and smooth the surface with a brush.
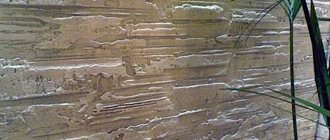
Formation of relief with mineral granules
Compositions with mineral granules are also quite easy to apply. The most popular of them is “bark beetle” - plaster, the surface of which imitates wood damaged by insects.
Apply the base layer
Instructions for applying the composition are not complicated:
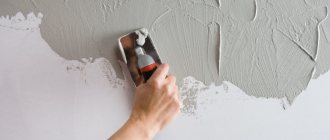
- Apply decorative material to the surface prepared and leveled using a plaster composition. To apply, use a grater, holding it at an angle of about 600 to the wall surface.
Advice! The optimal thickness of the applied layer should correspond to the size of the largest grain.
- After application, dry the surface. As soon as the applied hand stops sticking, we move on to decorating.
- We apply a plastic grater to the surface with its entire plane and move it under slight pressure. In this case, the mineral grains will shift, leaving grooves on the surface that repeat the direction of movement of the grater.
Forming the relief with a grater
- After the surface has been treated and dried, we paint the “bark beetle” with acrylic-based pigments.
Types and characteristics of plaster solutions
- cement and cement-lime - used for external facade plastering of the surfaces of walls and bases that are subject to constant moisture; for interior work - when working in rooms with high humidity - bathrooms, kitchens, toilets;
- lime, lime-gypsum and lime-clay - used for exterior finishing of walls that are not subject to systemic moisture, as well as for interior plastering of rooms in dry rooms;
- clay, clay mortar with cement and clay with gypsum - are considered quite suitable for interior work on plastering rooms with air humidity levels not exceeding the norm, and for external plastering of wall surfaces in areas with a dry climate.
How to determine quality
When preparing a good quality plaster mortar, the starting materials should first be sifted through a construction sieve so that you do not have to strain the ready-made mortar, which in itself is more labor-intensive. A high-quality mixture, ready for use, must have a uniform consistency, the required fat content, adhere well to the surface to be plastered, and not crack when it dries.
You can determine the fat content of the working solution for plaster using a paddle to mix its components. To do this, by mixing the components, we determine how the plaster mixture behaves:
- sticks to the mixer too much - we have a greasy solution, we should add filler;
- the degree of adhesion is average - we have a composition with normal fat content;
- does not stick at all - we have a thin solution that requires the additional introduction of a binder component.
Lime based mortar
- The lime mortar, which includes lime paste and sand in a ratio of 1:3, is brought to the required condition by adding water while thoroughly mixing the entire composition. When ready, it should resemble the consistency of a thick, viscous dough.
- In order to give the plaster mortar strength, 1/10 of this volume of cement is added to a ten-liter volume of lime plaster mixture. Thus, a cement-lime mortar is obtained. The above-mentioned lime-based compositions harden slowly, which allows you to work with them for 2-2.5 days.
- Lime mortar with the addition of gypsum (mix 5 parts to 1 part, respectively) is more durable, and it hardens after 6 minutes, complete hardening occurs after half an hour. This creates certain difficulties and requires special skills, but the plaster will be durable.
- The lime-clay mixture for plaster is prepared from clay and lime dough taken in a 1:1 ratio with the addition of five parts of sand. This plaster is much stronger than both lime and clay plaster.
Clay based
- Clay mortar for plaster is prepared in a special way by first wetting the binder and covering it with a thick cloth. The swollen clay (1 part) is mixed with sawdust (3 parts) and, adding water, stirred to the required consistency. The disadvantages of clay mortar are its fragility and instability to high humidity.
- In order to make the clay mortar stronger, cement is added to it (1/10 of this volume of cement is added to a ten-liter volume of clay plaster mortar). In this way, a solution with the addition of cement is obtained.
- Clay mortar with gypsum is prepared similarly to lime-gypsum, only clay dough is used as the main binding component.
Cement based
Cement-based plastering solutions are primarily suitable for treating walls that are often exposed to moisture, both indoors and outdoors.
- Cement mortar is prepared by mixing cement with sand in a ratio of 1:3, 1:4 (depending on the purpose of use), which is diluted with water and, with active stirring, brought to the desired condition. Use the prepared mixture for no longer than one hour. Exceeding this time of working with cement mortar leads to a decrease in its quality.
- Cement-lime mortar is prepared by mixing one part of Portland cement marked M400 or M500, ½ lime paste and two parts of washed sand.
This type of solution is prepared in two ways:
- Having previously mixed the lime dough with sand, add cement to the resulting mixture, then, intensively stirring the composition, pour water until the required consistency is obtained;
- Having made a mixture of sand and cement, mix the solution thoroughly, add lime milk (obtained by combining 1 part water and 1 part lime paste).
Plastic compositions
Processing with spatulas, brushes and other devices
In this section we will tell you how to apply textured decorative plaster. The main difference from the previous version will be the fact that the result here depends not so much on the processing technique, but on our skill.
In many ways, the formation of relief is akin to painting and sculpture, so even an experienced plasterer should practice before starting work to understand how the new material will behave.
We begin the work by applying the main layers:
- To begin with, we lay a base several millimeters thick on the leveling plaster. It will provide adhesion and will act as a background for our decor.
Note! Since the material will be applied on top of the base in a very thin layer, it must initially be painted in the shade we need. This is done by introducing pigment into the plaster solution and then mixing.
- We dry the base to a state in which a tool passed over the surface without excessive pressure will not leave marks on it.
- Then we take a small amount of decorative composition onto a spatula or grater and apply it to the wall in the form of strokes. We stretch each stroke along the base, trying to form a thinning layer about 2-3 mm thick at the starting point and 0.5 mm at the end point.
Apply strokes with a spatula
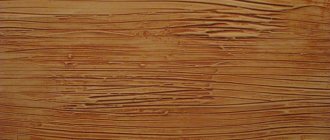
- The pattern of decorative plaster depends on the direction of the strokes. So, with a “Venetian” finish, the spatula should move chaotically, while the “rain” plaster is applied with diagonal movements along the previously applied markings.
- Instead of spatulas and graters, you can use brushes. In this case, we lay a layer of greasy plaster on the surface of the base (more binder and water, less filler), then level it with a trowel, and after that we treat the surface with a hard brush. The bristles of the brush will leave parallel grooves on the surface, forming the relief we need.
Applying relief with a brush
- Another interesting technique is to apply plaster yourself using plastic film. On a layer of greasy covering 2-3 mm thick we glue polyethylene with a large number of folds. We leave the material to dry and after a few hours carefully remove the film, leaving a very interesting relief underneath.
Advice from practice! You need to remove the polyethylene carefully, trying not to damage the coating. It is also important not to overexpose the film, otherwise it will dry out and come off with parts of the plaster.
Use of polyethylene
Rolling the relief with a roller
If the described technologies seem too complicated to you, and you are not sure that your skills are enough to create a beautiful relief, you can purchase a special roller. The protrusions and depressions on its surface form a pattern, which, when imprinted on the raw plaster, gives it a beautiful appearance.
Homemade and factory models
Advice! For work, you can also use a simple paint roller, partially plucking out its lint. Wrapping the working part of the tool with cords, polyethylene or tarpaulin with folds also gives good results.
These devices are extremely easy to use:
- We apply a layer of decorative plaster about 2 mm thick (this value is determined by the configuration of the roller).
- Roll the roller over the surface, forming a pattern.
- We make sure that the material does not stick to the working part, otherwise a lot of waste will appear.
- After drying, paint the plastered surface or finish it in another way.
Applying relief “under the skin”
Preparing the mixture
Making cement plaster yourself involves mixing all the necessary components and adding plasticizers to improve the quality of the mixture. The use of sand as a filler is traditional. Such a solution acquires the properties of strength and resistance to cracking, which is so necessary for the surface.
Important! All ingredients are important for the mixture, so when choosing cement, base it on its brand. Higher grade means better strength.
Let's find out how to properly make cement mortar for plastering walls yourself and learn tips from professionals:
- A novice master has no idea what cement brands mean. Therefore, when choosing them, proceed from the specifics of your work. For regular wall plastering, M400 is suitable; for work rooms, garages and where you need to save money, choose M300, but for the basement of a building and places with high humidity you should buy Portland cement M500
- The mixture begins to dry within 10-15 minutes after application to the base, so there is no need to hesitate when spraying and smoothing. It will take 10 to 12 hours for the plaster to dry completely. If you want to maximize the strength of the plastered wall, then you will need to exclude all additional finishing and mechanical influences for about a month
- You need to choose the right sand fraction for cement mortar - it can be from 0.2 to 0.5 mm and from 0.5-2 mm. Make sure that there is no organic impurity in the sand, otherwise it will cause rotting in the future
Table of proportions depending on the brand of cement:
| Cement brands | Brands of solution | ||||
| 200 | 150 | 100 | 75 | 50 | |
| 300 | — | 1:2,5:0,1 | 1:3,5:0,2 | 1:4:0,3 | 1:6:0,6 |
| 400 | 1:2,5:0,1 | 1:3:0,2 | 1:4,5:0,4 | 1:5,5:0,5 | 1:8:0,9 |
| 500 | 1:3:0,2 | 1:4:0,3 | 1:5,5:0,5 | 1:7:0,8 | — |
Important! Using an online calculator it will be easier for you to calculate the required amount of mixture for treating the wall surface. And with the help of the video, every beginner will learn the sequence of mixing plaster.
Most people are interested in how long it will take for cement plaster to dry on a wall? First of all, the drying process depends on the ambient temperature - for interior spaces it is prohibited to use artificial drying and allow drafts. For external walls, it will take approximately 24 hours to dry, but the strength indicators will gain strength about a month after finishing. In what sequence to prepare cement plasters and how to make the correct solution yourself:
- The main components in dry form must be taken in equal parts, then mix them well together
- To improve the quality of the plaster, it is necessary to sift the resulting mixture through a sieve.
- At the next stage, water is added to the mixture - the resulting solution should be homogeneous
- Cement plasters are not plastic, so there is one trick in which washing liquids are added to the plasters at the rate of 30-50 ml per 5 liters of water
How to properly prepare a solution for plastering walls
Finishing
No matter how the decorative plaster is applied, after drying it should be treated to improve its appearance and protect it from various influences. There are several processing methods:
Wax is applied by rubbing with force
| Technology | Description |
| Painting | For painting, acrylic pigments are most often used for interior or exterior work. Apply the material using a brush. Using a roller or spray bottle, trying to paint all the relief elements. Sometimes the paint is applied in several layers: the bottom one is made darker, and the top one is made lighter. This processing method allows you to give relief plaster greater visual depth. |
| Decoration | Body-painted plasters can be additionally decorated with metallics or pearlescent pigments. These materials are applied to the embossed surface either with a sponge or with a dry brush, and then secured using one of the two methods described below. |
| Waxing | Waxing is a standard option for protecting Venetian plasters, but it will also be applicable for other compositions. The limiting factors here are the price of the raw materials for waxing, as well as the strength of the plaster itself - some materials simply cannot withstand polishing. |
| Varnishing | Instead of a wax coating, you can use acrylic varnish for protection and decoration. It is applied in the same way as on any other surface - in two or three layers with mandatory drying. |
Metallic “gold” with partial painting
Subtleties of application
Before starting work, it is necessary to prepare to cover the floor with a protective film to prevent the composition from getting on it.
Carefully read the instructions for use of the powder you will be working with. Before diluting the gypsum mixture, you need to prepare the work surface so that it is as clean and dry as possible.
It would be correct to do this in several stages:
pieces of concrete break off and do not adhere well to the surface of the base;
tap the wall - if a dull sound is heard, the concrete has become loose, it also needs to be knocked down;
cracks and sinks are cleaned and filled with cement;
dry surfaces are polished with a steel brush;
dust from the walls can be brushed off with a soft brush or removed with a vacuum cleaner;
- In order to improve the adhesion of the base and coating, a primer is used; for concrete walls, the “Concrete-Contact” product is suitable;
- walls made of bricks and blocks are treated with a soil that has deep penetration characteristics to reduce their hygroscopicity. Before working with a wooden base, also use specialized products.
Plastering of walls is carried out with or without the use of beacons, as well as with or without the installation of reinforced mesh.
Work without a beacon is carried out when you need to slightly straighten the wall in plane or create an external decorative layer. This is often done with your own hands. Using the rule, unevenness on the ceiling and walls is determined - the tool is pressed in different places, thereby indicating the area of work. A gypsum composition is applied to these areas and spread over the surface. Next, using the rule, the presence of a gap between the tool and the machined surface is determined.
If the tool fits tightly, the same algorithm is worked out in the next section. All planned areas are processed in a similar way. The approximate thickness of the layer will be 2-3 mm; after the composition has dried and sanded its surface, you can begin decorative finishing of the base.
The technology is as follows: the beacons are leveled, while trying to keep the layer of plaster as thin as possible. Using a level, create markings for installing beacons. Apply a little solution to the indicated places and attach the beacons, always checking the level
Please note that the distance between them should be from 30 to 50 cm - small gaps guarantee a simpler procedure. Try to ensure that the step between them is not greater than the length of the building code
Next, keeping an eye on the beacons, the composition is applied to the base and distributed, the excess is removed.
After two hours, you can begin to putty the surface. To do this, spray water with a spray bottle and allow the moisture to be absorbed into the top layer of the gypsum composition. When the plastered surface becomes matte again, using a special brush, the moistened top layer is rubbed over the entire wall, filling in the slightest irregularities and making the surface impeccably smooth. Then the surface is again well ironed with a specialized trowel.
If you need to give the plaster a glossy shine, after a day it is moistened again with water and quickly rubbed with a spatula until the desired effect is achieved. It is highly advisable to remove the metal profiles after the work is completed, and the remaining holes can be easily filled with a small portion of the solution; if it has come to an end, you can always dilute an additional amount.
Over time, the beacons can rust and unsightly stains appear on the surface, thereby ruining its appearance. If the metal profiles are not bent or damaged, they can be used next time. The only case when profiles can be left under a layer of gypsum plaster is the desire to lay tiles on top of a plastered base.
Reinforced mesh is used when it is necessary to plaster walls of insufficient strength or in cases where the layer of plaster must exceed 2 cm. In most cases, if the walls are sufficiently smooth, they are treated with a layer of primer. Plasterboard or aerated concrete bases are primed in several layers.