Before starting an apartment renovation, residents try to select the material for finishing the surfaces in advance. Out of habit, wallpaper is chosen for finishing walls, which can be found on different bases. However, today there are other, newer materials that can significantly transform and decorate walls. So, DIY decorative plaster will be an excellent option for you.
Application technology
There are several ways to apply facade plaster; for example, one of the very attractive options is cladding the building with decorative finishing of the corners. However, such sophisticated options require the involvement of experienced professionals to complete. For a novice plasterer who wants to do this work with his own hands, a more suitable option is simply finishing the facade with a “fur coat”.
Before applying the decorative finishing plaster mixture, the walls must be leveled. For this, inexpensive mineral plaster is usually used, which is sold dry. Preparation consists of the following steps:
- When working with dry mixtures, you initially need to dilute the composition, for which it is better to use a construction mixer. It must be remembered that when mixing the plaster composition, the dry mixture should be poured into water, and not vice versa.
- For plastering wooden facades, surfaces with insulation and buildings subject to significant shrinkage (for example, new buildings), a facade mesh is installed on the surface, which is secured with screws or nails.
- Then beacons are placed that allow you to determine the curvature of the walls. After installation, the beacons are fixed with a solution until completely dry.
- The surface must be primed for the best adhesion of the plaster layer to it.
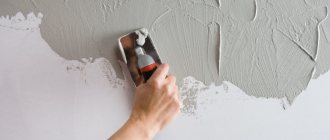
- Plaster mortar is applied to the wall; this can be done using a trowel, plaster ladle or spatula. It is necessary to adhere to the layer thickness recommended by the manufacturer (usually 30 mm).
- Using the plaster rule, the mortar is raised, achieving the most even result.
- While the mass is elastic, defects are corrected and seams are smoothed. These works are performed using a grater and a spatula.
- When the material has hardened (approximately 4 hours after application), it is necessary to dismantle the beacons, which may subsequently release rust. To do this, cuts are made on both sides of the beacon with a spatula, after which the strip is carefully removed.
- The sinks remaining after removing the beacons must be sealed. To do this, sweep them with a brush, moisten the surface with water and putty.
- The surface is impregnated with a primer, taking into account the characteristics of the subsequent decorative composition.
- After applying the plaster, it is necessary to provide comfortable conditions for its drying within 24 hours (the temperature should not be lower than +5°C, and there should also be no direct contact with water or scorching rays of the sun).
Work on decorating the facade includes the following stages:
- Covering. To apply the hand-finished fur coat, you can use a spray brush; for machine finishing, you can use a device such as a pneumatic gun with a large nozzle and funnel connected to a compressor. When using a ready-made construction mixture, the covering procedure should be carried out 2 times, with pauses allowing the solution to “set.”
- To perform the coating, known as “grated fur coat,” the surface of the facade wall is polished using a special grater with a steel surface. The movements when grinding should be light, only the tips of the surface are smoothed.
- Calibration until the final pattern is achieved is carried out on a dried but plastic surface. This work is carried out with pressure, and the movements should be wave-like.
To learn how to apply a “fur coat” to the facade, see the following video.
Applying the mixture to surfaces made of various materials
The advantage stated by the manufacturers is the ability to apply plaster for exterior use on many types of surfaces, but you need to consider how to properly work on each surface.
To begin with, you should follow the general rules:
- do not carry out work outdoors if the air temperature is less than 5 degrees Celsius;
- keep humidity at the required level, not higher than 70%;
- plastering the facade of a house with your own hands is done continuously, since when you stop, seams will appear visible to the eye;
- Immediately after construction, the building should not be finished; it should shrink.
This is a general set of requirements and recommendations for all types of mixtures.
Main types of external plaster
With your own hands - How to make it yourself Beautiful and unusual shelves with your own hands How to make a beautiful and unusual shelf for books, etc.
Decorative plaster of the facade is a great way to make your house noticeable against the background of other buildings, to highlight its architectural features. The main types of plaster mixtures include:
- silicate;
- silicone;
- mineral;
- polymer;
- homemade mixtures.
All these compositions, despite some differences in components, may contain:
- special polymer granules - to improve thermal insulation properties;
- small stone chips - for decoration;
- fine glass sand - will add shine;
- fine-grained crushed stone is suitable for creating an interesting textured surface.
Silicate mixtures are sold in hardware stores completely ready for use; their main component is liquid potassium glass. This composition has vapor permeability, good waterproofing properties and resistance to various stains and damage (including mechanical damage). The disadvantage of this type of mixture is the limited color palette and the need to use the mixture at once, since the silicate solution loses its properties during storage after opening the package.
Silicone plaster mixtures are also characterized by the elasticity of the coating, resistance to mechanical damage and ultraviolet radiation, and have a self-cleaning function. This coating has excellent waterproofing properties and a long service life. The only drawback is the price, which can be an order of magnitude higher than that of other plaster mixtures.
Mineral mixtures have a cement composition, are sold dry, and must be diluted with water before use (the recommended amount of liquid is indicated by the manufacturer on the packaging). The advantage of such plaster mixtures is a breathable surface, ease of use and inexpensive price. The disadvantages of this type of finishing are the need for careful surface preparation and the low elasticity of the finished plaster layer.
Polymer plaster mixtures, which are distinguished by their attractive appearance and durability, are most suitable for the external walls of a house. They can be applied to almost all types of substrates, they can withstand prolonged exposure to high temperatures, and are resistant to ultraviolet radiation.
These properties are due to the inclusion of synthetic resins in their composition:
- epoxy;
- polyurethane;
- acrylic styrene;
- polyvinyl acetate;
- acrylic water dispersion.
You can also make your own plaster mixture by mixing the components (cement, sand with fine fractions, water) in certain proportions. The disadvantage of this method is the laboriousness of the process, the need to accurately measure weight and maintain proportions, and the advantage is that it is relatively cheap.
External plastering work can be performed on the following surfaces:
- stone (including brick);
- tree;
- reinforced concrete;
- monolithic concrete.
Concrete walls require a special approach. When choosing plaster, you should take into account the fact that this material is capable of accumulating moisture and then releasing it. In this case, the exterior plaster of the house should be significantly weaker than the main surface. This will help prevent cracks from appearing. The selected plaster mixture must have excellent vapor permeability and allow the wall to “breathe” to avoid condensation.
Advantages of plaster finishing
In addition to improving the appearance, do-it-yourself exterior plaster has many other advantages:
- prevents moisture from penetrating inside without trapping air;
- special components included in the plaster mixture help improve heat and sound insulation;
- the variety of textures used to decorate the exterior of houses allows you to give any structure to the outer layer of facade plaster, and also in the future to change not only the color, but also the texture itself.
What surfaces are suitable for plastering?
The quality of work and the reliability of the coating directly depend on the material from which the façade of the house is made. The following are well suited for applying plaster with your own hands:
- tree;
- stone;
- reinforced concrete slabs;
- monolithic concrete.
Preparing the facade for cladding
With your own hands - How to do it yourself How to make a two-flight staircase to the second floor with your own hands photo drawings Do-it-yourself two-flight staircase to the second floor
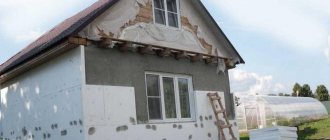
If a new building is being faced, it should be remembered that settlement of the structure must first occur (if the walls are brick or wooden). Concrete walls must be at least three months old, brick walls - 28 days. The base must be level, dry and strong.
The deviation of the walls from the vertical should not exceed 1 cm per floor, 3 cm over the entire height of the walls of the house. Detected deviations are leveled with a special mixture without rubbing the surface. All work on the construction of the roof, balconies, insulation and waterproofing of the walls of the house, and installation of drains must be carried out.
In old houses, it is necessary to remove crumbling plaster and check the reliability of the brickwork. To do this, the surface of the walls is tapped with a hammer or a wooden block. In places where the sound will be dull, the detached lining is beaten off.
The joints of brick and block walls are usually widened and deepened to increase the adhesion of the plaster to the wall. A special reinforcing mesh is attached to concrete walls that have a smooth surface, as well as to the fixed insulation.
Before starting work, the walls are cleaned of dirt, grease stains and salts. A primer is applied to the prepared surface. In hot, dry weather, brick surfaces are moistened.
To ensure that the joints of plaster applied at different times are invisible, the surface of the walls is divided into sections (grabs). Their boundaries should fall on internal corners, slopes or other protruding elements of the facade.
Acrylic facade plaster
With your own hands - How to make it yourself How to make a cornice invisible, hidden Invisible curtain rod with your own hands
The material has high elasticity and relatively low absorption, which is explained by the presence of resins and the use of special components. This coating makes it possible for the walls to “breathe”, namely, to remove moisture out. The coating tolerates temperature changes well and also protects the structure from the development of microorganisms.
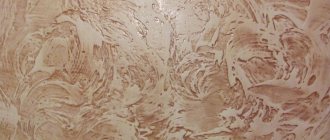
Texture of “Lamb” plaster
Many people associate the finishing of facades with decorative plaster with an acrylic mixture. This is explained by the fact that manufacturers produce finishing materials with different contents of auxiliary additives that affect the structure and visual perception of not only the facade, but also the entire building. For example, you can create an imitation of “bark beetle”, “lamb” and so on.
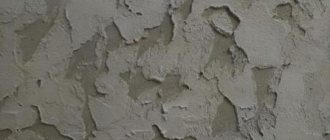
Texture of plaster "Bark beetle"
The solution does not require additional preparation, as it is produced in the form of a ready-made mass containing all the necessary components in the required proportions.
Silicate facade plaster
If the building was erected from a material with a porous structure, then it is recommended to pay attention to silicate finishing mixtures, as they have excellent vapor permeability. The liquid does not linger on the surface, but is brought out, which is achieved due to a unique composition, namely a base of liquid glass and auxiliary additives
If facade plaster is selected for aerated concrete, then many construction experts recommend using silicate-based materials, since they are easy and evenly applied, plastic and relatively economical.
The surface covered with silicate facade plaster is not susceptible to contamination, which is important if the building is located next to the road.
Silicone facade plaster
This type of finishing for external surfaces is universal, which is reflected in the cost. The coating provides high-quality protection from almost all types of influences, including climatic ones. In addition, features include high vapor permeability, exclusion of the development of microorganisms, dirt-repellent properties and preservation of an unchanged appearance for a long time.
The diversity of the palette deserves special attention, which allows you not only to choose the desired shade, but also to combine several options at once. The popularity of silicone plasters is limited, since the cost of the material is slightly higher than other types of finishing materials
The popularity of silicone plasters is limited, since the cost of the material is slightly higher than other types of finishing materials.
You can decide what kind of external plaster of the facade you will use yourself, based on the manufacturer’s recommendations and individual requirements for external design and properties. Another option is to seek help from a special construction and renovation company. In this case, the consultant will help you choose plaster taking into account the parameters of the surface to be coated, the desired result and material capabilities.
Selecting a texture
Once you've decided on the type and color of the material, it's time to choose the texture you want. There are many different textures. For example:
- "Bark beetle." Contains fine marble chips. A number of positive qualities: due to acrylic, the plaster acquires the effect of stone and has good strength. The composition includes natural materials that are harmless to people and nature. Available in white. You can add dye of the desired tone.
- "Antika". The main advantage of this material is considered to be low cost and good performance. The main qualities of facade plaster texture: easy to apply, attractive appearance, a wide variety of colors, excellent temperature properties and water resistance. Disadvantages: possible tracking, small cracks.
- "Mosaic plaster". By choosing this type, you will make your facade original. It is possible to add marble chips. The advantages of mosaic plaster: the color does not fade, the color range is varied, and does not require additional maintenance.
How to make decorative plaster on a facade
- "Brashek." In simple terms, this technology is called “fur coat”. It is one of the most common coating methods. It has high quality indicators: a variety of colors, serves as insulation. The material is moisture-resistant and frost-resistant, does not fade from sunlight. It looks very impressive in addition to clay and plaster finishes. It appears to have a rough, grainy texture. For a good and high-quality result, it is worth using the services of special workers.
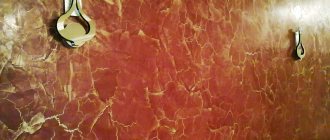
- "Traventine". With the help of an unusual application, the texture becomes similar to natural stone in the Italian style. The advantages of this type: a wide range of colors, resistant to precipitation and damage, does not fade from sunlight, good thermal insulation properties.
Varieties of mixture
In order for the quality of the plastered surface to be high, it is important to choose the right type of plaster mixture. As a rule, there are such types of plaster as:
As a rule, there are such types of plaster as:
- mineral;
- acrylic;
- silicate;
- silicone.
They perfectly perform the functions for which the right façade plaster is intended, but which mixture of them is best depends on your specific needs and budget.
Mineral plaster for the facades of private houses is most popular due to its low cost and ease of use, which makes it easy to apply it to the surface yourself (see photo).
This mixture is made from a solution of cement and sand (warm plaster for the facade does not contain sand, but substances with low thermal conductivity).
This mixture has vapor-permeable properties, making it suitable for facade insulation with basalt wool or polystyrene foam.
Most often, mineral plaster for facade insulation is used together with foam plastic, mainly due to the low cost of both materials.
The disadvantages of this type include a short service life - about 10 years, and low resistance to various cracks and damage that often appear over time.
The acrylic variety of plaster has a much longer service life - 15 - 25 years.
Such elastic plaster for the facades of private houses allows you to conveniently hide small cracks due to the fact that it can stretch slightly during shrinkage.
The mixture is made from acrylic resin (see photo). Disadvantages include vapor permeability, which is why plastering of the facade over insulation with basalt wool is not carried out.
The façade of a house can be finished with this type of plaster and insulated with polystyrene foam.
It is better not to apply acrylic plaster near dusty roads, as it actively attracts dust, and after some time it may lose its color brightness.
The properties of the coating include vapor permeability, so it is recommended to use it when insulating using the “bonded thermal insulation” method using basalt wool.
In this case, it is better to refuse insulation with foam plastic. A facade with such plaster is highly resistant to various damages and cracks due to the elasticity of the coating.
The main advantages of this type are the presence of antistatic properties and the ability to repel dust.
Finishing the facades with decorative plaster makes it easy to clean and maintains its brightness throughout the entire period of operation.
Silicone plaster for facades has the status of the most technologically advanced and modern coating. The service life is up to 25 years.
Photo:
This variety has the highest degree of elasticity and vapor permeability in comparison with other types, as well as a high stretch coefficient.
The silicone coating is antistatic and easy to clean. It should be noted that the plaster does not absorb various salts.
Self-plasterer step-by-step work plan
The general stages of the process are: preliminary (preparation of wall surfaces), distribution and installation of “beacons”, direct application of plaster for external walls.
Preliminary work
The appearance of the finished façade largely depends on the preparatory period when the old cladding is removed: in some places it needs to be removed, and in others it needs to be beaten off (depending on what the old cladding was made of). Unnecessary layers are scraped off and removed by tapping with a mallet over the entire area of the wall. The presence of voids is indicated by a dull sound. If necessary, use a chisel with a hammer or a hammer drill. Along with the old facing layer, the bumps and formed sagging are removed.
At the preliminary stage, contamination in the form of stains, dust, and dirt is combated. At the same time, the seams on the brickwork are “embroidered”: recesses are made in the joints between the bricks. This type of work, as well as the application of notches, promotes better adhesion of the applied layer to the surface of the walls.
Structures with a smooth surface, for example, made of foam blocks or reinforced concrete slabs, are not embroidered. Surfaces, including brick, pre-lined walls, are primed with a deep penetration solution. Then a reinforcing plaster mesh is stuffed or glued. The completion of the preparatory work is considered to be complete drying of the primer.
Approximate beacons
The “lighthouse” method is especially suitable for novice builders who are plastering the facade of a house with their own hands for the first time. The correct installation is as follows:
- The places on the wall in the vertical plane are determined where the surface “departs” from the vertical measured by a plumb line.
- In places of strong deviations, marks are made to indicate that more plaster mixture will need to be laid here.
- Beacons are installed of a given size, 3 or 4 m long and about 10 mm thick, for spot application (a patch with a diameter of 10-15 cm) of the plaster mixture. The distance between such points is half a meter.
- The beacon is pressed into the applied composition.
- It is better to choose a gap of 1.7 m between the alarms.
- The formation of the thickness of the layer of the applied mixture depends on the distance of the base of the lighthouse to the surface. This means that the thinner the patch, the larger the layer.
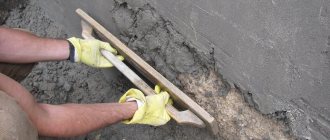
- A rule with a water level built into its “body” is applied to the beacon pressed into the solution.
- Pressing the plank against the wall, it is pulled back with progressive intermittent movements, forming an even layer of the required thickness. The solution deposits are immediately cleaned off, using a spatula to achieve a smooth surface.
- After waiting until the mixture on the wall sticks, the empty spaces under the lighthouse are eliminated.
- If the walls are more than two meters long, you will need to install guides in the corners.
- All work is constantly monitored by level.
Step-by-step application of plaster
Do-it-yourself decorative plaster on the facade is applied as follows:
- First, the mixture is prepared according to the manufacturer's instructions on the packaging of the finished mixture. Or a cement mortar of liquid consistency (pancake dough) is mixed. To improve adhesive properties, a small amount of PVA glue is added to it.
- Using a ladle, the material is thrown over the entire area of the wall. In this case, the cast should stay on the surface and not flow off it. The “semi-finished product” should dry out.
- The work is carried out in areas measuring 50 x 50 cm2. The prepared mixture, reminiscent of sour cream in thickness, is poured between the beacons. The thickness of the layer is determined experimentally, taking into account the fact that with a multi-layer coating, the total thickness of the entire plaster should not be more than 50 mm. Otherwise, the layer will simply fall away.
- Starting from the bottom, moving upward along the beacons, make progressive light movements, usually in the horizontal plane. There should be a flat surface at the bottom of the rule. For potholes and dents on the walls, in places marked at the preparation stage, an additional portion of the mixture is placed in the recesses, and the leveling is repeated again.
- All minor flaws in the form of cracks, bulges, small voids are eliminated at the next stage, when grouting is performed. It is performed using a special wooden grater in a circular motion only after the plaster layer has dried for a short time.
Preparations for work
To properly prepare the wall surface for applying the plaster mixture, you must:
- Remove old, weakly adhering plaster, if any.
If possible, remove swellings and bumps. If you are lazy, you will be faced with the forced application of thick layers of plaster, which will cause waste of materials, effort and time when performing work.
- Remove various types of contaminants from the surface.
- If you are dealing with a brick wall of a house, then it is worth unstitching the seams, that is, widening and deepening the joints. Thanks to this, the applied facade plaster will “cling” more firmly to the base of the wall. It happens that new bricklaying is carried out in advance “in a wasteland”, which can significantly reduce the time of preparation for the main work. After jointing, the brick walls need to be primed and allowed to dry completely. And only then can you start plastering.
If during the construction of the walls larger blocks were used than standard bricks, then there is no need for jointing. There will be much less seams here and places for hooking too.
- If the wall of the house was erected using the rough masonry method or smooth reinforced concrete slabs were used, then we proceed as before. A special plaster mesh can be immediately applied to the surface of such a wall. The wall must be treated in advance with a deeply penetrating primer.
Walls made of concrete or aerated concrete require a different attitude. Before you begin the finishing process, you need to figure out how to plaster them correctly. The selected facade plaster should be weaker in strength than the base. This will help avoid layer tension at the joints. The mixture should allow the wall to breathe, because concrete can accumulate and release moisture. The ability of the solution to penetrate steam will protect against condensation and the appearance of fungi.
Fungus on plaster surface
Decorative facade plaster is applied only to the main layer of the mixture, the thickness of which is from 1 to 5 cm. Before this, the base must be primed or finished with a special mounting mesh installed on a liquid base. If work is carried out at high temperatures, the layer must be periodically sprayed with water to ensure uniform drying. Otherwise, the outer layer dries earlier than the inner one. This will inevitably cause cracks to appear.
Mineral wool plastering technology
When the installation of the insulation is completed, they proceed to applying the finishing finish. To work with facade plaster, it is necessary to take into account weather conditions - work is carried out on a windless day, when no precipitation is expected, at an air temperature of +5 to +30 °C (optimally - from +15 to +25 °C).
Materials and tools you will need:
- fiberglass mesh;
- notched trowel;
- adhesive solution;
- plaster;
- wide metal spatula;
- metal or plastic grater;
- primer, brush or roller.
How does plaster hold up on mineral wool?
In order to ensure better adhesion of the plaster to the insulation, preliminary installation of reinforcing mesh on mineral wool slabs is required.
A special adhesive solution with a thickness of at least 2 mm is applied to the surface of the slabs using a notched trowel and, until it dries, the reinforcing mesh is pressed into it. The surface is leveled with a large spatula or trowel.
Another option is to fix the mesh on the insulation boards using self-tapping screws, and then apply the solution.
Work begins from the corners, and in these areas it is advisable to install a perforated corner profile for reinforcement.
After this, the composition must dry completely - this will take 1 - 2 days.
If silicone or silicate plaster is used, the surface is pre-treated with an appropriate primer, applying it with a brush or roller. Wait until it dries.
Plastering walls
The selected composition is applied using a wide spatula. When working with acrylic compositions, you need to work quickly, without taking long breaks - otherwise there may be significant color differences in different areas of the dried coating.
Each type of decorative plaster uses its own methods of creating texture. For example, to create the “bark beetle” effect, manufacturers add mineral fractions to the mixture - pebbles 2-3 mm in size. When this composition is rubbed, grooves are formed on the wall, imitating the texture of wood eaten away by a bark beetle.
Pebble (mosaic) plaster just needs to be leveled.
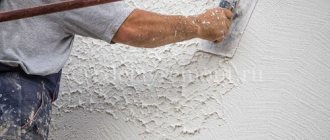
To create a “fur coat”, roll over the applied layer with a roller. You can also use a trowel. It is applied to the solution and quickly withdrawn.
If the finishing is done with a cement-sand mixture, then a pneumatic bucket can be used for plastering. In this case, the solution lies on the wall, creating a “lamb” texture.
You may also be interested in the following articles:
- Painting the plastered facade
- Painting decorative plaster
It is quite possible to insulate external walls yourself using mineral wool using the “wet facade” technology, but it is important to follow the order of work and choose materials that are suitable for each other. Previous FacadeWhich penoplex plaster is better? Review of mixtures and plastering technology Next FacadePlastering using facade insulation
Previous FacadeWhich penoplex plaster is better? Review of mixtures and plastering technology Next FacadePlastering using facade insulation
Insulating plasters
Today, the market offers mixtures that, after hardening, form a smooth, durable surface. At the same time, the layer is very porous. As a result, such plaster retains heat perfectly.
Aerated concrete compositions are widely used. They can be applied in a thick layer and serve as an effective means of retaining heat. Additionally, this coating protects the house from noise and sound penetration.
Technology of applying facade decorative plaster
Applying facade plaster
Decorative finishing of facades with plaster can be done either manually or by machine. For manual application of mixtures, no special equipment is required; it is enough to acquire only a standard set of devices, as well as tools, for example, special spatulas. When performing finishing work, it is imperative to follow the technology for applying facade decorative plaster recommended by the manufacturer, including the speed of applying the mixture, as well as its drying time.
To prevent the formation of cracks, before plastering the facade, you should wait a certain time until the shrinkage of the walls is completed. It is necessary to complete the installation of the roof and balconies, installation of external waterproofing, drainpipes and communications.
The façade is finished with decorative plaster in the following sequence:
- Preparatory stage. Install scaffolding. Clean the entire surface of the facade from protruding grease and bitumen stains, salts, dust and dirt. In hot and dry weather, walls made of concrete blocks, bricks or cinder blocks that need to be plastered must be moistened. Surface leveling is ensured during the preliminary main plastering process.
- Surface treatment with primer. It is impossible to obtain a reliable and high-quality coating without this stage. Therefore, there is no point in saving materials here. Careful priming is necessary because it increases the adhesion coefficient and prevents the spread of all kinds of biological pests, including fungi. In addition, the primer allows you to overcome uneven drying of the solution, and therefore the appearance of stains and cracks over time.
The primer should be applied with a roller or wide brush. Usually one or two layers are enough, but if the facade is made of moisture-absorbing or bulk materials such as gas silicate and foam concrete, several more layers will need to be applied. They will not allow the surface to absorb moisture present in the plaster mortar. Be sure to maintain the drying time, which is indicated in the description attached to the primer.
- Prepare the plaster solution according to the instructions.
- Plastering. The technology of applying facade decorative plaster allows you to recreate the structure of granite, wood, fabric and many other materials. This is done using various tools - rollers, wide brushes, paint spatulas or others. The thickness of the layer is determined by the diameter of the filler grain. During operation, the plaster composition should be stirred periodically.
If you need to get a needle-like surface of a facade wall, a pattern in the form of a pigtail or other texture, then first apply a base layer of plaster. Then it is dried and after about 15 minutes the second layer is applied. It is processed with a special structural roller, which is made of rubber.
If desired, you can print the drawing. This is done over a layer that is still pressed with a finger. Usually two people participate. One applies a texture matrix to the surface, the other presses on it with his hands or a trowel, imprinting an image. Sagging is removed with a soft sponge.
The final stage. Plaster can be painted
This is not necessary if a pigmented plaster mixture is used. It is important to ensure that the decorative finishing process takes place in calm weather, a temperature of 5–25 degrees, with a humidity of no more than 70%. Unfavorable conditions impair adhesion and can cause various defects.
Decorative plaster has many advantages over all other options for finishing building facades. By choosing this method, you have a real opportunity to give your home a unique personality that will always distinguish it from most buildings. You can select any plaster solution based on structure and color, taking into account the specific features of the facade surface. You can do all this yourself, without turning to highly paid specialists. It is enough to have some skills.
Preparing the surface for applying the material
After completing the construction of the walls of the cottage, select a suitable design. Think over the finishing sequence yourself, develop a plan, and use the services of experienced designers. In the latter option, they will not only help you place an order for the project, but will also be able to calculate the consumption of materials.
Before plastering the facade, find out whether any mixture has been applied to the wall before. If such a coating has been applied, it will have to be carefully leveled by removing the top layer completely or partially. The surface is cleaned of dirt using a brush, and then degreased. Then take a primer that is suitable in composition for the plaster (information on the appropriate type of primer will be written on the bucket with the plaster).
You can often find a primer from the same manufacturer as the plaster.
Then there will be perfect adhesion between the walls and the mixtures. when the home has just been erected, carry out preliminary work by cleaning the walls with a brush, then cover them with soil. The preparatory work has been completed. Decorative facade plaster is supplied ready-made, or as a dry powder from which the mixture will be made.
Tools for preparing decorative plaster
Before you start cooking, stock up on convenient tools. This will simplify the work and allow you to quickly prepare the desired consistency.
Plastering tools
You will need:
- a spacious container for the finished mixture (bucket, plastic container);
- electric drill or low-speed construction mixer;
- grater for leveling the surface of the plaster layer;
- trowel;
- sandpaper;
- 2-3 spatulas of different sizes;
- building level;
- plumb line;
- a smoothing iron that will help smooth and structure the surface of the material;
- several brushes of different sizes for painting dried plaster (the number of brushes depends on the color scheme);
- a sponge with which you will create various effects on a plane.
Decorative mixtures
Plaster, which most often serves as the “final chord”. By finishing the facade with this composition, you can achieve the following tasks:
- creating surface relief,
- obtaining a smooth wall with different color schemes or color transitions,
- imitation of other materials. You can make the house look like it is lined with stone, for example, as in the photo.
Decorative mixtures often include brightly colored dyes, stone chips of various sizes, crushed rocks and other materials.
Facade plastering technology using insulation
Work on creating a wet facade is divided into several stages. First you need to create conditions for work. a wet facade cannot be done at low or very high temperatures, optimal conditions are +15+25 degrees. Otherwise, you need to surround the building with scaffolding, cover it with windproof film and create a thermal contour. Next, the walls are prepared: you need to clean them of old coatings, if any, debris, dust, wash and dry. If there are chips and protrusions, they are removed with a chisel, hammer drill or other tool. Cracks and depressions are puttied and leveled. The surface of the walls should be as smooth as possible because... this ensures strong adhesion of the insulation
It is important to remember that the plaster and putty at this stage should already be combined in composition with insulation and other coatings. After this, the walls are primed
The next stage is installation of insulation. The insulation is glued, starting from the base profile, in horizontal rows, with a bandage of 20 cm. This is necessary to avoid long vertical seams that violate the thermal insulation of the structure. When laying insulation, you need to ensure that the error in smoothness does not exceed 3 mm, otherwise the resulting unevenness will be visible even after the work is completed. At the corners the insulation is glued with an overlap of 2-4 cm, the excess is later cut off. The technology for plastering a facade using insulation involves double fastening of the insulation: with glue (preliminary) and with umbrella dowels. You can fasten the dowels no less than a day after gluing. Now you can start reinforcing. Reinforcement consists of uniformly covering the insulation with a layer of reinforcing composition, into which a special alkali-resistant fiberglass mesh is immersed, and creating a top covering layer of the same composition. It is important that each layer of the composition is at least 2 mm thick, and the mesh is located between them, but not adjacent to the insulation. Reinforcement begins with the corners of the building, window and door openings, then the entire walls are reinforced. To facilitate the work and further strengthen the openings, you can use a reinforcing profile, which is a metal perforated corner connected to strips of reinforcing mesh, which is attached to the opening.
The next stage is finishing. After the reinforcing composition has dried (at least 72 hours), the walls are covered with decorative plaster or paintable plaster. The choice of materials here is huge, including smooth plasters, textured plasters, and colored primer paints that do not require plaster. In any case, you need to follow a few rules. All materials must be for outdoor use. The plaster and the finishing coat must match each other, i.e. Acrylic paint requires acrylic plaster. Weather conditions should exclude bright sun, low temperatures, wind and precipitation. Finally, the finishing coat is usually exterior paint.
It is important to keep in mind that for some types of paints, in particular for silicone and silicate (siloxane) paints, it is necessary to pre-prime the walls with appropriate primers
Price for facade plastering with insulation
A wet facade is one of the most affordable ways to decorate a house; its price is significantly lower than insulation and cladding separately.
It is especially important to simultaneously solve two problems: insulating the house and decorating its appearance. The plaster mixtures themselves cost between 70-90 rubles/kg
with an average consumption of 10 kg of the finished mixture per 4-7 sq.m. wall surface, depending on the thickness of the layer. Based on these figures, you can calculate the cost of materials. If you order facade work from a construction company, then plastering work will cost 250-300 rubles/sq.m. One of the important design solutions of a wet facade is the division of the insulation function between the walls and the outer cladding, which makes it possible to make the walls thinner, reducing the cost of construction. In addition, the materials used in this system “breathe”, which means they not only seal the walls from the influence of the external environment, but help maintain the microclimate in the interior. It is the combination of all these advantages that makes wet facades one of the most common in construction.
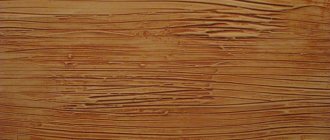
BARK BEETLE OR FUR COAT?
The relief of the textured surface of decorative plaster determines the size of the filler grains. The optimal layer thickness and, accordingly, material consumption depend on it. For fine-grained plasterers, the fraction size is 1 mm. for medium-grained ones - 1.5 mm. for coarse-grained ones - 2-3 mm.
Some of the most popular textures are “bark beetle” and “fur coat”. The type of surface with many directional grooves, which are obtained by moving a plastic trowel along a layer of plaster, is called “bark beetle.”
Visually, it really resembles the passages that this insect makes in wood.
Different directions of grouting: vertical, horizontal, circular - make the pattern unique.
Moreover, depending on the size of the grains, it can be more or less expressive. A layer with a predominance of grains of one fraction has a more uniform appearance and resembles densely packed pebbles. This texture is called “fur coat” or “pebble”. For interior decoration, mixtures with small fractions are chosen, which look more aesthetically pleasing from a close distance; for exteriors, mixtures with large fractions are chosen.