What is the solution?
Sand plaster for finishing work is a composition whose consistency is similar to wall paint. It combines the properties of plaster and paint, which allows the mixture to be used to create various design projects. Even a person without experience can work with such material.
This is interesting: Peach curtains in the room: creating an appetizing interior (21 photos)
History of appearance
The composition was created by ancient Roman builders. In those days, marble was the main material for building houses. When working with rock, a large amount of marble particles remained - dust or flour. The raw materials were useful for finishing work. To extend its service life, the plastered surface was sealed with wax and polished.
Later, during the Renaissance, the technology regained popularity, especially in Venice. The technique was used to decorate the best mansions. Venetian was used to decorate building facades and interiors, for walls and ceilings.
Peculiarities
Decorative plaster is a finishing with which various reliefs and other visual effects are created on surfaces.
Thanks to this material, you can imitate expensive finishing materials, while significantly reducing costs.
Decorative plaster “sand” is quite widely used in interior design and this is not without reason, because the material has a number of advantages:
- The plaster contains quartz or river sand, which helps create a varied coating on the surface of the walls.
- The material tolerates high humidity well. The coating can be cleaned with a damp cloth. To enhance its moisture-resistant properties, “sand” plaster can be coated with wax, after which the use of such a finish is permissible even in the bathroom.
- The composition is completely environmentally friendly and does not cause allergies.
- The material has high vapor permeability, that is, the walls underneath “breathe.” The surface can absorb and then release moisture back, maintaining an optimal indoor microclimate.
- Sand plaster has a fairly long service life, reaching more than 10 years. At the same time, the texture and brightness of the colors are preserved in their original form.
- The composition has increased resistance to the formation of fungus and mold.
- A wide range of colors will help you choose this coating for almost any interior.
- Due to its properties, this coating can also be used outside buildings.
The disadvantages of the material include its cost , but it is still significantly lower than that of good wallpaper. Another disadvantage is the fact that this coating absorbs odors well, so it is not recommended to use it in the kitchen.
Surface preparation and application of a decorative layer
First of all, we devote time to the surface on which sand decorative plaster will be applied. This material is always applied to the wall, because it looks extremely ridiculous on the ceiling. Preparing the wall consists of cleaning and leveling it. It is necessary to clean off previous coatings (wallpaper, paint) and weak layers of plaster. After cleaning from dust, dirt and grease stains (if any), you need to level the wall with putty until smooth. There should be no cracks or scratches. After this, a deep penetration primer is applied to the smooth coating using a fur roller.
Priming removes remaining dust, makes the base more durable, and also improves the adhesion of the next layer. With its help, we get a better and more durable coating.
The dry coating should be painted with acrylic paint. Its color should be several tones darker than the base coat. To do this, it is better to tint the paint yourself in the same way as you would tint decorative plaster yourself. It’s enough to just add the color to the total mass, and then stir everything until you get a single-color mass. Paint is applied using a velor roller. It is applied in a continuous, even layer.
After the paint has dried, you can proceed directly to applying a decorative coating with a sand effect. We also tint it in a top color that is lighter than the base paint. The actual application of the material to the wall is best done with a hard-bristled brush in multidirectional movements. In this case, small vortices will be created, similar to sand dunes. When working with large areas, the coating is applied to small sections of the wall, 2-3 square meters in size. The next section is applied before the previous one dries, covering the torn edges. In this case, it will be extremely difficult to notice the joints.
In a day the plaster will dry, and in a week it will be completely ready for use. In some cases, two layers of decorative sand plaster are applied. This technique is used only if pre-painting is not used. The advantages of this method over the option described above are very doubtful.
Possible sand effect designs
The advantage of decorative sand is that it can be used to create a variety of textures. Sometimes this requires selecting a specific mixture with appropriate fillers, and sometimes only special tools and skills are enough.
- The effect of a sandy wind can be achieved if the second layer of decorative plaster is applied with wide cross strokes. To implement this idea, it is best to tint the solution in 2-3 colors and apply them in a cross pattern. After the surface has dried, it must be sanded.
- Decorative sand plaster creates the effect of sand dunes if the finished coating is treated with mother-of-pearl pastes. They are able to highlight the quartz particles in the solution, awakening their natural shine. The resulting shimmering pattern will be somewhat reminiscent of sand dunes.
- The effect of river sand is obtained if the solution is applied with a brush in diagonal movements.
Technology of applying decorative plaster with sand effect
The method of application depends on the effect you would like to achieve, but the general sequence will be the same.
- Surface preparation.
- Preparation of the solution and its tinting. Sand mixtures for the most part do not require any additional preparation other than adding color, because sold ready-made. The only recommendation here is to strictly follow the instructions given by the manufacturer.
- Applying the base layer . The base is tinted to match the color of the base coat, but two shades darker. The base contains paint or primer and a tint of the desired color. The primer will level and smooth out all small cracks and irregularities. Apply two layers with a fur roller, there should be a period of drying time between them, 30-40 minutes is enough. When the paint has dried, you can apply the main decorative layer.
- First stage of application. The prepared solution is applied with a stiff brush or roller with a fur cover. After gradually applying the first layer, wait a few minutes.
- Second stage of application. Next, apply the second layer. It will take a day for it to dry completely, but to use the wall it is better to wait a week.
Regarding the choice of colors, you can choose the color yourself; the most common are pastel colors (yellow, beige, light brown).
Often the base is applied using acrylic paint and a velor roller, rather than the decorative sand itself.
Designers are developing new ideas for decorating living spaces. In this regard, the use of sand plaster mixture for decoration is completely justified. The result is stunning. The main condition is the choice of high-quality equipment and materials, which will greatly speed up the process.
Selecting the necessary tools
To work with plaster that imitates sand, you will need a number of tools:
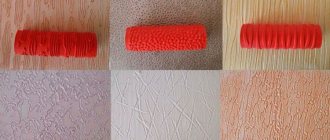
- scraper;
- spatulas of various sizes and purposes;
- trowel;
- grater;
- rollers of several sizes;
- brushes, combs and brushes;
- container for preparing the solution;
- drill with an attachment for mixing the composition.
There are various types of tools available in the market. It is better to give preference to stainless steel products. This will help avoid troubles associated with the appearance of yellowness on the composition.
Advantages and disadvantages
The widespread use of decorative plaster for interior decoration in recent years is no coincidence: this solution has a number of advantages that literally force you to choose this material.
- Durability and the ability to remain attractive for a long time . Experts say that such renovations eliminate all questions regarding the design of the premises for at least ten years. A rather old coating looks almost the same as a new one: it does not fade or fade even when exposed to direct sunlight.
- There is not a single synthetic material in “sand” plaster - this mixture is completely natural. All its components are completely safe for human health, which allows it to be used even in children's rooms.
- Variety of colors. Contrary to its name, this finishing material is not at all limited to the typical “sand” palette. Modern manufacturers produce a whole rainbow of colors, and the ability to use artistic effects to create patterns of any shape only increases the cultural value of such repairs.
- Versatility. Decorative plaster itself can perform the functions of several building materials at once. As befits plaster, it hides any unevenness in the wall, although large recesses should still be filled with a cheaper mixture. At the same time, “sand” is also an excellent finishing finish, which does not need to be additionally painted, because the repaired wall already looks beautiful.
- Mold protection. A common practice is to add special components to the mixture that prevent the formation of mold. Thanks to this, the atmosphere in the plastered room remains healthy.
- Easy to apply. As a rule, independent plastering is a feasible task for everyone, because no special skills are required for this. The whole process is intuitive, and there are hundreds of instructional videos on the Internet. Problems are only possible if the owner wants to create a very unusual and complex decor in the form of one pattern or another.
Of course, there are also disadvantages, but they are relatively few. First of all, “sand” plaster is criticized for its high cost, because ordinary plaster, paint, and most types of wallpaper will cost the customer much less. At a relatively high price, such material still cannot be called elite - it is still not something that one could be fully proud of.
It is possible to use sand finishing in rooms with high humidity, but then you need to carefully choose the type of mixture to be sure that water accidentally falling on the wall will not spoil the type of repair.
This is interesting: Laminate Tarkett - a collection of unsurpassed quality (27 photos)
Main types of plaster mixtures
Depending on the application, plaster is divided into three main types.
Ordinary plaster. This type is made from gypsum and cement. This solution is used in rough surface treatments. For example, for sealing seams, cracks and other similar damage. This type is quite popular, and this is not surprising, since without this material it is almost impossible to level the surface and rid it of defects.
Special plaster. It includes in its basic composition a variety of additives that give the material some unusual abilities. Thanks to such additives, the material can be used in rooms with high humidity or in laboratories with a high level of X-ray exposure.
Decorative plaster. This plaster has various design features. These include texture, plasticity and various visual effects. Thanks to this type, you can make an imitation of various expensive surfaces, as in the following photo. In this case, you won’t need a lot of money.
DIY application instructions
Instructions on how to apply the material to obtain the desired pattern and achieve a long-lasting effect:
- Remains of construction debris, dirt, and dust are removed from the surface. This can be done with a vacuum cleaner, or if it is heavily soiled, with a damp cloth.
- Examine the surface for cracks, flaws, chips, depressions, and fallen parts. If there is, then apply a primary leveling layer of gypsum plaster.
- Base of the wall. For brick, concrete, wood, mortar will be needed in different quantities. Using a good primer will help (it’s worth priming in 2 or even 3 layers).
- Wait for the preliminary leveling layer to dry completely. Lay out a protective layer of plaster already on an acrylic base.
- Then the surface is treated with a deep penetration primer. This procedure can be done several times after each drying of the previous layer.
- Apply the composition to the prepared surface. This work is performed with a roller covered with fur or fabric. It should be medium sized and new, unused.
- Allow the first layer to dry, and then use a foam roller to give the coating the desired texture.
- Formation of the drawing. The spatula is used to make movements on which the final texture of the surface depends. Using slight pressure with a spatula, make indentations of such a degree that a beautiful stencil pattern is obtained.
- Treat the completely dry surface with a finishing coat (toner, wax or paste).
Paint application technique
To achieve the desired result of wall finishing, it is necessary to follow a certain technology.
• Prepare the work surface to achieve perfect evenness and smoothness. For these purposes, it is recommended to use putty (starting and finishing) on a gypsum basis.
• After drying the walls, clean off excess putty with a special mesh.
• Treat the surfaces with a deep penetration primer in two layers. Instead of a second layer of primer, you can apply water-based paint to match the decorative coating.
• Applying the first layer of decorative paint with a roller. Using different techniques, surface texture is achieved.
• The second layer (composition with sand) must be applied with a brush. Without allowing the layer to dry, smooth the surface with a special tool (grater, spatula, trowel).
What effects can you create?
With the help of sand plaster, you can create various effects on the walls - they are obtained as a result of using various techniques when applying the composition to the wall.
- “Sand Dunes” effect. When applied in this way, a delicate shimmering picture is formed on the surface. A similar technique is used in ethnic styles using motifs from Morocco and oriental countries. The main feature here is the pronounced shimmer. The effect is achieved by using additional toners and special pearlescent pastes that increase the flicker of quartz particles.
- “Sand Wind” effect. This technique is also often called "sand whirlwinds" or "sandstorm". This coating is applied in large strokes in two layers. Each movement intersects with the next. Additional pastes can also be used here to increase shine and texture. After the surface has completely dried, it is sanded - this adds brightness to the applied composition.
- Shagreen skin effect. Here the second layer of coating must be applied using a special stencil. In order for the relief to be more noticeable, the surface should also be sanded after complete drying.
- Burlap effect. When applying the coating using this method, a stiff brush is used. Depending on the direction of movement, the texture and the resulting pattern change.
Application process
The most commonly used method for applying the mixture is called “Spraying”. It involves two layers of decorative sand plaster. In this case, the bottom one acts as a base, and the top layer provides a decorative effect.
For the simplest option, you will need a broom and a stick. The broom is lowered into a container with the prepared plaster solution, and then hits the stick so that the splashes hit the wall. Drops or flakes form on the surface, which creates relief.
Another application method is called the "Italian finish". It differs in that the second layer is applied immediately after the first, without waiting for it to dry. After all layers have completely dried, the surface is sanded.
Interior options
Ideas for interior design with this plaster finish:
- Terracotta effect of the fireplace area . The warmth of the fire is depicted over the entire height of the wall with tints in the texture of the finish.
- Bathroom decoration in a classic style . The calm, measured version of the interior looks chic and simple at the same time.
- Golden tone and forged stair elements . The sophistication and luxury of the texture is achieved due to the absence of bright and pretentious shades.
- Matte sand wall . Ideal in the living room, when decorating rooms in eco-style.
- Imitation of masonry from stone blocks . Country style will look great in a spacious hall or a spacious living room.
- The coating is characteristic and unambiguous - it is sand . The background in the interior here is created in pastel colors. Accessories and textiles, which are placed in the finishing area, play an important role.
We invite you to look at photos of interior options with decorative “sand” plaster.
Terracotta around the fireplace:
Decorative plaster “sand” in terracotta color in the interior:
Classic style bathroom:
Decorative plaster “matte sand wall in eco-style”:
Another interesting option for finishing with sand plaster:
What is decorative sand plaster: its composition
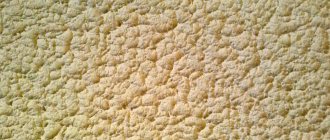
Sand plaster is a decorative finishing material to which sand is added. Finely crushed shells are used as filler. To achieve shine, pearl particles are added. There are two types of finishes:
- Mother of pearl – conveys a fabric texture reminiscent of silk and velvet. The shimmering finish is achieved by shimmering shells and mother-of-pearl particles.
- Matte surface – conveys the texture of sandstone. Unlike natural coating, it has a lower cost.
The decor is suitable for interior decoration. The surface retains its original color for a long time. For external use, it is necessary to additionally add protective impurities to the solution.
How to apply?
Despite the simplicity of the process, it is worth repeating the obvious truths once again, which will protect you from possible mistakes in the plastering process. There are really no difficulties during application, but careful preparation of the walls may come as a surprise to someone.
- First of all, the wall is thoroughly cleaned. In this case, even small contaminants should be removed, since they do not promote adhesion. To remove stains, special chemicals and industrial vacuum cleaners are used. If the base of the wall itself is cracked or looks loose, the damaged areas must be carefully cleaned.
- All significant surface irregularities are sealed with relatively inexpensive gypsum plaster (it is not recommended to use a cement-based analogue: it takes too long to dry). As an alternative, you can also use acrylic-based putty.
- For greater durability of the repair, the wall must be primed in two layers. What’s interesting: instead of a primer, you can use ordinary water-based paint, but then you will have to select the shade as accurately as possible so that it matches the subsequent finishing.
- The purchased mass must be prepared for application. Exactly how to do this will be written on the packaging. Usually the procedure is not complicated: the mass just needs to be thoroughly mixed, in some cases adding a little water.
- The plaster itself is usually applied to the wall using a stiff brush. If, when working with other types of finishing, a stable direction of movements is usually provided, then in this case, on the contrary, it is not welcome - the movements should be chaotic, since this allows you to create a complex and unpredictable pattern.
- The application of plaster usually occurs gradually, in pieces of 2-3 square meters, but the next piece must be started before the previous one is completely dry - this is the only way to hide the joints.
One layer of applied plaster is usually quite sufficient. The work will take at least a day to dry, but it is better to fully use the room only after a week, in order to eliminate the possibility of accidentally touching the under-dry surface.
Application methods
Before you start finishing the walls with “sand” plaster, you need to prepare and purchase (if something is missing) the necessary tools:
- Several spatulas of different sizes;
- Scraper;
- Half grater;
- Trowel;
- Construction mixer (can be replaced with a drill with a special attachment);
- Tray for the solution if application will be by roller;
- Brush and brush.
How to calculate material
In order to calculate the consumption of plaster with sand, you must first familiarize yourself with the manufacturer’s recommendations. So, for example, for the decorative coating “Dali Marrakesh” or “Optimist-Elite Karakum” the consumption is 1 kg per 3 sq.m when applied in two layers.
Application technique:
- To begin with, you should prepare the surface of the wall, removing all marks, dirt, stains and the like. At this stage, the main thing is to carefully inspect the wall for unevenness and cracks, because the plaster will not adhere to them. If there are any, delete them.
- The walls are primed with a deep penetration acrylic primer. This will strengthen the base and increase adhesion to the decorative layer.
- Depending on the desired effect, apply with a brush or roller. Movements can be chaotic or directed in one direction, the main thing is that the pattern over the entire area is similar.
- The sections need to be joined “wet”, i.e. do not wait for the previous one to dry.
- After 2-3 hours, the sand will set and will not stick to your hands. The finish will dry completely within a day.
Ready! Feel free to use the surface, and if done correctly, the finish will last in excellent condition for many years.
Interesting examples in the interior
- Designers quite often use decorative sand plaster in their projects. In the first photo, the fireplace area is finished with this coating. Terracotta colored plaster is used here. The warmth of the fire spreads to the entire height of the wall, shimmering in the texture of the finish. Such an element immediately becomes the main accent of the entire room.
- Sandstone plaster can even be used to decorate a bathtub. The result is quite interesting interiors in a classic style.
- The golden tone of the walls in combination with the forged elements of the staircase make the room elegant and luxurious. Such a room will not require additional bright accents.
- A matte sand wall would be appropriate in the interior of a living room decorated in eco-style.
- And walls decorated with “sand” plaster with imitation of masonry made of stone blocks will look good in a country-style room.
- A wall coated with “sand” plaster can also act as a background in the interior. To do this, use material in pastel shades. In this case, the accent in the interior should be highlighted with the help of accessories or textiles.
For the correct application of decorative plaster with the “sand wind” effect on the wall, see the following video.
Creating patterns
Although patterns in general seem intricate and unpredictable, professionals certainly know how to achieve a specific type of pattern. Those who want to make repairs themselves also have the right to know this.
Sand swirls on the wall are perhaps the most popular motif in modern renovations. To achieve this effect, you usually have to plaster the wall in two layers, of which the first is the main one, and the second is a decorative layer. “Storm” is created on the wall with wide cross-shaped strokes, and for greater spectacle it is recommended to choose plaster for these purposes in similar, but still slightly different tones. The dried surface must be sanded, otherwise the finish will look more like dirt than a work of art.
When executed correctly, this design will be a good addition to classic design styles.
Many people associate sand with the desert, so dunes created using decorative sand plaster are also in great demand. To create this effect, the plaster is applied in the same way as in any other case, but an additional step is required - opening the dried surface with a special pearlescent paste. This mixture increases the shine of the quartz particles in the plaster, making the wall seem truly made of sand.
There are no strict restrictions regarding the use of such an effect in the interior, but it would look especially impressive in combination with some ethno-style: primarily with the African or Mexican design of the entire room.
Finally, quite often customers, when choosing decorative “sand” plaster, want to end up with a wall that would resemble the alluvium of ordinary river sand. To create such a design, craftsmen usually resort to a fairly simple method: simply apply the mass to the wall in diagonal movements.
For a detailed master class on applying decorative plaster “Sand”, watch the video below.
Options for possible effects
Decorative plaster with sand allows you to create various effects using composition application methods. The following decorative effects are considered the most popular:
- dunes;
- vortices;
- rain;
- shagreen leather;
- sackcloth.
Each option requires certain tools and the selection of a special technology for applying the pattern.
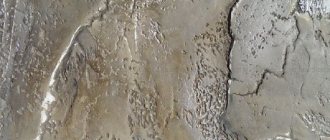
Dunes
The dune is associated with desert sands. This effect on the surface is created using a brush. The strokes are applied crosswise from one side to the other. The brush should be held at an angle, as when using a spatula. Before the entire surface dries, it should be checked for gaps and corrected in a timely manner. The dried plaster is shaded using a clean brush. For greater expressiveness, it is recommended to apply an additional layer of solution. It will increase the density of sand dunes.
Vortexes
Imitation of sand vortices is carried out according to a chaotic application scheme, combining cross movements with circular ones. The material must be dispersed over the entire wall area. At the same time, the brush should not be overloaded with the composition in order to avoid large “blunders”. After application with a clean brush, the decorative sandstone plaster is shaded in the same direction.
Rain
To create the “rain” effect, the pattern is applied evenly using a wide brush. Strokes are made in one direction: diagonally or perpendicular to the floor.
It is not recommended to cover small areas, as sand plaster dries quickly. If drying occurs before the next section is applied, seam joints may remain.
After the solution has dried, lightly brush it over the wall with a clean brush. This will not disrupt the drawing, but will eliminate any imperfections.
Shagreen leather
To imitate the snakeskin pattern on the surface, you will need a stencil. It is necessary to form an image on the second layer of plaster. To add realism and shine to the texture, the wall or ceiling should be carefully sanded. For this pattern, yellowish and brown shades of compositions are selected.
Sackcloth
To create a matte surface with a rough image of “threads” on the base, it is necessary to level the top layer using a short-bristled brush. To maintain this relief, it is recommended to treat the surface with wax.
Composition and effects
There are two main divisions of decorative plaster “sand” - matte and pearlescent. When walls are painted with mother-of-pearl coating, they acquire a silky and smooth feel. Thanks to the reflective particles in the pearlescent plaster, the finished walls shimmer in shades close to the base. The main reflective particles are crushed shells and various sparkles.
If you choose cheaper material, you can highlight brands such as Bayramix, Descartes, Elitas and others. And if a little more expensive, then “Veneziano”, “Baldini”, “Adicolor”. In terms of quality, one category is not much different from another; here everyone chooses according to their taste and composition.
Effects:
Sand dunes . Basically, this treatment is used if you want to depict a Moroccan or oriental style, since the wall turns out to be shimmering. As a rule, pearlescent paint is used in this technique.
Sandy winds . This effect is created due to the double layer of decorative plaster. The important thing here is to apply the layers in wide sweeping movements, crossing strokes with each other, drawing swirls. After drying, you should sand the surface so that the color becomes richer.
Pebbled leather effect . To create this effect, you need to resort to using a stencil (when you apply the second layer). Sanding is also recommended.
Burlap effect . You can achieve it by working with a small bristle brush. How much to manifest is up to you to choose.
What does it consist of?
The main feature of the composition of such plaster is inclusions of fine river sand. Other components are binders, a solvent, and various antiseptic additives to prevent the formation of mold and mildew.
For textural variety, along with quartz sand, mother-of-pearl chips, crushed shell rock or other minerals are added.
In appearance, plaster can be matte or pearlescent. The second group of compositions contains reflective particles, due to which, when rays hit at a certain angle, the surface acquires a pearlescent effect.
Plaster with sand: how to apply?
You can do the interior design yourself if you understand the technique of applying the material in advance. There is nothing difficult about this work. You just need to follow the technology, and then the decorative coating will last a long time.
First prepare the walls. The base for applying plaster must be smooth and clean. Therefore, remove the wallpaper, glue and paint, and fill the cracks and holes with putty. Before decorating, the walls must be primed. In this case, the plaster will adhere better, and it will also prevent the formation of mold.
In order for the plaster to adhere well, you need to carefully prepare the walls. They need to be cleaned, puttied and treated with a primer.
Then you need to dilute the dry mixture with water in a container, following the instructions written on the box. According to the technology, any plaster is applied in two layers. The first becomes the basis, and the second - the texture.
The resulting pattern depends on the application technique. The easiest way is to spray. You need to dip a stiff brush into the mixture, and then, at a short distance from the wall, hit the board with the bristles. Splashes will fly onto the surface, and after drying the desired pattern will appear. It is more difficult to work with a spatula. But without it, it will not be possible to create a surface with the “sand dune” or “wind” effect. Movements can be made in one direction or crosswise. The color of the walls can be made deeper and more complex. To do this, before applying the substance they need to be painted with colored acrylic. The color of the dye should be several tones darker than the plaster. For example, you can paint a wall light gray and cover it with a silver-effect material on top. Dense white paint will be combined with mother-of-pearl plaster, and deep yellow, brown or terracotta will be combined with golden plaster. In modern projects, unexpected combinations of colors are increasingly common. Sand plaster is used for walls, but this coating is not suitable for application to the ceiling.
Preparatory stage
Decorative plaster with a sand effect cannot be applied to old coatings or surfaces with defects. Regardless of the chosen application method, the wall must be pre-prepared.
To begin with, debris and dust are removed. Then all types of defects are eliminated: cracks, irregularities, chips. If it is necessary to eliminate stains, use chemicals or industrial vacuum cleaners. A loose wall should be cleaned to remove damaged areas. Irregularities are removed by applying gypsum plaster.
To improve the adhesion of the composition to the wall, the latter must be primed.
It is better to apply the primer in two layers. For this purpose, you can use not only a traditional solution, but also ordinary water-based paint.
It is necessary to prepare the purchased composition itself. This can be done according to the instructions. If it is missing, just mix the composition thoroughly by adding a little water.
Walls with decorative sand-like plaster in interior design
Decorative plaster with sand is suitable for any interior. The main thing is to choose the right drawing. In the hallway and corridor in the apartment, you can choose a light finishing material and make a classic spray. It will look more impressive than regular wallpaper.
Today, African interiors are incredibly popular. To create them, you simply need such plaster. For example, in the living room you can create imitation leather on one of the walls. African vases and masks against its background will look very impressive. It is also possible to decorate such an interior with plaster that imitates sand in the desert, on top of which you can hang photographs of African landscapes.
Plaster that imitates leather or cracked terracotta earth is ideal for an African interior.
Plaster with sand will fit into a rustic interior; it is also suitable for Provence. For such interiors, the structural material should not be too complex. It is desirable that there are no flickering particles in it. Choose plaster of sand, olive, beige, cream colors - they are ideal for these styles. Those who love a rich oriental style are advised to take a closer look at plaster with a large amount of quartz sand. Additionally, it must be treated with bronze, copper or gold paint. The corresponding accessories are also selected to match the color of the walls: pillows in golden pillowcases, candlesticks and gilded lamps.
Plaster with gold and bronze inclusions is ideal for creating classic interiors. It looks rich and presentable.
White plaster with a pearl tint is suitable for an office. This color will visually expand the space and make the interior more airy. Furniture made of wood, glass and plastic will look good against the background of light plaster. It is impossible to imagine an Italian-style interior without the use of Venetian plaster. It is suitable for both the living room and the bedroom. The material with this effect has a noble shine. It is noticeable only in certain lighting, thanks to which a chamber atmosphere is created in the room. Paintings in gold frames, crystal candlesticks, expensive wooden furniture and long-pile carpets will help complement the interior.
Plaster with sand is not suitable for all modern interior styles. For example, it will fit perfectly into a loft: using a gray substance you can create a cement “coat” on the walls. But such a finishing material is not suitable for Scandinavian interiors or high-tech rooms.
Decorative plaster with sand has several advantages over conventional wallpaper. With the right choice of pattern, it can be used to decorate interiors of different styles: from African and oriental to classic and rustic. Even a person without special training can cope with applying plaster to walls. And even if the mixture does not lie perfectly, it’s not scary. Flaws in the work can be passed off as a decorative technique.
Kinds
Shallow river
The plaster contains fine river sand . This allows you to make the surface unique, characterizing it with such qualities as:
- durability;
- environmental friendliness;
- natural effect;
- low price;
- versatility;
- beauty;
- moisture resistance.
Sand plaster is suitable for finishing all types of surfaces . It has good adhesion to:
- concrete;
- brick;
- tree;
- plasterboard.
It is not afraid of moisture and is not afraid of any temperature changes. Decorative materials can create unusual textures . Surfaces with this pattern are preferred because of its aesthetics and natural origin. Decorative plaster “sand” creates the same effect: such an interior certainly cannot be called boring.
Attention
Most often, sandy compounds are used to protect walls from mold and mildew. Under a layer of sand plaster, the wall breathes, so microorganisms and fungi cannot accumulate on it. It would be good if additional quartz was added to the mixture. This will give greater strength to the surface and will guarantee the absence of accumulation of microorganisms in the future.
There are many variations in color and coating pattern . In order for the desired effect to be achieved, all debris and dust must be thoroughly removed from the surface. If cracks, dents and unevenness are found on the wall, then the base is initially treated with a layer of simple plaster.
After the primary layer of material has dried, a thin layer of acrylic-based plaster is applied to it. Only after this is a deep penetration primer applied, and then all subsequent work begins to create a texture from the sand mixture.
Sand plasters are:
- With a pearlescent tint . Silk and a velvety base give this effect. The shimmer is obtained due to the addition of shells and shimmering particles to the composition.
- With a matte finish . Reminiscent of sandstone or natural stone. Decorative sand in this case perfectly imitates the natural origin of the finish.
Quartz
Plaster with the addition of quartz is distinguished by fine fractions of quartz sand. It is also similar in properties to sand, but has a difference. Quartz particles are more iridescent. The mixture with their addition turns out rich and shimmers beautifully. This moment may not always be suitable for purchasing the mixture. Some materials require a strictly matte base: for them, a sand mixture will be the best option.
Attention
Quartz composition is durable and strong. Plaster with the addition of such particles lasts quite a long time and does not deteriorate under the influence of the external environment. Such a mixture is not afraid of moisture or sudden temperature changes. Mold and mildew do not form on the surface or inside the wall. Quartz repels microorganisms and does not allow them to settle on the surface.
This decorative coating looks amazing in any residential or non-residential area. You can choose from different designs, shapes, and colors. You can decorate any area of the apartment with this coating. Plaster looks impressive in :
- bedroom;
- hall;
- living room;
- hallway
Many people use an interesting solution when updating the design in the kitchen area. Only in the bathroom it is not always possible to successfully create a composition due to the clumsiness and uniformity of the coating. But according to the tips of the masters, this zone can be given an extraordinary style.
Compound
The main substance in the material is stone dust . Other rocks are also suitable for making Venetian: granite, quartz, limestone, onyx. Grinding may vary. The smaller the crumb, the more graceful the drawing turns out. Larger particles leave a larger footprint. The surface on which plaster with coarse stone is applied is similar to cut stone.
slaked lime is used as a binder . The composition is also made from pure acrylates or mixed with lime.
Visually and in properties, an acrylic-based product does not differ from limestone. The acrylic mixture dries faster, but a more environmentally friendly option is lime.
A solution is made from stone flour and a binder and brought to the consistency of sour cream. Next, pigment is added to the mixture.
In ancient times, plants, earth and clay of different shades were used as dyes. In the production of modern finishing materials, synthetic pigments are used. Dyes are added at the stage of manufacturing the composition or cover the plastered surface.