After installing a window or entrance door, finishing of the slopes is also required to give the entire structure a finished, attractive look.
For this purpose the following can be used:
- drywall;
- plastic;
- MDF;
- plaster;
- laminate.
Laminate slopes on entrance doors and windows are not only beautiful, but in many cases it is not difficult to do the lining of the openings yourself.
Laminate parameters
The first step is to familiarize yourself with the characteristics of the material. Laminate is a sheet of wooden plywood with a decorative layer. The top layer is protective and is made from resin.
Laminate has long become popular in the design of slopes
Its characteristics directly depend on the type and quality of the laminate.
Even an inexperienced beginner can install slopes
This coating has gained immense popularity due to its durability. The material is used not only for finishing floors or other coverings, but also for door slopes. Its advantages include:
- Low cost. The products can be purchased at almost any hardware store at a low price.
- Attractive appearance. The coating harmonizes well with many styles.
- A large assortment. There are quite a few options for shades and textures. In addition, the material differs in strength class and, accordingly, cost.
- Easy installation. Even a beginner in the construction trade can install laminate slopes.
- Wear resistance. The coating is well protected from damage and has a long service life.
- Moisture protection. Thanks to the large number of layers, it can withstand water. The level of protection depends on the strength class.
A diagram of the layers of laminated coating can be seen below.
Mounting methods
Door or window openings are finished using one of the following methods:
- Glue. Installing laminate flooring using this method requires preliminary leveling of the base with plaster or plasterboard. To fix the material in the opening, polymer glue (for example, liquid nails) is used.
- On polyurethane foam (with low pressure during the polymerization process). In this case, there is no need to level the rough surface - the foam, expanding, will fill all existing unevenness.
- With the construction of the frame. Finishing is carried out without plastering the base. Simultaneously with laying the laminate, a layer of insulation is laid. The sheathing is done using wooden slats or metal profiles. The laminate is fixed with self-tapping screws and glue.
Strips of material are laid along or across the door (window) opening: in the case of horizontal installation, installation of laminate slope elements is carried out from the bottom up.
Methods of installation on door slopes
Installation on construction foam is convenient because you don’t have to worry about the panels fitting tightly on uneven slopes
There are many ways to attach this material to door slopes. The most popular and reliable of them are the following options:
- using glue. Here you will need to use liquid nails or adhesive mixtures. Before work, it is recommended to level the slopes using plaster or drywall;
- on polyurethane foam. The procedure is quite easy and somewhat reminiscent of the previous option. However, here no preliminary leveling is required, since all irregularities will be eliminated when the foam swells;
- on the frame. This method is the most difficult of all listed. However, at the same time you will receive a flat surface and an additional insulating layer. Fastening is done using nails or adhesive.
There are 2 ways to finish slopes using a laminated product:
- Vertical. The panels are connected along the narrow part and take on the appearance of a solid structure.
- Horizontal. In this case, installation is done from bottom to top. A frame is mainly used for these purposes.
How to make door slopes with your own hands
Today, the most popular are mainly three methods of installing laminate flooring on slopes, both door and window. Let's look at them in order:
- Using adhesives. Most often, either liquid nails or similar compositions are used. To avoid unnecessary problems, it is necessary to level the surface of the base of the slopes in advance, using either plasterboard sheets or plaster.
- With the construction of the frame. This method is quite labor-intensive, but allows you to obtain a smooth surface of the slopes without first leveling the base, and an insulating layer can also be laid at the same time. In this case, the laminate plates are fixed with nails or glue on a frame made of wooden blocks or plastic. The groove method can also be used.
- Using polyurethane foam. The simplest option available to anyone who wants to make laminate slopes with their own hands. It is a little similar to the first option, but simpler, since the elimination of irregularities occurs automatically due to the swelling of the foam.
In addition, laminate can be installed in all three cases discussed above:
- Vertical. Then the lamellas are connected to each other along the narrow part (although this is often not required if the laminate is wide enough).
- Horizontally. Individual short plates of material are connected to each other using locks, starting from the bottom to the top.
Preparation of the slope base
Before you start sealing the slopes with laminate with your own hands, you need to take care of the condition of the base surface. At the same time, the degree of necessary alignment of the side parts of the opening depends on which method of installation of the laminated material is chosen. It is recommended to first foam the gaps, lay insulation (if necessary), and then apply a special mesh and cover it with plaster. If you plan to putty or attach the laminate with glue, then it is necessary to additionally prime the base.
The next stage is marking the laminate and cutting it
The slopes should cover the wall at the opening without gaps. You need to start installation with a strip located across the door jamb in its upper part. After it is fixed, determine the length of the side slats. To cut laminate, it is better to use an electric jigsaw, but you can also use a hacksaw with fine teeth. You also cannot do without a square, a metal ruler and a tape measure. If you are afraid of making a mistake in the correct dimensions, you can make a template from some other available material, for example, gypsum board or cardboard.
Laminate installation
To do this work with their own hands, many choose to install slopes using polyurethane foam, since compared to other methods it is the simplest technology, so this particular method of installing laminate panels is discussed below.
Before you begin installing the slopes yourself, you must first define the boundaries of the limits in which the laminate will be located. Why do you need to install auxiliary strips around the perimeter of the door frame, which will limit the movement of the slats.
Preparing door slopes
Before proceeding with the installation procedure, you must first carefully prepare the surface. Depending on the installation method, it is necessary to align the sides and top of the doorway.
You can line the walls with plasterboard
If possible, it is recommended to seal all holes with foam and insulate the slopes.
If installation will be done using glue or putty, pre-treat the surface with a primer.
This will increase the level of adhesion, prevent the appearance of fungus, and also remove possible contaminants from the surface.
Start work from the top
Afterwards you need to mark and cut. Keep in mind that the slopes must be installed so that they completely cover the opening. First of all, they work with the threshold and only then move on to the upper part.
It is better to start all procedures from the upper transverse bar. After its installation, you can proceed to measuring the side sections.
It is recommended to cut the laminate using an electric jigsaw, this will prevent possible damage to the material. If you don't have a jigsaw, you can use a wood saw. To learn how to tidy up door slopes, watch this video:
The markings are applied after carefully taken measurements. If you doubt the calculations made, use a template made of other materials.
Installation of laminate slopes
Set the limiters
Finishing the slopes of the front door with laminate begins with marking the boundaries within which the work will be carried out. To do this, limiters are installed around the perimeter of the doorway.
After which, to facilitate work and increase strength, wooden planks are installed on each side. Their thickness should correspond to the distance from the slope to the coating.
Installation of slopes is carried out in the following order:
- First, the upper part of the structure is attached. After installation, you need to check whether the material interferes with the opening of the doors.
- Then foam is applied along the entire doorway.
- The foam is then applied to the inside of the laminate and the coating is applied to the slope. To improve adhesion, tape the area using masking tape.
- The final step will be to process the hole between the slope and the laminate using foam.
Do not apply a large amount of foam to the coating. It tends to increase in size, which can lead to displacement of the finish.
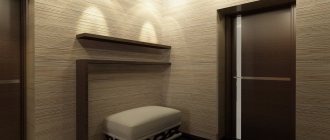
Simultaneously with the installation of slopes, decorative lighting can be installed
After this, you can proceed to the installation of the side sections. In this case, it is necessary to take into account the interlocking connection of the sections.
Measurements need to be taken only in the assembled state. To prevent the formation of gaps, we recommend removing the top layer and treating it with glue.
The installation procedure is completely identical to the upper section. Constantly monitor the level indicators not only while finishing the holes, but also while the coating is drying. As stated above, expansion of the foam may cause the finish to change location.
After the slopes for the entrance doors have dried and fixed their location, you can proceed to the final finishing.
To do this, you first need to carefully trim off the remaining polyurethane foam, and then treat the areas with plaster, which will significantly increase protection from external factors. For detailed instructions on finishing slopes, see this video:
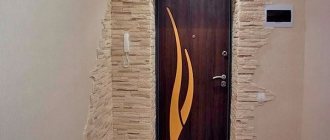
To hide the gaps, we recommend sticking a plastic corner of the same color as the coating. The final appearance of the door frame can be seen after installing the trim.
As you can see, laminate door slopes are a very good solution. You can create an attractive covering for the doorway yourself. Finishing with laminated material will provide quality and practicality at a low cost.
After the entrance doors are installed, the next step is finishing the slopes. It is best not to delay this, since unsealed slopes not only spoil the appearance of the hallway, but also dust and dirt are constantly getting into the apartment from them.
Modern materials make it possible to make door slopes using a variety of methods and materials. These are various plaster mixtures, decorative panels, glue and frame methods. This article will discuss in detail the technology of covering door slopes using laminate.
Distinctive features of slopes made of various materials
The oldest and most proven method of finishing indoor slopes is plastering them. Today, hardware stores are replete with a large variety of plaster mixtures. The main advantage of plaster is its low price and the possibility of applying any paint or finishing with other facing materials. But you shouldn't try to do it yourself if you've never plastered before. Before making a flat surface yourself, you need long-term training on less difficult areas, for example, on walls.
Choosing a laminate and finishing advantages
Laminate gradually ceased to be just a flooring material. Today it is successfully used for finishing walls and ceilings in various rooms. Also, the high performance properties of the laminated material are used for covering the bevels of the entrance door.
Advantages of using laminate
Finishing with lamellas has the following advantages:
- High wear resistance and strength of the material.
- Excellent resistance to external mechanical influence.
- Easy to care for: this finish simply needs to be wiped with a damp cloth to clean the surface from dust or dirt.
- A large selection of colors and textures, which makes it easy to choose slats of a suitable shade.
- Slopes finished with laminate have an attractive and neat appearance.
Material selection criteria
When choosing a laminate for covering the slopes of the front door, you can be guided by the following criteria:
- An important rule is the compatibility of flooring, doors and slopes.
- Contrasting shades are best avoided as they are often tasteless.
- When choosing an expensive wear-resistant and moisture-resistant laminate, you need to take into account that during its operation (15–20 years), the interior may change more than once.
- The plinth plays an important role in the interior. It should also be combined with the color of the flooring, the shade of the front door and the material of the slopes.
Advice! When laying laminate flooring, there are almost always quite a few pieces of varying lengths left. They can be used to cover door slopes. This will not only save on material, but is also a more profitable solution in terms of combining shades.
Making laminate slopes for entrance doors with your own hands: instructions and recommendations
After installing the front door, to complete the renovation, it is necessary to refine the doorway. Various materials can be used for this; laminate is one option. This material is excellent for these purposes, has a magnificent appearance, and besides, laminate slopes are easy to make with your own hands. There are several ways to perform such work, let's take a closer look at their features.
Laminate slope cladding technology
To make slopes, two methods of attaching lamellas are used:
- glue installation;
- installation on the lathing.
Let's look at both methods in more detail.
Glue mounting
This method includes three steps, which are described below. Preparation consists of carrying out the following work:
- The surface of the slopes must be cleaned of old plaster that does not adhere well or has defects.
- All debris and dust must be thoroughly removed. Brush the slopes with a broom.
- Then the surface near the door needs to be treated with a primer.
Plastering of slopes is done with cement mortar or special ready-made mixtures. It is necessary to carefully level the solution with a spatula or a special grater. In this case, it is necessary to monitor the vertical and horizontal plane. After the plaster has dried, it must be treated with a primer.
Installation of the lamellas begins after the primer layer has completely dried. For gluing, special synthetic glue or liquid nails are used. The following sequence must be observed when carrying out such work:
- From the selected material, slopes of the required size are cut out using a jigsaw.
- It is best if the slats are positioned horizontally. This will give a more logical and aesthetic look to the finish.
- Using a notched trowel, apply glue to the inside of the lamellas and to a section of the wall.
- After this, the lamella is pressed tightly to the surface.
- The remaining pieces are glued in the same way.
- The finishing of the slopes is completed by the installation of decorative corners and trims.
Advice! In order not to hold the boards for the required 10–15 minutes for the glue to set, you can use wooden blocks as spacers. It is very convenient to do this in a doorway.
Frame mounting
This method of covering the slopes of the front door allows you to do without plastering the walls. The preparatory stage consists of installing a wooden frame, which is done in the following sequence:
- Remains of polyurethane foam are removed along the contour of the door.
- Wooden blocks are installed vertically. Fastening to the base is done with dowels and self-tapping screws.
- In this case, it is necessary to maintain the general plane and maintain the vertical, which is controlled by the building level.
- If necessary, horizontal cross members are added to the structure, which will add additional rigidity to the structure.
Having assembled the frame, you can begin installing the laminate. Pre-prepared slats are attached in two ways:
- Using regular or decorative screws directly through the board. The hats are then closed with furniture plugs of a suitable color or special “nickels” with an adhesive backing.
- More complex, but not spoiling the appearance of the finish, is the method of using hidden clamps. To use them, you will have to trim the slats a little to ensure a tight connection between the locks. Here, of course, you will have to tinker, but the reward will be slopes without visible fasteners.
Advice! All decorative finishing elements: corners, platbands and baseboards are attached using silicone sealant. When installing such elements, you need to monitor the tightness of their fit to the surface and remove excess sealant.
Laminate door slopes can be easily installed with your own hands. This will require very few materials and time. This cladding will fit perfectly into the interior and will highlight the overall style. In addition to aesthetic appeal, slopes reliably protect against drafts entering the apartment from the front door.
Finishing slopes with laminate or panels
When thinking about how best to make slopes on the front door , using laminate seems like a great option. After all, you just need to install it correctly and no further finishing is needed. In fact, there are some difficulties depending on the laminate finishing method chosen. There are two ways:
Glue method
It is better to level the surface, but often, if the width of the laminate is sufficient for the slopes, then you can do without it. It is necessary to cut the plates of a suitable size and attach them to liquid nails or polyurethane foam. The laminate strips are joined lengthwise, fixed, and the space between the wall and the laminate is filled with polyurethane foam. The seams are treated with colorless silicone sealant. Platbands are installed.
Finishing entrance door slopes with laminate photo
Frame technology
It is good to use when they want to insulate door slopes. For this, insulation is used, for example, mineral wool, which is placed between the wall and the frame. In order to use the frame mount, you must complete the following sequence of steps:
- Carry out standard preparation of the slope and clear it of debris. The advantage of using a frame is that you don’t need to level the surface.
- Attach guides to the slopes. This can be a metal profile or a wooden beam. Use a level to make sure they are all at the same distance.
- Cut the material into pieces of the required size and begin attaching them to the frame using self-tapping screws or liquid nails.
Watch the video on how to properly make slopes on a laminate
Photos of work on installing laminated slopes on windows
To make laminated slopes from sandwich panels, we use environmentally friendly material - high-quality RENOLIT film. It covers the surface of the panel. Thanks to this, slopes of different colors and textures are obtained at the request of the customer. Our catalog contains a wide range of films in various shades of wood and simply colored ones; they will highlight your style and home comfort.
RENOLIT is a catalog of colors from which, instead of banal white, you can choose films of other shades. Laminated slopes are obtained by using a special type of decorative films on sandwich panels. They are used to cover the surfaces of PVC slopes.
Specialists use exclusively high-quality decorative films for lamination. Their excellent quality is confirmed by all certificates: conformity, hygiene, etc. The products fully meet not only domestic but also European standards.
Lamination color catalog
Golden oak 2178001 Bog oak 2052089 Dark oak 3149008 Light oak 3118076 Mahogany 2065021 Black cherry 3202001 Golden walnut 2178007 Bog oak2 3167004 Chocolate brown. 887505 Gray 715505 Balsamico Walnut F436-3042 Amaretto Cherry F436-3043 Pink Birch F436-3031 Two standard colors that are always in stock: Golden Oak and Mahogany.
Positive qualities of laminate
This material has become popular due to its technical characteristics:
- it is wear-resistant;
- is characterized by high strength;
- it is very easy to maintain: just wipe the surface with a slightly damp cloth;
- laminate is resistant to mechanical stress;
- Available in a variety of colors and shades: it can be easily matched to the existing interior;
- Laminate entrance door slopes always have a beautiful appearance and attract attention with their originality.
Laminate slopes to match the color of the canvas
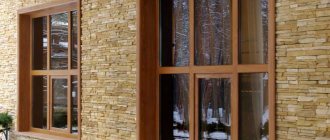
Why should you choose laminated slopes for PVC windows?
Plastic is the basis of modern double-glazed windows. For this reason, plastic finishing of openings looks most harmonious and appropriate. PVC panels are manufactured both in standard white color and, after applying a special laminating film, in a variety of shades. Laminated slopes for wood-effect windows are especially in demand, completely imitating the color and texture of natural wood.
The undoubted advantages of sandwich panels are:
- Reliability and practicality. Slopes made of plaster, drywall or natural wood, exposed to conditions of high humidity, can crack, delaminate, and grow mold or mildew. All components of PVC panels are resistant to moisture and microorganisms, so the flawless appearance of the windows is maintained for a long time;
- Tightness and sound insulation;
- Resistance to ultraviolet radiation, moisture, low temperatures and mechanical damage. Thanks to this, laminated slopes can be installed both indoors and outdoors. A window opening decorated in this way on both sides looks simply luxurious;
- Easy to install and cost effective.
Samples of films for lamination “RENOLIT STANDARD”
| PVC profile lamination color | Image | Catalog number |
| Dark brown - 851805 | RENOLIT 851805 | |
| Bog oak – 2052089 | RENOLIT 2052089 | |
| Mahogany - 2065021 | RENOLIT 2065021 | |
| Mahogany KBE - 2097013 | RENOLIT 2097013 | |
| Golden nut - 2178007 | RENOLIT 2178007 | |
| Rustic oak – 3149008 | RENOLIT 3149008 | |
| Light oak – 2052090 | RENOLIT 2052090 | |
| Mountain pine – 3069041 | RENOLIT 3069041 | |
| Golden Oak - 2178001 | RENOLIT 2178001 | |
| Striped Douglas - 3152009 | RENOLIT 3152009 | |
| Oregon - 1192001 | RENOLIT 1192001 | |
| Natural oak – 3118076 | RENOLIT 3118076 | |
| Light red - 305405 | RENOLIT 305405 | |
| Green moss – 600505 | RENOLIT 600505 | |
| Emerald green - 611005 | RENOLIT 611005 | |
| Dark blue - 515005 | RENOLIT 515005 | |
| Blue – 503005 | RENOLIT 503005 | |
| Gray - 715505 | RENOLIT 715505 |
All decorative films and coatings we use have passed the necessary quality certification.
Do you want the stylish windows of your dreams? Finishing wood-look slopes with laminated sandwich panels according to German quality standards!
Our “Stories” section is periodically updated with your stories about the work you have done yourself. Today there is another similar article sent by Gennady Ilyich Shapovalov from the city of Vladimir. It talks about self-installation of slopes on plastic windows.
When the idea arose to replace all wooden window units with plastic ones, I began calling companies capable of performing such work. As it turned out, this “pleasure” is not cheap - there was a catastrophic lack of finances. As a result, I agreed with friends who did this work much cheaper. Moreover, the low cost did not affect the quality of installation. However, the guys had little time, and therefore they did not have time to make the slopes.
I decided that I could handle this task myself and enthusiastically began searching for the necessary information. Frankly speaking, sometimes one text article contradicted another. I had to rely on ingenuity and intuition. And so that they don’t say anything similar about what I’m going to write about today, I’ll simply present to your judgment all the stages of the work I’ve done with a detailed photo report. If, from the point of view of professionals, something is wrong, please do not judge strictly. The work was done more on a whim than according to information collected on the Internet.
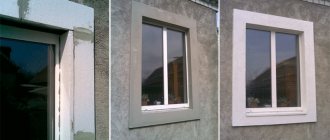
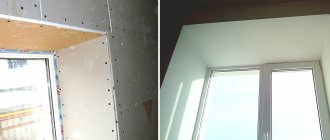
This is what the plastic windows looked like from the inside after installation
We continue the installation of plastic corners
Having secured the PVC profile to the top, you can move on to the side surfaces. Similar work is done here - measuring, cutting, fixing. The profile is not attached to the lower part of the frame; here the slope replaces the window sill.
When joining the corners, you should be extremely careful - the part that will be on top of the panels must be connected carefully. Many dock at an angle of 45º. I decided that it could be done at 90º. You will see the results of the work done at the end of the article.
The sides of the window block are measured similarly to the top part
Installing the strip across the window sill will also be a rather important task. Here it is better to cut the profile longer than necessary, and then, in place, adjust the size to the desired size. You should also pay special attention to the docking.
I can’t judge why it turned out this way, but due to incorrect cuts along the length and in the corner areas, the consumption of the corner turned out to be almost twice as much as necessary. Most likely, the lack of experience in producing such work played a cruel joke on me. Although, one cannot write off both inattention and the desire to do everything as quickly as possible. In any case, the result of my haste and inexperience was the overuse of the profile and an increase in time for installing internal plastic slopes on window blocks.
PVC profile section that requires the most attention when measuring
Measurements and adjustment of plastic panels
Having secured the plastic U-shaped profiles in their proper places, I began to work on the panels themselves. Here it is worth saying why PVC material was chosen rather than drywall. Despite the fact that gypsum boards are easier to install and cheaper, plastic panels attracted me precisely because of their appearance and the absence of the need for finishing. Well, I don’t like this “dirty” work with putty.
Another plus of plastic panels in an assortment of colors. The slopes can be made in any style and matched to the interior of the bedroom, living room or kitchen. This is quite difficult to do with gypsum boards.
I started (as in the case of profiles) from the top. Here it is important to measure the inner and outer sides along the length and width of the future slope. On the last point, I allowed a slight increase in the direction of increase - with the help of the same stationery knife, everything can be trimmed in place.
In the photo you can see how I “cut” the panel using a jigsaw. Surely everyone who is a little familiar with the work of such a tool is clear that it is impossible to work like that! For those who have not encountered a similar question, I will explain my mistake. It is better to place the panel on the same hard stool so that there is a support. This kind of work should not be done by weight.
Adjusting the panel to the size of the slope using a jigsaw is very simple
Installation of the upper slope and possible errors
It's quite strange that I got it right the first time. Although, when the panel was just pressed to the ceiling, a neighbor who came to visit said that such fixation was categorically unacceptable. The fact is that as an adhesive I used what was at hand, namely polyurethane foam. There was a lot of fun on his part and “predictions” that in an hour the panel would “open up”, however, they remained only in his imagination. Perhaps something similar would have happened, but the foam was pumped pointwise, in small quantities, and then the panel was tightly pressed to the concrete surface.
Pouring foam from a balloon between the panel and the concrete slope
In general, having installed one edge in the profile (fixed to the window), filled the space with mounting foam and fixed the outer edge with masking tape, the work continued.
The slope was tightly secured with tape to the top of the wall
The side slopes, resting on the window sill from below, were made in a similar way. After which you could rest a little with peace of mind, waiting for the polyurethane foam to dry completely.
What to do next
After preparing the laminate elements, we proceed to installation:
- We snap the tongue-and-groove lock and connect both cut parts together.
- To prevent the structure from falling apart, we stick a strip of masking tape along the seam on both sides.
- We try on the plank on the upper slope, marking the place of the cut.
- Use a jigsaw to saw off the excess (front edge).
- Immediately before fixing the laminate, we make small foam rollers - they will press the plank well from the inside, it will hold tighter.
- On the sides of the door we hammer a pair of nails on each side at the required height - you can put a strip on them and not hold it with your hands.
- We foam the free space between the laminate plank and the slope, but do not put a lot of foam - it can squeeze out the workpiece.
- We press the bar and fix it with masking tape in several places.
Installation of slopes
Main types of materials
PVC slopes on plastic windows
The finishing of doors, windows, loggias and balconies is carried out using different panel-type materials. The main types include:
- MDF panels.
- Plastic wall panels.
- Sandwich panels.
MDF is not often used for windows; as a rule, it is used to cover a door and is used as cladding. MDF panels have their own characteristics:
- Slopes require meticulous work. Moisture can get in through cracks and crevices, which means everything needs to be carefully sealed.
- The size of the panels is factory-made, due to which it will not be possible to use MDF everywhere. If the width of the slope is large, then MDF will do.
- Small selection of colors and textures.
- Plastic windows will not always be combined with MDF.
It is better to use the material by carefully considering the interior of the house. Goes well with wood or wood-look materials.
Advantages of PVC slopes
Plastic panels for slopes are the most popular choice of people. They have many advantages:
- The material is cheap compared to other types.
- Installation is simple, even without experience.
- The choice of colors is huge, so you can match any design inside or to match the facade of the house outside.
There are also difficulties during work:
- If the slope is more than 25 centimeters, then additional clamps are installed, otherwise the cladding will “walk”.
- It is recommended to use insulation, because insulation will not allow cold to pass into the house.
- Plastic panels are easy to damage.
Despite the disadvantages, plastic panels for slopes are an excellent option for window design. Cutting, installation and insulation are very simple, the appearance is decent. Slopes made of sandwich panels are a type of plastic material, but the characteristics of such raw materials are better, of course, this differs in the price of the product.
PVC sandwich panels for slopes
Sandwich panels for window slopes have their own characteristics:
- The product is made from two pieces of plastic, and there is already insulation between them. Due to this, there is no need to insulate the slopes.
- Installation work does not require large financial costs, the main thing is to calculate everything correctly and install the slopes carefully.
There is also a disadvantage of sandwich panels for slopes - if the window sealing is poor, moisture will begin to penetrate, the material will deteriorate and collapse, in other words, it will peel. You can also find other panel elements on sale:
- Natural wood is highly expensive and difficult to install.
- Composite panels based on gypsum, lined with PVC.
- Metal panels are used more often outside and require certain knowledge when installing slopes.
Although the materials are different, their installation instructions are almost always the same.