The used car market is booming like never before, and scammers are gaining ground. When purchasing a used car, you should be especially careful and research the product as thoroughly as possible. Many sellers claim that their car has factory paint and no putty. A device for measuring the thickness of a car's paintwork will help you realistically assess the condition of the body for the presence of additional coating above the metal layer. Using the device, it is easy to determine where the paint layer does not correspond to the factory thickness.
When buying a used car, many sellers claim that their car has factory paint and no putty. A device for measuring the thickness of a car's paintwork will help assess the condition of the body for damage to the paintwork, as well as additional coating above the metal layer.
Car paint thickness gauge
What the thickness gauge will show
Using a thickness gauge is simple: take a calibrated device and apply it to the car body at a right angle. It will immediately show the coating thickness in micrometers. One micrometer is one thousandth of a millimeter.
I applied the thickness gauge to the body of my car. Coating thickness - 117 microns. Everything is fine, my car was not painted (I already knew this, but for your use as an example)
The higher the value the thickness gauge shows, the larger the paint layer and the higher the likelihood that this car was repaired after an accident. Typically, the factory paint layer on steel parts of a car is no more than 200 microns.
Readings above 200 microns indicate repainting.
Readings of up to 300 microns occur if a cosmetic defect has been painted over on the car, for example a scratch from a key. This does not affect the safety of passengers in any way, but you can still bargain.
Readings closer to 1000 microns indicate that there is still putty under the paint. A body element with such indications was definitely severely deformed in an accident and was puttied during repairs. If the work is done poorly, the paint on the putty may crack and fall off over time.
More than 1000 microns is a sign of serious body repair, which means participation in a serious accident. It is better not to buy a machine with a coating layer of more than 1000 microns.
2000 microns is the maximum value that the thickness gauge can show. If the layer is thicker, the device will not show numbers. This means that there is a lot of putty at this point.
Check in advance what the factory paint thickness should be on the car model you are going to buy. This information can usually be easily googled using a query like “Mazda 3 paintwork thickness.” A small scatter of readings is acceptable, but not more than 60 microns.
There are comparative tables of normal coating thickness for different cars on the Internet.
How to use a paintwork thickness gauge?
Armed with the device, you approach the object of study and begin measurements.
Each part should be checked at least at three points. If part of the part is painted, then most likely a “small vital” defect was corrected. In this case, the excess will be 100-150 microns. If the entire part is repainted, the damage was serious. The presence of putty will greatly exceed the nominal thickness - more than 200 microns. In this case, we conclude that the car was repaired rather roughly.
When taking measurements using a thickness gauge, you should start with the roof.
If the element is completely painted, then something serious has happened to it. If part of the wing, part of the door or side panel is painted, do not be alarmed. We all get scratched in the parking lot from time to time.
“The fact is that the thickness of the paintwork there is closest to the factory state,” continues Evgeniy Gulevich. “The thickness that the device on the roof will show is what you should focus on further.”
And the roof can reveal terrible secrets. If the roof was painted, the car most likely tumbled. It’s worth taking a closer look at the ceiling in the cabin - if the paneling comes in waves or simply raises doubts about virginity, the verdict is the same - either a coup, or a strong blow that violated the geometry of the body, or maybe an icicle from the roof of the house conveyed greetings from the utility workers.
What functions does the paint coating perform?
Depending on the nature of the vehicle’s use, its paintwork can be applied according to various technological schemes. GOST 9825-73 gives an idea of this.
What does it mean about outside interference?
Why do you need to calibrate the coating thickness before testing. The calibration of coating thickness gauges will be affected by the type of material, shape, and surface finish of the metal substrate being tested. For example, the magnetic properties of steel alloys vary, and the electrical conductivity of various aluminum alloys and various non-ferrous metals, copper, brass, stainless steel, etc. also changes. These changes can affect the linearity of the coating thickness gauge. This means that the gauge setting on mild steel, for example, will be different from the same thick coating on high carbon steel.
For a modern passenger car, the paintwork performs two basic functions:
- Protective
– this is the main purpose of the body covering; - Aesthetic
- nominally this is a secondary aspect, but in practice it is often considered the main one.
Moreover, each layer of paintwork has its own responsibility:
Similar linearity effects occur on thin or curved substrates and in particular on profiled substrates such as blasted steel used for structural metalwork. To overcome these effects, most thickness gauges have features that allow you to fit the gauge to the job at hand, thereby maximizing the accuracy of the reading.
Adjustment of coating thickness. Adjustment is a method where you can adjust the thickness of the coating layer to suit the conditions that exist for the job. In addition to differences in materials, shape and surface finish, adjustments may be made at elevated temperatures or in the presence of a stray magnetic field. By adjusting the thickness of the coating layer under these prevailing conditions, the resulting errors are significantly reduced and even eliminated.
- Ground
– protective and adhesive function; - Enamel
– protective and color-forming function; - Varnish
– protective and tint-forming function.
The durability of the body and the entire car directly depends on the paintwork. This includes not only the correct selection of its system, but also the application technology - especially the preparation of the base.
How to determine damage using a thickness gauge?
The effect of surface roughness, particularly that produced by deliberate profiling of the substrate by sand or grit blasting or mechanical cleaning, is quite significant, to learn more. Using a coating thickness standard to calibrate coating thickness.
There are two main types of standard coating thicknesses, foil and pre-coated metal. For more information on coating thickness standards for thickness gauges. Magnetic meters do not require power. They are small, convenient and have many years of trouble-free use. Our tests are the result of many years of experience. While manufacturing these devices, our company uses the best quality materials to ensure that our products have a long life without any failure.
Here's what and in what proportion affects the lifespan of a car body:
- Preparing the foundation
– up to 70% responsibility; - Paintwork system
– 15% responsibility; - Application technology
– 10% responsibility; - Quality of materials
– 5% responsibility.
But despite the difference in numbers, all these parameters are important for paintwork. For example, incorrect selection of a coating system results in poor compatibility of its layers, which leads to premature cracking, blistering and peeling. Such defects stimulate corrosion and sharply reduce the life of the body.
We check if the car has been involved in an accident and if the paint is original. It is much easier to negotiate a higher price when we can state that the car has hidden body defects. The tester is shaped like a small pen. It is made of aluminum alloys and other high-quality materials that are resistant to normal mechanical factors, weather conditions and petroleum products.
Why does a variation in paintwork thickness occur within one car model?
Ideal for checking paint thickness on new and used vehicles.
- What elements have been replaced or varnished.
- Which elements were “dressed,” straightened, and then filled.
- They tell you the truth.
Layer thickness up to 70 microns - a thin layer of varnish.
Features of the paint layer at the factory - thickness and composition
Not all potential car buyers on the free market understand why there is such a stir around paintwork. Many brands of modern cars even indicate the exact thickness of the paintwork in the car documents. When choosing a used car with the right approach, it is necessary to examine the paintwork layer to check for its thickening in certain places. The thing is that the values from the table are of great importance for some reasons:
- Only high-quality components are used in the factory layer of paints and varnishes;
- the guarantee of the absence of putty gives hope for a long service life of metal body parts;
- with any car body repair, the quality of the paint will no longer be the same as it was at the factory;
- even budget brands try to do the painting as efficiently as possible to protect all parts;
- if the thickness of the paint layer is too small or too high, problems in car operation are guaranteed.
This is why you need a thickness table, which will help you find out the original parameters for each model. But the thickness of paint on cars must be assessed qualitatively. For this purpose, special equipment called a paint thickness gauge is used. With such a simple feature, you can examine the entire car and draw conclusions on the condition of the paintwork. To conduct such research, you do not need to be an expert in the field of auto enamel and painting processes.
How to determine damage using a thickness gauge?
It will not be difficult to conduct research on any brand of car using such a tool. You will need the original paint thickness on the car, which can be found in the table. Write down or remember this value. Then use the device to determine the paintwork indicators on all parts of the car. This procedure is carried out in a few minutes and does not require any special skills. But it is important to do everything accurately and without doubt.
The only caveat worth remembering here is the quality of the device. Sometimes the data from the table will not agree completely because the thickness gauge can be a little deceiving. If the deviation is within 10-15%, you can ignore such moments. But exceeding the permissible values by several times is a guarantee of poor-quality body repairs to the car. Most often, paintwork in such places can be visually distinguished from factory coatings.
Preparatory work
Using a thickness gauge is quite simple - you do not need to have the skills to use common hand tools. However, before checking the thickness of the paint on a car with a thickness gauge, the device needs preliminary adjustment, which in relation to most measuring instruments is called calibration. Note that some professional models are equipped with a self-calibration function - their configuration is not required before use. But since the bulk of thickness gauges are budget models, it is worth considering the calibration procedure in more detail.
The essence of the procedure is that the device that comes off the production line knows exactly the reference values of the measured quantities (after all, any measurement is a comparison of the measured quantity with the reference). Many instrumentation and control instruments are calibrated by specialized companies, but for thickness gauges this operation can be performed independently. For this purpose, several calibration plates are included in the delivery package. Usually one of them is metal, it is used as a substrate (base). The rest are dielectric, most often plastic, which will act as the measured paintwork. As a matter of fact, it is the last plates that are the reference ones. To simulate a body base, you can take any flat metal surface.
However, there are nuances here too, which we discussed above. Thus, some types of thickness gauges only work with body parts made of ferrous metals; for others, the type of metal surface is not particularly important. And this must be taken into account if you do not use factory plates. As for calibrator plates, since they are reference plates, you need to use only those that are supplied with the device itself. To be fair, we note that currently the de facto standard for reference wafer thickness is the same for all manufacturers and is 102 microns. If the kit includes plates with other thicknesses, they are used for more precise adjustment of the device, or rather, double-checking the calibration using a reference plate.
We will describe how to set up (calibrate) the thickness gauge yourself. To do this, you need to take two calibration plates that imitate the base and paintwork (if they are new, you need to remove the protective polyethylene film from them), and lay the plastic one on the metal one. Then you should turn on the device itself and reset its settings to factory settings. How it's done. Must be described in the instructions. Most budget models have a “0” key, which, when held while turning on the device or after, resets the current settings of the device to the factory settings.
The next step is to perform a test measurement on a reference sample. To do this, you need to press a special key, the designation of which may vary (most often the symbol “K” or the abbreviation “CAL”). If the thickness gauge is configured correctly, the error value will be zero. Otherwise, the device readings must be adjusted in accordance with the following instructions:
- using two other calibration keys designed to increase/decrease the displayed value, it is necessary to ensure that the reference value of the thickness of the top plate is displayed on the display (in our case it is 102 microns.);
- press the calibration key again;
- To double-check, we repeat the test measurement procedure until the instrument error is zero.
However, deviations from the standard not exceeding 3 microns are considered acceptable. If you are using a universal device, it is better not to limit yourself to calibration using a ferromagnetic substrate plate - the kit probably includes a non-ferrous metal plate, which is also used in the calibration procedure in the appropriate mode (nFe, that is, non-ferromagnetic material).
Preparing for measurement
Now the thickness of the paintwork can be set without problems, since the user knows the properties of the body and the device itself. Only before the measurement you need to carry out a preliminary preparation procedure.
Device calibration
The device for checking the thickness of the paint coating must be initially calibrated before measurement, this will help to obtain the most accurate readings. Today, many models are offered that can self-calibrate; if the user does not have one of these devices, this procedure must be carried out manually.
Initially, you should measure the reference value in a special mode, in which you manually specify the exact value in microns. For the task at hand, the kit includes several special plates made of plastic and metal. To speed up the procedure, you can measure only 1 plastic and 1 metal plate.
The selection of a control element can be carried out optionally from the factory design of the car. You can take any piece of the material being tested that the device works with. For the most accurate calibration, it is worth using several elements from different types of material with the smoothest possible surface.
For plastic elements, it is worth using standard plates; they are the reference ones. Almost always the kit includes a piece with a thickness of 102 micrometers, and sometimes several more samples are added.
Calibration of the ET11P thickness gauge
Calibration procedure
To determine the thickness of the paint, you first need to carry out calibration using prepared plates. If the measuring materials have a protective film, you need to remove it. The device is brought into the active position and immediately resets to the initial settings. Most often, to restore, you need to take a reference measurement of the plate and press the “0” button. It is better to clarify the reset procedure in the instructions.
The device for measuring paint thickness on the ET-111 car model works according to the described principle, but its trigger modification can only be reset when the device is turned off and the trigger is pressed with the “0” key.
During the test measurement, the screen will indicate whether there is an error. If the number “0” appears on the display, then the device does not need to be calibrated.
If different numbers appear, follow the instructions:
- A reference plastic part is placed on a metal plate, after which the thickness is measured.
- On the screen you need to press a key to enter the calibration mode; it can be designated “K”, “CAL”, etc.
- Using the arrows, set the value according to the reference plastic size - 102 microns.
- Now you need to exit the calibration mode by pressing the same “K” or “CAL” key.
- The device is calibrated and ready for use.
A device for measuring paint thickness on a car model ET-111
You can make sure that the calibration was successful by taking a second measurement; the value should not differ from the actual value by more than 2-3 microns.
The calibration process is carried out using a steel plate made of ferromagnetic composition. If the device is universal, then no further data adjustment is required. To perfectly set up the device, you should measure another material, preferably aluminum.
Paint thickness table
When the device is ready, it checks how thick the paint layer is on the car. After receiving the indicators, you should compare the data with the reference value table. If the thickness of the paint on a car is known, the table is the basis for comparing data.
You can determine what thickness of paint should be on a car using the table that is in the instructions or on the Internet. After this, it is worth comparing with the results and drawing a conclusion about the condition of the car.
The measurement accuracy will be guaranteed upon receipt of data from technical documentation. Even within the same model, periodic restyling is carried out, therefore, cars of different years of production may have different coating thicknesses.
Most automobile companies prefer to paint cars with a coating thickness of 70 to 150 microns. Most often, when taking measurements, results from 80 to 130 microns are obtained.
Paint thickness table
There are significant nuances in the procedure:
- The thickness of the coating may vary depending on the housing element. The size of the layer is influenced by the application technology and the properties of the paint coating. On almost all cars, the paint thickness in the center of the roof is slightly less than along the edges;
- despite the differences between individual sections, the symmetry of both sides must be observed;
- The layer thickness may vary even with factory paint, but the deviations are always within 50 microns - for both the minimum and maximum marks. Most often, the difference is 20–35 microns;
- internal staining is always significantly less than the outer layer, the difference reaches 40–60 microns.
If the buyer decides to choose a modern thickness gauge model, you can use a useful function - indicate the expected range of values. The function helps eliminate the risk of error in the event of hand shake or other negative factors.
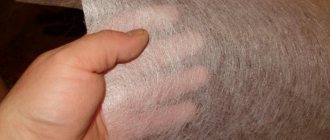
On average, the coating from the factory is approximately the thickness of a human hair. If the car has been restored, the indicator will differ significantly upward.
Measurement procedure
There is nothing complicated for the user in the measurement itself; professional skills are not required. Slight differences may occur between designs. Trigger options and individual pressure devices are somewhat outdated; they are activated without touching the surface. Newer models can turn on independently when touching a hard object.
Car paint thickness gauge
It is important to avoid directing the active sensor into a person’s eyes at a short distance.
The procedure has some subtleties:
- When turned on, the sensor should be firmly attached to the desired area. Accurate measurements of paint thickness will appear on the screen. If the trigger version is used, you must first press and release the trigger. Push models perform initiation on their own. It is important to ensure strong pressure and even contact with the enamel, making sure there are no distortions;
- the study can be carried out either point by point or by continuous measurement. In the second case, you need to hold the trigger and move it along the surface, the main thing is to ensure tight pressure. The device will change readings in appropriate places;
- To obtain data on the average size of the coating, you need to perform point-by-point replacements. All segments are measured separately;
- To study one element, you need to take 5 measurements: 4 of them in all corners and 1 in the center. The number of points may be significantly larger, but this is relevant when there is a suspicion of the presence of putty or a broken surface;
- at each point, 3 to 5 measurements are taken to obtain accurate indicators, each value is recorded on paper;
- all measurements of the point should be carried out at a short distance from the intended center, approximately within a radius of 10–20 cm. Using average indicators over the area, average data can be obtained;
- when 3–5 numbers are obtained, you need to determine the arithmetic mean. To calculate, add the values and divide them by the number of measurement procedures;
- after calculating the arithmetic average figures for all parts, you can determine the presence and level of discrepancies in comparison with the factory, tabular data;
- To calculate the coating thickness of the entire machine, you need to combine all the values for individual elements and again calculate the average value.
To study one element you need to take 5 measurements
What thickness values are considered a discrepancy with the factory ones?
It will not be difficult to determine the presence of putty or different paint based on all the listed data. When repainting, the values become 2 and sometimes 3 times higher.
To summarize, all deviations over 100 microns are guaranteed to indicate that the car was painted in a car repair shop, since factory coatings cannot have such a discrepancy. If the indicators are exceeded by 160 microns, one can judge the presence of a layer of putty.
Standard paint coating adds about 100 microns to the factory value. Therefore, when marks of 180–260 microns appear, we can guarantee that the part has been repainted or tinted. Above the specified marks, the surface was puttied. Sometimes the device does not provide correct data due to exceeding the microvalues, which indicates a thick layer of putty.
What is the thickness of the paint on cars in comparison?
As mentioned above, the paint thickness on modern cars is 120–150 microns. Of the total layer (primer + paint + varnish), the varnish is approximately 50 microns.
For comparison, note paper is no more than 76 microns (3 mil) thick. This means that the factory varnish on new cars is thinner than a piece of note paper.
A piece of note paper is thicker than a car's factory clearcoat layer.
The average credit card is about 635–890 microns (25–35 mil) thick (6–9 times thicker than paint).
The thickness of a sheet of carbon paper is about 70 microns (2.8 mil) (about ½ the thickness of paintwork) and is almost one and a half times thicker than the varnish on a car.
What is a thickness gauge
A thickness gauge is a device for measuring the thickness of a paint coating. Looks like a small box.
Some thickness gauges work at temperatures below zero, others do not. Some models measure aluminum parts, others only work on steel surfaces.
I recommend using professional thickness gauges - these are, for example, models Etari ET111, Etari ET11p, Autotest 112. You can buy one for 5000-7000 rubles.
But if you change your car every three years or less often and don’t plan to use a thickness gauge often, then there’s no point in buying one. You can just rent. It costs from 300 to 500 rubles per day.
Are you here
What should be the factory thickness of a car's paintwork? The table helps to quickly get an answer. For most vehicles this figure is 80-170 microns. The table was compiled taking into account measurements taken on 20 thousand different types of cars.
Paint thickness table
There is evidence according to which deviations in the thickness of the coating layer can be quickly identified. Below is a table with information on the main car brands:
| Car make | Paint thickness, microns |
| Audi A series | 80-100 |
| Audi Q series | 110-165 |
| BMW | 90-110 |
| Cadillac Escalade, CTS | 120-150 |
| Chery | 100-120 |
| Citroen | 75-125 |
| Citroen DS4 | 205-230 |
| Daewoo | 90-120 |
| Fiat | 100-140 |
| Ford | 115-145 |
| Hyundai | 70-130 |
| Honda | 80-130 |
| KIA | 100-140 |
| Lexus | 140-150 |
| Mazda | 85-130 |
| Mercedes | 165-180 |
| Mitsubishi Lancer, Pajero | 90-125 |
| Mitsubishi L200, Outlander XL, ASX | 55-75 |
| Nissan | 80-120 |
| Nissan Almera, Teana | 130-150 |
| Opel | 110-160 |
| Peugeot | 100-20 |
| Renault | 100-140 |
| Subaru | 100-140 |
| Toyota LC200, Camry, Highlander, Auris, Vers | 110-130 |
| Toyota Avensis, Corolla, Prado, Prius, RAV4 | 80-110 |
| Volkswagen | 110-140 |
| Lada Kalina, Priora | 60-100 |
| Lada Granta, Niva | 110-140 |
| Lada Largus | 180-230 |
Useful tips
- Completely undamaged cars older than two years are very rare in practice, so do not take the found areas of repaired defects or repaired damage to heart - this is a completely normal condition for used cars.
- Due to minor hidden damage, you should not refuse a nice option - it is more profitable to reduce the price in an auction. But if the front part of the vehicle has undergone a major overhaul, then this is serious.
- Found extensive damage to the roof of a car may be the result of an emergency “barrel”, and an upside-down car always has a broken geometry, keep this in mind.
- Measurements should be taken after the owner tells you about the condition of the car, and not before that moment. If the information you hear begins to be confirmed during the inspection, then you are in luck - the seller is a relatively honest person. But this advice is relevant for cars only after one or two owners.
In conclusion, I suggest you watch two interesting videos about the factory painting technology of a famous domestic and equally famous foreign car brand.
How to check a car with a thickness gauge
When buying a used car, it is important to know whether it has been in an accident before. Often sellers, especially resellers, in order to get maximum profit, try to hide the fact of an accident with the help of cosmetic repairs. At first glance, the vehicle looks like new, but serious damage may be hidden behind its presentable appearance. In many cases, in order to reveal the deception, it is enough to check the machine with a thickness gauge.
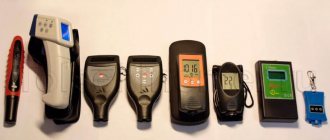
Types of thickness gauges
Today, there are several types of this device on the market with very different operating principles, but the most common among car enthusiasts are ultrasonic, magnetic, electromagnetic and eddy current thickness gauges. Their prices and capabilities, of course, differ from each other, so we will consider each type and its specialization separately.
Ultrasonic thickness gauge
Ultrasonic thickness gauges. They are a universal solution for checking paintwork with a thickness gauge: such a paint thickness gauge works equally well not only on metal surfaces, but also on composite materials, ceramics and plastic, which provides wide possibilities for use: you can qualitatively check the paintwork with an ultrasonic thickness gauge not only on the body , but also on a decorative component of the car, for example on a plastic bumper or carbon insert. The only negative is the price. The cost of the simplest ultrasonic thickness gauge for car paint coatings starts at 10,000 rubles. However, such a device is considered professional, not aimed at the average buyer, so this drawback can be said to be far-fetched.
The simplest and most inaccurate magnetic thickness gauge
Magnetic thickness gauges. They work according to the following principle: the device contains a magnet connected to an arrow pointer. All you have to do is apply the thickness gauge to the car body: the thinner the paint layer on the car, the stronger the attraction of the magnet to the body, the more the needle will deviate. Accordingly, the smaller the angle of inclination of the arrow, the thicker the level of coating on the body, which should alert you. The advantages of thickness gauges with a magnet include ease of operation, no need for batteries and a low price - the cheapest such unit costs about 450 rubles. However, such thickness gauges also have disadvantages. The most serious: low accuracy of readings. These devices show more or less correct results if the coating layer does not exceed 1.5 millimeters.
Electromagnetic thickness gauge CHY 113
Electromagnetic paint thickness gauges. They are considered the most reliable and practical devices, since they produce the most accurate results, and the cost does not exceed 3,000 rubles. Unfortunately, there are also disadvantages. Checking the paintwork with an electromagnetic thickness gauge only makes sense on surfaces containing iron. Such a unit, as they say, will not handle plastics and non-ferrous metals - remember this when purchasing.
Eddy current thickness gauge Et 11S
Eddy current thickness gauges. Its “trick” is the ability to estimate the thickness of the applied coating on any metal, and it also produces the most accurate measurement results. The disadvantages of such devices include the dependence of measurements on the conductivity of the metal whose coating thickness you are measuring. That is, when working with copper, aluminum and other metals with good current conductivity, the measurement results will always be accurate. But using a paint thickness gauge on, for example, iron, errors will appear in the measurements, sometimes very serious. An eddy current automotive thickness gauge costs around 5,500 rubles.
Which paint thickness gauge should I use?
Now you can buy a great variety of devices that differ in operating principle and price: ultrasonic, magnetic, electromagnetic, eddy current. The Internet will tell you that magnetic is the simplest and most inaccurate, and eddy current is the most reliable and accurate, but “does not see” painted plastic surfaces, and so on. The main thing to understand is that it doesn’t matter which thickness gauge you use.
“Any of them is capable of showing a deviation of 50-100 microns, and this is quite enough to understand what was done to the car,” Evgeniy Gulevich .
How to calibrate a thickness gauge
To give accurate results, the thickness gauge must be calibrated. Calibration gets lost due to temperature changes or if the battery runs out.
To calibrate the thickness gauge, metal plates are used, which are sold with it. If you rent an instrument, ask the owner to calibrate it in front of you and provide you with rental calibration plates just in case.
The calibration plates look like this:
My thickness gauge has two gauge plates because it works on both steel and aluminum parts. The device must be calibrated separately for steel and aluminum. If the thickness gauge only works on one metal, there will be one plate.
The kit usually includes a special calibration film, which is used for adjustment.
The calibration process is simple - place the thickness gauge on the plate and reset the readings to zero:
We apply the calibration film to the plate and place the device on top:
The thickness gauge should show the numbers printed on the film. If this does not happen, repeat the procedure.
Proper Use of a Thickness Gauge
Before starting work, you should check whether the battery is sufficiently charged (the charge level should be at least 60-70%). Otherwise, the measurement may be incorrect. The surface for measurement must be cleaned of visible dirt, grease, and other stains.
How to check paint thickness? Working with the device is very simple. It needs to be started (turned on), after activating the display, apply the sensitive element to the target area. Usually they choose a dubious one, which even outwardly seems suspicious. In other cases, you should apply the device to any point on every part of the car.
It is best to use the “square-nest” method. To do this, the body is mentally divided into squares with sides of 25-35 cm, then each square is checked in 1-2 places. The method is painstaking and will take up to 1-2 hours, but it is very reliable. If you need to act quickly, use a different method. A cross is mentally drawn on each part, then measurements are taken at its extreme points and in the center. In each place you should hold the device for a few seconds - as written in the instructions for the thickness gauge. After the data is reflected, it is reset or fixed, and a new measurement is taken.
Priority check of certain parts
Experts advise starting the inspection from the roof. It is rarely painted, since this element of the car is almost never involved in accidents. The paintwork layer here will become the standard - from it you can determine what the thickness should be in other places of the body. Factory indicators in other zones are always a little higher, as provided by the technology (but not by much).
Next, the check procedure will be as follows:
- racks;
- front and rear bumpers;
- body sills;
- doors.
It is also worth checking the interior, trunk, space under the hood, and the gas tank flap. Suspicious areas are measured several times - in the center and periphery. Differences of more than 35-55 microns are considered a defect; this is not factory painting.
The thickness gauge is not a guarantee
After a moderate accident, the car can be equipped with attached used parts from other cars. If during repairs the technicians find spare parts of the required color in the original color, the thickness gauge will show standard values on the external elements.
Therefore, the indicators of a thickness gauge alone are not enough
When inspecting, you need to pay attention to the gaps between body panels, the condition of the bolts, the year of manufacture of the glass and a lot of other parameters
If you don't want to figure it all out, turn to the selection experts.
Why check paint thickness at all?
The thickness of the paint coating (LPC) determines whether the car body has been repainted or repaired after an accident. This means that it is possible to determine whether there were any accidents at all.
A car is painted in two cases:
- For cosmetic purposes - due to a scratch or minor accident.
- After a serious accident.
Not only a used car, but also a new one can be tinted. If you are not an expert, it is difficult to determine by eye whether a car is painted: with careful repairs, the coating cannot be distinguished. Therefore, you need to measure it with a thickness gauge.
You can still buy a car after cosmetic painting, for example with a repainted wing, even if the thickness gauge shows deviations from the norm. But deviations are a reason for bargaining.
If the car was in a serious accident in which the body structure was damaged, then it is not a car, but junk on wheels. Being in such a car is life-threatening: you never know what kind of damage remains in the body, what could come off or jam, and in the event of an accident there is generally a huge risk. You can buy such a car only for spare parts.
It is important to understand the reason for the painting and exclude a serious accident. Ask to dictate the car's VIN - identification number - and check the car's history on the traffic police website
If the car is from Moscow, additionally check it with the Autocode service. This way you will find out whether the car was in an accident and in what circumstances. It's free.
If the seller refuses to name the wine, do not buy the car. Most likely, they are trying to cruelly deceive you.
Why is the paintwork on modern cars so thin?
Modern paintwork is thin for various reasons. One of them is economic. Manufacturers do not want to waste more paint and varnish than required. The layer is made thick enough to protect the body and thin enough to reduce the cost of production.
Little paint and varnish is also applied due to the reduction of environmental pollution. In addition, many factories now use water-soluble paints, which are capable of applying more pigment in one layer than conventional paints. Conventional paints require 4-6 thin coats with drying in between. Modern water-soluble paints require 2-3 base coats. The number of layers of base coat paint does not affect the overall quality of the coating. As a result, the overall production time of the vehicle is reduced.
Essence of the question
The same situation can happen when you start looking for an expensive model in the lower price range on the used market. A list of the best options for used cars under 400,000 rubles can help to some extent, but not in assessing the condition of the body and its coating.
A separate group of buyers can be identified as those who want a certain car due to some kind of attachment, for example, BMW. Here you will have to keep your eyes open, because crime, corrosion, and multiple repairs are possible. Examination of the paint layer can tell the future owner a lot:
- Was the car involved in the accident?
- What kind of damage did you receive in the accident?
- How were the body or coating defects eliminated?
- How much can you reduce the price of a car when bargaining?
ICE and electric motor
The main difference between electric motors and internal combustion engines is the thrust characteristics. This characteristic describes how power and torque change depending on the speed. In the case of electric motors, the torque is available immediately, and as the speed increases, the torque will fall.
This characteristic is more suitable for a car - at the moment of starting movement and during acceleration, when you need to put a lot of effort into overcoming inertia, it is better to have a large torque. In order to move further evenly, much less effort is required. The power of electric motors in any rotor speed range is close to maximum, and in any mode it is realized and used almost completely. Therefore, electric motors are more suitable for use as a vehicle propulsion system. In internal combustion engines everything is a little different. When the crankshaft speed is low, the power is also low. The torque remains virtually unchanged.
If the resistance to movement increases and the speed begins to decrease, the electric motor will increase the torque. In the case of an internal combustion engine, the torque will increase only slightly and then decrease.
The traction performance of an internal combustion engine is considered completely unsatisfactory. But even now, in terms of efficiency, overall dimensions, and other qualities, they are significantly superior to modern electric power units. Based on these considerations, engineers accepted the shortcoming of the internal combustion engine and created a gearbox to solve this problem. Its purpose is to change the gear ratio between the crankshaft and the drive pair of wheels. As a result, maximum torque is available in a narrow range of optimal speeds, but in different gears. This makes the engine run more efficiently.