Today, when building a new house, there are no difficulties with facade cladding, because there is a huge range of finishing materials on the market. Nevertheless, when choosing a finish, owners of private houses and cottages pay attention not only to its appearance, but also to the technical characteristics and, of course, to the cost.
The situation is similar with the owners of old houses built several decades ago from wooden beams or logs. To update a dilapidated facade, give it beauty, durability and at the same time fit into a modest budget - people choose siding. However, when finishing a wooden house using this method, some nuances arise. This will be discussed below.
Which siding is best for cladding a log house?
There is no clear answer here. Most often, vinyl or metal siding is used for these purposes.
As you can see, vinyl siding is superior to metal siding in a number of respects - it is easier to work with and cheaper in price. However, the service life of vinyl material is still shorter, that is, it is less durable.
As for the cost of finishing work, they average a fourth or third of the cost of the siding itself. And this does not take into account preliminary work. We conclude: if you cover your house with siding yourself, you can save a lot.
Materials for insulating external walls under siding
Types of insulation:
- Mineral wool insulation. They are made from metallurgical waste, silicates and other rocks. The thermal conductivity of the material is 0.042 W/m*K. Mineral wool has good fire-fighting properties. The main disadvantage is the high water absorption coefficient (about 70%).
- EPPS (extruded polystyrene foam). Low thermal conductivity (0.03 W/m*K); water absorption does not exceed 2%; ease of installation. These advantages and the high density of the material (up to 40 kg/cub.m) provide it with high thermal insulation properties. A significant drawback is the high degree of flammability.
- Expanded polystyrene is suitable for insulating foundations and rooms with high humidity.
- Styrofoam. It has a low level of thermal conductivity (0.035 W/m*K) and water absorption. The material contains many gas bubbles. The buyer can choose slabs of different thicknesses and densities. The disadvantage of polystyrene foam is that rodents love it.
- Polyurethane foam. It is obtained by mixing two substances - a polyol and an isocyanate. Low thermal conductivity, good noise insulation, high density, low degree of water absorption. It does not lend itself to mold, rot, and does not harbor rodents or insects. Its disadvantages: it is destroyed under the influence of UV; When attaching siding, the integrity of the layer is compromised, and this reduces the effectiveness of the material.
The first two types of insulation have better sound-insulating properties than polystyrene foam and polystyrene foam, but at the slightest wetness they lose their thermal insulation properties. Therefore, it is better to install mineral wool with special membranes. Foam and EPS may require additional sound insulation during installation.
When choosing between rolled and slab materials, the following should be taken into account: rolled mineral wool serves more effectively on horizontal surfaces, does not fit well at joints, and to prevent the dew point from being in the room, the material must be laid in two layers. Slab insulation does not have such disadvantages, so it is more often used for wall insulation.
The environmental friendliness of the material plays an important role. Here the winners are basalt insulation, polystyrene foam and polyurethane foam.
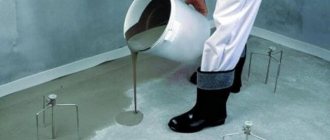
Preparing the wall surface
Siding is installed only on the sheathing, so it is important to mark the walls correctly so that the sheathing does not turn out skewed. Wooden houses suffer from moisture much more than brick ones, so their protection must be thorough. Damp logs dry out greatly, so you need to regularly treat them with an antiseptic composition. This treatment protects the log house from dampness and from insect pests that live in the wood and destroy it from the inside.
On a note! Unlike walls made of concrete and brick, wooden walls are not plastered with cement mortar. They are caulked using tow, jute or sealant - covering cracks, irregularities and other defects.
Before starting work, remove trim, shutters, drainage elements and other parts that may interfere with the quality of the walls. It seems easier to level walls made of flat boards than walls made of logs, but this opinion is wrong. In reality, round logs only need to be caulked and a heat and vapor barrier layer installed - so there is nothing complicated here.
Sheathing over lining
In certain cases, new panels can be installed on old panels, but only if they are in good condition. There are also other important factors to consider. For example, the entire lining must be very strong so that the elements attached to it are not blown off by the wind. Insulation in this case is not used, since a large layer remains. It is not necessary to cover the lining with membranes - you will get a double ventilation gap, which ensures good air movement. Protection from moisture of the lining is provided by waterproofing, but only if there is an air gap between the wall and the old finishing material. If it is not there, then it is necessary to use a vapor-permeable membrane.
If there is any doubt, then siding on a wooden house over the old sheathing is not carried out. It is necessary to carefully inspect the material for the presence of rot or poor strength. You should not leave the old coating if it is deformed, unevenly laid, or there is no ventilation gap.
Thermal insulation
When the walls are caulked, you can proceed to installing a thermal insulation layer. Do it like this:
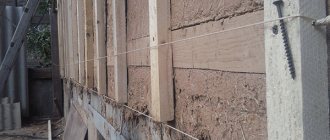
- A sheathing is made, which in this case will also serve as the basis for laying the heat insulator. To do this, take slats or blocks of wood measuring 4x4 cm and install them on prepared walls, the distance between adjacent slats is 25-30 cm. The bars must first be impregnated with an antiseptic.
- Insulation is placed on the finished sheathing, directly into the formed cells. It is usually used as mineral wool, glass wool or slab foam. When choosing insulation, take into account its density coefficient - it should be at least 35 kg per cubic meter. Moreover, the higher the building, the greater the density of the thermal insulation should be.
- A layer of vapor barrier is placed on top of the insulation, which prevents condensation from settling on the walls and destroying them. To make a vapor barrier layer, a special membrane film with micropores is suitable, through which excess moisture will escape from inside the structure. The film is attached to the sheathing with a stapler.
At this point the preparatory stage ends - you can begin cladding the facade.
Arrangement of vapor barrier and frame construction
Before you begin constructing the sheathing, you need to attach a vapor barrier membrane to the walls, this is especially important if the house is wooden or frame. The film strips are placed overlapping and taped to make the joints airtight. It is advisable to cover the joints of the walls (corners) in solid pieces.
Important! The vapor barrier membrane is attached exclusively with its rough surface to the wall. Otherwise, it will not perform its function.
Next, you can begin constructing the sheathing, which is simply necessary to attach the siding and ensure mandatory ventilation. It can be assembled either from wooden blocks or from a metal profile.
Siding a wooden house: sequence of work
The siding installation process is divided into the following stages: marking walls for fastening profiles, door and window openings, installing sheathing and installing panels on it.
- Marking. Having retreated 5 cm from the foundation of the building, nails are driven in and a nylon cord is pulled over them. In this case, you must strictly ensure that the cord runs parallel to the walls. Then the first profiles are fixed at the level of the cord with a gap of about 0.5 mm from each other.
- Installation of planks. Door and window openings are trimmed with slats, and in the corners they use a separate type of slats - corner ones. When they meet, the top bar should overlap the bottom bar by about 2 or 2.5 centimeters. And the gap between the solid part of the bar should be at least 0.5 mm.
- Siding installation. Siding panels are usually installed after the window and door openings are completely processed. The first panel is inserted into the fixed starting profile and secured with self-tapping screws. The second panel is laid with an overlap - by 1 - 1.5 cm. To more accurately adjust the length and thickness of the panels, they are cut using a sharp knife or a hacksaw.
Material selection
The correct choice of material will affect the entire structure as a whole.
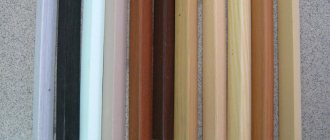
Siding is produced in different colors and textures. It is necessary to familiarize yourself with information about it, study information about its invoice.
To begin with, before selecting it, you should decide on the final look and color of the future home. A combined selection of textures and colors is possible. Then select siding in accordance with the planned result.
Manufacturing enterprises produce several types of siding ranging from 2.5 m to 4 m in length.
Plastic
- Advantages: the most accessible inexpensive type of finishing , light weight.
- Disadvantages: susceptible to mechanical damage.
Metal
- Advantages: Durable, long service life. It is recommended to purchase from authorized dealers, who guarantee long-term absence of corrosion.
- Disadvantages: Requires periodic rust protection.
Wood
- Advantages: complements the properties of the original wall material. Environmentally friendly cladding.
- Disadvantages: increased price.
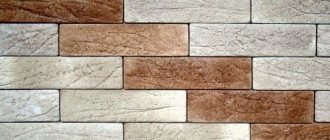
Fiber cement
- Advantages: non-flammable, highly durable. Diverse in color, style, texture.
- Disadvantages: heavy, difficult to install.
Next you need to select the sheathing. The lathing is divided into 2 types:
- metal galvanized, not subject to temperature changes 50×50, 60×27;
- Wooden.
A metal profile is most suitable for surfaces with uneven surfaces. It is strong enough to support the weight of any type of decorative cladding.
Metal profiles with different sections are selected.
Costs will be reduced when using a wooden frame, since there is no need to create protection for the section of the wall at the line of contact with the sheathing.
The wooden frame must meet the following criteria:
- no delamination;
- no deformation;
- no signs of rot or stains.
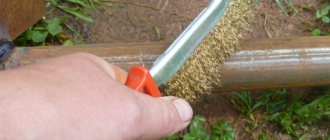
Before installation, the frame must be impregnated with antiseptics and fire retardants to create a protective fireproof layer, a coating against fungus or mold.
Bars of size 40×40, 50×50 or 50×80 mm are selected. When doing the work yourself, you should first study as much information as possible on this topic.
Several recommendations for covering a wooden house with siding
To correctly purchase the number of panels, you need to make the calculations correctly. Let's assume you can determine the area of all the walls that will be sheathed and divide the result by the area of one siding panel. This way you will know how many panels will be needed for the job.
- Since window and door openings are not lined, their area can be subtracted from the total area of the walls, and then added to the result by 7-8% in reserve.
- In addition to the number of panels, you also need to determine the number of profiles - starting strips. Typically, this is done by dividing the total area of the house by the length of one plank.
- Don’t forget about finishing window and door openings - you can calculate the number of planks that will be needed for this in the same way as for the building itself.
- When the walls are sheathed, begin processing the corners and joints. Decorative details are well suited for these purposes and will give the cladding a finished look.
It is not difficult to cover a wooden house with siding if you follow the technological process.
This method of cladding will solve several problems at once - it will make the facade beautiful, warm and durable. We will be glad if this information will help you cope with the finishing of your home perfectly. Return to list
Siding elements
Drainage
This element serves to protect the base and foundation of the building from moisture. It is a painted metal corner. Drainage drains are leveled along the entire perimeter of the building. Insulation and siding of a house should begin with drainage.
Then the initial or starting rail is attached to them. The rigid design of the drain allows it to be set strictly at level, which simplifies the installation of the soft starting rail.
Starting rail
This rail is attached directly to the drainage system while maintaining the level. This is where siding installation begins. The lower starting level is corrected by releasing the sheathing to the required level if the walls have a slope.
The siding panel is inserted into the starting rail until it clicks. After installing all the elements, install the panels from below into the lock, also until they click. On a blank wall, the panels are stacked up to the roof, and on a wall with windows – up to the bottom of the window.
Siding corners
The siding must be closed on the sides and ends of the building. To protect against side winds and water, wide siding angles are used. To properly install the sheathing, you need to attach the corner of the siding to the wall surface and make the necessary notches. The panels extend into the corners by 10 mm and should not rest against its walls.
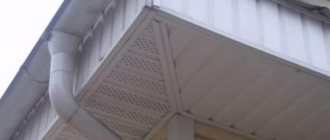
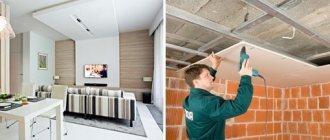
Soffit
A soffit is needed for lining the roof overhangs from below. The difference between soffits and panels is that soffits have perforations for natural ventilation. The fastening technology is the same as for all elements, only the edges of the spotlights are inserted into the J-rail.
Fastening the panels after installing all the elements will not be difficult. This is easy and simple to do, just like insulating plastic windows or insulating a loggia.
Insulation of the house followed by cladding with siding panels
Completion of finishing
How to properly sheathe a building under a roof? You need to follow this algorithm:
- Measure the distance between the bottom of the finish strip lock and the penultimate siding panel. From this distance, subtract 1-2 mm per indent and obtain the required width of the last panel. The element is marked and the upper part, in which the locking connection is provided, is cut off.
- At the top of the last plank, hooks are made, which are located in increments of 20 cm. To do this, make cuts and bend them outward.
- The prepared strip is inserted into the penultimate panel and snapped into the finishing profile.
To sheathe the pediment, use profiles for internal corners or starting ones. The installation technology is similar to cladding the main part of the wall. In the same way, you need to trim the panels and remember the gaps of 6 and 9 mm. The last, uppermost section of the gable can be secured with a self-tapping screw directly through the panel material. This can only be done here; in other cases, drilling holes is not allowed.
Preparatory work
The technology requires careful preparation of the base. The work may vary depending on the material from which the walls of the house are made.
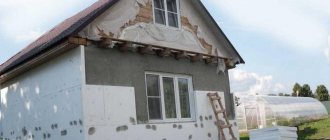
Wooden base
To qualitatively sheathe such a structure, you need to perform the following steps:
- The general condition of the coating and foundation is assessed. This must be taken responsibly, because problems can only be eliminated by disassembling the casing and removing the insulation.
- The surface is cleared of all unnecessary elements and decorative elements are removed.
- Cracks and crevices are opened and cleaned well.
- The wood is carefully treated with antiseptic compounds. It is also recommended to impregnate with fire retardants.
- After drying, the damage is covered with a special wood putty.
- All cracks are carefully sealed.
- As additional protection, the basement part (foundation) is waterproofed.
Before cladding a wooden house, all cracks and cracks must be sealed with special putty or sealant.
Similar measures are carried out with a frame or panel house, provided that the outside is completely covered with slabs.
Siding in modern construction
Until recently, log houses were sheathed with boards; this was required by the functional side of the cladding. However, expensive and impractical materials have been replaced by more affordable products. Here are some positive aspects obtained as a result of facade finishing:
- Isolates from various sounds, wind and precipitation.
- Prevents heat loss.
- Transforms the appearance - ideal for old houses, where the walls have already been seriously deformed and have lost their original appearance.
It doesn’t matter at all what your house looked like before covering it with siding. It is worth noting that you can use not only PVC panels, which many people don’t like, but purchase metal or wooden siding: natural and environmentally friendly, without harmful impurities and additives. An interesting option is one made from fiber cement, made specifically for the harsh Russian winters, but it is not so popular, and its cost is much higher. And very little is required for your wooden house to shine with a new cover: facade brick, bulky cobblestones or the texture of tropical trees. The most important thing is to purchase finishing materials. And you will find the answer to the question of how to cover a log house with siding with your own hands here.
For your information!
For a positive result, it is very important to follow the stages of the entire process.
Frame installation
Finishing with siding is preceded by the installation of the frame. Key points of the process:
- Guides are installed in the corners of a wooden house.
- The choice of pitch between intermediate profiles depends on the thermal insulation material.
- For wooden sheathing, slats of 50x80 mm or 40x40 mm are suitable.
- Self-tapping screws or nails with an anti-corrosion coating are used as fastening elements.
- Initially, the vapor barrier is secured with a stapler.
- When the installation of the sheathing is completed, the insulation is fixed between the guides.
- A protective layer of waterproofing completes the preparation.
The wooden structure finished with siding is shown below in the photo:
Positive and negative qualities of coating
Before starting installation work, it is necessary to study the advantages and disadvantages of the material used to understand whether it is suitable for use in specific conditions. In some situations, it may be relevant to use completely different products that can perform broader tasks.
List of Important Benefits
- The price of vinyl covering for the facade is relatively low, and after the work is carried out there is no need to spend money on maintenance;
- Simple cladding technology allows you to transform old buildings with your own hands in a relatively short time;
- Resistance to aggressive weather conditions makes it possible to use the cladding for a long time;
- The aesthetic characteristics of the material are very high, since the panels have a clear geometry.
This is how you can transform an old wooden house.
Note! All maintenance of the coating consists only of periodic washing. It is possible to remove all kinds of contaminants from the surface using special cleaning agents or without them.
A little about the disadvantages
The material is quite fragile, which means it requires caution when cutting and other installation operations. The risk of damage increases significantly when the temperature drops to sub-zero values. In this regard, it is not recommended to carry out siding work in very severe frosts, especially if there is no experience.
Since the polyvinyl chloride from which the sheathing panels are made is a plastic, it is prone to linear expansion with temperature fluctuations. However, this problem is easily solved by properly fixing the elements to the supporting structure.
Winter installation of siding with insulation
Installation of siding in the cold season (photo No. 9)
All installation processes are dry. Therefore, covering a house with siding with insulation, as well as without insulation, can be done even in winter. It should be taken into account that vinyl and acrylic panels are narrowed at this time
In the summer they will expand, and for this it is important to provide a gap between the panels, as well as between panels and slats, of 4-6 mm
!
If you are installing vinyl siding in winter, the gap between panels, as well as between panels and strips, should be maximum - 4-6 mm.
The panels become more fragile in the cold, so scissors should not be used to cut them in the cold season. And at temperatures of -7 degrees and below, it is better to postpone installation of the facade. This is dangerous for the panels, and it will also be uncomfortable for you.