Primer before puttying is necessary to level the base, improve adhesion, protect against mold, and reduce the consumption of the plaster mixture. The work uses acrylic, alkyd, silicate, aluminum or epoxy primer. The characteristics of the primer composition are determined by the type of surface (concrete, wood) and the qualities of the plaster used.
Let's consider what comes first: putty or primer
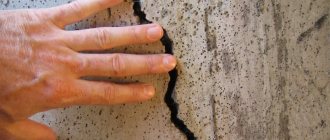
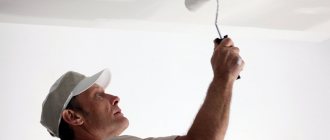
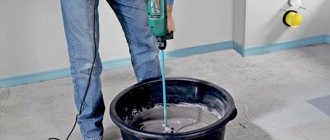
What do they do to achieve the result shown in this picture - do they first putty or prime? Compliance with the sequence of technological operations when performing plastering and painting work is, if not decisive, then very important.
Therefore, anyone who intends to do the finishing of a room with their own hands should know how to properly prepare its surfaces for finishing. The video in this article on the topic: “What comes first: putty or primer?” will become a visual aid in this matter.
Materials and tools
The primer for putty is applied using the following tools:
- wide and narrow brushes;
- roller;
- metal brush;
- spatulas;
- sheets of sandpaper;
- heat gun;
- paint stirrer;
- spray;
- disk brush for drill;
- rag, etc.
For protection during work, a mask and gloves are required. When finishing, you will need a primer, water, containers for diluting the solution, and, if necessary, additional antiseptics.
Sequence of layers
In order for the interior to ultimately please the eye, you need to work hard. Perfectly smooth walls and ceilings are not a guarantee that the whitewash or wallpaper on them will adhere well.
If you have any doubts that you won’t be able to do a high-quality finish on your own, it’s better to trust an experienced craftsman.
What should you do first if the surfaces were leveled with plaster or drywall, and how do you generally choose the right materials for them? We hope that our instructions will give you comprehensive answers to these questions.
Dyeing process
Window slopes can be painted only after all preparatory measures have been completed and the treated surface has dried. The coloring process is as follows:
1. First, open the can of paint and mix thoroughly, pour into a container or tray. The latter is convenient when using a roller, and a small container is recommended for brushes.
2. First of all, you need to paint all hard-to-reach places, such as corners or joints between the wall and the window. This can be done using a small brush, a flute works best for this.
3. Then we paint with a roller, carefully rolling it over the surface. It is important to remove excess paint from the tool so that it does not run later.
4. After complete painting, the slopes should be left to dry. It is best to dry naturally, that is, ventilate the room. Next you will need to apply a second coat of paint.
If the surface is plastered
Despite the increasing popularity of drywall, the plaster leveling method has been and remains number one. The reason is simple: it does not take up useful space from rooms that are often already too small. And then, covering walls with sheets of gypsum cardboard (see Cladding walls with plasterboard: how to do it), although it is called the “dry” method, also includes wet processes.
- We will talk about them a little later, but for now we will consider the option when you need to make repairs without stripping the surfaces of the walls or ceiling to the base. This is only possible if the plaster layer still retains its strength, and its finishing coating requires updating.
- No matter how hard you try to remove it so as to preserve the smoothness of the covering layer of the old plaster, you will not succeed. And it doesn’t matter what decorative covering was on the walls: wallpaper or whitewash.
- When removing it, you will have to use a spatula, which means that in some places you will definitely get potholes and cracks will be exposed. To hide them and make the base smooth again, a new covering layer is applied, or this operation is also called puttying (see Puttying walls is easy: selection and proper execution of the job).
Note! When purchasing putty mixtures, you need to consider some nuances. For example, you can apply gypsum putty to cement plaster, but you cannot do the opposite. Gypsum screed has less strength and therefore cannot serve as a basis for applying cement-based putty. Therefore, if the base is gypsum, then you need to putty it with a gypsum mixture.
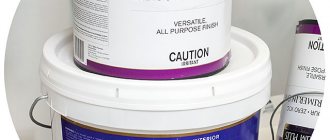
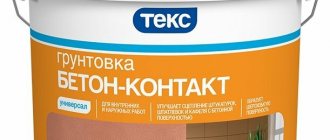
- Now let's figure out how to select a primer for putty. Let’s say right away that the type of putty composition does not play a role here. What matters is the type of base that needs to be primed. Typically, the primers indicate which surfaces they can be applied to: wood, heavy concrete and brick, gypsum screeds, or cellular blocks (see Types of construction primers and their scope).
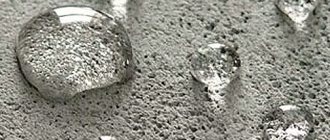
- If the label says o, which is what we see in the photo presented, it means that the composition can be used for all types of surfaces. The primer should be applied to the leveled base in one layer, and be sure to allow it to dry before starting to putty.
- Since it is not always possible to eliminate all potholes on the surface with one layer of putty, it is often necessary to apply several layers. In this regard, many people have the following question: “Is it necessary to prime between layers of putty?” We’ll answer right away: there is no such need – and we’ll explain why.
Important! Layers applied with the same solution have excellent adhesion and therefore do not require priming. It’s a different matter when plastering is performed with different compositions - first with the starting (base) composition, and then with the finishing one. In these mixtures, the filler has a different fraction, and accordingly, screeds are obtained with different mechanical properties. In this case, priming between layers is necessary!
The putty - that is, the covering layer of plaster, is primed before starting the finishing of the surfaces, and this technological operation completes the preparatory process.
Features of plastering and painting works
During the plastering and painting work, the following services are performed:
- applying plaster to partitions and plasterboard walls;
- finishing of ceilings, walls, door/window openings;
- work on insulation and noise insulation of the premises;
- decorative surface finishing;
- installation work;
- wallpapering.
When performing painting work, employees paint the surface and carry out preliminary preparation. In the process, it is possible to level the surface and improve adhesion with diverse finishing materials. Preparation is carried out inside and outside the premises using a special finishing cement mortar.
Employees of TekhStroyKomplekt LLC are ready to offer customers a full range of services in the field of painting and plastering work. We adhere to the wishes of the customer, in the end the house will look the way you want.
By contacting us, you can count on a number of advantages:
- Reasonable prices for services. We carry out molar and plastering work; preliminary price lists are presented on the website for your reference. The price for painting and plastering work indicated in the price list is current for 2021. The final price quoted does not increase as a result.
- All types of work performed are covered by an official guarantee.
- We carry out professional painting work on a turnkey basis. Facade and interior plastering works. We work throughout Moscow and the Moscow region. We are ready to work with projects of any complexity.
Prices for painting and plastering work in Moscow
The cost of plastering and painting works is indicated per square meter. The cost of work in the price list is current for 2021 for Moscow and the Moscow region.
| Name of service | Unit change | Price with VAT |
| COLORING | ||
| Ceiling painting (2 layers) | m2 | 300 rub. |
| Painting walls with high-quality paint (1 layer) | m2 | 250 rub. |
| Painting walls with oil paint (1 layer) | m2 | 250 rub. |
| Floor painting | m2 | 300 rub. |
| Radiator painting | PC. | 500 rub. |
| Painting water pipes | p/m | 100 rub. |
| Painting window sills | m2 | 300 rub. |
| Painting decorative cornice | m2 | 200 rub. |
| Painting metal grilles | m2 | 210 rub. |
| Removing high quality paint | m2 | 100 rub. |
| Removing Oil Paint | m2 | 100 rub. |
| Removing old whitewash | m2 | 100 rub. |
| Cleaning walls of paint and putty | m2 | 150 rub. |
| Painting window slopes in one layer | m2 | 150 rub. |
| Painting wooden windows | m2 | 150 rub. |
| Painting skirting boards in two layers | m2 | 100 rub. |
| Painting door slopes | m2 | 150 rub. |
| Painting doors, arches | m2 | 850 rub. |
| Painting walls with wallpaper | m2 | 200 rub. |
| Painting walls with color selection in 2 layers | m2 | 350 rub. |
| Painting walls with water-based paint in 2 times | m2 | 350 rub. |
| Painting walls with oil paint in 2 times | m2 | 300 rub. |
| Painting the wall with varnish | m2 | 250 rub. |
| PRIMER | ||
| Stan (one time) | m2 | 50 rub. |
| Ceilings (one time) | m2 | 100 rub. |
| Floor tiles (one time) | m2 | 50 rub. |
| Window slopes in one layer | m2 | 30 rub. |
| Metal surfaces | m2 | 120 rub. |
| GRINDING | ||
| Stan | m2 | 200 rub. |
| Ceiling | m2 | 200 rub. |
| PUTTY | ||
| Walls under wallpaper | m2 | 200 rub. |
| Walls to be painted | m2 | 250 rub. |
| Ceiling under wallpaper | m2 | 250 rub. |
| Ceiling for painting | m2 | 300 rub. |
| Dismantling putty | m2 | 100 rub. |
| Slope putty | p/m | 90 rub. |
| Putty on window and door slopes | p/m | 300 rub. |
| Textured putty | m2 | 300 rub. |
| Gluing corners, joints, rustications with serpyanka | p/m | 300 rub. |
| Plasterboard putty with seam sealing | m2 | 250 rub. |
| WALLPAPER | ||
| Wallpapering walls | ||
| Pasting walls with paper wallpaper without selecting a pattern | m2 | 200 rub. |
| Pasting walls with paper wallpaper with pattern selection | m2 | 250 rub. |
| Wallpapering walls in two levels | m2 | 300 rub. |
| Wallpapering in two levels with a wallpaper border | m2 | 350 rub. |
| Pasting walls with vinyl, non-woven wallpaper without a pattern | m2 | 250 rub. |
| Pasting walls with vinyl, non-woven wallpaper with pattern selection | m2 | 300 rub. |
| Pasting walls with glass wallpaper | m2 | 200 rub. |
| Structural wallpaper for painting | m2 | 250 rub. |
| Sticker of textile, printed wallpaper | m2 | 450 rub. |
| Pasting bamboo wallpaper | m2 | 500 rub. |
| Wallpapering with flock covering | m2 | 400 rub. |
| Wallpapering the border | p/m | 350 rub. |
| Pasting photo wallpapers | m2 | 500 rub. |
| Removing wallpaper | m2 | 100 rub. |
| Removing wallpaper from ceilings | m2 | 100 rub. |
| Removing wallpaper from walls | m2 | 80 rub. |
| Wallpapering the ceiling | m2 | 300 rub. |
| Pasting embossed wallpaper | m2 | 190 rub. |
| Gluing cork wallpaper | m2 | 260 rub. |
| Application of liquid wallpaper to walls | m2 | 180 rub. |
| PLASTER | ||
| Plastering walls without beacons | m2 | 300 rub. |
| Plastering walls on beacons | m2 | 400 rub. |
| Plastering ceilings without beacons | m2 | 400 rub. |
| Plastering ceilings on beacons | m2 | 500 rub. |
| Plastering walls on lighthouses with cement-sand mixtures | m2 | 350 rub. |
| Plastering ceilings using gypsum plaster | m2 | 300 rub. |
| Installation of reinforcing mesh on walls | m2 | 50 rub. |
| Installation of reinforcing mesh on ceilings | m2 | 100 rub. |
| Installation of beacons on walls | m2 | 80 rub. |
| Installation of beacons on ceilings | m2 | 100 rub. |
| Plastering door slopes | mp | 350 rub. |
| Plastering ceilings with a cement-based plaster mixture | mp | 450 rub. |
| Knocking down old plaster | m2 | 150 rub. |
| Plaster corner installation | mp | 80 rub. |
| Plastering arched slopes | m2 | 350 rub. |
| Plastering walls of irregular (rounded) shape | m2 | 500 rub. |
| Plastering walls using gypsum plaster | m2 | 250 rub. |
| Installation of decorative plaster | m2 | 400 rub. |
| Installation of Venetian plaster | m2 | 600 rub. |
| Fragmented plaster repair | m2 | 600 rub. |
| Sanding, sanding slopes | m2 | 80 rub. |
| Ceiling skin with lamp (for painting) | m2 | 150 rub. |
| Sanding walls using a lamp (for painting) | m2 | 100 rub. |
| Sanding the ceiling and walls for wallpaper | m2 | 50 rub. |
For the exact cost of painting and plastering work in Moscow, please contact our managers by phone:
Putty on plasterboard sheathing
Much of what was said in the previous chapter also applies to puttying the surface of drywall. In particular, either a special primer for drywall under putty should be used, or the composition should be universal. Let us add on our own that it is better to take both gypsum board sheets, primer, and putty composition from the same manufacturer.
- Price does not play any role here - the main thing is that in this case you can be sure of the best compatibility of materials. Priming and puttying of drywall is carried out using a long-established technology: first sealing the joints between the sheets, and then puttingty over the entire surface.
- Although it is believed that the surface of the plasterboard does not need to be puttied before wallpapering. Note that when using dense and embossed rolled materials, this is really not required. Moreover, the paper base of the wallpaper is tightly glued to the cardboard shell of the drywall. This results in savings on putty - but this can become a problem if you decide to update the interior.
- It is almost impossible to remove wallpaper from unputtyed gypsum board sheets without spoiling their surface - the wallpaper sheets will be torn off, as they say, “with meat”. This is the same case when a stingy owner needs to pay twice: it is possible that the entire lining will have to be changed. So it’s better to spend money on putty.
- In this case, surface preparation is performed in the following sequence. First, the seams are primed, and after the composition has dried, they are filled with putty. At the same time, they cover the places where the sheets were fastened with self-tapping screws. Then, until the mixture has hardened, the joints are glued with sickle tape, pressing it well into the solution, and again allow time to dry.
Next, primer is applied over the entire surface, after which putty is applied. One layer is usually sufficient, since the sheathing is even.
When the screed has dried, it is lightly sanded with an abrasive mesh or fine sandpaper. The resulting dust is removed with a vacuum cleaner, and the room is wet cleaned. All that remains is to carry out the final priming - and the surface is ready for painting or pasting.
Slope preparation
Preparing surfaces for work includes the following activities:
- removal of decorative trims;
- external inspection of slopes, frames and canvases;
- tapping with a hammer to identify peeling plaster, concrete and brick;
- removal of dirt, old finishes (plaster, paint, wallpaper, tiles);
- applying a deep penetration primer to strengthen the base;
- sealing deep cracks and holes;
- covering the floors with cardboard or rags to protect them from contamination with mortars.
Finally, the frame and window sill are sealed with masking tape. It is recommended to cover the glass with newspapers or cellophane.
Do I need a primer for walls under putty (after plastering)
Primer before puttying is necessary to level the base, improve adhesion, protect against mold, and reduce the consumption of the plaster mixture. The work uses acrylic, alkyd, silicate, aluminum or epoxy primer. The characteristics of the primer composition are determined by the type of surface (concrete, wood) and the qualities of the plaster used.
Primer consumption
The consumption of the solution depends on its composition and the surface of the base. Approximate values are indicated by the manufacturer in the instructions for use.
The approximate fluid consumption for various materials is as follows:
- concrete - 100 ml/m²;
- brick - 200 ml/m²;
- plaster for external use - 250 ml/m²;
- plaster for interior work - 300 ml/m²;
- wood - 250-400 ml/m².
An increase or decrease in indicators is determined by the tools used and work experience.
Advantages of priming walls over putty
High-quality repairs cannot be carried out without knowledge of the basic stages of finishing material surfaces. Do I need to prime the walls before applying putty? Definitely yes, because to prevent the putty from crumbling, you need to prime the walls before applying it. This will prevent them from falling off after repair. More than once it happened to inexperienced builders that they omitted the priming moment and applied finishing material to an unprepared surface.
This led to terrible consequences: the plaster crumbled, and the finishing, accordingly, also deteriorated. And, as you know, it is much cheaper and faster to make repairs if you first apply primer to the required surface.
Also, if there are any microcracks on the ceiling or wall, the primer lays on the surface with a thin film, covers all the potholes and protects the object from external factors.
The adhesive properties of the primer before puttying are quite high, which is why finishing materials adhere so well to surfaces.
Which primer to choose, which primer is better
Choosing which putty to apply for walls is required in accordance with the base material.
The compositions for panels made from the following materials differ:
- wood;
- concrete;
- plasterboards;
- gypsum base, etc.
For wood
Wood is a natural material; to increase service life and durability, it requires treatment with a special primer. To increase the wear resistance of wood, you will need to degrease and treat the base with antiseptics. It is optimal to use an alkyd primer mixture, which is characterized by high strength and performance characteristics. It is necessary to take into account the drying time of the coating. Acrylic composition is also suitable for wood, which is consumed at the rate of 12 liters per area of 1 m².
It is allowed to use a mineral, acrylic or oil-based primer solution. The solution must have deep penetration and contain antifungal components. The color of the coating should be light.
For concrete walls
You can determine whether the walls need to be primed before puttying by the quality of the concrete base. Surface treatment is necessary to create an aesthetic coating with decorative materials and level out unevenness. The primer mixture is selected taking into account the susceptibility of concrete foundations to destruction from mechanical influences, precipitation and temperature changes.
Experts recommend using polystyrene, alkyd or polyvinyl acetate primer. The materials provide a smooth surface, uniform application of plaster, strength of the base, reduce the consumption of decorative composition, protect from moisture and sunlight.
From plasterboard
Determine whether it is necessary to prime walls made of plasterboard slabs based on the quality of the base. Treatment must be done when the surface is dirty. For clean plasterboard floors, preliminary priming is not required, because the level of adhesion for wall putty and finishing will be sufficient. If there are seams and joints of slabs, you need to treat the areas with a primer mixture or putty.
Experts recommend using the primer solution only for interior work. Products must be of high quality, with high performance characteristics. Universal formulations are optimal.
Process steps
To navigate the intricacies of repairs and the peculiarities of using various types of building materials, it is recommended to understand in detail the process of finishing the wall surface. Only in this way can you understand what is done first - priming or puttying the walls, whether this is necessary, and how many layers are applied.
Preparatory activities
During the discussion of the project or preparation for work, you should finally decide how many layers will be applied to the wall surface. This has a direct impact on the volume of primer mixture that will have to be purchased.
As you know, the manufacturer’s instructions recommend purchasing an impregnating composition on a basis similar to the solution chosen for puttying. For example, when finishing a wall made of concrete or cement, you should use materials designed taking into account their properties, and choose acrylic-based primers for dyes.
Often, finishing specialists opt for universal compositions, because they help save time and not have to do additional calculations.
Particular attention is paid to the period of time during which the primer dries before applying the putty solution, because the timing of the repair depends on this factor. As a rule, the manufacturer indicates such information on the packaging material.
It is best to use those types of primer compositions that are developed and produced by the manufacturer who produced the putty material you have chosen. This eliminates inconsistencies between different components and components that can enter into chemical reactions.
The product line of putty compositions produced by well-known and not so large companies is so large that you should choose a primer with full responsibility, taking into account the characteristics of a particular material.
Rough leveling layer
We begin to understand when the primer is applied - before or after puttying. Craftsmen claim that a primer composition is mandatory before the putty mixture, especially when it comes to applying the first leveling layers. In this case, the material is planned to cover a wall built from other components. For this reason, it is important to strengthen the adhesion index and ensure a unique combination of layers.
When figuring out what should be done first - prime or putty, it will not be superfluous to remember that the primer composition is also applied in order to reduce the ability of the wall surface to absorb moisture. This will protect the putty from premature drying, prevent the formation of cracks in its layer, and help reduce the cost of building materials.
It turns out that after applying another layer of putty mixture, you should again treat the surface with an impregnating composition. This once again confirms what is applied first - a primer or a new layer of putty.
The soil will play the role of a binding component, saturate the putty and form a reliable connection, strengthening the surface and extending its service life.
There is one more feature - many craftsmen apply not one, but several layers of primer. First, they reduce the percentage of absorption, fill the micropores of the walls, and then form a film layer that ensures adhesion of the putty to the wall material. Note that in such cases, the price issue of the cost of materials and work increases.
Remember that applying the solution to a wet surface is prohibited. Therefore, developers, having found out what is going first - putty or primer, are additionally interested in when, after priming, they are allowed to work with the mortar mixture, so that the reactions have the opportunity to work positively. Professionals advise taking a break of at least four hours, regardless of the recommendations given by the manufacturer.
Finishing
A special feature of this stage is the correct selection of building materials. The issue of choosing a primer mixture is resolved simply - the type of wall surface (the material from which the structure is constructed) is determined. But before the finishing layer, it is recommended to use a composition suitable for the material that is planned to be used for finishing.
Equally important is given to one more fact - a primer mixture is also applied to the applied, dried and sanded putty layer (finishing layer). In this way, the surface is protected from peeling off the smallest particles, the absorbency rate is reduced, and this is combined with a reduction in financial costs for paintwork materials or gluing wallpaper material.
It turns out that the importance of the primer is difficult to overestimate. The component has a list of advantages and can have a serious impact on the finishing process. For this reason, anyone who decides to work with their own hands is advised to clarify at what stages primers are used.
Primer of wooden windows
The fashion for wooden frames is coming back again and there are reasons for this. Wood is capable of transmitting steam, absorbing and releasing moisture, maintaining a comfortable microclimate in the room. Before finishing the wood, it must be thoroughly treated with primer. Otherwise, the material will quickly become unusable. In addition, pre-impregnation of the base will ensure better adhesion to the topcoat.
It is advisable to purchase a multi-component primer, which includes antiseptics and fire retardants, oils and resins, adhesives and pigments. This solution protects the wood from all external factors. To achieve a high-quality result, you need to apply at least 3 layers of primer.
Types of primers
Primer compositions are sold in the form of concentrated liquids, dry mixtures or ready-to-use solutions. Any soil contains a binder base, which may contain special fillers and additives. For concentrated and dry mixtures, you will need a solvent, which is indicated on the package. Most often this is ordinary water.
Based on the base material, the following types of primers are distinguished:
- acrylic - suitable for processing most types of surfaces and considered universal;
- phenolic – for coating metal and wood, including chipboard, OSB and fiberboard indoors;
- alkyd - for impregnation of stone walls, plaster, putty surfaces and drywall with subsequent application of alkyd-based paint;
- perchlorovinyl and polystyrene - for plaster and brick when performing external work;
- glypthal - for wooden and metal surfaces, while the composition has toxic properties and can only be used outdoors.
Types: which primer to choose
The list of popular primers includes the following compositions:
- Alkyd - the mixture is intended for finishing metal and wood surfaces. The solution contains polyurethane, dyes, polyvinyl chloride, polystyrene, acetate. The primer is universal and can also be used on glass.
- Acrylic - the composition is universal, can be used for bases made of different materials (concrete, metal), interior and exterior work. The composition can be applied in several layers.
- Polyvinyl acetate - used before plastering walls and painting, using specialized compounds (with shine, pearlescent effect).
- Silicone - concentrated composition provides durable, dense coating of the base. The material is optimal before tinting with silicone-based paints. The composition is intended for outdoor use, not recommended for indoor use.
- Silicate primer mixture is optimal for treating facades made of brick, concrete, and plastered surfaces. The material is optimal for use with silicate dyes. The product is based on liquid potassium glass.
- Epoxy - designed for impregnation of concrete bases. The product is based on resinous components and artificial additives. After applying the primer coating, the surface acquires a glossy or matte film and becomes resistant to temperature changes, precipitation, and mechanical damage. The composition is optimal for metal coating.
- Mineral - the primer composition is universal and can be used for finishing different types of surfaces. Ideal for use on plastered and limestone substrates. The coating is resistant to high humidity and sun rays.
- Shellac - the product contains methyl alcohol, natural ingredients and is suitable for treating wooden surfaces.
It is also necessary to select a primer for application before putty based on the degree of penetration.
Manufacturers produce the following primers:
- Surface action - solutions are recommended for use on bases made of concrete, bricks, wood, glass. The product forms a film, filling the porous base with microcracks. It improves the quality of adhesion to the surface. The primer does not penetrate into the deep layers of the base.
- Deep penetration - the product contains fine-grained components that are capable of penetrating into substrates (wood, MDF boards) to a depth of 15 mm. After treatment, the surface becomes smooth and contains antibacterial components. The material protects the inner layers from destruction and rot. The composition is optimal for use on wood, plaster, drywall, gypsum plaster, brickwork, cement, concrete, cinder blocks.
Materials are divided into types according to the place of application:
- For exterior finishing - they are highly resistant to temperature changes, sunlight, high humidity, and mechanical stress. The facades of buildings are treated with the products. Indoors, dense solutions will impair air exchange and lead to the creation of a greenhouse effect.
- For interior work - these primers according to GOST in terms of composition, application density, and vapor permeability are intended for interior finishing.
Based on their properties, the primer is divided into the following subtypes:
- Water-repellent - allows you to create a protective layer in rooms with high levels of humidity. The primer is optimal for treating walls and ceilings before laying tiles in the bathroom.
- Antiseptic - mandatory when treating wooden bases and old buildings.
- Strengthening - suitable for correcting uneven bases covered with plaster, putty, and lime mortars.
- Adhesive - will increase the adhesion characteristics of materials to the base. The solution is available for treating ceilings, wall panels, and floors.
- Anti-corrosion - required for coating metal surfaces or walls with a combined composition (wood, metal). The material will prevent the appearance of rust, mold, and rot.
- Final - applied at the end of the cycle of preparatory finishing work, preceding the stage of applying decorative plasters and dyes.
- Universal - used for different types of bases depending on the type of use, composition (metal, wood, brickwork).
Proper priming and puttying of walls
Those people who want to make repairs to their apartment or home themselves should know that proper priming and puttying of the walls will make the repair high-quality and durable. This article will help you make the right choice of primer and putty for the surface of the walls, as well as use these materials correctly.
Choosing a primer for walls
Let's first clarify why a primer is needed and why prime the walls before puttingty.
The purpose of the primer is an important point in the pre-finishing of walls. The primer completely removes dust from the walls and ensures reliable adhesion of the putty to the base of the wall. In addition, penetrating deeply into the wall (about 2-3 mm), a high-quality primer strengthens the base, which makes the wall surface more reliable for adhesion of the putty mixture.
There are 3 types of primers used in wall repairs:
- Deep penetration primer
- Dust removal primer
- Primer for walls “Concrete Contact”
Proper priming and puttying of walls will be done efficiently if it is advisable to use the primers listed above.
For example, a deep penetration primer should be used when you are ready to apply putty to the walls. That is, an hour before plastering the walls.
A primer to remove dust is applied immediately before wallpapering or before painting walls. Using this type of primer for walls does not have the ability to penetrate deep into the wall and strengthen it; it is only needed to remove dust.
Primer for walls “Concrete Contact” is used to strengthen the surface of the wall and give a rough surface. Typically, “Concrete Contact” is not used before puttingtying walls. It is used before laying ceramic tiles on walls and floors.
Proper priming and puttying of walls will really work if you use the primer wisely.
Rules for priming walls
Rule one . Priming the walls is mandatory before starting puttying work. Ignoring this rule will result in the gypsum putty peeling off from the base. This is a proven fact. Before the first layer of putty, you need to prime the walls with a deep penetration primer.
Rule two . Before painting the walls or wallpapering, be sure to prime the walls. Remove all dust using a primer. Without doing this, you will not get a good result. The paint will lie unevenly, and the wallpaper may partially not stick.
Third rule . Before gluing the tiles to the walls, prime first with a deep penetration primer, then with the “Concrete Contact” primer.
Fourth rule . Before applying primer to the walls, remove anything that has come loose from the wall. Are there any cracks? Then expand them using a narrow spatula or even a punch.
All cracks on the wall need to be deepened and widened, and then coated with a deep penetration primer with a brush.
Proper wall putty
Puttying of the walls is done 1-2 hours after applying the primer. Then, seal the cracks (if any) with putty and glue a strip of mesh (serpyanka) onto them. Serpyanka is glued to the putty mixture.
The putty should be applied to the walls with a wide spatula 30 - 40 cm. Apply it to the spatula, you need a little putty, on the very edge of the spatula. Then it will be easier for you to apply putty.
The correct putty is putty in three layers, and sometimes in four. Typically, puttying walls for wallpaper is done in three layers, and four layers for painting.
After applying the last layer and drying it, the putty deposits are removed by sanding with an emery net. The mesh for sanding should first be taken No. 180, and after removing thick deposits of putty, No. 200 or 220.
Proper priming and puttying of walls is inexpensive
Now you have learned about the basic rules for proper priming and puttying of walls. Do you find this difficult? Maybe you're right. Indeed, without experience in this type of work, it will not be possible to do high-quality putty the first time. This requires skill.
Look at our price list , it shows all the prices for wall putty and priming, as well as for all other types of finishing work. You may not want to deal with this dirty work and invite our masters.
In fact, proper priming and puttying of walls is inexpensive and you can see this for yourself by calculating the cost of puttying and priming walls using our free online calculator. Using the calculator for calculating the cost of wall repair work, you can find out the exact cost of puttying the walls in your premises. Here is a link to an online calculator.
Painting drywall trim
Painting plasterboard slopes will require preparatory work that will help achieve the best result. The best option for paint would be water-based paint, since it adheres well to the surface, and after drying, it allows you to wash the internal slopes without damaging the coating .
Preparing the slopes
Once you have finished the slopes with plasterboard, the next step is to putty all the empty holes, joints and corners. Before sealing, the areas for fastening with self-tapping screws need to be slightly widened so that the putty lays more evenly. This can be done with a Phillips screwdriver, running along the hole and expanding it by approximately 3-5 mm over the entire diameter. Allow the applied mixture to dry for several hours, then sand the surface using an abrasive mesh, carefully going over the areas of the window. The mesh will help get rid of all the unevenness and clean the prepared surface well.
An abrasive mesh is used to clean out uneven surfaces.
A few words about how to properly paint slopes so that there are no small cracks left. Follow simple rules:
- Take a painting knife with a sharp blade and make a small chamfer along the joint area, going inward by 2-3 mm. Make sure that the work is carried out at an angle of 45°C in relation to the window frame.
- Cover the frame and slopes with masking tape, leaving 1-2 mm from the base of their surface. Immediately cover the cut areas with primer.
Painting tape is used to protect the frame from paint
- Using a gun with an acrylic tube, fill the bevel, then run a clean rag or finger along all seams to remove excess acrylic and make the joint even.
- First, with a small brush you need to carefully paint the corners and other places that are inaccessible to a large brush.
- Once you've finished with the corners, you can apply paint over the entire work surface using a large brush or roller.
Do not replace acrylic with silicone materials, as they do not paint as well as acrylic . Allow the window to dry thoroughly for 12 hours, then prime the entire area. It dries quickly enough and there is just enough time to cover the window frame with masking tape. Try to apply the tape evenly and without errors so that the painted areas can look attractive.
Let's start painting
Pour the paint into a convenient container and stir thoroughly. It is advisable not to save on the cost of painting material, since expensive paint will require fewer layers. Similar water-based options with low cost will lead to high financial costs.
If you decide to use a roller for painting, give preference to velor products with fine pile, then the paint will apply in even layers and with less consumption.
Using a velor roller the paint will go on smoother.
Try not to go over the same place many times, painting the entire surface evenly. Poorly painted areas can be covered with a second coat, but only after the first one has completely dried . Otherwise, roughness and unevenness may appear on the surface.
Sequence of priming work
When it is decided to carry out renovations in an apartment with their own hands, newly minted craftsmen are concerned with the question: how to prime the walls before puttying? The entire process of priming work can be divided into several successive stages.
Preparatory stage
The first priority is to prepare the walls. They should be cleaned of dirt, dust, and old coating if it has begun to peel away from the base. You also need to make sure that the walls are not wet. If there is moisture, it is better to dry them, since it is correct to prime the walls when they are completely dry.
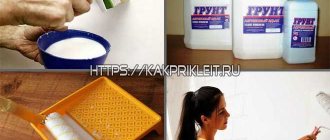
Preparation of the primer composition
The process of preparing the primer is carried out in full accordance with the instructions on the packaging. It's very easy to do it yourself:
- The ready-to-use composition is usually simply mixed thoroughly and poured into a convenient container.
- Concentrated primers are diluted in the proportions specified in the instructions.
- The dry mixture should be diluted with water following the directions on the package.
Applying primer
It is necessary to apply the primer composition in a thin layer, in narrow stripes, when priming each subsequent section, stepping slightly onto the already treated part.
Advice: it is better to use a white or pigmented primer, then all untreated areas will be clearly visible.
You can cover the walls with primer using a brush or roller. If it is necessary to apply several layers of the composition, you should wait until the previous layer has completely dried. The approximate drying time of the primer must be indicated on the packaging.
Priming is an integral stage of finishing work
Applying a primer before finishing work provides advantages that make the repairs made better, more economical and durable. Depending on the type of materials used, the appropriate soil is selected to ensure maximum efficiency. Neglecting this stage is not saving money, since without surface preparation, the consumption of materials increases, and poor-quality repairs will soon have to be redone.
Is it necessary to prime the surface before plastering, puttying, or wallpapering?
Types of primers
So we found out what needs to be done first - prime or putty. However, to ensure quality repairs, it is not enough to simply use the first primer you come across.
It is extremely important to understand which primer and putty are combined with each other, as well as what surfaces they are intended for.
Today, there are the following types of primers:
- Acrylic is a universal material that fits well on almost any material and dries in two to four hours. This is just the perfect primer for drywall under putty.
- Phenolic - usually used for processing wood and metal. True, it is not intended for application to putty, but it is often used for processing drywall.
- Alkyd - used exclusively for wood. Under no circumstances should such a solution be applied to putty.
- Perchlorovinyl is an excellent solution for processing putty. True, before applying it, you should find out whether it is necessary to prime between layers of putty of one type or another. For example, epoxy does not require priming, even if it is applied to another type of putty.
- Glyphthalic is an excellent composition for processing wood and metal, but it can only be used in well-ventilated areas, as it is very toxic. It should also be borne in mind that glyphthalic solution is not used before or after puttying.
- Polyvinyl acetate - this primer is applied over putty only if it will be painted with polyvinyl acetate paint.
- Polystyrene is an excellent option for processing putty, as well as wood or plaster. This composition is also very toxic.
Thus, when choosing a primer, you should be interested not only in its price, but also in its purpose, which is usually indicated on the packaging.
Plaster, primer, putty: what is the difference and the sequence of application
Plaster and putty are finishing materials that make wall surfaces even and smooth . Only the first material is represented by coarse-grained fractions; in finished form it is used to eliminate significant irregularities and cracks.
The putty is applied to an almost flat, pre-primed surface . The fine-grained structure makes the material unsuitable for filling large defects.
A starting layer up to 1 cm thick and thicker is necessary to eliminate shallow dents and irregularities if they remain after plastering. The finishing layer makes the surface perfectly smooth, after which only decorative finishing or wallpapering follows.
It is important that the layers of putty and plaster do not mix, otherwise the wall may crumble.
It is in such situations that a primer is used, which always acts as a boundary between two adjacent different materials.
Ideally, the sequence diagram for using finishing materials looks like this: first primer, then plastering, then primer again, then putty on the wall, primer again and subsequent finishing work.
You might be interested to know how long it takes for the primer to dry? Read in this article.