Wood is one of the oldest building materials, which, despite its beauty and environmental friendliness, requires a special approach to working with it and operating it. However, when using modern materials and technologies, finishing a bathroom in a wooden house is practically no different from similar finishing in a brick house.
Features of bathroom finishing
Before starting finishing work, you should take measurements of the room, decide on materials, location of water risers, valves, ventilation system, plan lighting and wiring location, and determine the location of plumbing fixtures.
Please note that finishing a bathroom in a wooden house involves using only high-quality moisture-resistant and insulating materials.
Proper arrangement of floors
In wooden houses, all floors are made of wood, the base of the floors is no exception. In order to install plumbing, the floors should be made more durable, and also treated with special compounds to protect them from dampness, microorganisms, and mold.
The main finishing materials for the bathroom floor are:
- cork covering;
- tile;
- laminate;
- thermowood;
- linoleum;
- porcelain stoneware
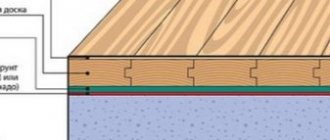
To install a concrete floor base, it is necessary to pour a concrete screed. The first step is to place thermal insulation, then reinforced mesh, install beacons and fill it all with concrete with a high level of strength. Please note that the floor should be made with a slight slope, installing a drain hole at the very bottom - this will help avoid flooding.
Various building mixtures and polymer films can be used as waterproofing. Screed or plaster is usually placed on top of the insulation layer. The final stage is the finishing layer.
If wood is used to finish the floor, it should be pre-treated with special protective compounds.
Bathroom ceiling decoration
When talking about bathroom cladding, it is worth mentioning such an important aspect as the finishing of the ceiling. First of all, the finishing method is selected based on the design features, location and general concept of decorating the bathroom.
When placing a bathroom on the attic floor, care should be taken to insulate the ceiling structure. For finishing, you can use moisture-resistant plywood and drywall, which can be puttied and painted. Ceiling beams often remain visible - they can also be beautifully enhanced by focusing on the contrast of materials and colors.
If the bathroom is located downstairs, on the ground floor or in the basement, the best option would be to use a slatted ceiling.
A slatted ceiling is a type of suspended ceiling when slatted panels (wooden, aluminum) are attached to a special profile system. In this case, the ceiling profile must have an anti-corrosion coating.
Another spectacular way to decorate the ceiling is with laminated wood panels, which can be used either as a stand-alone piece or in combination with other decorative elements, such as glass or lighting.
Bathroom waterproofing
Wood is a porous material that quickly reacts to high humidity, therefore, in wooden buildings, close attention should be paid to moisture insulation of premises, especially bathrooms and utility rooms. The insulation layer must cover the surface of all walls, floors and ceilings. The wooden base of the floor (ceiling) is covered with bitumen mastic, and a water-repellent material is glued to it. Wooden walls must be impregnated with antiseptic solutions.
Bathroom layout
The first step in decorating a bathroom is careful planning of the space. Based on individual needs and preferences, you need to decide on the types and quantity of plumbing fixtures that will be equipped in the room.
If a large family has a two-story house at its disposal, then it is possible to arrange two rooms on top of each other.
When developing a plan for your future bathroom, you need to take into account the basic rules for room design:
- When installing a sink, for ease of use, you must leave at least 20 cm of free space on the sides,
- The height of the sink is usually 80 cm, in front of it it is necessary to plan about 70 cm of empty space,
- the free space in front of the toilet should not be less than 60 cm, and on both sides no less than 40 cm,
- In front of the shower stall or bathtub, you also need a free space of at least 70 cm.
Compliance with these rules will help you plan a comfortable room and place the necessary elements of equipment in the most rational way.
Ventilation system installation
It is very important to take care of installing a high-quality ventilation and exhaust system to ensure an optimal microclimate in the bathroom. The ideal option in a wooden house would be to install a forced air exchange system. To do this, you need to install 2 pipes under the ceiling: one for the inflow, the second for the outflow of air from the room. Special releases should be made in opposite corners. Special sockets should be mounted at the ends of the outlets, one of them will be covered with a grille, and in the other it is necessary to install a fan after finishing the ceiling.
The hood is selected taking into account the area and needs of the room. The absence of a ventilation system and forced air intake contributes to the development of mold, which is extremely undesirable.
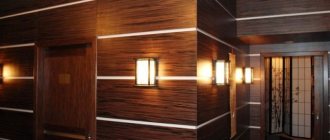
Decorative finishing of wooden walls
To decorate the walls in the bathroom, you should use moisture-resistant materials that can reliably protect the wooden base from harmful moisture. In order to reliably protect wood from dampness, you should use only high-quality moisture-resistant materials and carefully follow the technology for their installation.
The most popular types of bathroom finishing include:
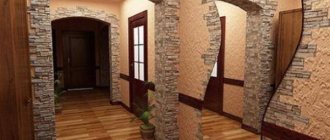
- Ceramic tiles are one of the most popular finishing materials, have a wide variety of shapes and colors, and are resistant to steam, dampness, and high temperatures. Since the log base has a spherical shape, cement-bonded particle boards, glass-magnesite, wood-fiber or plasterboard sheets can be used as the basis for tiled finishing. If ordinary wood was used as a building material, the walls should be covered over the entire surface;
- plastic panels - resistant to high humidity, sudden temperature changes, have a simple, locking installation method;
- painting is the simplest type of finishing; moisture-resistant drywall is used as a base;
- decorative plaster - has not only a decorative, but also a heat-insulating function (applied to polystyrene foam boards);
- facing with gypsum stone or 3D panels - creates a beautiful relief surface;
- Pasting with durable washable wallpaper is one of the easiest finishing methods to perform; it requires a plasterboard base.
Each type of finish has its own advantages and disadvantages; the only thing they have in common is resistance to high humidity and temperature changes.
Tip: when choosing the type of finishing materials, consider how convenient it will be to regularly clean the room.
Tiling wooden walls
Finishing wooden walls with ceramic tiles is a complex and quite labor-intensive process, requiring at least minimal construction skills and experience. However, such work can be done with your own hands, without hiring expensive craftsmen for finishing - you just need to follow the algorithm of actions.
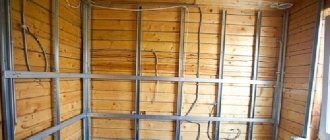
First, you should thoroughly clean and prepare the surface (clean off dust, sand, eliminate minor defects), apply a layer of a special protective compound. After the protective layer has dried, you can begin laying waterproofing - rolled rubber or polyethylene film (fixed with a construction stapler). Then you should install the profile (metal, wood) in increments of approximately 50 cm - this is a necessary condition for laying plasterboard sheets. At this stage, you can lay the main communications (electrical wiring, pipes). It is not recommended to lay a layer of insulation.
Please note - for the durability of the finish, you should choose only moisture-resistant plasterboard, paying special attention to its marking (preference should be given to the GKLV or GKLVO marking) and the thickness of the sheets, the presence of noise protection and the degree of fire protection of the surface.
For greater convenience during installation, drywall should be cut into small squares, which are attached to the installed profile using self-tapping screws.
Important! If the list of finishing works includes covering all surfaces, then the drywall is first attached to the ceiling (using sliding fasteners). Then a construction (reinforcing) mesh should be attached to the finished plasterboard surface. The mesh is also cut into small rectangles and overlapped.
Do not forget about the natural shrinkage of the house; leave a small technical gap between the sheets (up to 3 mm), covered with plastic putty.
Tip: to make the mesh lie more evenly, it can be temporarily pressed with plaster beacons.
After completing all the steps, you can begin laying the tiles. To do this, you will need a special laying compound (cement-adhesive mortar), a building level, a notched and rubber trowel, plastic dividing crosses, a foam sponge, and a container of water.
The installation process is quite simple, although it still requires some experience. First, the starting profile is installed and secured with self-tapping screws (using a building level). Then tiles are laid on it in rows (no more than 5 elements in height). The work is carried out gradually, continuing only when the previous section has completely set. Streaks and stains that form on the tiles during work should be removed with a damp sponge.
When the walls are completely tiled, you can begin grouting the joints using decorative grout (performed with careful movements using a narrow rubber spatula).
In order to create a unique and unusual wall decor using tiles, you can use several methods of laying them. The most popular include:
- diagonally - the most labor-intensive, requires cutting tile elements;
- with offset - the tiles are laid out in a checkerboard pattern, reminiscent of brickwork;
- modular is the most versatile method; it can be used to lay tiles of different sizes and shapes;
- “herringbone” - the shape resembles the laying of parquet;
- The mosaic method is the most economical, because broken ceramic tiles can be used as a finishing material.
Please note that the main emphasis in bathroom design can be placed on the processing of natural wood surfaces. The best option is a beautiful and practical combined finish, which includes sanding and varnishing the surface of the timber, as well as ceramic tiles in places of direct contact with water, for greater tightness.
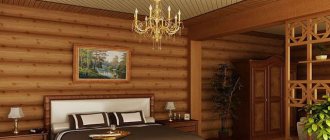
Bathroom interior in a wooden house
When the complex design is completed, you can begin choosing plumbing fixtures, furniture and decor for the bathroom. At this stage, everything depends on the size of the room, the number of people in the house and stylistic preferences.
Plumbing
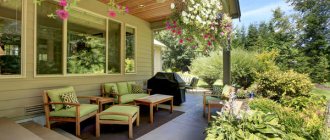
A free-standing bathtub looks very nice in a private home - especially if the room also has a large window. If you use finishing with natural noble materials (wood, stone, marble) and high-quality sanitary ware, you get a real luxury design. However, when choosing a bathtub, it is better to immediately abandon cast-iron models - they weigh too much and are not suitable for a wooden house, especially if the bathroom is located on the top floor.
Instagram @vsedddoma
Instagram @studiopikaplus
Instagram @smart_wood
If the area is small, you can replace the bath with a modern shower. It can be installed against any wall; it is most convenient to place the shower in a corner.
Instagram @design_denis_serov
Instagram @lubyanaya_design
Instagram @desart_group
Features of decorative finishing
Decorative processing of a natural wooden surface is justified when using high-quality calibrated wood, which has an ideal shape, as the main building material. Walls made from calibrated timber are smooth and beautiful, and interior decoration can be minimal, which compensates for the high cost of this material.
Basic methods of decorative processing
Sanding a wooden surface is the main technique in decoration; it involves removing the top layer of the surface using a special sanding machine. This is a rather labor-intensive process, which is compensated by an excellent result and significant savings on tinting and coloring compounds. Sanding allows you to remove small cracks and chips that are necessarily present on the wooden surface of logs, as well as darkening of the top layer - a natural reaction of the material to the presence of microorganisms and exposure to ultraviolet radiation. Sanding emphasizes the beauty and texture of the natural wood surface, making the design truly unique.
Toning is changing the color of wood using special tint compounds. This allows you to emphasize the natural texture of the surface, make the color more saturated (deep) or uniform, and create the effect of an aged surface. To do this, you can use both natural (organic) and factory-made aniline tints.
The toning process includes:
- wetting the sanded surface with water;
- surface treatment with a transparent or coloring solution (use a sponge or brush for this) - several layers;
- re-grinding (with a more delicate abrasive material);
- coating the surface with wax (as an alternative, impregnation with a special oil) is an important step, since such treatment not only protects the wood from excess moisture, drying out, absorption of odors, and deformation, which inevitably occurs during operation.
By following these recommendations, you can easily arrange a bathroom in a wooden house in accordance with your taste and desires. It is very important that such a DIY renovation will be beautiful, durable and will highlight the individuality of your home.
Decoration
Ceramic tiles in themselves are already a beautiful design technique. If you place it in an unusual way, you can get an exclusive version of the bathroom:
- Diagonal method of laying tiles. Quite a labor-intensive process. It involves frequent cutting of stones.
The first row is cut off with triangles and then the necessary diagonals will be the starting ones. Then they proceed in the same way as usual masonry, with the insertion of crosses and observance of the order.
- With offset. The method is reminiscent of brick laying. It is good for imitation of this product. The essence is clear - the tiles are laid in a checkerboard pattern.
- Christmas tree. Reminiscent of parquet or stacked bricks. The first row is cutting triangles, the second diagonally, the third half a unit.
- Modular installation. Suitable for laying tiles of different shapes and colors. By the way, this method will help you save on the purchase of expensive material - you should ask construction stores about the cost of the leftovers, and then finishing a bathroom with tiles in a wooden house will not cost the owners a pretty penny.
- Mosaic. For such a purpose combat is suitable. You will have to work hard, but even children can do the work; by the way, they can also be involved in work.
You don't need any plastic crosses or a level - the fragments of tiles are attached to the wall in any order. And after a while they are erased. Finishing a bathtub like this in a wooden house always looks great!
Your own bathroom is a relaxing room and you cannot allow it to remain ordinary and dull. The industry has come up with a lot of decorative materials, in particular, tiles and panels that are not susceptible to moisture and look great. The cladding work does not require expensive hired labor - a home-grown craftsman can easily do it himself.
Andrey Ponamarev
Author of publications on 1Drevo.ru with the topics: Polishing the house | Log house made of rounded logs | Insulation of a log house | Houses made of profiled timber | Houses made of laminated veneer lumber | Outbuilding made of laminated veneer lumber | Pine windows | Construction of a house from cylinders | Wooden floors | Cladding walls with clapboard | Porch | Material for home, etc.
Was this publication useful to you?
Bookmark it on social networks!
Total score: 9Votes: 1
Decorating a house with metal siding yourself
Imitation of logs for exterior and interior decoration
We recommend! — Encyclopedia Wooden Houses — NEW
You can find out detailed and expanded information on the topic of the article from the book “Wooden Houses,” which reflects all stages of building a house, from laying the foundation to installing the roof. Book price = 77 rubles.
You may also be interested in other BOOKS on building houses from wood with your own hands.
We recommend other posts on this topic:
Design of a veranda at the dacha in harmony with the style of the country house
Painting wooden walls inside a timber house
Do-it-yourself finishing of a log house from the inside
How to sheathe the inside of a log house with plasterboard
Fireplace in a wooden house - fireproof installation
Finishing a house from cylinders inside and outside