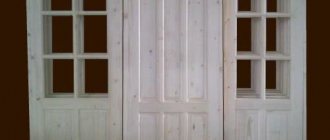
What is a subfloor?
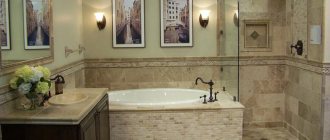
The subfloor is a kind of base for the finishing coating, creating a horizontal, even plane for it. It serves to distribute the load on the floor covering.
A classic subfloor is the construction of a subfloor on joists. This is exactly what is usually done in wooden buildings. For it, logs with a certain distance from each other are laid on the base base. For large areas, a double frame system, the so-called sheathing, is provided.
In it, between the lags, jumpers made of timber (crossbar) are installed. At the same time, the horizontal alignment of the surface of the logs is constantly monitored. A cranial block is attached to the bottom of the log. A subfloor made of plywood or wood board is laid on it. Subsequently, insulating material and waterproofing are laid between the joists.
Insulation and vapor barrier are laid on top of the subfloors. To make a rough coating, chipboard or fiberboard or plywood is used.
Rules for laying floorboards
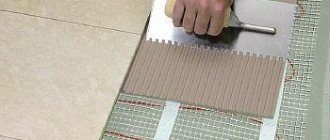
A subfloor made from planks is not that difficult to install. The first board must be mounted, not forgetting to leave a gap of 10-15 mm from the wall. It is recommended to fasten the boards with nails, the length of which depends entirely on the thickness of the floor boards. Nails should be attached at each location where deck boards and foundation joists meet. This will ensure maximum reliability of the subfloor structure.
The nails must be driven in deeply; it is recommended that the heads themselves be recessed as much as possible, but the minimum depth should be 2 mm. After the first board has been secured, it is necessary to begin fastening the second, attaching it quite tightly to the ridge. To simplify the work, use a regular hammer and spacer. All boards must be laid in such a way that they are tightly connected along the ridge, in which case the flooring will be reliable and able to withstand all loads.
If the rough flooring is for parquet flooring, then the nails should be driven in at an angle. They are recessed from the outside, but there are no holes left, as with conventional fastening. This improves the surface quality of the deck. When laying boards, you need to make sure that there are no gaps, so you need to press each individual board. After laying the first base, it is necessary to tamp all subsequent ones as tightly as possible. All boards are pressed so that a bracket can be driven in between the last installed board and the wall. The end board is hammered in using a hammer and a wooden spacer. This work must be carried out carefully so as not to damage the adjacent wall. Experts recommend using plywood panels, which can simply be attached to the wall.
To install a subfloor, you can use ordinary unedged boards, but you will have to process them yourself, performing the following set of works:
- planing from the front side is required;
- you need to trim the edges along a strictly established line, you can use a template;
- When the processing is completed, you can begin laying the flooring.
After installing the subfloor, it is necessary to check its quality and stability, then you can begin work on laying the finishing floor covering. But before that it is necessary to install hydro- and thermal insulation.
Stages of subfloor installation
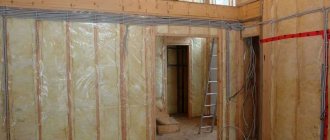
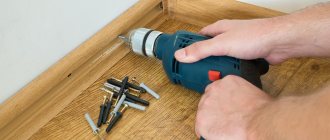
And now more about how to make a subfloor with your own hands. There are two options for installing lags: on the ceiling or on the base. In any case, before installing the subfloor, it is necessary to take care of the ventilation of the subfloor. All it takes is drilling a few round holes in the corners of the house. Subsequently, they are covered with bars. Also, before starting work, the entire underground space is treated with an antiseptic. These events guarantee the strength and durability of a wooden house.
Preparing logs for construction
In fact, logs are bars from which the frame for the future floor is made. For them, boards made of second or third grade wood are used. Since such logs usually have an uneven surface, they must be prepared before use.
To do this, the side on which the finished floor will be attached must be leveled using an ax. It will not be possible to make the surface perfectly flat, but it is necessary to level it a little. The horizontalness of the final coating depends on this. The top of the logs are covered with antiseptics.
Before laying the logs, grooves are made in the upper crown of the walls. Planed logs should fit exactly into these grooves, but with a distance from the end to the walls of 2-3 mm. Later, a soundproofing gasket is installed between them. In addition to the grooves in the beams, additional support in the form of brick pillars is installed for long logs. The distance between the joists depends on the thickness of the boards used for flooring. The thinner the boards, the more often the joists are located.
For boards 35 mm thick, the distance between the joists is at least 50 cm, 35-40 mm - 80 cm, more than 40 - 100 cm
Note! After installing the logs, their ends must be fastened. This is necessary so that they do not separate during the process of laying the rough covering boards.
Before carrying out work, the base surface is leveled, covered with crushed stone and compacted. Next, measurements and markings are made for the supports. The supports can be either a grillage covered with roofing material or the beams of the lower frame. In the first version, the mark is placed on the roofing felt, in the second, on the bars.
The horizontality of the logs is checked not only relative to the ground, but also relative to each other. They should lie on the same level. The maximum permissible deviation per 1 m² is no more than 1 mm
The support pillars are installed on a foundation, the minimum dimensions of which for one element are 40x40 cm. Its height must be at least 20 cm, with 5 of them above the ground. Waterproofing material is placed on the supports under the joists. It will protect the wood from mold. The logs are attached to the posts using corners and self-tapping screws with dowels. The same device has a subfloor in a brick house.
Fastening the timber
To support the subfloor on joists, use a beam with a section of 50×40 mm or 50×50 mm. Attach it to the bottom of the joists on both sides. In this case, it is necessary to take into account the size of the future insulation that will be laid on the rough coating. It is more economical not to purchase ready-made bars, but to buy a 150×40 board and cut it into three parts. As a result, from one board you will get three 50x40 mm bars.
Laying the subfloor
The subfloor is made from plywood or OSB or chipboard sheets. It is advisable to use slabs with tongue-and-groove ends about 20 mm thick. It is allowed to use sheet materials 12 mm thick in two layers. To fasten them securely around the entire perimeter, a sheathing of additional transverse bars is made to the joists. The subfloor boards are secured using self-tapping screws in increments of 90-140 mm. If the floor is made of sheet materials, the joints should fall on the central axis of the additional beams.
Note! Some craftsmen advise using not high-quality material for the subfloor, but a waste board, slab or picket fence. This is due to the fact that the rough coating reacts to changes in humidity and temperature. And such material is capable of deformation.
Having completed the installation work, they begin laying thermal insulation material and waterproofing. You have to be very careful. Subfloor boards can break under heavy weight. Therefore, it is advisable to walk on joists or thick boards thrown over them
Constructions
The construction of a wooden floor can consist of one or several layers. A single covering is installed without the use of joists and is not characterized by low thermal conductivity. To insulate a house, it is best to make several layers of boards, which will provide additional waterproofing.
Floorboards are always laid on joists, and they, in turn, are laid on a base of concrete or brick, metal pillars or on the ground. In rare cases, a technology is used that involves walling up logs into opposing walls. This leads to the formation of wide spans that are quite difficult to bridge.
The installation of a wooden floor on a concrete base looks the same as the installation of coatings in an apartment, which involves the use of floors made of reinforced concrete slabs. It is most difficult to install flooring on the ground floor, since the underground space must be well ventilated and dry. The reliability and durability of the floor surface depends on this, especially if the building is located in an area of high groundwater.
The floor in a wooden house consists of OSB boards, on which a layer of waterproofing and thermal insulation material is placed. The structure is secured by a vapor barrier film and finishing flooring. To ensure natural air circulation in the home, a distance of 2 cm should remain between the heat-insulating material and the finished surface. For the same purpose, holes of several centimeters are drilled in the corners of the rooms.
It is necessary to make an insulating layer on both wooden and concrete bases. For maximum insulation, thick insulating material is often used, which is placed between the first and second layers of double flooring.
Results and video with an example of the work
That's probably all, the rest is in your hands. The seemingly unnecessary expenditure on such flooring will pay off over time. A layer of insulation laid on the rough covering will help save on heating costs. And this, you will agree, is a significant argument in favor of installing a subfloor. In addition, a high-quality subfloor is the key to the durability of the finishing coating.
Processing of rough floors and rough ceilings, boards and lumber used for installing the rough floor and ceiling in a house and bathhouse is carried out to protect them from damage by rot, mold and mildew at the initial stage of building a house or bathhouse or at the time of its finishing. It is important to treat subfloors in the house and baths with an antiseptic to protect the wood, because in the future, these areas of the house will be sealed and access to subfloors, subceilings and hidden cavities will be limited or impossible without partial or complete dismantling of the floor or ceiling structure. To choose the right antiseptic for subfloors and subfloors, as well as an antiseptic or impregnation for treating subfloor boards, use a simple rule:
- In the house and especially in the bathhouse, more attention should be paid to bioprotection when treating floor beams and subfloors. Bioprotective treatment of floor beams will prevent rotting of beams made of logs or timber, boards, etc. in rooms with high humidity and a risk of mold and mildew formation.
- It is advisable to protect ceiling beams and ceiling beams, as well as interfloor ceilings and structures, using not only an antiseptic against fungus, an antiseptic against mold, a composition against wood rot (bioprotective impregnations for wood), but also against fire and the spread of fire. To do this, use fire-retardant antiseptics and fire-retardant impregnations.
Branded formulations
Chemicals for protecting wood when installing floors, according to building codes and regulations, are divided into several types:
- surface antiseptics;
- impregnation;
- film-forming compositions.
According to SNiP standards, surface compositions are divided into three types:
- water soluble;
- organic;
- oil
Water-soluble compounds include fluorides, borates (washable antiseptic substances), as well as complex compounds containing chromium, arsenic and copper (difficult to wash out antiseptics). Organics include compositions based on alkyds, urethanes and acrylics. A large group of oil compositions includes substances based on coal, anthracenes and other compounds of this kind. Oil preparations also include formulations based on vegetable oil, tar, and rosin.
We suggest you read: How to treat a bathhouse
Glazing compounds are used for surface treatment. By surface application we mean a depth of 1-3 millimeters. Impregnations are capable of penetrating 15-35 millimeters into the wood structure.
According to their functionality, antiseptic agents are classified as follows:
- preservatives;
- fireproof;
- transport;
- whitening.
Chemicals can be roughly divided into factory-produced compounds and folk remedies.
They are divided into fire-protective and bioprotective agents, as well as non-washable antiseptics.
This method of protection is one of the most effective, since it allows you to protect wooden materials not only from microorganisms and putrefactive processes, but also protects against fire. The latter quality, due to the fire hazard of wood, is of considerable importance.
Fire-retardant substances preserve the structure of the logs for many years: fire protection is provided for 3 years, and biological protection of the material is provided for 25 years. Although, if a wooden product is not used under extreme conditions, the actual lifespan of the drugs will be longer.
Fire-retardant compounds are environmentally friendly, lack unpleasant odors and are completely safe to use. The environmental friendliness of the drugs is ensured by their composition: there are no components dangerous to humans, including allergens.
Any legally sold drug must have a conclusion from a sanitary-epidemiological station, fire regulations and a quality certificate.
When you need to treat subfloors and ceilings with fire-retardant compounds:
- It is better to treat subfloors and subfloors in the house from mold and mildew, treat the subfloor and subfloor boards with an antiseptic immediately immediately before installing the subfloor, or immediately after laying it, or during the installation process.
- It is necessary to protect floor beams from mold and bark beetles, protect joists and floor joists at the time of assembling your house or bathhouse.
- You can treat floor beams against fungus with a fire-retardant antiseptic or treat ceiling beams immediately after assembling a house from logs or timber on the customer’s site after its final installation “under the roof” for the entire period of “shrinkage” and “standing” of the log house until the start of finishing the log house or covering a timber house with siding. It is very important to protect the floor and ceiling beams as soon as possible after assembly, because The wood of a log house or bathhouse may have high humidity and is most susceptible to darkening and the negative effects of fungal and mold spores. The beams carry the main load of the floors and everything that you will load on them. When a floor joist rots, the cost to repair or replace it can be very expensive.
← Photo of how to properly treat subfloors and ceilings with a fire-resistant antiseptic
What protection is provided when treating sub-floors and sub-ceilings with fire-retardant impregnation if you choose an antiseptic to protect the sub-floor:
- protection of subfloor boards and subfloor boards from fire, protection of subfloors from fire,
- protection of the subfloor in the house from darkening, mold and mildew,
- protection of subfloors and ceilings in a log house from bark beetles, protection of the subfloor and its components from infection by woodworm larvae,
- protection of interfloor ceilings, subfloor boards and subfloors from wetness and moisture,
- reducing cracking of subfloor and ceiling boards from cracking.
BUY an antiseptic to protect the subfloor and subfloor:
| for wood, protection of the subfloor and ceiling from fire, fire, mold, bark beetle, fungus, woodworm, rotting. Comprehensive protection of floor and ceiling beams. | for wood. protection of the subfloor and ceiling, interfloor ceilings of the house and bathhouse from mold, bark beetle, fungus, woodworm, darkening, etc. |
| In the category, some antiseptics are selected and offered for fire protection of subfloors and subceilings, according to the criterion of MAXIMUM EFFICIENCY and QUALITY of protective impregnations at MINIMUM COSTS to the customer for the entire life of the composition. | |
| BUY a fire-bioprotective antiseptic at the ColorLak Trading House. Our RECOMMENDED formulations - a possible solution with free delivery | BUY a bioprotective antiseptic at the ColorLak Trading House. Our RECOMMENDED formulations - a possible solution with free delivery |
| More information about our recommended protective compounds |
| Calculator for calculating the required amount of antiseptic to protect the subfloor and ceiling |
Joists are important structural elements of a home that serve as support for the subfloor and flooring. The joists provide rigidity and strength to the entire floor structure. Therefore, it is very important to ensure their long-term operation, protecting them from rotting and insects. From the article you will learn how to treat floor joists in a wooden house, and we will also focus on means for treating other internal elements of a log house. Not only the external walls of a wooden building are exposed to adverse effects, but also inside the house the wood requires good protection from moisture and insects. The criteria for selecting drugs for internal processing are described below.
Primary processing of lumber is carried out even before the construction of the log house. At this stage, the logs are treated with preservative, hard-to-rinse antiseptic compounds, which protect the wood from moisture and other weather factors for two to eight months.
The second time antiseptic treatment of wood is performed immediately after construction. Then the log house undergoes a shrinkage process, which lasts about a year, and after grinding, the final comprehensive processing of the wooden house is carried out. First, the outer walls of the building are treated, and only after that the antiseptic is applied to the internal elements of the house.
The choice of antiseptic for treating interior spaces must be approached very responsibly. It is necessary to choose preparations intended for internal use that are safe for humans and animals.
Typically, water-based antiseptics are used for protection inside the house, which do not contain harmful components, do not emit toxins, do not have an unpleasant odor, are breathable and moisture-resistant.
If there is blue discoloration or dark spots on the wood, these areas are treated with an active oxygen-based bleach that does not contain chlorine.
After antiseptic treatment, fire-retardant impregnation of the internal walls of the house is performed. To protect against fire, you can use salt and non-salt fire retardants. Preparations of the first type are inexpensive, but they are not able to fully protect the house from fire.
Non-salt fire retardants are more preferable, as they provide a high degree of fire protection for the home. They penetrate deeply into the wood structure, protect the wood from fire and prevent the spread of flame.
Antiseptic treatment from the inside of the house begins with the treatment of joists, subfloors and other lower structural elements that are closest to the ground or in direct contact with it.
The logs do not have direct contact with the ground; they are laid on the foundation. However, the crawl space is the wettest place in the house. In addition, due to the temperature difference in the basement and room, condensation accumulates under the floor surface.
Thus, conditions are created that are favorable for the development of microorganisms and insects, the appearance of fungus and mold, which, in the absence of antiseptic treatment, will very quickly spread to the walls and other surfaces of the house.
The antiseptic is applied to a clean and dry surface. The wood is thoroughly prepared beforehand. To remove unevenness, the base is sanded, dust and other waste is removed from the surface after sanding, cracks and crevices are sealed with putty. After this, you can begin applying the antiseptic.
Three groups of products can be used to process lags:
- fire-bioprotective;
- bioprotective;
- leave-in antiseptics.
Preparations of the second group provide biological protection of the inside of a wooden house from beetles, microorganisms, mold, and rot. Bioprotective antiseptic for floors in the house is environmentally friendly, free of allergens, and has a slight odor. Products are usually sold in the form of concentrated solutions, which are diluted with water before application.
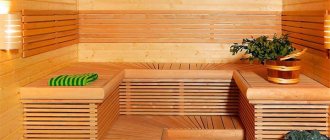
Leave-in antiseptics are intended for rooms with high humidity. They are often used to treat baths, saunas, and bathrooms. A lasting effect is achieved with 3-4 times application.
Wooden logs can also be treated with folk remedies: transformer or motor oil, resin, saline solution (100 g per liter of water).
It should be taken into account that when used oil and resin are used, the room is filled with a persistent odor that does not disappear for a very long time.
After treating all vulnerable areas inside the house, you can begin to antisepticize other internal elements of the room: walls, partitions, wooden floors. All these parts are usually impregnated with one layer of antiseptic. To treat a bathhouse, sauna or unheated garden house, a two-layer treatment is used.
Antiseptic for lining is applied with a brush, roller or spray. You can use several methods at once: treat complex areas with a brush, and the main area with a spray.
The water-soluble antiseptic dries completely in 10-20 days, after which you can proceed to the next stage of treatment.
Bleach is used to remove blue stains and dark stains from the surface of wood. The product is applied in a thin layer, pointwise only to the affected areas. To apply the composition, use a brush with natural bristles. The artificial material can react with the chemicals in the bleach and stain the walls.
The product forms a film on the surface that prevents fire. Wood impregnated with a fire retardant does not support combustion, and the fire does not spread to other parts of the house. To achieve maximum effect, it is necessary to process the log house at least 3-4 times.
After all stages of processing have been completed, you can begin finishing the wooden house. If you want to leave the walls unchanged, they can be coated with clear varnish, which will highlight the natural beauty of natural wood.
Today on the market you can find many high-quality covering paints that will completely paint the surface and give the wood any shade in accordance with the chosen dye.
Please note that any paint coating has its own service life and must be renewed every 3-7 years of service.
Logs and external environment
Theoretically, lags should not be directly affected by aggressive environmental factors. First of all, we are talking about dampness. The fact is that if the logs are laid on the foundation of a building, they do not have direct contact with the environment, since the material is vapor-proofed and waterproofed. However, due to temperature differences between the upper and lower levels, condensation still accumulates in the underground.
It should be understood that builders do not always strictly follow the technological process when laying floors, and if this was the case, then the wooden structure will also begin to rot.
Scheme of a wooden floor on joists
Another enemy of wood is harmful microorganisms. Due to natural factors, any unprotected wooden structure is susceptible to pests. Therefore, processing of any wooden structures is an urgent need.
There is no single correct way to handle lags. In each specific case, many circumstances must be taken into account, for example, the type of wood. After all, each type of wood reacts to humidity differently. However, a number of general recommendations can be given that will give you an idea of the correct approach to treating floor joists.
The main way to protect wood from rotting and microorganisms is treatment with chemicals.
What is a subfloor?
The simplest definition of a subfloor can be formulated as follows: this is the base on which the flooring is laid - from laminate to parquet and linoleum. The main purpose of such a subfloor is to level the surface so that the coating does not repeat unevenness and looks perfectly smooth. Typically, such leveling is required for floors in apartments of multi-story buildings.
But a subfloor is also called the base for an insulated floor, namely insulated, but not heated. This base is also called a slab. It is created so that in private homes, especially on the lower floors, the floor, which does not use a heating system, is naturally warm. Such an insulated floor will help save about 20 percent of heat.
It makes sense to consider both subtypes of subfloor.
The subfloor is laid on supports. The logs can be laid on the screed. But first you need to lay a waterproofing layer. Insulation is laid between the joists; its height should be the same as the beams. One of the most modern floor insulation materials is ecowool or mineral wool, or other insulation. Foam plastic, polystyrene or expanded clay can also be used as an insulating layer. Wooden elements are treated with an antiseptic so that the subfloor is not spoiled by insect pests and fungus. Also a very important factor is the ventilation of the subfloor, so the boards are not nailed to the floor, so they can be minimally deformed by moisture from the basement, but the finished floor will not suffer from this.
A vapor barrier is laid on the insulation. If foil-isolon material is used, which is laid with the foil layer facing up, then this technology helps retain heat.
The finished floor is laid on top of the insulation, but it is imperative to maintain a gap between the insulation and the flooring of at least one or two centimeters.
The technology for arranging an insulated subfloor, despite its apparent simplicity, requires knowledge of technology and practical experience. In addition, it is the professionals in this industry who will be able to determine for a particular project why a subfloor is needed, namely insulated, and whether it is needed at all. It is believed that in houses built in a warm climate, you can do without it, but where the temperature, especially in winter, is low, it will be necessary.
Pouring the floor in a private house instructions
To pour a concrete floor yourself, you do not need any special construction skills. The main thing here is to prepare the necessary consumables and calculate their quantities. If this is done, then filling the floor in a private house will be effective and simple.
Don’t forget, installing a durable and level concrete floor is the key to quality installation of any floor covering. To carry out quality work you must use:
- vibrating rammer;
- roofing felt;
- plastic film;
- expanded clay;
- foam boards;
- reinforced mesh;
- restrictive slats;
- building levels.
Work procedure or instructions for pouring a floor in a private house
1. First of all, you need to prepare the base surface for the future concrete floor. To do this, the top layer of soil must be removed to the required depth. Make an effort to ensure that the plane is as even as possible. Now, it must be compacted using broken bricks or crushed stone. A vibrating rammer will help you with this. If you do not have the opportunity to use such a tool, and you need to arrange the floor in a small area, then compaction can be done manually.
- 2. At the next stage of work, waterproofing and thermal insulation should be installed. It is most rational to use roofing felt for these purposes. If you want to save a little money on installing insulation, and you are sure that the groundwater level will never reach the floor in your house, then floor insulation can be done by laying several layers of a material such as ordinary plastic film. Here your personal preferences and financial capabilities play the main role.
- 3. When the waterproofing is completely installed, you should begin laying the heat-insulating material. For these purposes, you can use expanded clay or foam boards. Although this material is being used less and less, glass wool can also be used to create a heat-insulating layer. When insulating a concrete floor, take a responsible approach to the process of calculating the amount of consumables, otherwise, performing such repairs can cost you dearly.
4. Now, you can begin the process of filling the floor with mortar. Concrete is laid on top of the prepared surface from the end of the room opposite the door, while gradually moving towards the beginning of the room. The use of limit rails, which are set in accordance with the floor level, will help you in this process. It is very important here to strengthen the final layer with a metal frame. To carry out reinforcement, a regular chain-link mesh can be used. Using these actions, you can increase the impact resistance of the top layer.
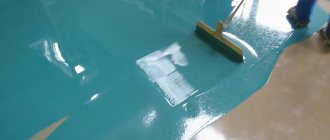
5. Well, now we can proceed to the final stage. Here you will need to carefully make a screed using a leveling layer of cement, which has been diluted with water, until it turns into a liquid slurry. For these purposes, you can use a special leveling mixture, which is freely sold in specialized stores.
Leveling subfloor.
It is no secret that new buildings are usually handed over only with a rough screed on the floor, and after purchasing an apartment, the owners think about how to make the floor as level as possible. Approximately the same thing is done with ceilings, making them tension. But when leveling both the top and the bottom into the room, pay attention to how many centimeters will be “stolen” from its height. If the final result approaches two and a half meters in height, this is already a critical limit.
As in the case of an insulated floor, when leveling everything starts with the joists, and boards or plywood are already laid on them, as well as fiberboard or chipboard about thirty millimeters thick.
Sometimes, during renovation or remodeling, communications in an apartment have to be moved. Such actions are also performed using a subfloor. Pipes or wiring are located between the finished and subfloor. Again, the height of the room should be taken into account so as not to reduce it further.
Any covering on a flat floor will look great, but at the same time, even the most expensive covering will not hide unevenness; furniture that stands on a curved floor will become deformed over time, and walking on such a floor is completely uncomfortable.
Features of log operation
Wooden structural elements during operation are not directly exposed to all kinds of natural factors, such as precipitation and wind. As a rule, there is no direct contact between the logs and the natural environment.
Sometimes dampness can damage them only if they are laid on a damp foundation. But when installing logs, property owners strive to prevent the beams from coming into contact with the external environment. In this case we are talking about the device of vapor and waterproofing.
Since wood is highly susceptible to rotting processes and mold fungi can intensively multiply on it, it must be protected from adverse external factors.
Cost of subfloor.
The total cost of the subfloor will be calculated based on the cost of the material; the work will cost exactly the same. Therefore, the more expensive the materials for the subfloor, the more expensive the work, and therefore the total cost of the subfloor. Of course, the purpose will also matter - leveling or insulation - depending on this, different materials and different technologies are used. Prices can vary from 120 to 1000 or more rubles per square meter.
Based on the above, discuss in detail with designers, builders, and craftsmen what a subfloor is needed for and whether it is needed in your particular case. If professionals think that you can’t do without it, listen, but if they say that the subfloor will be an unnecessary burden on the budget, refuse.
The durability of the finished floor covering also depends on the quality of the base preparation. It is for this reason that laying the subfloor plays such a significant role. The material used during installation must ensure the evenness of the finished structure and be resistant to compression. Modern technologies offer several options for arranging subfloors using different materials.
Services of professional craftsmen
Antiseptic treatment of the internal walls of wooden buildings is an important and responsible job that requires care and precision. Therefore, it is best to entrust it to professionals.
offers its services for interior processing of a wooden house. The work is performed by qualified specialists with extensive experience. We use safe and certified products, which we select individually, taking into account the characteristics and condition of a particular object.
You can send your application or contact us by phone; you will find our contact information in the “Contacts” section.
Calculate the cost of painting and insulating your home right now
Select types of work:
Select materials:
Do you have accurate measurements of the house?
By clicking on the button, you consent to the processing of personal data
Types of subfloors
The subfloor in cross-section resembles a layer cake:
- Base. It is he who bears the entire burden.
- Layers of hydro, heat and sound insulation.
- Screed.
- Rough coating.
Not every owner can build something like this, however, you can make a subfloor with your own hands in different ways. Fortunately, there are several options for its arrangement.
Wet floors
The most popular methodology. Its implementation does not require special skills or high costs. The screed is carried out using gypsum or cement-sand mortar. Most relevant in houses with slab floors. The screed is poured onto the layers of thermal insulation. The top of such a floor must be leveled and dried, and only then covered with the final finishing layer.
There are three main types of wet screed floors:
- Single layer. Used to eliminate defects in slabs, usually with differences of up to 1.5 cm.
- Double-layer and multi-layer. They are used when it is necessary to level out significant dissonance in heights (up to 12 cm). It’s simply not possible to eliminate them in one layer.
Pouring the base is a great way to create the perfect surface for laying carpet, laminate or linoleum.
The positive qualities of a wet screed include: moisture resistance, fire resistance, strength and relatively small thickness. The cost of the material is affordable: $1-3 per kilogram of the mixture.
Dry floor
To minimize the installation time of the subfloor, use a dry screed. Solutions practically do not participate in the process of its formation. For this reason, the screed does not require long drying. The creation of the “pie” involves insulating material, sheathing and wood flooring. During installation, ventilation gaps are created.
Important! The screed under ceramic tiles must be treated with a primer. Failure to do so may result in the coating peeling off.
Prefabricated floor
We are talking about a dry screed. It is mounted on top of slabs or flooring with boards. A prefabricated floor is a structure made of rolled, sheet materials and dry backfill. The “pie” usually consists of screed, thermal insulation materials, joists and dry mixtures. A subfloor is installed on top.
Prefabricated floors have a high level of sound insulation and serve as the base for most finished floors. They are almost 2 times lighter than wet screeds, but have a decent thickness, so they are not suitable for thin roll coverings.
Floors on joists
This type of subfloor is most often found in old houses. The logs level and greatly facilitate the installation of a wooden floor, and also prevent the weakening of the load-bearing beams.
Arranging floors on joists seems quite simple, but it cannot be done without proper preparation. It is impossible to work with them without knowing all the subtleties.
It is not permissible to level the joists using wooden wedges and wood chips. Such a structure is not viable and after some time the floor begins to creak and sag. To level, sand is poured under the joists or the material is trimmed.
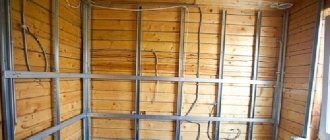
Antiseptic treatment and ventilation increase the service life of the frame. It is covered with slabs or sheet material on top, and to reduce the reduced noise index, polyethylene foam or fiberboard can be laid under the logs.
Adjustable floors
These floors are supported on the floor slab through threaded posts. They help raise the finishing coating to a height of up to 7 cm (if we are talking about plywood) or up to 22 (using logs). To create a subfloor, beams, skull beams and boards made of coniferous wood, usually of a lower grade, are used.
Filled dry screed for wooden floors
Filled screed also has its advantages. It is more durable and strong, but there is more hassle with it, since the wet process requires compliance with a number of conditions for the room in which the work will be carried out. The poured screed provides a dense, durable structure that is ideally even, since it is not expected to have any seams or joints. But this type of subfloor can only be laid by a specialist, and drying the layer can take quite a lot of time - from a week to a month. But the performance characteristics of this type of screed are impressive - it will serve for several decades without repair. Adjustable base floors are an alternative floor preparation technology used under any finish. This method is distinguished by the fact that, among other things, it does not “steal” space, ideal for apartments with low ceilings. This floor preparation makes it possible to hide utility lines underneath, ensures natural air flow in the space, is lightweight, and can be installed as quickly as a dry screed. The only drawback of adjustable floors is their high cost compared to other types of base coverings.
Subfloor materials
To correctly answer the question: how to make a subfloor, you need to decide what materials are needed for its arrangement.
The base is assembled from the following components:
- Bricks. They are used to create pillars that are placed on cement mortar.
- Metal corners and bolts. The logs are attached to the brick pillars.
- Waterproofing. Choose a material that can prevent rotting.
- Insulation. Lay on the bottom layer of the rough base.
- Boards or slabs. Used for flooring.
Of course, these are not all the necessary elements. Their variations are due to the variety of types of rough coating and the wishes of the owner. The quantity is calculated based on the size of the building premises.
The lifespan of a floor directly depends on proper preparation and the positive qualities of the materials included in its composition, including coatings.
Gypsum fiber boards
GVL and GVLV create a perfectly even base for finishing coating. Usually they are laid in two layers, fixed with glue. These slabs are usually used for leveling over expanded clay backfill or to create a heat and sound insulation coating. They are also suitable for laying over old subfloors. The only thing that should not be done is to combine GVL (GVLV) with lags. In this combination, the material cannot withstand local loads: even furniture legs can break the floor.
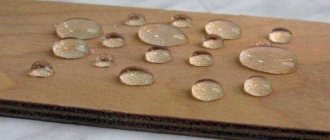
The base is suitable for almost any finishing surface: laminate, carpet, tiles, linoleum, cork or parquet. To protect the subfloor from the influence of possible leaks, you need to treat the slabs with a water-repellent compound.
Moisture-resistant chipboard
The material can withstand heavy loads (we are talking about the idea of high-density chipboard) and allows you to form a fairly even base. Due to its increased strength, it can be laid both on backfill and on logs.
Chipboard has good thermal and sound insulation properties. Typically, slabs, like drywall, are fixed with glue. They are laid in two layers, not forgetting about treatment with a water-repellent compound.
Important! Chipboard is best used in dry rooms and covered with carpet, parquet or linoleum. For additional sound insulation, the slabs are covered with technical cork.
Cement particle board
The material has excellent characteristics:
- High strength;
- Environmentally friendly;
- Water resistant.
DSP does not burn and is not afraid of even serious leaks. The market offers slabs with a thickness of 1-3.2 cm. They are laid on the backfill or on frame joists, laid in two layers (the top one is treated with a waterproofing or water-repellent compound).
DSP is excellent for laying parquet and laminate flooring. The only drawback of the slabs is minor deviations in thickness at the joints (up to 2 mm). In this case, it is unacceptable to cover the surface with cork or linoleum without first preparing the base. Defects are eliminated by sanding and putty.
Treatment of floor structures from rotting
Since any type of tree is a material that can easily rot, the question remains relevant: “How to treat floor joists?”
As mentioned above, moisture does not get under the flooring from the external environment, but it is present there. This means that condensation is accumulating under the floor surface. The reason for this phenomenon lies in the difference in air temperatures between the room and the basement below it. However, the difference between them can be significant.
All this means that treating wooden joists is really necessary. In addition to rotting, wood is a favorable breeding ground for various insects that can completely destroy the wooden floors of a building. This should not be allowed. Pests need to be destroyed.
There is no perfect solution for how to treat underfloor joists. The choice largely depends on the type of wood that was used to install the floor structure. The water environment can affect each wood species differently. The fact is that the microclimate in the floors of each of the constructed houses has its own characteristics, and they depend on many parameters.
According to both specialists and home craftsmen, a product called “Senezh” has proven itself best, but, unfortunately, it cannot be called universal. When purchasing it, you should pay attention that an individual composition has been developed for each tree species. The cost of the product depends on it. This antiseptic contains approximately 10 different drugs. In addition, the way they are used is also different.
It was for lags that the drug “Senezh Ognebio” was created, which:
We invite you to read: How to make a rough ceiling using wooden beams with your own hands
- perfectly protects wood;
- applies effortlessly;
- has an affordable price;
- able to prevent fire in a wooden house;
- is an excellent biological protection of bars.
Once applied to wooden elements, the preparation protects against fire for a period of up to 3 years. When a professional antiseptic is used for floor joists, this period increases to 5 years. If we talk about bioprotection, the period of effective action is about two decades.
In practice, another option is used for treating lag from the rotting process - it consists of using creosote. It is customary to treat railway sleepers with this composition. Unfortunately, when applying creosote there is also an unpleasant odor that is difficult to get rid of. It will also not be entirely pleasant to be in such a house.
On the domestic market, the choice of antiseptics for wooden elements is not limited to Senezh. You can treat logs using various high-quality products (read: “How to treat logs in a bathhouse and how to do it correctly”).
Often, owners of wooden houses are faced with a big problem - insect pests that settle in wood cause them a lot of trouble. This phenomenon must definitely be combated. Since the place where the logs are located is always warm, insects prefer to settle and breed there. Entire colonies of pests can render floors unusable and require major repairs.
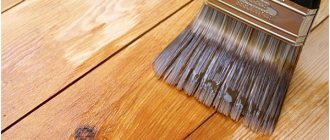
To prevent this, it is necessary to treat the logs using special protective agents. As practice has shown, the most effective and proven method is the use of resin. It still needs to be prepared for application before use.
The resin is heated by placing it in a metal container. After it softens, you can begin to work. Impregnation for floor joists is applied using a paint brush. After completing this procedure, no pest can penetrate the wood structure. The fact is that such a durable layer almost does not collapse over time.
When installing a subfloor, a board is often used. Basically, it serves only as a basis for laying insulation. The load from the insulation is small, so you don’t have to knock down the flooring tightly, but leave a gap of up to 1 cm. But such a sparse installation is suitable for materials with sufficient density. When using bulk thermal insulation, you will have to make a continuous sheathing.
If the beams or joists are long, intermediate jumpers are also added for a more stable geometry.
If necessary, a concrete floor can be made over wooden beams. The only question is whether the beams can withstand the load. This is calculated separately. What's good about this design? Because:
- An ordinary “cold” floor can be made warm. You can even heat it up (if the beams can handle it).
- You can lay tiles on top of a concrete slab, lay sheet material and lay coverings that are demanding on the base - laminate, PVC tiles, linoleum.
Using the same principle, you can make a subfloor using wooden joists without cement. As a top layer, you can lay plywood, OSB and other sheet materials that you consider suitable in two layers. Again, tiles and any other type of finishing coating can be laid on such a base.
Wooden floor under screed or insulated attic floor
What kind of logs and board should I use? You can/should be selected, since the thickness of the board depends on the step of installing the logs:
- the distance between the lags is 80 cm (up to 100 cm is permissible, but not under screed or tiles, under lighter coatings) - board 40 mm;
- installation pitch lag 50-60 cm, board 30-35 mm;
- for boards smaller than 30 mm, support is required with a distance of 35-40 cm (depending on the specific thickness).
In this case, the subfloor may not be continuous, but with gaps. Under a concrete slab, it is best to use extruded polystyrene foam or high-density polyurethane foam as insulation. You can use foam glass (foam glass), but it is very expensive. These materials can normally withstand the weight of a monolithic screed. By the way, the screed must be reinforced, since it is laid on an unstable base.