Using drywall in a bathhouse
Basically, baths are built from a wooden frame outside the city. Few people would think of using moisture-resistant drywall in a bathhouse. If we consider this option in more detail, there are many advantages:
- If you use drywall in a washroom, the wood will not succumb to constant moisture.
- If you decorate the dressing room with plasterboard sheets, then you can easily install hangers and hooks. Clothes will not be wet.
- The use of drywall is not only protecting wooden blocks from moisture, but also leveling the surface for decorating it with tiles or other decor.
- Creating a partition in a bathhouse from plasterboard will not be difficult. This is the best option if you need to divide the room.
The use of plasterboard in a bathhouse makes it warm, durable, and pleasant to relax.
Full contents of the material
Basic materials
It is preferable to choose materials for a bathhouse as for a wet room . Because during procedures, humidity increases in all rooms, and not just in the steam room and sink. Of course, the further you go, the less moisture in the air, but materials that are negatively affected by its excess should simply not be used in a bathhouse.
Regardless of where the future partition will be located, there are not many options for what it can be made from:
- brick;
- frame;
- timber or log;
- glass.
Let's look at the first three in more detail. All four types of materials are discussed in more detail here.
Brick
Brick partition from floor to ceiling. Photo InstallationFireplace
Brick can be used as needed and as desired. For example, partitions in a bathhouse near the stove are often made of brick - in this case it is the optimal material for fire safety . In all other cases, regardless of the room and the wall material of the bathhouse itself, brick is used as desired.
Detailed and interesting material about the construction of a brick partition can be read at this link, but here we will mention only the main thing that a bathhouse owner who decides to build a brick partition should know.
So, a foundation is required for it . It makes no sense to dig below the freezing depth of the soil; shallow soil is sufficient, but it is mandatory because the brick wall will weigh quite a bit.
And immediately answering the question about the type of brick: red ceramic , solid or with voids.
about the type of masonry, the composition of the mortar for different needs and much more at the link mentioned above.
Frame
A frame partition is often referred to as a “board partition.” It is the same. Whether or not to put insulation inside the partition is up to you, but it’s worth thinking about whether sound insulation or not. After all, the insulation in the internal partitions also serves as a sound insulator.
The minimum frame thickness is 50 mm. are made from timber or boards (if the frame thickness is greater) . are installed inside them . Horizontal ones are enough.
The frame is sheathed with boards. This can be a regular edged board, unedged, which will have to be sanded by hand, as well as lining (the most common option).
This article will introduce you to pictures and all the details of the design and manufacture of a frame partition.
Beam or log
In a log house, the partitions will most likely be made of the appropriate logs - round timber or timber. The principle of constructing such a partition is no different from the principle of constructing a wall from a log or timber. It will be necessary to use dowels or dowels to secure the logs together.
IMPORTANT! Such a partition (unlike the others) will shrink on its own. Therefore, regardless of the wall material, it must be allowed to slide when attached to a load-bearing wall.
Read more about making a log partition in this article. You will also find illustrations there.
Sheathing a log house with plasterboard
Is it possible to use gypsum plasterboard in a bathhouse?
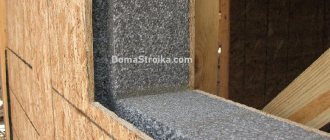
Before covering a wooden frame with moisture-resistant plasterboard, you should remember that wood “breathes”. It shrinks and swells. During the first years after construction, the tree shrinks; this should be taken into account. In order to combine a plasterboard structure, which is motionless, with a “living tree”, you need to create a system:
- it will not interfere with the “movement” of the tree;
- the plasterboard structure will be rigid and durable;
These transfers can be made in two ways:
- Creating a separate wall.
- Use sliding fasteners when installing drywall frames.
Using the first method requires a lot of resources and additional space. The second method is used much more often.
Inside the bathhouse
Bathhouse layouts contain a different number of rooms, each of which has its own functional purpose and corresponding design. Without having a specific project in front of us, we can only talk about general principles, which can be expressed by the following enumeration:
- Expediency. It is necessary to take into account the frequency of use of the bathhouse. This fact dictates the redundancy of its constant heating. At the same time, the building material must withstand numerous freeze-thaw cycles, quickly warm up and be fairly common and affordable. For most regions of Russia, this material is coniferous wood.
- The economic calculation that develops the first point of this list includes a comparison of bathhouse options with similar layouts, but made from different building materials. If we are not talking about a prestigious building, wood will again be a priority.
- Reasonable adherence to traditions means following time-tested interior solutions.
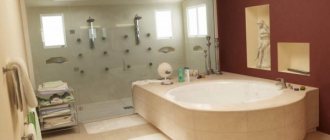
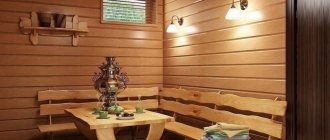
The following nice photos of bath interiors confirm the thesis about the priority of wood:
Washing compartment with font and shower.
Non-wooden materials also find a place in bath interiors:
- ceramics for walls and floors, as well as sanitary and hygienic equipment;
- metals, including bronze, brass, copper for the manufacture of taps, shower heads, pipes and accessories;
- glass - partitions, stained glass, etc.
In the design of a bath interior, more than anywhere else, a sense of proportion is important!
Preparing for frame installation
The frame for covering it with plasterboard is made of wooden beams or a combined frame. This will require wooden slats and a galvanized profile. First, a wooden frame is mounted, then profiles are installed on top.
The log house must be clean and treated with an antiseptic. Drying oil is best suited for this.
Electrical wiring must be insulated and corrugated.
Installation of a frame for plasterboard sheathing
Fasteners with oval holes are used to create the frame. The “breathing” of the wood will not be reflected on the plasterboard structure, since the fasteners will run along the cut grooves.
Wooden slats to create the frame will be needed in different sizes:
- support jays – wood 75/25 mm;
- for guides and horizontal ones you will need 50/25 mm slats.
If the slats are smaller in size, then they cannot be used. The length of the slats should be 4 cm less than the height of the room. This is important for the shrinkage of the log. On the ceiling in the bathhouse, decor is made from plinths, closing the gap of 3 cm from the floor there should be a gap of 1 cm.
Drywall frame diagram
A sheet of drywall is attached across the width in three places. This requires a calculation - 3 vertical slats per 1 sheet of drywall. The center rail must be mated to the support post. Thus, the support posts will be located every 1.2 meters. There are guide rails between the supports. They provide structural rigidity.
Step-by-step instructions for installing a wooden frame
In order for the plasterboard structure to be strong and durable, you should follow a step-by-step algorithm of actions:
- A line should be drawn on the floor, which will serve as a guide for the evenness of the future frame. It should be clear and even. To do this, use a level.
- The same line should be drawn on the ceiling. In order to make the plane level, you should use not only a level, but also plumb lines.
- If, during the installation of the slats, the wooden beam of the base wall protrudes, it should be scraped and processed. If there is a space between the lath and the base, wooden logs and pieces of plasterboard are placed under it.
- Now you should mark the places where the support posts will be fixed. The distance between them is 60 cm.
- The places where the guide bars are fixed should also be noted. Guides and support should alternate. The distance between the guides is 60 cm.
- The bars should be attached to the wooden base with screws with a vertical oval washer. The screws are attached at a distance of 30 cm from each other.
First, slats are installed along the edges of the future wall. Between them, a thread is stretched across the entire wall to make the surface even.
Frame for plasterboard walls
The screws are not tightened very tightly as the wood will move.
- After installing all the vertical structural elements, you should begin fixing the horizontal slats. Horizontally, the slats should be at different heights, not connected into one horizontal line.
- The best option would be a horizontal distance between spacers of 40 cm.
- The last step in installing a wooden frame is to check the structure for evenness of the surface. For this, a level and plumb line are used.
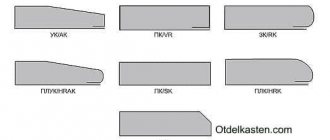
After completing the installation of the frame, you should begin covering it with plasterboard. The edges of the plasterboard sheets should be chamfered with a plane.
Ceiling insulation
For the ceiling we also recommend using pressed mineral wool, a thickness of 10 cm will be sufficient.
It is very important to make a reliable vapor barrier, mineral wool under the ceiling works in the most difficult conditions
Ceiling insulation
The sheets can be placed on the rough ceiling (the optimal option from our point of view) or secured against falling out with any metal slats, and special 20x50 mm slats can be nailed to secure the finishing lining.
Step 1: Nail the sub-ceiling to the ceiling joists. To do this, you can take unedged boards of the second or third grade with a thickness of approximately 20 mm. Don't forget to remove the bark. Over time, wood pests will always appear under the bark, which will begin to damage not only the boards of the rough ceiling, but also all the wooden structures of the frame bath. The distance between the boards is 20÷25 cm; for fixing, you can use ordinary nails or wood screws.
Draft ceiling installation
Example of a draft ceiling
Step 2. Place sheets of insulation in the free niches of the rough ceiling, carefully aligning them around the entire perimeter. First, you should put all the insulation from the attic side, then correct their position from the inside. Insert a knife or hacksaw blade into the joints between the sheets and, moving them forward/backward, achieve a perfect fit of the insulation on all sides.
Laying mineral wool
Step 3. Do a vapor barrier. To do this, you can use aluminum foil, modern membrane materials or ordinary polyethylene film. All these materials cope well with the tasks, although the difference in price can be very significant.
Bath ceiling vapor barrier
Be very careful when working with foil - it tears quickly. And any hole significantly reduces the effectiveness of the vapor barrier with all the resulting negative consequences. The vapor barrier is fixed with a stapler; do not allow the material to sag too much. The distance between the finished ceiling paneling and the insulating material must be at least one centimeter.
Sheathing slats are fixed on top of the vapor barrier for installing the lining
Step 4. Nail slats approximately two centimeters thick to the ceiling beams; the lining will be attached to them.
Video - Insulation of a frame bath
Step 5. Check the position of the waterproofing and insulation, if everything is normal, then begin finishing the ceiling. During sheathing, additional work may occur if the stove chimney exits through the roof. How to finish a chimney pipe?
The principle of protecting an insulated ceiling from heat
The scope of work will depend on the material of manufacture and the type of chimney. Let's look at the four most common types of chimney pipes.
- Sandwich pipe. The most modern chimney, has built-in thermal insulation, and is mounted together with the ceiling trim.
- An ordinary metal pipe. The most dangerous in terms of fire safety standards. When insulating ceilings, you need to leave a distance of at least twenty centimeters between its walls and the nearest wooden elements. The hole in the ceiling after insulation and installation of the chimney should be covered with a sheet of metal. To seal cracks, use a thin layer of mineral wool or sheet asbestos. The material is placed between the ceiling sheathing and a sheet of iron and tightened tightly with screws or nails.
- Ordinary brick. As a rule, the wall thickness of such a chimney is 220 cm. Additional measures for insulating wooden structures are the same as in the case of metal ones.
- Classic brick. It has a special thickening (fluff) at the place where the ceiling passes. Additional fire prevention measures are not taken in the area where the chimney passes through the ceiling.
Combined frame
This frame consists of a wooden sheathing and overlay galvanized profiles. This is a more expensive frame, but more reliable than a wooden one.
It will require galvanized profiles, wooden slats and drywall. You can take all the same slats, since the design is somewhat different.
Technology of plasterboard cladding of a log house
The wooden sheathing is mounted on the base of the log house in a reliable and routine way. A profile is mounted on top of the tree on oval backings, which allow the wood to “breathe.”
- Every 60 cm, slats are attached to the wooden base. First, you should fix the outer slats in different directions of the wall, and after the tensioned line, the remaining components of the wooden sheathing. The voids formed between the lath and the wooden wall are filled with a special mixture of sand and gypsum. The gypsum is soaked and brought to a “liquid dough” state, after which sifted sand is poured into it. The mixture dries in 5 minutes.
- All vertical slats must be mounted evenly; the rigidity and evenness of the surface of the entire structure depends on this.
- Horizontal struts should be attached every 40 cm. Fasteners with oval holes are used here.
- A horizontal bar should be attached 3cm from the ceiling downwards, onto which the guide profile is mounted.
- A wooden strip is mounted strictly horizontally below the floor 1 cm. A horizontal guide profile is attached to the slats at the bottom and top. Afterwards, the profile is taken, inserted into the NP and mounted vertically on horizontal slats every 40 cm.
- The result should be a double frame.
Return to contents
Sheathing with plasterboard. putty
After making the frame, an equally important moment comes - finishing the structure with plasterboard. Initially, whole sheets of material are applied. They should be secured using the method of “sinking” the heads of the screws into the gypsum board by 1 mm.
Afterwards, the “edged” sheet is mounted in steps. There should not be a single line of sheets horizontally. A chamfer is made on the cut sheets using a plane. The sheets are fastened from each other at a distance of 5 mm after the frame is completely covered with plasterboard, you should begin reinforcing the joints and puttingty.
Often tiles are placed on drywall
- The boundaries of the drywall sheets should be covered with a primer and wait until completely dry. When priming, you should engage the screw heads.
- After the primer has dried, reinforcing tape is applied. If it is self-adhesive, then by pressing tightly it is glued along the entire length of the joint. If it is a simple tape, then it should be glued to a thin layer of putty.
- After installing the tape, the joints are puttied and the screw heads are hidden. You should wait until the putty has completely dried and the excess has been grouted.
- The last step is to completely cover the entire surface with putty and, at the end, grout it with sandpaper.
- Before you start laying tiles, the surface should be coated with a primer for better adhesion.
If you follow the instructions of the step-by-step algorithm, then the plasterboard structure in the bathhouse will last a long time and with high quality.
Source of the article: https://gipsokarton-blog.ru/raboty/gipsokarton-v-bane.html
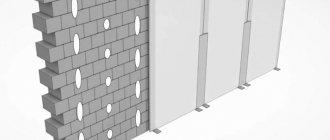
Foam block, aerated concrete
Construction of a partition from an aerated block
A partition made from this material is built according to the brick principle, but there are some nuances.
- When purchasing, choose a material whose sides are as smooth as possible, this will make the whole process easier for you.
- It is better to use a special glue for the solution, which is more flexible and dries faster. If you want to prepare it yourself, then the proportions will be 4:1; in addition to sand and cement, you will also need a plasticizer and a foam additive (they need 50 grams per batch).
- The first row is tried on without glue. If one of the blocks needs to be trimmed, it is better to trim the two outer ones to the same size to get a good dressing.
- In the same way as in the previous case, ligation is carried out with load-bearing walls using reinforcement or metal plates.
- After two rows, a metal mesh is placed in the seam.
- The doorway and the partition above it are planned in the same way as in the previous version.
- Finishing is done using facing material or putty.
Interfacing walls made of aerated concrete
Note! Be sure to provide ventilation in all rooms. This will help prevent the growth of fungus and mold.
To do this, you can install supply valves that will shut off. You can also install anemostats into the ceiling and draw leads from them through the ceiling to the roof.
Now you know how to make a partition in a bathhouse. There are no barriers to trying to build it yourself.
In a brick bath, the partition between the steam room and the relaxation room can be made of foam blocks - a material that is more accessible to install and use.
The significant advantages of the blocks are:
- low weight compared to brick;
- large dimensions, thanks to which the construction of the structure is completed faster;
- convenience and ease of installation;
- low cost.
The technology for installing the material is similar to brickwork and involves the following stages of work:
- The preparatory stage is carried out in the same way as in the previous version. Carrying out the necessary markings, fixing the cord to determine the contours of the future structure.
- Dry laying of the initial block row. If necessary, the blocks can be cut with a grinder or a hacksaw to obtain the required width.
- To connect individual elements, a special adhesive solution for foam blocks is used, prepared according to the instructions.
- The adhesive mixture is applied evenly in a thin layer, after which the foam blocks are installed in a row. For additional structural strength and reliable connection to the walls, reinforcing rods or nails up to 6 cm long are used. They are installed in holes previously prepared in the wall.
- After the partition has been erected to the upper level of the doorway, several reinforcing bars are installed above it along its entire length as a base, after which the blocks are laid up to the ceiling.
The same adhesive mixture is suitable for plastering foam blocks. After drying, the wall is primed and puttied. Painting composition or ceramic tiles are used as decorative materials.
Drywall in the bathhouse - features of use
Published on October 20, 2017 in the Bath category // // Author: Admin
- 5
- 4
- 3
- 2
- 1
(0 votes, average: 0 out of 5)
Usually the inside of the bathhouse is decorated with wood. For a steam room, this is a traditional material for which there is no alternative. Not everything is clear with the washing room - many people choose tiles that need to be attached not to the sheathing, but to a flat surface. Therefore, the question “can drywall be used in a bathhouse” is relevant.
The use of plasterboard in bath decoration
The only place where there is no point in using drywall, even theoretically, is the steam room. If the bathhouse is not wooden, but made of brick, foam concrete, or assembled using frame technology, the walls and ceilings of the steam room must be lined with wood.
In the dressing room, rest room and wash room, gypsum plasterboard can be used as a leveling material for wall planes for tiling with tiles, natural or artificial stone tiles. Regardless of what material was used in the construction of the bathhouse. The only question is choosing the right type of drywall and the correct installation technology.
https://remontcap.ru/mozhno-li-ispolzovat-gipsokarton-v-bane.html
Options for making partitions in a bathhouse
The reasons why an owner is thinking about remodeling a bathhouse can be completely different, but the questions that arise will be the same. If new partitions , then what are other people’s partitions made of? What options are there in general, and are they suitable for the bathhouse that you have specifically? Let's try to answer these questions and resolve all doubts with this article. The entire section about partitions for baths is here.
Further
Materials for a bath inside, Materials for building a bath, Partitions, Do it yourself