How many layers does the Earth have?
The earth consists of several layers. At the center of the planet is the inner core. It is surrounded by an outer core. Then there is the mantle. Above the mantle is the lithosphere, the earth's crust, on the surface of which we live. Another layer is occupied by the hydrosphere - the intermittent water shell of the Earth, consisting of oceans, seas, land reservoirs, as well as groundwater and glaciers. On top there is a gas layer - the atmosphere.
Internal structure of the Earth
The crust is the outer layer of the earth's surface. On the continents the crust is 30-40 kilometers thick, under the Pamirs and the Andes - 70-80 kilometers, under the oceans - about 10 kilometers. Accordingly, two types of crust are distinguished - continental and oceanic, the structure of which differs. The uppermost part of the crust consists of sedimentary rocks, and the remains of long-extinct animals and plants are often found in it.
Beneath the crust is the mantle, a very dense and very hot part of the planet. The upper boundary of the mantle runs at a depth of several kilometers (under the oceans) to 70 km (under the continents), the lower boundary - at a depth of 2900 km. The mantle makes up 83% of the Earth's volume and 67% of its mass.
Below that lies the molten outer core, which is between 2,900 and 5,100 kilometers thick. The outer core is liquid, that is, its substance is in a molten state. The outer core is the source of our planet's magnetic field.
The diameter of the inner core is small - approximately 1500 km. Most likely, it is solid, as it experiences enormous pressure that the overlying layers exert on it. It is believed to be composed of iron and nickel. The inner core is heated to 6 thousand degrees.
Partition and door
A door can be installed in any gypsum board partition. We read about this. Here, let me remind you that the weight of the door leaf should be:
- No more than 25 kg, for a PS stack without reinforcement with timber;
- No more than 50, 75,100 kg, if racks in the door opening type UA 50\75\100 are used.
Note:
The UA rack is a standard power (reinforced) rack from the Knauf company.
conclusions
A partition made of two layers of plasterboard costs more than a C111 partition (one layer partition). This is probably why in apartments and houses with ceilings up to 3 meters they prefer to make single-layer partitions, which in principle is not correct, since single-layer partitions are more suitable for technical rooms.
- Our prices:
The cost of installation work is below the market average. Just compare with your competitors. - Discounts for volume:
Sometimes we discount another percentage... - Reviews:
No fake reviews about us. You can find both positive and negative reviews online. Something is true, something is the obvious effort of our competitors... In order to check these facts, you are given the opportunity to see us in action at our facilities. We are an open company! Waiting for you. Call! - The quality of our work:
There is an installation technology, and no one can cancel it. We guarantee strict adherence to the technical assembly of the metal frame. - Delivery of building materials:
We offer our prices. Do you like it? Take it from us! No? Take it wherever you see fit. - Payment for work:
First, we erect a partition, money is paid upon the fact of their proper completion. No advance or prepayment before the start of work. If the volume is large, then we divide it into stages. At the end of each task, payment will be made for the volume completed. Form of payment: Cash and non-cash form of payment. - Experienced craftsmen:
High human capabilities and professional working tools make it possible to perform large volumes of work in a short time.
Do you have any questions? specialist or call a specialist for measurements.
Partition in 2 layers
Since, as mentioned earlier, two-layer cladding is used more often on partitions than on walls, we will consider the installation process using this design as an example. The covering begins, naturally, with the first layer. You need to remember four basic rules that remain relevant for covering any partitions.
- Vertical joints of sheets, if they are on the same side in the same layer, must be distanced from the joints of the opposite side by sixty centimeters. If they coincide, then cracks will inevitably appear on the partition, so this option is unacceptable under any circumstances;
- It is very important that all horizontal joints are on the profile. The joints should not be allowed to simply hang in the air;
- Horizontal joints between different sheets of drywall should not be on the same line. They cannot be allowed to even approximately coincide. The minimum distance between joints is forty centimeters;
- On the same side, horizontal joints with a distance of forty centimeters should be placed in a checkerboard pattern.
First of all, you need to calculate the required amount of materials. A calculator of components for covering the partition on both sides in two layers will help us with this:
*Attention ! All results are approximate - accuracy depends on the wall material, condition and shape of the room
So, let's get down to the cladding technology. To begin with, you need to sheathe only one of the sides, and then move on to the second. Do not forget that the sheets can be joined strictly on profiles and they are placed only vertically. But there are not enough profiles to secure sheets knocking in different places, so you will need to install jumpers. It will be difficult to install them alone. You will have to look for a partner who will hold the jumpers while you secure them to the profiles with self-tapping screws. When you install the first layer, it is important to remember that the pitch of the screws should not exceed seventy-five centimeters. After you have sheathed one side of the partition with the first layer, do not rush to start the second. If you have wired inside the partition, be sure to mark the location of the ends of the wires. It would be a good idea to take a photo of all the wiring.
To prevent the partition from appearing cardboard, fix sound-absorbing mineral wool in it before covering the other side.
You need to insert cotton wool between the profiles, leaving no free space. You need to use a little more cotton so that it sticks without additional fastening.
After covering one side, you can proceed to the second. The cladding process is no different, so I won’t go into detail about it separately. When both sides are sheathed in one layer, you can not start applying the second immediately. First, you need to finish the seams between the plasterboard sheets of the first layer. Firmly fill all seams at the joints with putty. There is no need to use reinforcing tape at this stage. It will only be needed on the second layer. Wait until the putty has dried on the seams before continuing to work.
Now you can begin installing the second layer of plasterboard sheets. Here comes the time to remember one very important rule: the joints of the sheets of the first and second layers of drywall should not coincide with each other. Why is that!? This is done for strength.
However, as was said earlier, the first layer of sheets was laid on the profiles and lintels; only on them should the joints be located. It would seem that all the joints of the second layer will automatically fall on the jumpers. To solve this problem, the distance between the profiles is made 2 times smaller than the width of the sheets. Thus, the edges of one layer fall on all even edges, and the edges of the other layer fall on all odd edges.
To correctly complete this task, it is recommended to record all the parameters of the sheets, namely their size, as well as the placement coordinates of all profiles and jumpers. This will help you not to miss when installing the second layer. Also, it will be useful to draw up a diagram of the partition in advance, indicating the parameters of the frame and all the necessary sheets.
The screws for the first and second layers differ in size. If for the first layer their length should be twenty-five centimeters, then for the second - thirty-five. The step, on the contrary, on the second layer is much smaller - twenty-five centimeters. It is also important to remember that plasterboard cladding should not be located close to the floor and ceiling. You need to make a small indent of five to ten millimeters.
Once you have completed the second layer of sheathing, you can begin drilling holes for sockets and switches. It was for this purpose that it was vitally necessary to record the placement of the built-in electrical wiring in a photograph or at least on paper. If you didn't integrate wiring into the partition, you won't have to do this. Those who decide to install a socket or switch will not have to worry too much. The process differs from installing wiring in a single-layer gypsum board wall only in that the hole needs to be drilled twice as deep.
Now it's time to process the seams of the second layer. As in the first one, you need to prime them. Carefully and firmly drive the primer into all joints so that no seams remain. First of all, try to press the primer inside the seam to completely fill the space between the sheets. After filling all the holes, putty the seams on top. After this, do not rush to immediately glue the primer tape. Take a spatula and remove all excess from the wall surface almost at a right angle. This is done so that the tape does not stick out. If the seams turn out to be protruding rather than concave, it won’t get better anyway. The surface must be perfectly flat so that decorative finishing from paint or wallpaper can be applied.
This applies to vertical seams; with horizontal and corner seams the situation is somewhat different. as well as horizontal ones, hammer them tightly with putty, remove excess, but before covering the seams on the surface, wait until the putty sets and dries. After this, reapply the putty, level it and apply tape. If you do everything at once, then most likely the seams will bulge and form unevenness on the wall. We have already figured out that this is bad for appearance. The thing is that the putty sits tightly in the seam and it is quite difficult to get it out of there with a spatula.
The paper reinforcing tape has a kind of groove in the center, which is designed to make it more convenient to bend the tape and thus press it to the corner. To avoid future problems, you need to carefully squeeze out all the putty from under the tape. Otherwise, it will be difficult in the later stages of repair. Forethought will help get rid of excess putty. When you first dilute the mixture, make it thinner. Remove the putty with a spatula. Press it harder and move it along the entire tape.
This completes the covering of the partition with plasterboard. The result is a dense partition made of two layers of plasterboard and does not allow noise to pass through. The next step will be the installation of sockets and switches, as well as finishing the wall to give it an acceptable appearance.
Double-layer gypsum plasterboard partition
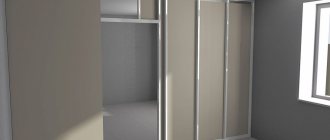
Good evening (it’s my evening here), friends! The New Year is approaching, I have no time to write, you understand, so this article will be the last in the outgoing 2013. In it I will talk about the nuances of installing an interior partition with two layers of drywall. The fact is that everything here is somewhat more complicated than in the case of one layer. As you can see, there is a gap of about 10 cm between them.
The easiest way out here would be rough marking with the expectation that the front edge will extend 2-3 mm beyond the plane of the wall. If you make it so that you can then simply plaster those 10 cm, it’s easier than accurately adjusting the HA to the plane. But we will go the hard way, because it is not always possible to act according to a simplified scheme. Our example is a completely real construction that I have been working on quite recently.
It actually consists of two partitions, but we will consider the larger one. There are three atypical points here: You ask - Roman, why make it two-layer at all? There are two reasons for this: increasing the stability of the structure due to its almost twice the weight and, accordingly, increasing its soundproofing ability.
If my memory serves me right, by 7 dB (52 versus 45). I wouldn't say it's worth it, but if finances allow, then why not? Naturally, in order to understand this article, you must definitely read the main article about a single-layer plasterboard partition. If you have already done this, then move on.
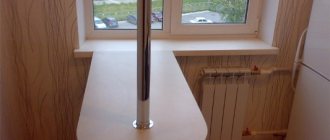
The easiest way to do this is as follows. Several pairs of plasterboard strips are sewn onto the rack profile, after which it will be much easier to adjust its offset from the base plane. We apply a level or a piece of the rule to the base wall and rest our PS against it with a pair of sheet scraps sewn onto it.
Wall paneling
As for double plasterboard sheathing on a regular concrete wall, applying a second layer is no different. The frame will be built a little differently and, accordingly, the sheets on the first layer of sheathing will lie differently, but double finishing occurs in a similar way. But covering a simple wall with plasterboard twice is not recommended. If, in the case of a partition, the second layer is necessary so that the artificial wall is strong enough and does not allow sound to pass through, then sheathing a concrete wall in two layers makes little sense. One layer of GVL will be quite enough for insulation, leveling, and sound insulation of walls. The disadvantage of two-layer wall covering is that it significantly reduces the size of the room. Perhaps in large halls this will be completely unnoticeable, but in small kitchens, bathrooms and toilets, which are often found in Russian houses, you will immediately feel the reduction in space. It's not very pleasant to live in cramped conditions. This is too high a price to pay to build a structure that in most cases will not be useful in practice. In such situations, it is better to get by with a standard single-layer construction.
In modern life, people who have no idea how repair and construction work is carried out correctly may encounter difficulties when installing drywall, and when they hear about installing this material in two layers, they may consider it something incredible. Often the use of two layers of drywall is associated with the manufacture of additional partitions in the room. In this case, plasterboard, mounted in two layers, is an excellent solution. It will not only divide the room into separate zones, but also create the necessary soundproofing of the spaces.
You can follow the link to learn how to soundproof partitions and walls made of plasterboard.
The practical use of plasterboard partitions made using two sheets makes it possible to produce a reliable and durable soundproofing structure.
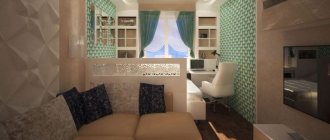
Plasterboard partition between the kitchen and living room in the interior of the apartment
And 3 more tips from an expert
Today, not a single renovation can be completed without the use of drywall. Therefore, it is important to have an understanding of its installation to avoid mistakes. Blogger Alexander Perikov answered the most pressing questions.
1. How many layers of plasterboard are best used in partitions and cladding? With a partition height of up to 4 m, you can install one layer of gypsum board on both sides. If the partition is about 4.5 m, then it is necessary to sew up the gypsum board on both sides in two layers; for a height of 5 m or more, three layers of gypsum board will be needed. By increasing the layers of gypsum plasterboard, you increase not only the stability and strength of the partitions, but also sound insulation.
2. Is it possible to glue wallpaper without first puttingtying the sheet over the entire surface? You shouldn’t do this: the sheet may be damaged from transportation and the wallpaper will not lie flat. Apply at least one layer of putty: it will not only level the surface, but also make it uniform - when hanging light-colored wallpaper, the drywall may show through.
3. How to hang heavy objects on plasterboard walls? In places where heavy objects are attached, for example, kitchen cabinets, it is best to install fasteners made of thick plywood. If you want to secure less bulky items, use special dowels for attaching to gypsum boards.
Installation points
The next stage is the installation of the second layer of plasterboard. However, before doing this, there are some points to consider:
- during the installation of the first layer of drywall to the metal frame, you need to cover one side of the partition with sheets, then attach the insulating material and cover the second side of the partition;
- joining of sheets in places where there is no profile is carried out using installed jumpers between the vertical profiles;
- when installing the first gypsum board, the distance between the screws should not exceed 15-20 cm;
- if there is wiring inside the structure, this should be taken into account when fixing the insulation, as well as gypsum boards. You can find out more about laying wiring under plasterboard sheets at the link;
- the space between the metal profiles must be completely filled with insulation;
- upon completion of one-sided cladding, you can begin finishing the second side of the partition;
- the metal structure is made taking into account that the distance between the profiles is 40-60 cm;
- fastening the second layer of drywall is no different from the first; it is also fixed with screws directly to the metal profile through the first layer, passing right through it;
- To attach the second layer of drywall, small marks are first made with a pencil to accurately hit the metal profile.
Watch in the video: a partition made of gypsum plasterboard in two layers using KNAUF technology.
It is worth noting that it is quite difficult to fulfill all the rules and conditions for the correct installation of the partition; for this, all calculations should be carried out in paper form and saved until the end of the work.
Number of screws for the partition
It is important to understand that to secure plasterboard sheets you will need plasterboard-to-metal screws of various lengths. For the first layer you need 25 mm TN screws, for the second layer you need 35 (or 45) mm TN screws.
I remind you:
- The sheets are attached to the frame horizontally and vertically;
- The pitch between screws is no more than 250 mm. Such technology;
- In this case, the screws must be at least 15 mm away from the horizontal edge of the sheets. At least 10 mm from the vertical edge. This will prevent the edges of the sheet from breaking;
- The displacement of the rows of vertical screw fastenings at the joints of two sheets must be at least 10 mm. This will strengthen the structure.
Final stage
To create a partition from two layers of drywall, you should think in advance about the output of sockets and switches. In this case, they are made twice as deep as when using one sheet of cladding. After fixing the plasterboard sheets, you need to proceed to the final stage of manufacturing the partition:
- the joints of the drywall sheets are covered with a primer material using a brush;
- the seams are carefully puttied with special KNAUF putty;
- after applying the first layer of putty to the seams, reinforcing tape is applied;
- excess putty is removed and a second layer is applied;
- This putty is also used to cover all fasteners.
Finishing consists, first of all, of reinforcing the joints.
When carrying out work on covering a partition made of two layers of plasterboard, attention should be paid to the following points:
- Be sure to prime the surface before applying putty.
- Installation of sockets and switches is carried out only after all other work has been completed and the putty has completely dried.
- When making a frame, pay attention to the strength of the structure, since if the strength is insufficient, the plasterboard sheathing may crack and the whole work will have to be redone.
- In order for the structure to maintain its integrity for a long time, it is advisable not to expose it to vibration.
- The surface of the partition is covered with finishing material. To finish the drywall surface, you can choose:
- painting the plasterboard surface with water-based paint;
- applying liquid wallpaper;
- covering gypsum boards with decorative plaster;
- painting or wallpapering.
Creating a frame
Let's make a reservation right away. There are many profile options on the market, but note that their quality often varies significantly. The price depends primarily on the thickness and composition of the steel, as well as on the layer of protective anti-corrosion coating. If you want the wall structure to last as long as possible, try not to skimp on the quality of the profile. But if you decide to save money, buy a profile with a thickness of at least 0.4, it will cost you less than “brand” ones, and the quality will be much better than Chinese fakes.
Installation of plasterboard begins with the creation of a frame based on metal profiles. To do this, guide strips (UD) are attached to the ceiling and floor using dowel nails driven into pre-prepared holes. Thus, the guides will actually follow the contours of the room and CD profiles can now be attached to them, which, if properly marked, will take a strictly vertical position.
CD profiles, depending on the weight of the structure, are located at a distance of 40 to 60 cm from each other. Then, using direct hangers and dowel nails, each profile is firmly attached to the wall. Thus, we will get a rigid frame to which, in fact, the drywall will be attached.
Installation of drywall on the ceiling
The metal frame of the ceiling structure is sheathed with plasterboard sheets using one of the following techniques:
- Ceiling plasterboard;
- Wall plasterboards;
- Install the ceiling gypsum board in two layers.
The thickness of the ceiling plasterboard is 9.5 millimeters. Such a thin material without sufficient rigidity. To eliminate the risk of cracking, all planes are reinforced with mounting mesh.
Interior decoration
The wall analogue with a thickness of 12.5 mm is more durable. Its rigidity is sufficient to obtain subsequent reliable coating. Correct installation and sealing of seams using reinforcing tape will protect the ceiling from cracks.
A reliable way is to fasten ceiling tiles in two layers. This method is expensive and labor-intensive. Costs are 25 percent higher compared to a single-layer ceiling.
Accurately and competently calculate the required number of drywall sheets using one of the options:
- By calculation, the total area of the surfaces to be coated is divided by the area of one slab;
- Use the help of a sales consultant in a specialized hardware store;
- Use the online calculator on the manufacturer’s website;
- Perform calculations using a computer program.
When sheathing in two layers, the result obtained is multiplied by two.
Pay attention to the shape of the gypsum board edge
Standard gypsum board sheets are produced with two forms of longitudinal edges: straight (PC) and thinned on the front side (UK). Gyproc gypsum board with thinned edge (Edge Pro) is suitable as the outer layer of multi-layer structures or for single-layer cladding. During installation, two adjacent sheets with CC form a groove, which is filled using special joint putty and reinforcing tape. The result is a strong, smooth, continuous surface.
Gyproc gypsum boards with a straight edge are used as a basis for the production of decorated (painted, wallpapered) sheets. The same sheets can be used for the inner layer of two- and three-layer frame cladding.
Arrangement of the first layer
First of all, markings are made. The principle consists of drawing a horizontal axis on the surface, which subsequently corresponds to the location of the outer side of the ceiling being erected or a line for the contour of curved elements. The wall slats of the structure frame are also placed along the applied horizontal line.
Beautiful and reliable
All types of frames differ in the method of attaching load-bearing elements to the racks, and in the type of hanging consoles (brackets). Installation is often carried out according to one of the following schemes:
- To save ceiling height, guide metal profiles are fixed between the main sections, perpendicular to them at the same level, using x-shaped suspensions;
- The guide rails are mounted perpendicular to the main ones on U-shaped consoles at different levels.
Installation is carried out in compliance with the following recommendations:
- For ease of use, sheets of drywall are marked;
- The maximum step for fixing sheets is 25 cm, hardware is screwed in using stops and strictly vertically;
- Place the hardware at a distance of 1 cm from the edge of the slab;
- the first sheet is laid in one piece, starting from the corner;
- The end edges are chamfered;
- Each panel is attached to two profile elements of the frame;
- The second row starts from half the slab.
Upon completion of installation work, fill the seams and joints with putty solution.
Installation of rack profile (PS)
The racks are made from PS profile
length 3000 or 4000 mm. Thanks to the ribbed surface and curved edges, it has greater bending rigidity. Its width in the partition design depends on the height of the room being repaired, the weight of wall objects and gypsum plasterboard slabs.
In kitchens, corridors and hallways (in areas with high traffic), a stronger profile with a width of 75 or 100 mm is installed. A pair of such racks (PS-100) can support a door weighing up to 30 kg. When installing more massive structures, use the UA profile - a reinforced version of the rack profile with a thicker wall. When installing a UA profile, the maximum permissible weight of the door leaf increases to 70 kg.
Vertical posts are fixed along the edges of the guide profile. They are cut so that a damping gap of 10 mm is formed between the tops of the supports and the ceiling profile, designed for shrinkage of the building.
Be prepared for the fact that the profile may bend at the cut points. If the support posts are deformed, take pliers in your hands and straighten their edges.
After cutting, each of the racks is attached to the lower profile, and then, like a support on a hinge, its free end is tucked into the upper guide, aligned vertically and screwed to the PN profile using self-tapping screws.
The row posts and posts that form the base of the doorway are installed in the same way. The difference in their installation is as follows: the first, as a rule, follow a standard step of 400 or 600 mm (since the width of the plasterboard sheet is 1200 mm), and the second are installed directly on site and are tied to the width of the doorway.
Marking the axes of ordinary racks begins from the edge of the wall. From it to the center of the first rack (when aligning and installing them, the tail of the tape measure can be hooked onto the edge of the guide profile) and the central axes of other supports are set aside 600 mm. When the bevel of the outer sheet is cut, the distance to the first rack is reduced to 550 mm.
In case of increased load on the frame (when tiling a wall, hanging heavy cabinets, boilers, heating radiators on it), the distance between the racks is reduced to 400 mm, remaining a multiple of 1200 mm.
With the above steps of the frame racks, the plasterboard sheets are joined in the middle of the profile.
Installation of the second layer
Installation of the second layer of drywall begins only after the sheets of the first layer are securely attached to the ceiling. When performing installation, increase the interval between fasteners.
Interior partition
The two-layer fastening technology means that plasterboard sheets are installed in such a way that the seams of the first layer do not coincide with the seams of the second. The first sheet is not laid whole, but starts with half. The order of work is as follows:
- The end surface of the gypsum board is lubricated with glue;
- It is optimal to plant sheets on PVA glue;
- Screw the sheets with long self-tapping screws to the frame slats through two layers;
- Next, installation is carried out by analogy with the first layer.
The seams are sealed using reinforcing material.
The result is a ceiling with a strong, rigid, almost monolithic ceiling sheathing. The total thickness of such a coating is 19 mm, onto which a frame can be safely installed in two or more levels.
There are many variations in the design of the formed ceiling base. They combine perfectly with other types of finishes. Multi-level illuminated systems amaze the imagination with luxury and variety.
Our services
If necessary, our craftsmen will level the walls in your home. Many years of experience of each of them is a guarantee that the walls will become perfectly smooth and will receive a new life for many, many years. We never rush or chase the number of orders, but treat each object as our own brainchild, taking care that every detail becomes flawless. This applies not only to the alignment of walls. Plasterboard partitions, plasterboard ceilings and suspended ceilings – the company’s specialists perform any task conscientiously and at the highest technological level. Plus, we can provide you with impeccable sound insulation , as well as a full range of electrical installation services - from wiring and installing switches with sockets to installing ceiling and wall lighting. There are no impossible tasks for us.
If necessary, we will completely relieve you from the hassle of repairs by providing all the necessary materials.
Our warehouse contains only high-quality metal profiles, drywall and everything that is required for construction work.
You can order specialist services by either filling out a form on the website or by calling.
Installation diagram - you can draw a diagram of the installation of gypsum plasterboard sheets according to the drawing of the future ceiling on a reduced scale in order to clearly see how the ceiling plasterboard will fit on the frame, and how many sheets you need to buy. Plasterboard floor. To level the floor and give it thermal insulation properties, waterproof plasterboards are used. Calculations of the required number of sheets are made similarly to the formula for a single-level ceiling.
It is important that the profile thickness is at least 0.55 mm, otherwise it will deform over time, resulting in cracks along the seams.
Installation of a double-layer partition
In order to improve sound insulation in the room and to enhance the stability of the plasterboard partition, the structure is sheathed with material in two layers. Such installation is carried out under the obligatory condition that the partition is adjacent to the load-bearing wall.
First, gypsum boards are installed on one side of the interior partition, and they are joined on the profiles and cross members of the frame. Be sure to leave technical gaps so that the drywall has a cavity for expansion with fluctuations in humidity and air temperature. The slabs are fixed at a distance of 15.0 cm from the floor, with an interval of 15.0-25.0 cm.
Partition in two layers
Then the insulating material is tucked tightly into the frame without gaps. A rolled version of mineral wool is better suited. The insulation is not additionally fixed.
Mount reinforcing jumpers to join the sheets on the other side, and install the sheets. Now the lining of the first layer is ready.
Seams are sealed without reinforcing mesh. Dry and begin installation of the second layer.
It is important that the seams between the sheets of the first layer of the inner surface of the partition coincide with the seams of the second layer on the outer plane. This will allow the transverse joints to fall onto the already installed additional jumpers. A design drawing or a magnet will help you not to miss.
Drill holes for switches and sockets. Electrical wiring is placed in a corrugated sleeve.
Compliance with safety rules when performing electrical installation work is a prerequisite.
We begin lining the end planes of the partition. Then all surfaces are primed, and then the seams and joints are sealed, now using reinforcing material. They are treated with primer again and finally leveled with a layer of putty. The choice of finishing material is unlimited.
Required tools and materials
To create partitions from plasterboard in two layers, you will need to use not only step-by-step instructions, but also suitable tools and components for installing gypsum boards. In this case, you should prepare in advance:
- sheets of drywall in the quantity required according to calculations;
- metal profile for forming the frame;
- soundproofing material, you can use mineral wool;
- self-tapping screws for profiles and drywall;
- metal scissors for cutting metal profiles and hacksaws for cutting drywall;
- finishing putty and for joints of gypsum board sheets, spatulas;
- primer material;
- measuring instruments: building level, tape measure;
- construction knife for soundproofing material;
- electric jigsaw or hacksaws for cutting drywall;
- tape for sealing joints.
Two-layer partition cladding technology
At the first stage of double cladding, the first layer of wall plasterboard (Knauf thickness 12.5 / 2 or 2.5 m) is fixed to the supporting frame. When installing the second layer, you must adhere to the following four rules:
- Both horizontal and vertical joints of the sheets of the inner and outer layer on one side of the partition must be at a distance of at least 50 cm;
- Vertical joints of sheets of opposite sides of the partition when sewing, both the first and second layers, must be spaced at least by one load-bearing post - 60 cm;
- If the room has a significant height and vertical joints appear during the cladding, they should also be fixed to horizontal profiles. It is unacceptable for sheets to hang in the air or rest on the underlying sheet. This is guaranteed to lead to deformation of the edge of the plasterboard and the appearance of cracks on the outside of the decorative layer;
- The placement of horizontal joints must be at least 40 cm.
IMPORTANT! Since additional load-bearing profiles must be provided in the frame to secure horizontal joints, it is more advisable to use large-sized gypsum boards for renovating an apartment with high ceilings. For example, Knauf moisture-resistant plasterboard thickness. 12.5 / 3m.
Mineral wool must be placed inside the wall for sound insulation
Strengthen walls with heavy storage systems
If you plan to place storage shelves on the wall, a large TV, or decorate vertical surfaces with heavy decorative brick, ordinary drywall will not work. Bet on Gyproc Strong with increased thickness and reinforcing fibers in a gypsum core. This is a good alternative to “wet construction”: a partition made of Gyproc , with a smaller thickness, provides better sound insulation, and the process of installing a gypsum plasterboard structure is significantly reduced, due to the absence of such lengthy “wet processes as plastering.
Some features and secrets of installation
Although two-layer cladding somewhat raises the cost of apartment renovation, there are certain tricks that will allow you to save money. First of all, this is the use of thinner (9.5 mm) plasterboard for the inner layer. For the exterior, you will have to use standard Knauf wall plasterboard with a thickness of 12.5 / 2.5 m. If a double partition should be erected in rooms with high humidity, then for the first layer it is allowed to use ordinary, non-moisture resistant gypsum board.
If there is no supporting profile at the junction of the first layer, the use of jumpers is allowed. These are strips of standard wall gypsum board with a width of at least 20 cm. Installation of the lintel is best done by two people. While one worker supports the jumper from the inside of the wall, the second secures the element with a screwdriver. The pitch of the screws for fastening the jumper should not exceed 30 cm.
The distance between the supporting frame profiles is best taken as half the width of the plasterboard sheet. Thus, the first layer of gypsum board will be attached to odd racks, and the second to even ones. The first layer is fastened to the supporting frame with self-tapping screws for plasterboard 25 mm long in increments of no more than 75 cm. The second layer is attached with self-tapping screws 35 mm long in increments of 25 cm. It is recommended to fasten the sheet from the center to the edges or from one edge to the other, this will prevent the formation of waves .
Layout of joints for two-layer installation
It must be remembered that both the first and second layers of gypsum plasterboard should not fit closely to the ceiling or floor of the room. This can cause internal stress in the structure as the building shrinks, which will lead to cracking of the load-bearing layer and external decorative finish. The distance to the ceiling and the finished surface of the floor covering should be at least 5-10 mm.
There should be no gaps between the two layers of drywall; their presence can lead to acoustic reverberation, in other words, the second layer of drywall can resonate like a tense drum. Still, between the sheets of the first layer it is necessary to seal it with putty, but without using plaster tape. To improve the connection, some craftsmen coat the entire surface of the first sheets with wallpaper glue for paper (bustilate or PVA), this guarantees a reliable connection and gives the instructions additional solidity.
People who do not have experience in construction, having heard about two-layer drywall (the installation technology of which is much more complicated than single-layer), do not always understand why such a design might be needed. Carrying out renovation work often involves the need to divide a large room into several parts using additional partitions. For these purposes, plasterboard finishing in 2 layers is usually used.
Cost of leveling walls using drywall
Installing drywall on walls makes repairs much faster and easier. GCR, unlike building mixtures, does not require a long drying time and after working with it, much less dirt remains.
An additional plus is convenience. For example, with the help of plasterboard sheets you can very quickly align the corners of a room at 90 degrees without using a huge amount of materials for this. This is especially important in older houses, where over the years the size discrepancy can be measured in tens of centimeters.
For apartments, the soundproofing properties of gypsum boards are important, as well as simplification of the installation of hidden communications (electrical wiring or plumbing). If the walls are leveled using plasterboard , there will be no need for gating, which is always associated with a large amount of dust and construction debris, plus it takes a lot of time and money.
Finally, drywall opens up truly limitless possibilities for the designer’s imagination. Niches, decorative protrusions and other interior elements - with gypsum plasterboard all this can be achieved quickly and without spending extra money.