Painting problems and solutions
Let's consider typical problems that can arise in cases where paint and varnish materials are not selected correctly, the approach to painting work is carried out, the processes of painting, drying, etc. are disrupted.
Peeling
(cracking and peeling of the paint layer)
Probable reasons:
- the paint is applied in a very thick layer, especially if alkyd or oil paint was used;
- applied in unsuitable weather conditions - in extreme heat, when the top layer of paint dries faster than the base layer;
- painting was carried out in a damp room;
- Uncleaned surface is painted.
Solution:
- Remove loose paint with a wire brush and sand. If using primer paint, allow it to dry completely. For repainting, use high quality paint.
Wrinkling
(deep, irregular cracks that resemble a dirt-covered surface)
Probable reasons:
- the paint is applied too thickly, usually on a porous surface;
- the paint is applied too thickly to a surface previously painted with lower quality paint to improve the coating;
- paint has accumulated in the corners without being leveled.
Solution:
- Remove the old paint layer with a scraper or sandpaper. Clean the surface, then prime and repaint. Using high-quality latex paint can prevent cracking because the paint forms a more flexible film than water-based paints.
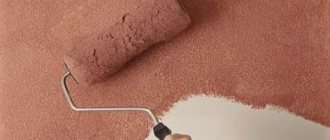
Roller marks
(traces of uneven texture on the painted surface)
Probable reasons:
- the wrong type of roller was used;
- low quality paint used;
- the wrong technique was used when painting with a roller.
Solution:
- Make sure to choose the right type of roller. If the roller has been washed before, make sure that the water has been squeezed out of it. Do not allow paint to pool around the edges of the roller. Start working from the ceiling and continue down in small areas. Apply paint using the M or W technique, starting from the top and without lifting the roller from the surface.
Cracking, peeling
(the paint film cracks due to aging, which leads to peeling of the paint layer)
Probable reasons:
- low quality paint was used, which does not provide tight adhesion to the surface and is not elastic;
- the paint is applied in too thin or thick a layer;
- improper surface preparation or applying paint to a wooden surface that has not been treated with primer paint;
- cracks resulting from deformation of the painted surface;
- seams and surface cracks are processed technologically incorrectly.
Cleaning products for freshly painted floors
Before washing the wood surface after painting, you need to wait until the paint has completely dried. Then use table vinegar mixed with water for cleaning.
The instructions are very simple:
- Fill a clean bucket with almost hot water and add 1-2 tbsp. l. vinegar.
- Wash the floor with a clean, or better yet, new, soft cloth, using the prepared solution.
- Change the acidic solution in the bucket and repeat the procedure.
Then, for another 7 days in a row, wipe the floors with a damp cloth soaked in a mixture of water and vinegar to remove the oil that will continue to bleed from the inner layers of paint for some time.
How to speed up the drying process of paint?
Option 1
A special catalyst will help speed up the drying of oil paint. This product is called a desiccant. It is sold in the paint and varnish departments of construction stores. The drier is an accelerating element for polymerization, that is, its purpose is to ensure that the drying process does not take too long.
Salts of cobalt, manganese and calcium can be used as catalysts-accelerators-driers. Lead, zirconium and barium salts are often used. Salts of carboxylic acids are an ideal solution, although the modern market increasingly offers multi-metal mixed dryers that can be used for several types of paintwork materials and do not in any way affect their color and adhesive properties if you follow the included instructions.
The appendix will tell you how much drier you need to add per 1 liter so that the paint does not “curl” when applied, but simply dries faster. After using such an accelerator, difficult-to-dry oil compositions obediently polymerize. How long does it take for paint with drier to dry? Typically within 24-28 hours at room temperature.
You need to take care of the acceleration before applying the first layer, that is, you need to add the drier directly to the paint before painting, otherwise the trick will not work.
Option 2
How to quickly dry oil paint if the catalyst application time has been missed and 2-3 layers of paint are already on the wall? I would like to believe that the layers are thin enough. If you prefer a spray gun to a roller or brush, which under pressure produces an even, thin, smooth layer, and the paint is distributed over a heated surface, then the drying time is significantly reduced.
A cold wall for oil paint is a bad option. In the cold, the butter hardens, spreads poorly (think of a sandwich) and, accordingly, dries with difficulty.
Option 3
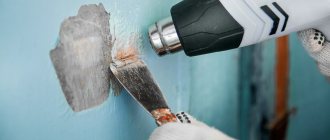
What else can you do to make the paint dry faster? Raise the temperature! High temperature is another catalyst to make the paint harden faster. At industrial facilities they use a heat gun, but for us a hair dryer or a regular infrared heater is enough. With this we will “kill two birds with one stone”: we will raise the temperature inside the room and lower the humidity.
Lack of moisture and heated air contribute to the rapid release of solvent from paint layers (oil paints do not have their own water), so the film formed during drying becomes dense and hard - it has dried out!
Option 4
When the solvent evaporates, many odorous harmful substances are released, so many people advise creating a draft in the room. Ventilation will not only remove unhealthy fumes, but will also promote quick drying. Therefore, we open the doors and windows, turn on the fan, and place the heater in the middle of the room, in no case close to the wall.
The infrared waves of the heater must penetrate through the resulting film and oil base evenly, and also evenly heat the wall underneath. However, make sure that the temperature does not rise above 60 degrees, otherwise the “boiled” paint will simply burst and crack. This is definitely not our option!
Advice! When the paint has dried, wipe the fresh surface with a soft cloth soaked in a solution of vinegar or ammonia, then it will not “stick” and will acquire a pleasant shine.
On any composition (on the packaging) you can read that it must be thoroughly mixed before use - if you neglect this instruction, the binding components may remain at the bottom, making the coating incomplete.
It is also very important that the surface to be treated is dry and free of oil and grease stains, which can directly affect the drying time of the paint. Another reason for prolonged drying may be a violation of storage conditions - all paints have a critical negative temperature. Perhaps the composition you purchased simply froze, losing its properties.
Is it possible to wash floors with vinegar after painting - what are the dangers of old methods?
It is possible, even necessary, to wash floors with vinegar after painting, but it is important to do it correctly: follow the proportions exactly and do not wash too early, until the paint has dried. Read on to learn how to wash the floor without damaging the fresh coating and why you should use vinegar.
Preparing the vinegar solution correctly
Household vinegar is universal: it not only destroys odors and has disinfectant properties, but also removes greasy stains. Quickly and efficiently copes with even minor dirt and dust that appears on a freshly painted surface, especially after drying. Housewives love this method of cleaning the floor for its effect of enhancing color saturation.
The first thing you need to do before washing is to properly prepare the vinegar solution. The procedure is important, since too hot water or a high concentration of vinegar will only aggravate the matter and cause unsightly stains.
A vinegar solution for cleaning floors after painting is prepared as follows:
- We take a standard plastic or zinc bucket with a volume of 10 liters.
- We collect a full bucket of hot water. The most important thing when cleaning the floor is to choose the right water temperature. It should not be boiling water, but also not just warm liquid. A suitable temperature is one at which you can hold your hand in the water, but not for long - up to 5-7 seconds.
- Add 2 tablespoons of simple vinegar to the water. It is also called household or home. Concentrated acetic acid, even if it is found in the house, cannot be used.
- Mix thoroughly for 15–20 seconds.
- Let's start cleaning the floor.