Although wallpaper continues to be popular for wall decoration, now it is increasingly giving way to paint and varnish materials. The latter have a number of advantages: no seams, long service life of the coating and a large number of possibilities for decoration. An additional advantage is the wide range of wall paint colors: pearlescent, beige or the recently trendy dark blue.
Pearlescent paint is one of the most beautiful and popular finishing compositions.
Reasons for the popularity of mother of pearl
Paint containing mother-of-pearl is suitable for finishing walls and ceilings, as well as for decorating pieces of furniture and decorating individual interior elements. A variety of shades allows you to experiment with the intensity of shine.
By changing the concentration level of the coloring pigment, as well as experimenting with the thickness of the protective varnish layer, you can achieve an iridescent effect, i.e. scattering of sunlight.
In addition, the pearlescent shade can create the illusion of a silk or velvet texture. In some cases, such a coating is used to create a concrete texture.
Key Features
The basis of paints and varnishes used in interior decoration is acrylic resin. There are several reasons for this. Firstly, it is non-toxic. Secondly, this paint is plastic, which allows you to use the same application methods as with plaster. Thirdly, the resin promotes rapid drying.
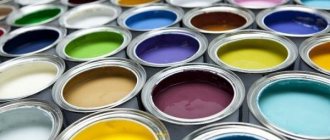
Composition and color palette
Even in ancient times, people knew how to extract natural mother-of-pearl from oyster shells. But in industrial production, this method would lead to an increase in the price of the product. Therefore, natural pigment is used in the manufacture of cosmetics, and synthetic materials are used for paint and varnish coatings.
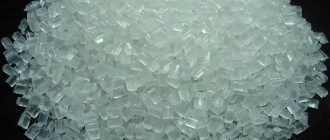
Pearlescent pigment for paint is made from natural mica.
For example, the effect of rainbow shine is achieved by adding mica to the paint. If it is natural, the result is opaque mother of pearl. Artificial mica makes the material translucent, and full transparency can be achieved using glass. If the coating needs to be given a metallic shine, aluminum or bronze powder is added to the composition.
The basic shades of mother-of-pearl are pearl, silver and gold.
Pigment granules, having a high refractive index, create the effect of depth of coverage. Their size plays an important role: the smaller the granules, the lower the gloss intensity, but the better the surface coverage.
It is better not to use a pigment that provides a golden shine for finishing facades, since it quickly fades in direct sunlight. On the contrary, silver mother-of-pearl is highly resistant to weathering.
What materials is it suitable for?
The adhesiveness of the materials included in the paint is high enough to cover well not only rough, but also smooth surfaces, but in the latter case the wall or ceiling is pre-primed. The coating fits well on wood (including fiberboard and chipboard), glass, concrete and plasterboard.
Depending on the type of surface, additional components are added to the material to provide protection. For example, when treating wooden walls, additives should be used that prevent the formation of fungus or prevent rotting. When painting metal surfaces, you need to take care of anti-corrosion protection. These components do not affect the decorative properties of the paint.
In what form is pearlescent paint available?
Construction stores produce material in 3 types:
- Powder that is added to the acrylic base. The advantage of this form is the ability to independently determine the shade of the coating. In this case, it is important to maintain the proportions of the paint components, since if the required level of pigment concentration is exceeded, the coating will clump.
- A paste that also allows you to experiment with shades. In this case, the problem of incorrect pigment concentration will not appear, but, unlike powder, its service life is shorter.
- Ready-made paint with pearlescent effect.
Combination with other coatings
Pearl-colored enamel goes well with other types of paint coatings: water-based, acrylic, alkyd, oil, etc. When painting wood with pearlescent enamel, various impurities, such as plaster and wax, are added to improve the quality of the coating. This feature of the material makes it possible to update old wallpaper and wood cladding.
Types of paints with silk effect
There are many types of decorative paints. Here are some of the bottom:
- Luminescent. This material is unique in that it glows in the dark. In addition, even after turning off the light, it glows for some time.
- Mosaic. Thanks to granulation, a strict and very beautiful interior of the house is created.
- Wet silk with pearlescent effect. Some people call paint a chameleon, because when you change the viewing angle or if you change the lighting angle, the color itself will change.
- Pearlescent with a metallic effect. Bronze, gold or silver tone finish.
Advantages of paint
We can confidently say that a room decorated with such decorative paint will have an excellent look that cannot be compared with wallpaper or an ordinary hard hat. The appearance of the room will be unique and rich. But besides this, there are some other advantages:
- environmental friendliness;
- resistance to ultraviolet rays, moisture, temperature changes;
- ease of maintenance;
- unique wall design;
- good adhesion, or, in other words, adhesion to the surface;
- ability to mask defects.
Painting process
It should be noted that the painting process is quite complex and labor-intensive, so you cannot do it without special skills.
To begin with, it is very important to prepare the surface well. It is important that nothing falls off the wall and that there is nothing superfluous. All unevenness must be smoothed out using putty.
The next step will be treating the wall using a special impregnation. This will strengthen the wall and allow the paint to apply evenly. Approximately six hours after impregnation, you can begin priming the walls. After complete drying, sand the surface again and completely level it.
The second step, after preparing the surface, will be the process of painting the walls. You can apply the paint with a spatula, roller, brush or spray gun. After painting, we apply a varnish coating or a special wax, thanks to which the walls acquire water-repellent properties.
How to choose a color scheme
When applied to a primed surface, you can use the material either in its pure form or tinted it in the same shade as the base. At the same time, it should be 1 tone lighter. It is important to choose the right color here. If you want to decorate a room in blue or gray tones, use silver pigment. When decorating is done in yellow or brown tones, golden mother-of-pearl is more suitable.
Silver pigment is used to decorate surfaces in gray colors.
Decoration options
The possibilities of creating textures and optical effects at the final stage of surface finishing are determined by the composition of the paint coating.
Depending on the amount of pearlescent pigment added to the material, paints with strong and weak concentrations differ.
Strong concentration
A lot of pigment is added to such a composition, and the future color of the coating becomes a secondary issue. The purpose of using this material is to create a bright and shiny surface. Therefore, paints with a high mother-of-pearl content are rarely used to decorate an entire room: the light-refracting effect is so strong that it can have a negative psychological effect.
But if you need to highlight a certain element of the interior, this material is completely suitable. You can achieve a high concentration of mother-of-pearl yourself by adding pigment to the base composition, or buy a ready-made product.
Weak concentration
Unlike the previous method, with low concentration the emphasis is on the color of the coating. Using a composition with a small content of pearlescent pigment for the ceiling or walls allows you to achieve a slight shimmering effect that changes depending on the lighting and viewing angle. This creates a cozy atmosphere in the room.
Advantages and disadvantages of pearlescent paint
One of the advantages of this coating is its versatility. Paint with pearlescent pigment can be used to decorate walls, ceilings and other surfaces.
Pearlescent wall paint is very beautiful and aesthetically pleasing.
The second advantage is safety for human health and the environment. The exception is when the pigment was added to an alkyd base that is not environmentally friendly.
In most cases, pearlescent compositions are produced in water-dispersion form, which makes them easy to dilute with water and eliminates the unpleasant odor characteristic of other paintwork coatings.
For the same reason, a surface painted with this material dries quickly.
The paint is durable. It does not crack, does not fade and is resistant to other external influences. If you carefully monitor the cleanliness of the surface and promptly remove dust from it, you will not need to renew the coating soon.
The disadvantage of the material is its price. In the paint and varnish market, mother-of-pearl compositions do not fall into the budget category. But the cost of coating can be reduced if you buy a pigment of the required shade and make the paint yourself.
How to apply the coating?
Pearlescent wall paint is applied using the same technology as other acrylic compositions. The main steps are:
- The surface to be painted is thoroughly cleaned of dirt and other deposits, washed and dried. Cracks in the wood are repaired and the concrete is plastered.
- The surface is primed and completely dry.
- Paint is applied; To obtain a high-quality result, two layers are done.
- If only part of the surface is to be painted, cover the unpainted area with masking tape while working and drying.
The process is not very complicated, and with some skill it can be done independently.
Gray pearlescent paint in the interior
Pearlescent paint with silk effect
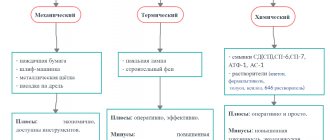
Tools and application technology
There are no special tools for applying pearl effect paint.
You can use the same methods as when painting walls and ceilings with other types of paint and varnish coatings:
- foam sponge;
- spray gun;
- brush or brush;
- paint roller;
- Venetian trowel;
- putty knife.
Additional tools are required in some cases for more precise decoration. For example, if you need to paint not the entire surface, but a fragment of it, use masking tape.
Tools used for applying pearlescent paint.
All work on finishing the room can be divided into 3 stages: preparation, painting and decoration.
At the first stage, you need to carefully inspect the surface being treated for any defects: chips, unevenness, roughness or cracks. All these shortcomings need to be eliminated. Uneven walls or ceilings are leveled with putty, and the protrusions are cleaned or knocked down. It is important to thoroughly clean the surface from old coating or stains.
After this, the wall to be painted is primed with a material whose color will match the decorative paint. The primed surface dries in 6-8 hours depending on the composition used. During this time, you can prepare mother-of-pearl enamel, if it was not purchased ready-made. If necessary, the material is tinted with various pigments.
Next, use a narrow brush to make a starting line. When it comes to painting walls, it is done under the ceiling. Its width is 5-10 cm. The presence of this border reduces the risk of staining the ceiling if, for example, a paint roller is used.
After this, a continuous background (aka base) layer of paint is applied. It dries within an hour, although some formulations may require only 30-40 minutes.
Then the dried surface is covered in fragments with a second layer of mother-of-pearl enamel. This is the decorating stage, when the desired visual effects are created using various tools. Particular expressiveness is achieved when using a material 1 or 2 shades lighter than the base. To do this, you can mix the untinted composition with the tinted one in a 1:1 ratio.
At all stages of work, it is better to use compounds from one manufacturer, because this is a guarantee of greater compatibility between them. The exception is the situation when the paint is made independently.
If all rules are followed when painting, the material consumption is 200 ml per 1 sq.m.
Soft sponge
The texture of the foam sponge is suitable for creating various patterns and ornaments. Therefore, it is used at the stage of additional decoration, but not when working over the entire surface.
Before work, the sponge should be moistened with water and squeezed out well. To avoid smudges, the instrument is lightly dipped in paint and then, if necessary, blotted with a sheet of paper. They work with it either in a circular motion or with light pressure against the wall.
Spraying with a spray gun
This tool ensures uniform distribution of the composition over the surface to be painted. In this case, the paint must be diluted with water (in this case, dilution by 40% is allowed), otherwise the tool will clog. The consistency of the diluted material resembles sour cream. If for some reason adding water does not seem appropriate, it is better to use another tool.
When using a spray gun, the paint applies perfectly and the work is completed quickly.
Brush
This tool is more suitable for working in small areas. When painting an entire wall, using a broom or brush will waste material and may require a lot of physical effort.
It is advisable to use a brush when decorating corners, hard-to-reach areas and areas with complex terrain (for example, behind batteries).
An unusual effect is obtained when using 2 round brushes. Each of them is dipped in a pigment of different colors (for example, white and blue). Their combination and chaotic application will be useful when creating drawings on the wall.
Paint roller
At least 3 such rollers will be required, since the work takes place in several stages.
The tool can be made of various materials, so the following nuances should be taken into account:
- fur is more suitable for priming the surface;
- velor is used for basic coloring;
- foam rubber is used for coating with mother-of-pearl composition.
To create various wall drawings, you can additionally acquire a textured roller or use a regular rag. It is dipped in paint, squeezed out, twisted into a rope and wound onto a paint roller. After these manipulations, you can start decorating. Using such a tool creates the effect of “crumpled walls”.
A paint roller allows you to distribute the paint evenly and economically. In addition, it is the easiest way to create clear boundaries between different areas of the surface.
Using a paint roller you can quickly and evenly distribute the paint composition over a large area.
Application with a spatula
The high viscosity of pearlescent paint makes it possible to use a spatula. Both metal and plastic tools are suitable. The optimal spatula width is 80 mm. Sometimes this tool is auxiliary. For example, it is convenient for them to distribute material over a trowel, which is then used for decoration. The trowel and spatula can be replaced with a textured roller.
What application methods are there?
For textured paints, you can use different application methods and different tools. The following methods are distinguished:
- Using a brush, brush. It is necessary to apply a layer of paint to a surface with an area of 1.5-2 square meters. Lines are drawn on the wall with a large brush. The direction is chosen arbitrarily. You can even make waves. The result is an unusual drawing. You can create unique surfaces.
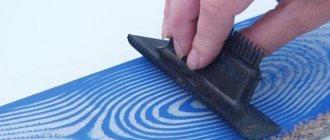
- The method using a comb is needed to obtain a more pronounced relief.
- Method using a spatula. It is necessary to apply a thin layer of paint to the surface, then use a spatula to make sparse strokes. The application technique is quite rough. The shape of the strokes resembles stones. It will be difficult for a person who has never worked with this method to do an entire wall alone. In this case, it is better to turn to professionals.
- Using a roller. You need to take a roller with a fur “coat” or foam rubber. Paint is applied to the wall in a thin layer, after which you need to roll over the surface until the paint has dried. The result is a rough wall surface. The pattern depends on the type of roller.
- Using a figured roller will help you create an unusual pattern on the wall. The roller has a relief “fur coat”. His drawing is imprinted on the wall. When using this technique, you need to try to ensure that the drawing does not break off in the middle of the wall. It's better to continue it to the floor.
- Using a sponge or cloth rag will allow you to make some kind of stamps on the surface of the wall. The result is an unusual drawing. Some people make patterns using their fingers. It all depends on the person’s imagination and desire to get a unique room design.
How to restore the surface of wallpaper and wood cladding
The high compatibility of the material with other coatings allows it to be used to renew dilapidated coatings. If the varnish on wooden surfaces has darkened over time, it can be covered with a thin layer of pearlescent paint. To do this, you should use a spray gun or purchase material in aerosol packaging.
Using the same method, you can enhance the reflective effects on old wallpaper or on surfaces painted with a different water-based composition. Although the material does not adhere well to plastic surfaces, you can use the same pneumatic spray gun and pearlescent paint to enhance their shine and reflective effect.
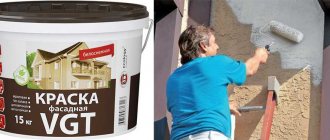
Ceiling paint
The appearance of the room largely depends on the ceiling. No matter how expensive the materials for the walls or floors, even a minor flaw in the ceiling can undo all the work you have done. Let's look at the main criteria for choosing material for this type of work:
- Long life of paint.
- Plastic. This criterion will help to avoid cracks due to slight deformation or temperature changes.
- Affordability.
- Ability to hide defects.
- Water resistance. Thanks to this, it is possible to carry out wet cleaning of the surface.
Let's consider two types of materials that will provide an excellent look to your ceiling - velvet paint and mother-of-pearl.
Velvet ceiling paint
Silicone material with a matte finish and high adhesion. If you use velvety material, the ceiling can be washed or wiped with a damp cloth. In addition, the ceiling will have a breathable effect due to good vapor permeability.
Includes:
- latex additives;
- acrylic polymer;
- fillers;
- light-resistant additives.
Pearlescent ceiling paint
Among the advantages of this material, it can be noted that it is environmentally friendly and therefore ideal for interior work. Over time, the painted surface does not fade or deform from moisture. A huge advantage of the material is fire resistance. When choosing pearlescent paint, you can choose a color to suit every taste. When completely dry, it boasts a silky shine. Products with pearlescent shades are recommended for use in rooms with low lighting, as the material contains reflective particles. The photo shows a sample of this paint.
It is better to buy compounds from foreign manufacturers, in trusted stores. Remember to prevent the ceiling from becoming stained or yellowed, beware of fakes and choose paint responsibly.
Making mother-of-pearl paint with your own hands
Pearlescent pigment is sold in various forms in art stores. The most commonly used is fine powder.
To obtain a pearlescent composition, pigments are used in powder form.
You will also need to purchase gum arabic - an extract of acacia resin, sold there. For finishing work, it is better to use this substance as a water-based one. Ink is sometimes used to enhance color.
To make paint you will need a small, clean and dry container. Pearlescent pigment is poured into it, and then gum arabic is added. Optimal proportions of the elements of the mixture: for 1 part of gum arabic, 3-5 parts of powder are required (depending on the desired intensity of gloss).
If the mixture turns out to be too thick, and you plan to use a spray gun for the work, it must be diluted with water. After thorough mixing (it is important to ensure that there are no lumps in the composition), the composition can be used to decorate surfaces.
Technology for obtaining mother-of-pearl effect
In general, pearlescent paint is produced using approximately the same technologies as metallic paint. However, it is not the smallest particles of metal that give the unusual shine, but the smallest particles of mica.
The difference is that mica is translucent. If metal simply reflects light, according to optical laws, then mica no longer only reflects it. Or rather, it reflects, but also from the outer edge and from the inner one, where it passed through the thickness of the material. This is what causes the color change, all according to the laws of physics.
After all, light is an electromagnetic wave, and when the reflected rays are added out of phase, a peculiar picture is obtained, with many different wavelengths, and therefore with many color shades. But painting a car with mother-of-pearl is not as simple as it initially seems. Unless, of course, you take into account a number of nuances, and if you take into account...
Composition by layers of paint layer
In general, two main components are used - paint and varnish. Much is similar to working with metallic, but there are a number of differences. So several layers of varnish are needed to get the effect of depth. And the layers of varnish themselves will differ, and in composition.
In addition, applying paint is not so easy - after all, it is necessary to achieve symmetry of reflections. Those. the color flow should be symmetrical to the car body. Let's look at how to achieve this.
What materials will be needed:
- Paint base;
- Special pearlescent pigments;
- Varnish;
- Solvent.
There are already mixed formulations, but it is better to purchase them separately, which will allow you to achieve the maximum, and most importantly, the desired effect. Only the components must be from the same manufacturer, otherwise a chemical conflict may occur. He can express himself immediately - the paint will simply curl up, or maybe later (for example, in a year the layers will begin to crumble). Therefore, saving is not appropriate here.
Painting a car with mother of pearl, the process itself
First of all, the element itself that is being painted is necessary. Prepared at that. Those. car, or part of it (door, fender, etc.). Prepared - meaning clean and straightened, completely ready for painting. Preferably covered with a special primer – i.e. not the transport one (with which the parts come in the form of spare parts - it must be removed), but the one intended for paint.
equipment requirements
In addition, what you need to have:
- High-quality spray gun – for applying layers of paint;
- A compressor that creates a smooth air flow, without pulsations and with filtered air;
- A set of painting materials (solvent, paint, varnish and pigments).
A special dust-free room is also necessary, i.e. paint booth. This is where the enthusiasm of garage craftsmen often dries up, but there is no need to panic. It’s easy to make a dust-free garage room - just do a wet cleaning and organize fresh ventilation, with filtration of the incoming air.
Design tips
When decorating the interior, you should take into account factors such as:
- room area;
- its purpose (too bright shades and strong concentration of mother-of-pearl are unlikely to be suitable for the bedroom);
- lighting intensity.
For decor, designers offer some basic practical tips. In particular, when the room is well lit, it is advisable to apply a background layer in a blue tint without using pearlescent pigment.
A neutrally painted room will be enlivened by a repeating motif made using a stencil.
Powder is already added to the material for the second layer, but it is better to choose the color itself from a different spectrum. Thus, when the viewing angle changes, the surface will shimmer in different shades, which will give an unusual visual effect.
If a room is decorated in neutral colors and looks a little dull, then you can liven it up with the help of various decor options.
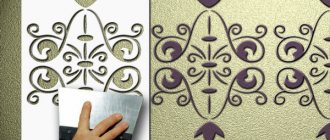
For example, cut a stencil of the desired shape and size from a thick sheet of paper (for example, in the shape of a tree leaf). Then apply a small amount of pearlescent paint on it. This template needs to be briefly attached to the wall in any order. If you wish, you can paint a tree trunk with a brush, and then create a crown using a stencil.
Gradient and rubbing on nails
World podiums never tire of surprising us with new and unexpected turns. And now the time has come when hands look like art objects covered with chrome-plated metal dust.
The unprecedented excitement caused by the cold reflections of metal on the nails of stars raised brilliant manicure to a new level of popularity. And now every lady dreams of trying at least once a manicure with the shine of molten metal on her nails.
Another combination of techniques that clearly benefits those who love experiments. The shiny multi-color design will definitely appeal to lovers of disco style. Everything that glitters and shimmers immediately becomes an object of desire, and a gradient in several shades of metal is no exception.
The use of pearlescent paints in different interiors
The abundance of shades of mother-of-pearl allows you to decorate a room to suit every taste. White paint is often chosen as the base paint: it makes the room visually larger. At the same time, at the stage of preparatory work, it is important to eliminate all surface defects (for example, level the walls), since when using this shade, all irregularities come to the fore.
Another popular visual effect that can be achieved using pearlescent paints is the chameleon effect. A surface designed in this way will change its hue when the viewing angle or lighting changes.
To achieve a greater effect, it is better to apply the material from an aerosol can or spray gun to a wall primed in dark colors. A special advantage of this method is the smoothing of roughness and other surface defects.
Some types of pearlescent pigment can create the illusion of pink or white pearls. In the first case, it is better to cover the wall or ceiling with a blue or gray base. In the second option, carefully leveling the surfaces at the preparatory stage again becomes the primary task. After completing all the preparatory work, you can apply the pattern to the wall with a special stencil or sponge.
Method for creating paints from PVA
You can make stained glass materials yourself, and the cost of their production will be minimal. The easiest way is to make paints from PVA glue. Its texture is ideal for application to any surface, since it is thick and not prone to spreading, and lays down in an even layer.
To prepare coloring agents, you will need PVA glue and a pigment of the selected color. You can take several dyes and spread the glue into disposable cups, Kinder Surprise eggs or other small dishes. Add 2-3 teaspoons of glue to each container, then add the required amount of pigment and mix thoroughly. If the shade turns out to be too bright, you can dilute the paint with an additional portion of PVA glue.
The following are used as pigments:
- construction colors; watercolor; gouache; fabric paints; gel pen refills; paints for Easter eggs; food colorings.
In the future, you can mix the finished paints with each other, getting different interesting shades. To increase the thickness of the product, loose eye shadow is introduced into it. Pearlescent shadows will help give stained glass paint a beautiful shine. The result of applying the materials will be very interesting: the fact is that, if desired, the design can be completely removed from the glass and re-glued like a sticker. If you want to get this effect, you need to apply the paint in a thick layer.
It is also permissible to make a drawing on a file (multifold), inside of which it is very convenient to insert a stencil. It is clearly visible through the base and allows you to carefully draw the details of the future stained glass window. Using the file, you can make stained glass paintings even without artistic skills.
It is important to leave the design applied with homemade paints until completely dry (about 10-12 hours), and only then glue it to the window or door. To do this, you just need to attach the picture to the glass and smooth it with your hand.