Stained glass painting is a type of art that has not yet lost its relevance. Stained glass windows were used to decorate temples, palaces and castles. Previously, only noble people could afford such decoration. And even now, stained glass drawings are not affordable for everyone. At first they decorated church buildings, then survived the Renaissance and filled the houses of wealthy citizens, and now they are found not only on houses, but also in miniature accessories.
Stained glass is a way of decorating glass and mirrors.
What is stained glass drawing
Modern painting is the process of applying paint to glass or ceramics. Craftsmen of past centuries were content with colored glass. From many pieces of glass they laid out biblical scenes and picturesque paintings. The principle of fine art was similar to mosaic. By transmitting sunlight, the glass “forced” the window or wall picture to play with new colors.
Now stained glass paintings are very popular in the creation and design of interiors.
In the 21st century, art made it possible to create decorative items that were exclusive of their kind. Stained glass decorates:
- mirror;
- interior door;
- window;
- household items;
- table services;
- paintings;
- wall panel;
- interior partitions;
- decorative inserts in wall panels;
- ladies' jewelry and more.
The advantage of the technology is the ability to create stained glass yourself.
This type of design continues to fascinate with its originality and play of reflections. Thanks to emerging technologies, there is now no need to collect a drawing bit by bit. The painstaking work of creating glass mosaics has turned into a fine art. To apply the image you will need special stencils and paints for stained glass painting. The picture for stained glass on glass can be printed on a printer.
The main thing is to choose the right pattern and not be afraid to look for extraordinary ways in creativity.
How to draw a stained glass window: we draw in the Vitrage style - making a painting by painting on glass
Stained glass on paper is called a squiggle pattern - this is an unconventional technique for making stained glass. This technique is mainly used to develop drawing skills in children. The purpose of creating stained glass is to teach children to create a drawing in a stained glass style, increase the level of self-esteem, and develop originality. How to draw a bright stained glass window and its design yourself? This is very easy to do - just follow our instructions!
How to draw a stained glass window with step-by-step instructions and photos
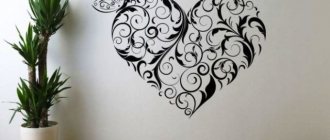
In this way you can draw any flowers or berries.
Learning little tricks for big work: nuances for beginners
A few secrets about painting on glass, when a colorless glass surface turns into a work of art in just a few hours.
How to correctly depict a picture on windows, glass doors of kitchen cabinets, bottles, flowerpots and other interior items? Often, masters are silent about some, in their opinion, insignificant details. Although for many inexperienced beginners, many nuances are valuable in learning the correct technique for making stained glass.
- Never start learning with the most complex, start with the simplest. Those. If you decide to take up stained glass painting for the first time, then never immediately take on a large drawing with many small details. First, try your hand at small glass with a simple template, and when you master the technique a little, you will be able to take more complex drawings.
- Also try using different types of paints, they also apply differently. Stained glass paints are thicker, and they are applied pointwise, followed by distribution over the surface of the fragment being performed. Varnishes are liquid in consistency and spread quickly, so they are usually applied in several layers, drying in between. The brightness and light transmission of the pattern depends on the number of layers.
If you take into account all the nuances, your work will be of higher quality.
Pictures on glass:
- If you decide to make a stained glass window with your own hands, you must immediately decide what design you want to see on the window and make a sketch on whatman paper.
- Then you should carefully prepare the glass by first removing it from the window frame or door. Wash the surface with detergents or degrease with an alcohol solution.
- Attach the sketch to the back of the glass with tape and place it on a flat table.
- Draw all the contour lines of the design on the glass with contour paint. Make sure all lines are closed. Otherwise, the paint may flow from one fragment to another and mix. Remove bloopers with an ear stick soaked in alcohol.
- When the outline is dry, apply paint to the inner surface of the drawing fragments. Drip paint from the brush, distributing it evenly over the part until the layer reaches the required thickness. When all the fragments have been painted, leave the work until the paints are completely dry.
- The paints have dried, you can insert the glass into the frame. Look at the photo how beautiful the stained glass drawing made with paints looks.
Video on the topic of the article
Types of stained glass designs
Popular topics include the following types:
- Abstraction looks beautiful as a panel on an elongated surface or on glass of a non-standard shape.
- It is better to depict nature on rectangular and square glass. Landscape paintings will decorate the hall and living room.
- Pictures in the Art Nouveau style are suitable for decorating any living space.
- Gothic patterns are distinguished by the angularity of their details. The figures of people, birds and animals are made in the style of the Middle Ages. They look beautiful on round, oval and arched shapes.
- Antique stained glass will appeal to lovers of the classics. He combined portrait subjects, floral arrangements and intricate mosaics.
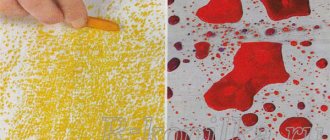
Dot painting technique
The types of images depend on the choice of painting technique. Thanks to the dot technique, you can work with contour stained glass paint on the surface. The sequence of work is as follows:
- Draw the outlines with a simple pencil.
- Points that have the same dimensions at the same distance are drawn along the contour.
- The technique requires drawing a picture from general elements to specific ones, immediately a large image, then smaller details. The size of the coloring dots will depend on how hard you pressed the tube.
- When using a contour image, you need to paint the details along the contour of the drawing.
- To perform detailed drawings, use thin brushes or contour paints in a tube.
To perform stained glass painting you will need skill and accuracy. Paints in tubes are not as thick as acrylic paints, so they can spread over surfaces.
We hope that the information received will help you master this interesting technique. Let painting with colorful stencil paints bring you real pleasure from the creative process!
Stencil painting of a glass (1 video)
Variety of stencils and templates (23 photos)
What type of painting is better to choose?
The theme for the picture is chosen according to your taste. Most often they depict landscapes, bouquets of flowers, birds and animals. The main difference between the patterns is the technique of their application. There are several stained glass painting techniques:
- contour;
- without contour;
- multilayer;
- spot.
Decorating traditions are often used in furniture design.
Each type of painting allows you to create an original work.
Contour
The contour technique uses a sketch, which is a black and white drawing with clearly drawn contours. The voids between the contours are filled with paints to result in a beautiful ensemble. The main advantage of the technique is the ability to see the “draft” version of the picture in advance. Even a beginner can do the drawing.
It is this type of stained glass that is most popular today; they are created on mirrors or glass.
Contourless
Contourless technology is not particularly popular among ordinary people. At the end of the work, the picture does not have clear contours or transitions. It resembles a typical watercolor only with a varnish coating. The highlight of the non-contour pattern is the random mixing of colors. This type of pattern is much more complex than the previous one. It will take you a lot of time and effort to master the contourless technique.
It is best to use stained glass varnish paints to create beautiful paintings using the contourless technique.
Multilayer
Multilayer technique fully lives up to its name. This type of paint application allows you to create the most realistic paintings. Layering one layer on top of another can be done in a “dry” or “wet” way. In the first case, the bottom layer is allowed to dry thoroughly, and in the second, the previous layer is mixed with the new one, without allowing it to harden. Using multi-layered drawing you can convey shadows and play of light. This technique does not tolerate amateurs. Only a professional stained glass master can handle it.
Multilayer etching is carried out with special compounds in several layers.
Spot
Spot painting is one of the widely used but labor-intensive types. It is used to decorate not only glass, but literally everything, from book covers to clothing. The technique involves spot-applying paint to the surface. The dots differ in color, saturation and size.
Spot painting on glass looks very bright and original.
Stencil
If the listed techniques require artistic taste and the ability to draw, then the stencil method of painting is a godsend for pioneers in stained glass painting. The stencil will allow you to paint the surface evenly and accurately. It can be disposable or reusable. The first is made of paper or thick cardboard, and the second is made of self-adhesive polymer film.
Thanks to the availability of various stained glass paints and interesting stencils, anyone can master this art.
Stencils can be purchased at stores that sell art supplies. You can also print them on a printer or draw them yourself. The disadvantage of stencil painting is the taboo on exclusivity. But if desired, this minus can be reduced to nothing. The main thing is to show your imagination and collect individual elements into a single composition.
Using stencils you can create spectacular glass painting.
Stained glass: sketches. How to make stained glass: stencils and templates
Stained glass is a work of art made of colored glass, designed for through-lighting. Previously, stained glass was used mainly in churches, but now it is a newfangled trend in decoration, which is becoming increasingly popular every year. Stained glass has become much more accessible; it has become possible to insert them into door panels, ordinary window frames, partitions and screens.
To make stained glass windows with your own hands, you don’t have to invite a craftsman; almost anyone can handle this task. All you need is the desire to achieve your goal, a little perseverance and precise implementation of the given advice.
How to make a stained glass window?
You will need:
- PVA emulsion;
- Special stained glass paints or aniline dyes;
- Whatman paper, cardboard or graph paper;
- Pencil;
- Alcohol or acetone;
- Scotch;
- Level;
- Brushes;
- Aluminum wire 1.6 mm thick.
Instructions:
- Before you start working, decide what pattern you want to see on the glass and what colors it will be made of. The design can be absolutely anything: an ornament, an image of flowers, birds, animals, etc. The image can only be limited by your imagination. Involve children in creating the drawing - they will definitely give you an interesting idea.
- Draw the outlines of the pattern on whatman paper, cardboard or graph paper. Mark where and what color you will put it. If you don’t know how to draw, ask your friends or use carbon paper. Take the glass out of the item you will decorate with stained glass. Degrease the side of the glass on which the stained glass will be located with alcohol or acetone.
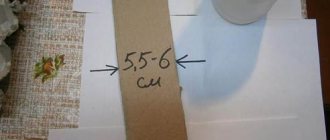
- Use tape to secure the design to the back. Using a level, position the glass strictly horizontally. Bend the necessary elements from the wire along the contours of the drawing. Lubricate them liberally with PVA emulsion on the side adjacent to the glass and place them on the glass. To make the wire stick more tightly, place a metal plate with a weight on it. After about 1.5 - 2 hours the wire should stick.
- While the wire is being glued, start preparing the colors. Dissolve aniline dyes in distilled water and strain the resulting solution. As a result, there should be no lumps or other solid particles left in it. Mix the solution with PVA emulsion until it reaches the consistency of cream.
- To check the saturation of the color, apply a little of the mixture to a small piece of glass. After polymerization you will see the final shade. If it is too bright, you can add more PVA to the mixture; if it is too pale, you can add a dye solution. In addition to aniline dyes, you can use ready-made stained glass paints - they do not have to be diluted in emulsion and water.
- Don't just get carried away with bright colors. The overall color scheme should be harmoniously balanced. When all the colors are prepared, pour them into glass jars and cover with a lid to prevent them from drying out prematurely. Now you can begin the most important and important stage of the work - decorating the picture on the glass.
- Before you start, prepare a clean brush and practice a little. The color must be applied strictly sequentially, gradually pouring the solution at the contour of the pattern from the wire using a brush. When adding new colors, monitor the overall thickness of the layer - the saturation of the area being covered and the uniformity of its tone will depend on it.
- During work, do not touch the already formed layer, otherwise the emulsion will begin to dry out under the influence of contact with air, and new portions of the color will upset the balance, which will lead to a defect. If this happens, carefully wash off the piece and let the glass dry.
- Having covered all the necessary areas with the 1st color, rinse the brush thoroughly and proceed to applying the next color. In order to avoid possible bleeding of the 1st color into the others, in case of loose gluing of the contour wire, it is better to fill the color only in the vicinity of already hardened spots. In any case, be careful in relation to already painted areas and, just in case, place clean cotton wool and a container of water next to you.
- When you have completely painted the picture, look carefully at the back of the stained glass window. Sometimes, the places where the wire strands are glued look sloppy - this can be corrected with white enamel paint (degrease the glass first). When the white strip is dry, you can attach the stained glass window to its place.
What materials are needed for stained glass painting
Before you start painting, you need to buy special materials and decide on the location of the painting. These include the following accessories:
- basic paints;
- contour paints;
- brushes of different thicknesses with artificial bristles;
- acrylic clear varnish;
- stencil;
- alcohol;
- synthetic solvent;
- Double-sided tape.
Materials you will need to create your own stained glass window.
Auxiliary items include napkins, pieces of fabric, cotton swabs and toothpicks. With their help it will be possible to remove defects in the drawing.
Painted stained glass windows are the easiest to create. Even children can make such stained glass.
Important! Paints are divided into two types: for firing and not requiring firing. For beginners, it is better to choose those that do not require heat treatment.
Surface and stencil preparation
Procedure:
- First, wash the surface of the glass with water and detergent, then degrease it with alcohol and let it dry completely.
- While the surface dries, secure the stencil with double-sided tape. Then press it firmly onto the surface and smooth it out well.
- Take contour paints and outline the outline of the stencil.
- Then fill the voids between the contours with paint.
- Dry the surface well. You can leave the product for several hours or a day. Drying time depends on the type of paint.
- Once completely dry, coat the image with clear acrylic varnish.
Painted stained glass does not require special equipment or complex manufacturing technology.
Note! When applied, the paint has a dense and opaque consistency. You can tell whether it has dried or not by its appearance. After drying, it becomes transparent and transmits light well.
Stained glass windows in the Tiffany style are distinguished by grace and lightness.
For stained glass painting, not only stencils are used, but also templates. In the first case, there is no need to outline the drawing, but in the second, the outline is applied manually. The template resembles a carbon copy of a pattern.
Fusing is an original type of stained glass. The technology consists of soldering individual elements together in a fusing furnace.
How to draw your first stained glass window
Use a step-by-step action plan:
- select the theme of the picture;
- prepare a sketch template and necessary materials;
- choose a well-lit and ventilated room;
- place the glass in a horizontal position;
- place the template under glass;
- degrease the working surface with alcohol;
- carefully trace the outline according to the template;
- let the paint dry naturally or use a hair dryer;
- then take colored paint and gradually fill the voids between the outline;
- Apply the paint carefully and try to paint evenly without overstepping the outline.
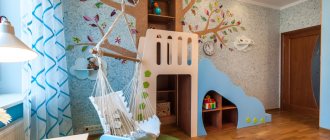
A stained glass window that conveys a landscape or painting is well suited to a modern interior.
Advice! Despite the fluidity of stained glass paint, it does not have time to spread evenly across the glass. It will take skill to get a neat job. Make sure that there are no air bubbles or gaps between the outline and the base color.
It is worth choosing light designs for stained glass with one main element and small additions along the periphery.
Little tricks
Stained glass is a decorative picture that can be made in any style.
Masters often keep silent about some, in their opinion, insignificant details. Here are some tips to help you make stained glass:
- Never start learning with the most complex, start with the simplest. Never take on a large drawing with many small details at once. Try a simple pattern first, and when you master the technique a little, you can take on complex designs.
- use different types of paints for your work, they all also apply to the drawing differently. The brightness and light transmission of the design depends on the number of layers of paint.
- To carefully adjust the pattern, use ear sticks and cotton pads.
- Use a sharp knife or blade to remove defective lines.
- Use wet alcohol wipes on your hands.
- The lighting should be good both from below and from above the work in order to immediately reveal the shade of color and the density of the coating.
- One of the main components of beautiful and neat work is its quick completion. For example, if you apply the contour paint too slowly, it will vary in both color and thickness. If poured slowly, the paint will lay down in an uneven layer and this will affect the quality of its surface.
Related article: Chenille wire roses
Samples of stained glass painting
For a sample of stained glass painting on glass, choose templates with the pattern you like. When deciding to diversify your interior with stained glass, consider the following tips:
- the drawing should suit the general style of the apartment;
- the lines and colors of the pattern can conceal and visually expand the space;
- too bright paintings overload the room.
Stained glass is unthinkable without light, so the ability of glass to diffuse light, but not absorb it, allows you to create unusual color schemes in the interior.
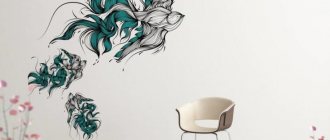
The plot can be of any topic. Most often it is done in an abstract style, with a plant motif or strict geometric shapes, in the form of a still life or landscape. An abstract picture is the best option for a modern interior. But for lovers of the classics, it’s better to choose nature. Landscape paintings will become an outlet for household members.
Stained glass windows in the interior of an apartment or house are present in many photographs of the works of modern designers, so choosing a suitable design will not be a problem.
Stained glass painting is a great idea for decorating interiors, windows, interior doors, mirrors and glass sets. It takes time and patience to create a masterpiece. But the first stained glass designs can be obtained using ready-made stencils and templates.
A wide selection of stained glass options allows a person, even with a small income, to give his home exquisite beauty and originality.
Schemes and stencils for dot painting
Point-to-point
The name of the technique does not deceive - the entire drawing is performed in stages with dots of different sizes. To work, you will need special paints - most often stained glass acrylic contours are used for glass and ceramics.
For contour and dot patterns on fabric and leather, it is better to use fabric contours, as they have good relief and penetrate the fibers, holding firmly to the surface of the product.
However, fabric contours can also be used on other surfaces such as wood, MDF, plastic, metal, etc.
To add volume and texture to the product, you can use 3D gels or “pearl” paints as touches.
On what surface can you do dot painting?
Since acrylic contours are designed for glass and ceramics, they can be used on any surface, even the smoothest. You can decorate absolutely any object with dot painting - from a glass goblet to a mobile phone case, from your favorite pair of shoes to a car steering wheel. The main thing in this matter is to properly prepare the surface.
- The most popular decorative items using the dot painting technique:
- - glass and ceramic dishes,
- - diaries and various covers for documents,
- – textiles (bags, clothes),
-furniture (cabinet fronts, chests of drawers, bedside tables, etc.)
Preliminary surface preparation
Pre-treatment of the surface must begin with degreasing with alcohol; if necessary, then primer and background painting. If the work is not planned on a glass or ceramic surface, then you need to apply 1-2 layers of acrylic varnish before pointing - this way the paint will go on smoother and last longer, and the shades and tones will be more saturated.
Dots can be applied in different ways:
- directly through the narrow, elongated “spout” of a tube of paint (or through a suitable nozzle);
- using a knitting needle, needle, end part of a brush or pencil, or other available items.
Where do the patterns come from?
Unfortunately, not everyone has artistic talent, so every master has his own secrets for creating patterns. One can improvise without preliminary sketches, starting from the shape of the object and his own imagination. Another thinks over and draws the future composition, and then transfers the sketch to the work surface.
There is a third way - for those who do not know how to draw, but really want to join this activity: you can use stencils or drawing diagrams in your work. For opaque surfaces (wood, plastic, metal, leather), stencils are suitable - you can purchase them in specialized stores or make them yourself from a plastic folder or thick paper. The transparent surface simplifies the task - you can use any patterns, ornaments or designs you like, attaching them to the back of the product.
The following can be used as patterns for spot painting:
- patterns for cross stitch or mosaic weaving with beads;
- beautiful patterns on fabrics (neck scarves in Oriental, Moroccan or African styles, imitation colors of various animals, floral motifs, etc.);
- crocheted openwork napkins or patterns for crocheting them;
- ethnic ornaments and patterns printed in a suitable size on paper (you can use books on traditions and ethnic embroidery;
- paper napkins or decoupage cards.
Inspiration in the search for patterns and ornaments can be found in the cultures of different nations: oriental mosques are famous for their floral patterns; in cathedrals you can borrow patterns from stained glass roses. A lot of useful information and diagrams can be found in various books on the history and construction of ornaments among different peoples.
Spot painting with contours: ready-made diagrams and stencils
Depending on the shape and size of the object, it is worth choosing a pattern. The simplest in execution and universal in purpose are simple geometric shapes.
If you've never done dot painting before, start by tracing circles on a flat, rectangular-shaped surface such as a passport cover or cell phone case.
By composing an ornament from simple shapes - circles, triangles, squares and lines of different colors, you can achieve very interesting results. To achieve maximum effect, you just need to choose the right contour colors.
More complex circular and linear ornaments. To perform them, the surface of the product must first be prepared - apply barely noticeable marking lines with a pencil. If the work is to be done on a transparent glass surface, you can secure the sketch of the design on the back side with tape.
Techniques for using different paints
How to paint with acrylic
Acrylic paint perfectly combines the best properties of watercolor and oil, and after drying the paintings are not afraid of moisture and sunlight. Even a child can make simple drawings with such paints.
The universal properties of acrylic lie in the ability to apply each subsequent layer to the previous image. Unlike watercolor, you don't have to wait for a layer to dry before applying a new one. Read the easy instructions and get started!
To begin with, you can learn to use six colors. Later, the palette will gradually expand to 18 shades. Also prepare:
- The surface for the painting is wood, glass, plastic, paper, cardboard, canvas.
- A set of brushes made of synthetic and natural materials.
- Palette.
- Water.
To obtain high-quality paint, it must be diluted with a solvent or water. Undiluted paint is used on synthetic surfaces and dries faster.
There are several techniques for painting with acrylic:
- Wet - on a canvas that has been moistened with warm water.
- Dry - using several brushes.
- The method of glazing in layers is to apply a thick layer and then paint a picture.
- “Impasto” – similar to oil paints, with wide, clearly visible strokes.
For a drawing, a novice artist needs to choose a base surface and paint in a jar or tube. Choose a drawing technique that interests you. Prepare a palette of colors.
Synthetic brushes are more suitable for working with undiluted paints. If you choose a watercolor technique, it is better to use natural bristles.
At the end, you can additionally apply strokes with a felt-tip pen, ink, marker, gel pen, or pencil. Even a child can master the simplest drawing technique from scratch.
Once you master the basics of the technique, you will be able to draw on fabric and glass, create aerial landscapes or portraits. Even painting your favorite T-shirt will be easy if you learn how to work with acrylic.
On video: step-by-step acrylic painting lessons.
How to draw with gouache
Children master drawings with gouache paints for beginners at an early age. This paint is loved by kids for its ease of application and because the image does not blur, unlike watercolors. Gouache allows you to get more vibrant drawings.
For older people, instructions from the Internet will help them create a unique landscape. The basis of the pattern can be the following surfaces:
- Paper.
- Plywood.
- Glass.
- Fabric.
There are the following types of gouache:
- Artistic.
- Poster.
- For children.
- Acrylic gouache.
Immediately draw a sketch with a simple pencil. When learning to draw, start with dark shades, gradually moving to light tones. Mix paints on the color wheel. Step-by-step drawing with children will allow you to get beautiful images on paper.
If you mix adjacent colors in a sector, you will get a dirty shade. Shadow can be rendered with green, blue or purple, but not black.
Whatever technique you choose, the main thing is that inspiration comes to you. We wish that all your works are successful, that you like them, and that they give you ideas for further creativity. With the help of such an activity you can throw out your emotions and impressions. Draw with confidence and pleasure!