Preparation of brick and block surfaces for plastering.
Ideally, when starting to repair the walls, the old plaster will be completely removed.
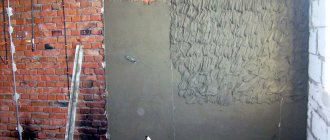
Cutting down the bulges and priming is the main purpose of preparing the surface for plastering.
Inspect the wall surface for various depressions and protrusions. If such defects exist, they must be eliminated. Depressions and holes more than 20 mm. It’s better to straighten it straight away with plaster mortar.
It is necessary to remove the deposits of old masonry mortar, identify bulges and holes on the surface, and cut down the mounds.
Knock down all the ledges and loosely held wall elements.
Knock down protrusions and protruding mortar with a hammer and chisel, trim with an ax, knock down with a hammer drill or use a grinder with a diamond cup, and deep depressions and holes can be plastered.
If there are cracks in the surface, they must be opened (widened) and covered with mortar.
If the brick surface is plastered, then it is better to knock off the plaster.
It is better to embroider the masonry seams to a depth of approximately 1 cm.
Remove dirt and dust, roughening it with a wire brush to ensure the best adhesion of the solution to the base.
You need to give the walls a smoothed look. In this case, differences allowed at this stage can range from 10 to 15 millimeters.
To make it easier to detect places of differences, you can purchase a laser level and axle builder.
After the initial straightening, the walls are cleaned. To do this, use a spatula, metal brush, broom or vacuum cleaner.
To achieve an ideal result, before proceeding to plastering the walls , you should walk over them with a primer. It is better to use a deeply penetrating agent with an antifungal effect, which will save the room being plastered from problems in the future.
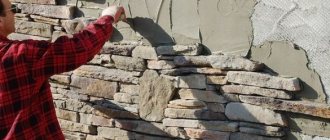
But not in all places the adhesion of the plaster to the wall occurs well enough. On ledges, bends and other places where the plaster does not adhere tightly to the wall, professional builders suggest using a mesh with small cells. It will help the plaster adhere more firmly to the wall.
Watch the video: preparing walls for plaster
How to prepare the base for painting?
Treatment of the wooden surface before painting is necessary to obtain a high-quality aesthetic finish. Necessary:
- Check the condition of the surface. Identify roughness, chips, irregularities, prominent knots, protruding spots of resin, nails. Use a chisel to remove burrs and protruding bumps, hammer the nails deep, cut the resin to a depth of 2–3 mm, and wipe off oil stains with gasoline, kerosene or acetone.
- Sand the surface with sandpaper. The wall should become smooth.
- Fill defective areas with putty for wooden products. After drying, it also needs to be thoroughly rubbed.
- Treat the wall with a primer at temperatures from +18 to -28 degrees.
- Blend the primer layer with a flat brush and then sand with fine-grained sandpaper.
Advice:
After the treated layers have completely dried, make sure that the base is intact and ready for painting. It should be a uniform color, without inclusions of other shades, even, very smooth. If deviations from these parameters are noticed, then you need to repeat the previous steps until the desired result is obtained.
Preparing a concrete surface for plastering.
The technology for preparing monolithic concrete surfaces for plastering is performed slightly differently.
We also inspect the concrete surface. Large protrusions are cut down with a jackhammer, hammer and scarpel, chisel or hammer drill. You can use a grinder with a diamond cup.
Depressions more than 20 mm. level with mortar, if necessary, onto a pre-fixed plaster mesh.
Large cracks, if any, should be opened and sealed.
Now you need to roughen the concrete surface to be plastered.
To do this, notches 3-4 mm deep are made in a checkerboard pattern. You can make notches using a chisel, a scarpel and a hammer, a hammer drill or a jackhammer.
It is best to use a grinder with a diamond cup to go over the entire surface that will be plastered. It is necessary for the gloss of the concrete to become matte, that is, it is necessary to open the pores of the concrete for better adhesion.
For large areas, roughness is achieved using a sandblasting machine.
We clean the concrete surface being prepared for plastering from dirt, dust and leaked mortar using scrapers, spatulas, a broom, brushes, and a vacuum cleaner.
Treat with a primer.
Then, on the prepared surface for plastering, we secure the plastering mesh with dowels with a slight tension.
Watch the video: Preparing a monolithic and reinforced concrete base for plaster
Use of plaster mixtures
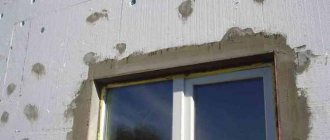
Plaster finishing can be used not only for leveling ceilings and walls. It is necessary to plaster window/door slopes, cracks, and other defects on the surface. High-quality and durable repairs can be done with your own hands, when the workshop has reliable tools and equipment for plastering work.
Equipment types:
| View: | Description: |
| By purpose | Surface preparation tool |
| Equipment for plastering and leveling walls | |
| Auxiliary tool | |
| Operating principle | Hand tool |
| Power tools |
Without a good start, there will be no good finish. Each process in surface plastering leads to the next, so a serious approach to the initial stage of work is important. To plaster walls and ceilings in a short time, craftsmen give preference to electrical equipment.
Plastering tools (video)
Hand tools: types, photos and videos
Necessary tools for plastering walls
Plastering walls and ceilings also requires certain preparation for work and the acquisition of the necessary tools. A large selection of equipment is not always justified by its functionality and the need for use in work. Which plastering tool is intended for what?
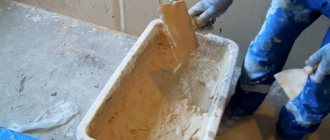
- Bucket and mixer for mixing. The first elements without which there will be no repair. It is convenient to mix the plaster solution in a construction bucket without splashing with a special mixer.
- Ladle. This tool is convenient for throwing a mixture of any consistency onto the wall. The stores offer a wide range of bowls of any size.
- Falcon. It is a small metal tray with sides and a wooden handle. Place a little solution on it so you don’t have to hold the bucket in your hand all the time.
- Trowel. This is a specially shaped plastering spatula for throwing the mixture onto the falcon, and then onto the walls. Needed for initial surface treatment.
- Rule. Made from wood or aluminum. Serves to level the mixture along the beacons.
- Half-grater. It is used for leveling and cleaning a layer of plaster at a stage when the mixture has already lost some of its moisture, but has not yet completely hardened.
Tools for performing plastering work are not limited to the above list. Also, all kinds of spatulas, paint brushes, smoothers, sanders and other equipment are used in the work. There is also a list of needs for tools for plastering work, which lists and describes in detail all possible equipment for high-quality and quick repairs. To make plastering of premises easier, technologies are being improved, and the list of equipment is constantly being supplemented with original devices.
Preparing metal for plastering
Before plastering metal bases, it is necessary to complete construction work, install and secure partitions, door and window frames, ventilation systems, and hide electrical wiring.
Surface preparation includes the following steps:
- cleaning the base;
- degreasing the metal base;
- priming to prevent corrosion.
The work is performed in several ways, including:
- mechanical;
- using chemicals;
- heat treatment.
Chemical cleaning of metal substrates can be of the following types:
- alkaline;
- acidic;
- phosphating;
- using etching;
- oxidation.
Manufacturers produce specialized solutions for washing off old finishing materials for metal surfaces.
Mechanical surface cleaning
Such methods of cleaning bases include treatments:
- steel brushes;
- a grinding machine with brush or abrasive attachments;
- sandblasting equipment.
A simple method of cleaning surfaces when renovating apartments is to use a steel brush or sander. During metal processing, dust, dyes, and putty are removed. At the end of the work, construction dust is cleaned using a dry or wet method. Mechanical cleaning of metal bases is carried out in rooms with dry air; condensation is not allowed.
Surface degreasing
Before applying plaster, it is necessary to degrease the base. New steel surfaces that have not been used are treated with white spirit, metal removers, and gasoline. To prevent corrosion, the surface is coated with a primer mixture.
Traces of oily liquids are removed with alkaline solutions containing surfactants up to 10%. Optimal: 10% sodium solution, 0.5% OP-7 powder (10 g of substance required per 1 liter of water). Traces of soot are removed using a solution of hydrochloric acid (3%), then the remaining substance is washed off with water without additives. If there is a layer of rust no more than 100 microns thick, the oxidized metal is cleaned off with a special modifier.
Features and Benefits
Plaster serves to protect the wood from rotting, getting wet and drying out, and damage from wood-boring beetles. A wooden surface requires a competent and responsible approach to work. It is necessary to properly treat the base before applying the protective layer, to clean out any unevenness and roughness. It is also important that the material is dry, otherwise the coating will crack when it shrinks.
Among the advantages, we note that plaster is a plastic material, easy to apply, and dries quickly. Finishing materials adhere well to it, and it promotes good adhesion to the base. Good plaster mixtures have a fine consistency and form a thin layer.
It is recommended to plaster the wooden beams used to construct the floor of a house no earlier than a year after its construction. This is necessary to prevent cracking of the plaster when the walls shrink.
Necessary tool
Depending on the type of surface (concrete, brick, aerated concrete or wood), the master must have a set of tools for the job.
- You will need a portable ladder or platform that is convenient to climb onto to process high sections of the wall.
- The old coating is removed by tapping with a hammer. A chisel, brushes, and a set of spatulas may be useful. With these tools you can remove all layers of the old coating down to the very base.
- In hard-to-reach places, use a hammer drill with attachments. Remains of plaster are removed with a metal brush.
AdviceA good assistant is an electric drill or grinder. When working with these tools, it is advisable to prepare bags for garbage, as there will be a lot of it.
- You will need an extension cord when working with power tools.
- It is good to scrape off the lagging layer of wallpaper or plaster with a spatula. If it is thin, it is easier to pick it up with a paint brush dipped under water.
- Sometimes you may need a sander or a vacuum cleaner to use a hose to collect all the wall dust.
- You need a container for mixing the solution, rollers with different attachments, a trowel, a regular knife, a blade, rags for wiping away stains, masking tape for sealing corners and baseboards.
Types of plaster solutions
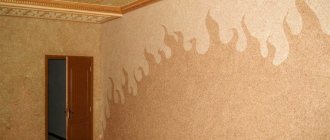
The main components of plaster mortars for wood are cement, gypsum, clay, sand and special additives. Mineral chips of various diameters are added to decorative plasters of the “Bark Beetle” type to obtain convolutions on the surface that imitate the passages of the bark beetle.
Let's look at the composition of ordinary plaster.
Cement-sand mortar
This plaster mixture contains cement and sand. For one part of cement, take 3-5 parts of sand. The ratio depends on the brand of cement. Here is the most commonly used ratio of cement and sand in cement-sand plaster:
| Cement brand | Amount of cement in shares | Amount of sand in fractions |
| M600 | 1 | 6 |
| M500 | 1 | 5 |
| M400 | 1 | 4 |
| M300 | 1 | 3 |
| M200 | 1 | 2,5 |
All components are thoroughly and gently mixed until the grains of sand turn gray. Subsequently, the mixture is sifted, removing particles larger than 2.5 mm. Then add water. This is done in small portions until the consistency of thick sour cream is obtained.
You can make the plaster mortar yourself, or you can buy it ready-made.
Important! By purchasing a ready-made mixture, we will receive a composition with the addition of plasticizers. This improves the quality of the solution and facilitates the work of applying plaster.
Cement-lime mortar
The best composition for the first layer directly on a wooden surface. Adheres reliably to the base and has good adhesion to wood. The result is a frost-resistant and water-resistant coating. Used for interior and exterior finishing works. Has the following composition:
- cement grade M300 – 1 share.;
- sand – 4 shares;
- slaked lime – 1 share.
It is better to use slaked lime, which can be purchased ready-made. Here it is important to choose the right quality one, otherwise cracks will appear on the plastered surface.
Lime-gypsum mortar
Consists of a mixture of gypsum powder and dry lime. First, lime dough is prepared. To its 4 parts add 1 part of gypsum. Gypsum dries in about 30 minutes, so it is prepared in small portions and used quickly. It is useless to dilute dried gypsum plaster with water; it will not give a good result.
Plastering wooden walls inside a house is the main use of lime-gypsum mortar; you just need to exclude rooms with high humidity.
Clay-based plaster mortar
Clay has been used for plastering wooden surfaces for a long time. Currently, the composition has been slightly changed; modern components are added to it for strength, for example, non-woven glue.
The following composition is used:
- clay – 3 parts;
- straw or sawdust - about a liter by volume;
- sand - 7 parts.
It’s good to add a liquid glue solution (the preparation method is indicated on its packaging). When decorating the outside of the house, add 1 part of cement. This plaster can be used in damp areas.
The plasticity of clay plaster is determined as follows: roll a 4 cm ball, squeeze it between two planes and observe its condition. The appearance of 3-4 shallow cracks indicates its readiness. If the ball crumbles, you need to add clay. If the ball wrinkles like plasticine, increase the amount of sand.
It is convenient to use ready-made plaster mixtures for work. They have an optimal composition, which is difficult to obtain on your own. The additives used in them make it possible to obtain breathable walls, while at the same time maintaining their moisture resistance and vapor permeability.
Advice! When choosing a plaster mixture, you need to consider what kind of substrate they can be applied to in order to provide a durable coating that will not peel off.
These capricious protective coatings for metal
And now the most interesting thing: each “protection” does not ask, but requires the required degree of cleaning so that the coating adheres well and lasts a long time.
Do not forget to check the products immediately before applying protective coatings to metal.
Paints and varnishes based on natural resin are the 3rd degree of metal purification.
Paints and varnishes based on synthetic resin are the 2nd degree of metal purification.
Mastic, putty, self-leveling “protection” on liquid glass is the 3rd degree of metal purification.
Mastic, putty, self-leveling “protection” on natural resin is the 3rd degree of metal purification.
Mastic, putty, self-leveling “protection” on synthetic resin is the 2nd degree of metal purification. Pasting protection on a bitumen and bitumen-rubber basis is the 4th degree of metal purification.
The adhesive protection with artificial synthetic glue is the 2nd degree of metal purification.
Pasting protection on asbestos with liquid glass is the 4th degree of metal purification.
Lining and facing with binders made of liquid glass - this is the 3rd degree of metal purification.
Lining and facing with synthetic resin binders - this is the 2nd degree of metal purification.
Lining and facing with binders made of natural resin - this is the 4th degree of metal purification.
Single-layer latex rubber coatings are the 2nd degree of metal purification. Two-layer latex gumming agents are the 4th degree of metal purification. Important!
The cleanliness and dryness of compressed air - with the appropriate cleaning method - is determined according to GOST.
When mechanically cleaning products, condensation is not allowed.
After cleaning, the metal is dusted by any means and a protective coating is applied.
What and how to check
- The thickness of the putty joint is 0.5 mm.
- The thickness of the coating compositions is from 25 microns.
- We take an electric lamp with a reflector with a narrow hole. We direct the beam parallel to the base. So, ideally it should not give shadows (spots).
How to get rid of rust on plaster
When the plaster layer gets wet, rusty stains may appear on the surface.
Several methods are used to eliminate them:
- decolorization of damaged coatings using hydrogen peroxide or sodium hypochlorite (suitable for gypsum plaster);
- treating surfaces with a solution of orthophosphoric acid - allows you to remove rust from the base;
- treatment with hydrophobic putty, characterized by good vapor permeability;
- use of specialized primers (at the finishing stage).
It is also allowed to use acrylic-based water-based primer mixtures with modifiers in the form of epoxy resin to remove rust. This material allows you to create a membrane that prevents the formation of a rusty layer. In this case, the composition allows air and steam to pass through.
Features of plastering outside
The question of how to plaster a wooden wall on the outside of a house has a number of its own characteristics. Work is carried out only after completion of the interior finishing. Almost all stages of external processing are similar to the internal sequence.
An exception is the use of gypsum solutions. Also, you should not choose clay compositions. In dry and warm weather, in order to avoid the appearance of cracks, the plastered external surfaces are periodically moistened with water.
Work is carried out only after completion of the interior finishing.
Second stage: do-it-yourself wall repair for plaster before finishing
After removing the coating, you should carefully inspect the walls. They have cracks, chips and damage. Any existing defects should be eliminated.
Repairing reinforced concrete panels is no different from restoring concrete floors. Loose elements in brickwork should be removed, and the cement mortar on the sides and top should be beaten off. Then lay the bricks back on the cement and sand mixture. It can be replaced with polyurethane foam.
Expand small cracks to fill with mortar. Reinforce large ones with self-tapping screws and use “cement laitance” - a mixture of cement and water in a 1:1 ratio. The composition can be replaced with a penetrating primer.
Use the mixture to seal the slotted edges to prevent their destruction in the future. Ensures adhesion to the repair mortar. Seal the cracks with it after the primer mixture has dried. Remove chips and unevenness using the same method.
Non-through cracks in aerated concrete should be reinforced and sealed with putty. It is necessary to prepare a gypsum solution from a special finishing mixture (for example Knauf HP Fin).
Drying plastered surfaces
In the first three days, no methods are used to accelerate the natural course of the process. If you neglect this rule, the top layer will dry out too quickly and will crack in the future. By 4-5 days, you can somewhat speed up the drying of the coating by installing a heat gun or regularly ventilating the room.
Drying plaster with a heat gun
Exterior walls usually dry naturally. During this period, it is important to protect them from precipitation, direct sunlight, and strong winds. For this purpose, a durable polyethylene film is fixed to the walls, which will prevent damage to the plaster layer.
Modern equipment
Professionals strive not only to improve their skills and achieve the highest quality of work, but also to reduce the time spent on repairs. Obtaining a good result in a short time without compromising quality is especially important when finishing facades or when processing interior spaces with a large area.
Among the tools, devices and mechanisms for plastering work, a special machine is often used to automate the process. She mixes the mixture and sprays it onto the surface under pressure. At the same time, the plaster is “compacted”, ensuring adhesion with the next ball.
The results of working with professional power tools are at the highest level, but the price is appropriate. Often, after such leveling of the walls, even puttying is not required. The dried surface is primed and prepared for applying decorative finishing.
Preparing the old layer
Preparing old plaster for renovation
According to technology, it is not recommended to apply the solution to old plaster, but it can be updated using a grinding solution consisting of lime, quartz sand and water.
Preparing the surface for renovation:
- Tap the old surface with a wooden mallet to identify poorly adhering areas and clean these areas from the plaster to the base.
- Clean off any old paint from the surface.
- Remove white marks.
- Clean all cracks, chips, scratches throughout the entire depth, use water for this.
- Cut out efflorescence, grease stains and traces of mold along with the old plaster.
- Cover the broken areas with the solution from which the mixture is made. If the layer of old plaster is more than 3 cm, first spray with a thin layer of liquid mortar, and then apply primer. After the solution has dried, renew the entire surface.