Types of paints for MDF
Laminated MDF boards, from which the facades of finished furniture are made, are the easiest to paint - the film coating on them acts as a leveling layer and primer.
The following compositions are suitable for coloring them:
- Alkyd or oil based enamels. These are universal compositions with high coverage and resistance to water, abrasives, mechanical and chemical influences, but with a pungent odor and additives harmful to human health.
- Paints containing polyurethane resins. They are characterized by increased wear resistance and durability, but working with them requires some professional skills.
- Acrylic-based enamels can be liquid or in the form of aerosols. They contain water-soluble components - acrylate or latex polymers, therefore they are safe, resistant to moisture and temperature changes, but do not protect well from abrasive and mechanical damage.
- Furniture enamels and nitro paints. Their advantages are high coating density, good adhesion to the surface, quick drying and durability.
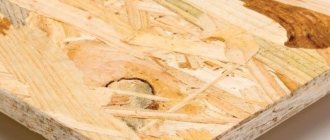
It is more difficult to paint the furniture body, since MDF boards without additional coating absorb a lot of paint, and wood fibers that rise during the painting process make the surface rough.
In this case, the following types of paints are suitable:
- Acrylic compositions in the form of aerosols. To get a fairly smooth surface, you will need to apply at least 4 layers.
- Special paints for MDF. They have a polyurethane or urethane-acrylic base, are applied with a brush or spray, and the furniture coated with them almost does not fade and is resistant to various types of influences.
- Automotive enamels. Despite the fact that they were developed for painting metal surfaces, they are also suitable for MDF, as they have suitable characteristics - fast polymerization, good adhesion, resistance to high temperatures and moisture.
A decorative effect, such as imitation of patina, leather, silk, shagreen, textured metallic, can be achieved using polymer powder paint for wood and MDF, but its application requires special equipment.
Paint or varnish application technology
Application of materials is carried out either manually or mechanically. In the first case, achieving high quality is difficult; considerable experience and skills are needed. You can manually renew the coating on country furniture, refresh household or auxiliary items. However, an even layer without streaks or drips can only be applied by spraying.
There are two types of spraying:
Both mechanized methods require experience and skills. An untrained person will never be able to apply a neat layer without drips the first time. Therefore, before starting work, it is necessary to practice, as they say, to get better at it. No explanations will help here; you have to try it yourself, look for the optimal thickness of the torch, select the appropriate air pressure and viscosity of the material.
There are no universal recipes here, but you need to know the general requirements:
These rules are quite sketchy; real skill can only be obtained through practice.
Types of varnishes suitable for MDF
Varnishing furniture made from MDF greatly increases its service life. The following varnishes are used:
- Alcohol or oil based. They dry quickly and are inexpensive, and oil-based ones give the surface additional moisture resistance.
- Alkyd-urea compositions of two components, which are mixed before starting work. Gives the surface strength and shine.
- Epoxy varnishes also consist of two components. They withstand contact with water well, so they are often used for application on countertops.
- Polyester compounds. Resistant to high temperatures and chemicals.
- Nitrocellulose. They are not durable, so they polish well.
- Acrylic-urethane and acrylic. They are diluted with water and do not have a strong odor. Surfaces coated with them are safe for health, allowing contact with food.
- Polyurethane. Used in places where increased wear resistance is required.
Applying varnish to furniture parts is a more complex process than painting.
Types of furniture finishing
The finishing coating for cabinet furniture can be divided into several groups:
Furniture made from laminated chipboard also often suffers due to the negligence of owners or movers. Its surface can be restored using self-adhesive film or other methods.
There are furniture products that do not have a finishing coating, but are only impregnated with a special oil. Usually, these are antique items made of valuable wood. For these products, special restoration techniques must be used, and the work must be carried out by a specialist.
Necessary materials and tools for painting MDF furniture yourself
You can paint the entire piece of furniture or part of it. This does not require professional skills or special equipment, but it is better to prepare all the necessary tools and materials in advance.
To paint MDF products you will need:
- paint of the desired color in sufficient quantity and a container for diluting it;
- primer if the surfaces are not laminated;
- solvent for the selected paint;
- wood putty for sealing cracks, scratches and joints;
- spatulas of different sizes;
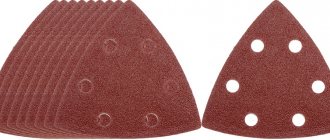
- sandpaper or abrasive mesh for cleaning joints and excess putty;
- Screwdriver Set;
- film to protect surfaces that do not need to be painted;
- masking tape;
- depending on the type of paint - flat brushes, a spray gun, a short-haired, long-haired or velor roller;
- construction knife;
- clean rags.
When working with paints and varnishes, you need to wear gloves, a respirator and goggles.
How to choose the right paint
Anyone who decided to paint furniture themselves probably wondered how to do it correctly. Interior items made from chipboard absorb moisture to a lesser extent than wood. It will take a long time for them to dry.
Chipboard will need less primer than wood.
There is a wide variety of acrylic paints with a metallic or pearlescent effect.
To thoroughly paint, use varnishes. They will give the furniture an antique effect. She will look great. The plane must be painted in several layers, first allowing each layer to dry. This is not their only property.
Varnishes help fix the color and protect against minor defects.
Each manufacturer produces the appropriate primer for their paint, and it is better to use this particular primer.
Step-by-step instructions for coloring
Before starting work, remove doors, shelves, handles and other fittings from the piece of furniture. Cover glass or mirror inserts with masking tape. Cover the area where painting will be done with a protective film.
Surface preparation
First, remove any grease or dirt from the surface. To do this, you can wash it with the addition of a cleaning agent. Use wood putty, such as acrylic or car putty, to seal all cracks and chips, first cleaning them with the blunt part of a knife. Chips on the edges and corners should also be treated. If the putty will have to be applied in several layers, wait until each layer has hardened before applying the next one.
After all layers have completely dried, carefully sand the surface - this will remove excess putty, and the MDF board will become rough, which is necessary for good adhesion to the paint. After this, use a rag or vacuum cleaner to remove dust from the item you are preparing to repaint.
Primer
The final result depends on the quality of the primer - it not only increases the adhesion of the material, but also eliminates minor defects. By reducing the absorption of the primed surface, paint consumption is reduced. It is recommended to use a universal polyurethane primer.
Start with the ends and raised parts, then apply primer to the entire surface of the product. Let the first layer dry completely, sand it and cover it with a second and, if necessary, a third, etc. Before applying the last layer, the MDF is sanded again.
Selecting paint type and color
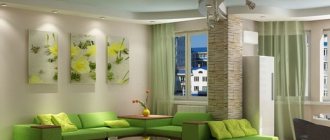
To repaint MDF furniture in a bedroom or children's room, it is better to use water-based acrylic or silicone paint. They are easy to spread and apply, dry quickly, do not have an unpleasant odor and are safe for others. In living rooms and children's rooms, you can use furniture enamels with high abrasion resistance.
Surfaces painted with polyvinyl acetate-based compounds quickly become dirty and destroyed when exposed to moisture, so they cannot be used to paint kitchen furniture or bathroom cabinets. In rooms with high humidity, it is better to use silicone enamel; it is elastic, which helps compensate for the thermal expansion of MDF boards.
Wear-resistant polyurethane and automotive aerosol paints are well suited for kitchen facades. Compositions containing latex have a dirt-repellent effect, so they are suitable for cabinet fronts in the kitchen or hallway.
Alkyd paints are cheaper than others, which is important when you need to paint a large area. They are easy to work with, but it takes up to three days for them to dry completely. They contain substances harmful to health and have a persistent, pungent odor that does not disappear for a long time, so only furniture used in non-residential premises can be painted with alkyd enamels.
Paints and varnishes are transparent and pigmented. The first ones will emphasize the structure of the wood if the MDF is covered with veneer. In construction stores you can buy a ready-made color mixture or tint, which is added to white paint to give the desired shade. To determine what tone you will get, paint a small area; you may need to add more color.
Applying paint
The most beautiful furniture is obtained when using a spray gun. Painting with aerosols gives a good result, but the room can suffer from heavy splashing, so the easiest way is to use a brush or roller suitable for the selected paint composition. Move the tool in one direction only during operation.
Surface preparation
A varnished cabinet made of solid wood, or a set of MDF, first needs to be sanded. If you plan to do this manually, without special machines, then be prepared for a labor-intensive process. If you have a grinding machine at your disposal, this will save both time and effort.
Before painting, furniture should be prepared.
After processing, the surface becomes rough, and thanks to this, the paint penetrates deeper into the wood, lays evenly and stays on the surface of the furniture for a long time. The layer of old varnish is removed using medium-grained abrasives.
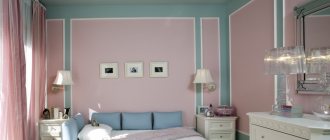
When decorating your bedroom, use all your imagination.
And after treating the entire surface with fine abrasive fractions, the final stage of sanding is carried out. Then dust and dirt are carefully removed from the surface. During the cleaning process, do not use wet rags or sponges - the old layer of farba will eat into the wood, and the new one will lie unevenly.
Chipboard furniture must be cleaned of dirt and grease before painting.
After treatment with abrasives, the surface is degreased. This is a required step. For degreasing, use alcohol or acetone. If you don’t want to bother with abrasives, then you can skip the sanding step, but in this case you need to use only high-quality spray paint.
Wash with a sponge or soft cloth, rinse, let dry, wipe with a napkin.
Then the wardrobe (cabinet, table) is simply treated with a degreaser (it is better to use white spirit), then a primer is applied and after that they begin to paint.
We paint old furniture white or give life to unnecessary things
Often an old chest of drawers, chair, table or cabinet made of solid wood is very dear to us, like a memory. It’s a shame to throw them away, and they no longer fit into the new interior. Therefore, the task is to update it. How to paint furniture at home?
I suggest the most elegant, fresh color is white. Painting furniture is a great way to extend the life of old furnishings and equipment and give them new life.
For example, white distressed furniture can be finished in such a way that it looks very stylish. You will need to process the furniture in two stages:
- whitening;
- light sanding with sandpaper.
Wooden products made from solid wood are best suited for this purpose: oak, pine, birch, beech.
To work you should prepare:
- dark dye and white acrylic paint or two colors of acrylic paints;
- white wax candles;
- brushes;
- coarse and fine-grained sandpaper;
- textile;
- knife.
- Clean the surface of the chest of drawers or chair from dust, wipe it several times with a damp cloth and leave until completely dry.
- If the surface is painted, you need to remove the varnish layer with sandpaper (first coarse and then fine-grained).
- Places that you want to highlight: carved decorations, slats, edges, should be covered with darker paint (brown and blue shades are ideal here). Leave the paint to dry.
- To get an uneven and natural effect of worn corners, wax the areas previously painted with dark paint. The wax will make it so that the next coat of paint will not adhere tightly to these areas.
- Cover the entire surface with white paint, preferably several times, with breaks to dry. Avoid stains.
6. Areas covered with an additional layer of paint and wax should be rubbed with a knife. Don't press too hard - this way you will get a good effect.
7. Rub the entire surface with fine sandpaper to level the surface.
Whitening with whitening paste
Bleaching using a bleaching paste consists of rubbing the wood with a special paste containing wax and pigment. The wood surface will develop distinctive white lines, making it look older. Porous wood is suitable for such bleaching - trees such as oak and ash.
You need to buy in the store:
- special paste,
- prepare paint in the chosen color,
- metal brush,
- hard brush,
- textile,
- a piece of coarse and fine-grained sandpaper.
- Wipe the clean surface of a chair or chest of drawers from dust several times with a damp cloth and leave until dry.
- If the surface is painted, you need to remove the varnish layer with sandpaper.
- Paint the surface with paint and let it dry.
- Using a wire brush on the wood, make tiny grooves according to the grain orientation.
- Apply the whitening paste, fill the grooves well and wait for the paste to dry.
- Wipe the surface with a dry cloth.
- Cover the surface with varnish.
Express whitening
If you want to give a simple wooden stool new life, you can do it with a washed-off white paint effect. Nothing could be simpler.
- Rub the wooden surface with sandpaper.
- Using a brush, apply a coat of paint.
- When the paint dries, remove excess paint with a napkin.
- Coat the wood with varnish.
How to repaint lacquered furniture? Yes, just like repainting polished furniture and any other furniture. The only problem is old, cracked varnish or polish. It can be removed in several ways:
- The mechanical method is the cheapest and most accessible , but also the longest and most labor-intensive. Old polishing or varnishing is removed using sandpaper or a sandpaper. Once you select it, don’t forget to wear safety glasses to prevent dust and small pieces from getting into your eyes.
- The chemical method is quite expensive ; it involves special chemicals applied to the old surface and then washed off with water. They come in the form of powder, gel, foam, etc. When removing old varnish using this method, you need to protect the skin and mucous membranes.
- The thermal method removes the old coating using a hair dryer . Heating the surface with one hand, scrape off the polish or varnish with the other. With this method, you need to be careful with temperatures to avoid ignition.
Below are photos of painted furniture:
Another option for white furniture. You can decorate with artistic drawings.
If you liked the article, please like it)) Thanks in advance.
Coloring
The surface is covered with paint in 2-3 layers. If the first layer turns out to be uneven, with bald spots, the defects are corrected during the second painting. After drying, the first layer can be lightly sanded with fine sandpaper. This grinding has two purposes. It removes sagging and grooves of paint, and makes the surface matte, so that the next layer will adhere better.
If after the second application you are satisfied with the result, leave the cabinet until completely dry. Otherwise, the procedure is repeated a third time. It is not recommended to apply a fourth layer: the drying period will be prolonged, and over time the coating will most likely begin to peel off.
The number of paint layers applied affects the visual result of painting. One or two coats applied with a roller will leave a slight translucency, necessary if you want to emphasize the texture of the wood or create an aged effect. If it is necessary to create a smooth gradient, light paint is applied first, then a dark shade is gradually added.
The cabinet is left to dry for several days, after which the parts are assembled together. The following compositions are used as a finishing coating:
Furniture can be painted without removing the old coating, if it is strong enough, smooth, and does not crack or peel. In this case, the technology is the same, only the varnish removal stage is missing. It is also important to degrease the surface especially thoroughly and use a special adhesive primer.
Work order:
At first I wanted to paint it like this without removing the door, then I realized that it would be inconvenient. So I took a risk. and took it off. It turned out not to be difficult. True, worries about how to put them back on were present until the last moment. In the end, I also screwed it myself; I didn’t have the patience to wait for my husband))).
I pulled out the built-in lights and wrapped them in a suspended state with masking tape. The same tape was used to protect the walls on the sides of the cabinet, the floor, and the mirrors on the doors. Prepared the workplace. I decided to paint it. on the bed)))! I covered it carefully with polyethylene. And I have never regretted this choice. The bed was large and high, everything fit, there was no need to bend over and crawl on all fours. I prepared approximately equal stacks of books and wrapped them in cling film. They are needed as substrates so that the doors can be lifted and painted as if suspended; the painted edges will not come into contact with a flat surface.
Stage 2.
I sanded all surfaces that needed to be painted. It is necessary to sand lightly, without fanaticism, with the finest sandpaper. Light circular movements. Purpose: to create roughness without removing the laminated layer. If there are dents and scratches, they should be filled with putty at this stage. After sanding, thoroughly wipe all surfaces with degreaser. It will remove dirt, grease marks, and everything that can disrupt the adhesion of the primer and paint.
Stage 3.
Primer. I went through hard-to-reach places with a brush, and the rest with a roller. A thick layer is absolutely not necessary; it must be covered with primer without drips and in a thin layer. Uneven coloring is not a problem, but there should be no gaps. I didn’t prime the rattan inserts; the paint applied well to them anyway.
They are easy to paint - just roll them with a roller; with a brush it is more difficult not to go beyond the edges. Wipe off any blemishes immediately with a cloth. Each layer was dried as recommended by the manufacturer; the acrylic dries “touch” in an hour and, in principle, you can carefully turn the door over and paint the other side.
Stage 5.
I assembled the closet. I screwed the doors and handles. I removed the masking tape and cleaned everything up. At first I planned to keep the doors open for two days, I was afraid that they would stick. Nothing like that - you can close it right away.
Dresser.
Mirror.
Important!
Acrylic paints dry quite quickly “touch-free”, but polymerize for at least a month; with a primer the process can take even longer. The painted product can be used almost immediately (or it’s better to wait 2 days) and even wiped with a damp cloth. But within a month, the coating remains very vulnerable; it must be handled carefully, not scratched or rubbed with force. If shelves or horizontal surfaces are painted, then it is better not to immediately place things on them that could “stick”, wait until the paint “sets”. Although I immediately put everything I needed on the chest of drawers, nothing stuck).
Here you go. The work is labor-intensive, but I was pleased with the result. The paint job ends up looking no worse than the factory paint, no brush marks are visible. It holds up well too. I haven’t tried scratching, I use the furniture as usual. But usually I don’t scratch it))). Although I will conduct an experiment in a month. The room has been pretty updated). Alas, the photos after compression leave much to be desired; in fact, the colors are brighter and cleaner, but this is not so important.
If you also want to redo furniture and have questions, write to me and I will answer. And if such a rework seems complicated to someone, I assure you that it is not, labor-intensive - yes, but quite doable without any experience. You can just start with internal, unnoticeable parts, or with small furniture, a chair, for example. The rework took three days. At the same time, I managed to cook and... suffer from bronchitis + my leg is still slightly lame after the cast. The “disabled painter” was able to paint, which means you can too))).
Seal the cracks
The appearance of cracks on pieces of furniture made of chipboard, as a rule, is facilitated by the ingress of moisture, they are also formed due to exposure to heat or frequent opening and closing of doors without holding them, or slamming doors. You can remove this defect yourself without resorting to outside help.
To work you will need a syringe with a needle, clamps, and PVA glue.
Fill the syringe with PVA glue and put on the needle. Fill the entire crack gap with glue. We attach a clamp to the plane from the side where the crack appeared and tighten it. Remove excess glue with a napkin. Leave it for a day or two. After time has passed, we continue restoration work.
You can get rid of cracks using putty.
Apply the mixture to the surface with a spatula in two layers. We distribute the first layer equally evenly on the surface. We wait for it to dry, apply a second layer of putty, and also let it dry.
How and with what to paint furniture with your own hands at home
Hello everyone! I think it will be relevant to talk about how to paint furniture and what to choose for the planned work in terms of materials.
Agree that the market offers many options for painting furniture surfaces made of veneer, laminated chipboard, wood, etc. Some people need to repaint it a different color, while others want to restore the old polished MDF surface with their own hands at home. .
I do not exclude that it will not be possible to cover all the nuances, but I will try to reveal some secrets as much as possible and share useful recommendations. In addition, you can use photo and video instructions to correctly complete the task.
How to paint home furniture - technology, materials, useful tips
The surface of furniture often becomes unusable due to careless handling, unsuccessful assembly or transportation. Many users throw away durable, sometimes almost new, furniture because it has worn, scratched or torn areas in the most visible places. However, the issue has a completely effective and high-quality solution. Furniture can be painted, completely or partially. You just need to know how it's done.
Tools and materials
It makes no key difference whether you plan to repaint old chipboard furniture white, restore a modern set from Ikea, or try to paint the panels antique with your own hands.
To work you will need a certain set. For planned painting work you cannot do without:
- object to be painted;
- masking tape;
- gloves;
- paints;
- brushes;
- rollers;
- paint tray.
But this is just a set for work without sanding and preliminary preparation. Just to take furniture and repaint it a different color. Kitchen, room or children's room furniture is not so important at this stage.
Often, if you want to achieve a high-quality result, to realize your idea of adapting furniture in the Provence style, for example, you first need to go through the preparatory stage.
The preparation kit consists of:
- putties;
- safety glasses;
- sandpaper;
- grinding machine;
- spatulas;
- rollers;
- brushes;
- gloves, etc.
You can also add various tools here, such as pliers, a hammer and screwdrivers, if the furniture needs to be partially or completely disassembled. For example, if the element is made of pine, it is better to prepare it from all sides, carefully plaster it, remove all irregularities and apply a protective impregnation to increase its service life. Then you can safely cover it with acrylic paint or other materials.
How to paint correctly: secrets of painting and decor
Tips on how to repaint old furniture white step by step include all the important steps, from surface preparation and paint selection to painting technology. However, important little things that simplify the process and improve the result are often overlooked. The following tips will undoubtedly be useful:
- It is useful to stock up on several brushes of different sizes (thicknesses). It is convenient to handle large surfaces and decorative elements using a spray gun.
- The wooden surface is painted along the grain with smooth movements, the brush is lowered into the jar no more than a third.
- If there are fittings on the furniture façade (handles, locks), they are removed during painting or wrapped with mounting tape.
In the kitchen with a touch of Provence Source archidea.com.ua
- Aerosol paint is used uneconomically, for example, when painting a chair. But it is convenient to work with fittings or decorative elements. Color is applied to small details with an aerosol faster and more evenly than with a brush.
- Using spray paint and a stencil, you can apply a pattern to a wooden surface. For example, a plastic lace napkin is suitable as a stencil.
- Furniture in retro or Provence style can be decorated with decorative stucco molding made of polystyrene foam or polyurethane. The decor is attached with wood glue; paint the product after the glue has dried.
- Masking tape is a useful addition to the job. It will protect the already painted part from getting another dye.
Fittings are important for style Source mydecorative.com
Nuances of preparation
Furniture is usually painted if it was assembled with your own hands, or they want to restore the old one, give it a new look and extend its life.
Preparation includes several stages:
- Thorough inspection. If it is old furniture, it is worth examining it from all sides, looking for weak points, replacing something as necessary;
- Sanding. Glossy and matte surfaces are sanded with fine-grained sandpaper to avoid leaving deep scratches. If available, use a sander;
- Primer. It is correct to start painting with a primer. It will increase adhesion and the paint will adhere better to the surface;
- Putty. Irregularities and defects can be repaired using putty;
- Re-priming. If putty was applied, wait for it to dry completely, sand it again, and complete the preparation with another layer of primer.
I will only add that the choice of primer should be approached carefully. Its color should be as close as possible to the color of the chosen paint. If you are repainting chipboard furniture white, you should definitely not use dark primers.
How to prepare a cabinet for painting
Before you begin, you must:
To remove the old coating you will need:
Tip: The primer should be selected in a shade that will match the color of the paint. When purchasing brushes, you need to make sure that the fibers do not fall off when painting the cabinet.
How to choose the right paint
Paint for a wooden cabinet should be furniture-grade, water-based, which includes:
Tip: When purchasing paint, you should immediately select a primer for it. Manufacturers also produce a primer for their paint, which significantly improves the adhesion of the coating to the surface.
What shade can you use to repaint a cabinet white? To correctly resolve this issue, it is better to use samplers and observe them for several days.
In this case, it is necessary to take into account:
White colors are:
Tip: If white has a purple undertone, it will eventually look like pink. When choosing shades, you should take into account the lighting and the entire interior of the room.
Paint selection
Now directly about what you can paint with. There are a lot of paint options on the market. Here the main attention is paid to the material from which the furniture is made. In addition to paints, varnish is actively used. It creates an attractive appearance and has excellent protective properties.
Varnish is the basis of the composition. An appropriate coloring pigment is added to it. That is, start by choosing a varnish base, which can be:
- alcoholic;
- epoxy;
- oil;
- polyurethane;
- alkyd;
- nitrocellulose.
If you want to use paint, then listen to a few tips.
- Acrylic compounds are considered the traditional choice for furniture. They are durable, quick-drying, safe and do not have a strong unpleasant odor. At the same time, they are diluted with water;
- Working with a spray can is much easier in terms of doing the job. They also use acrylic compounds. Lay flat on the surface, no need to use rollers or brushes. But the price is higher and the consumption is more impressive;
- Enamel ones are mainly used for treating wooden surfaces. Their advantage is that they create a glossy and shiny structure;
- If you need a matte effect, use oil-based formulations;
- The laminated surface is painted using polyurethane and alkyd compounds;
- Epoxy enamel is generally not bad, but it takes a very long time to dry, plus an unpleasant characteristic odor remains in the room for a long time;
- In theory, laminated chipboard and MDF can be coated with acrylic latex paint, but then you will have to use a special primer and apply it in 2 layers.
Conventional white base paints, which contain a large number of pigments, are very popular. This allows you to create your own shades and experiment without spending a lot of effort, time and money.
Removing old paint
We often come across furniture based on chipboard. Even if it is quite worn out, it can be restored and fit into the interior favorably.
Any repainting procedure begins with preliminary preparation. And sometimes you have to first get rid of the old paint before applying primer, putty and new paint.
There are 2 ways to clean surfaces.
- Chemical method. Here you will need to purchase special chemicals that are designed to remove old coatings. Here, start from the material that previously covered the furniture. The means are distinguished by adaptation to a specific material. Be sure to use gloves when working;
- Thermal method. The essence is the effect of heat. A hair dryer would be an ideal option. First, hot air is supplied to the surface. This allows you to soften the paint or varnish, which is then simply removed with a scraper.
Now you can safely putty, sand and prime before applying the finishing coat of your chosen paint or varnish.
Is it possible to paint an old cabinet?
It all depends on the material from which it is made and in what condition it is. Smooth varnished surfaces require a special approach. For example, removing polish from the facades of Soviet furniture made in the 80s, if it has obvious signs of time in the form of chips and cracks, is labor-intensive and pointless. It is unlikely that this will be done neatly and evenly.
If the cabinet itself is in good condition and does not require restoration, then it can be painted with chalk paint. Chalk paint fits perfectly on surfaces made of veneer, wood, plywood, chipboard and MDF. Unlike acrylic, which requires:
- Complete removal of the varnish layer (for better adhesion of the coating to the surface). To do this, you will have to arm yourself with a whole arsenal of tools for sanding and sanding the old cabinet.
- Washing and removing dust from the surface, followed by degreasing.
- Applying primer and special contact agents before painting.
Useful tips
And just a few more tips that will complete this material and allow you to obtain additional useful information.
- It is better to take all materials in the form of primer, putty, varnishes and paints from one manufacturer. This ensures their compatibility. It's better not to waste money. Plus, you will significantly save time on searching for components;
- Take advantage of the color palette. Original and bold combinations help to benefit from contrast in the interior;
- Use only new rollers and brushes. It’s better not to take old ones that have been lying around on the balcony since the previous renovation;
- The most even and accurate layer is laid when using spray cans. But they cannot always be used for various reasons;
- Rollers are used for painting wide surfaces;
- Use brushes only to tint the end parts, fittings, and hard-to-reach corners, otherwise the pile may interfere with the creation of a smooth surface;
- Never forget masking tape. This will prevent paint from getting where it is not needed. Plus it will allow you to apply paint or varnish as smoothly and accurately as possible;
- Even when working with safe compounds, use a respirator and ventilate the room. It's better to play it safe once again.
That's all, actually. Now you know not only how, but also with what you can repaint your old furniture or elements you just assembled with your own hands.
If you still have any questions, you can ask them in the comments. I will try to answer you as quickly as possible.
That's all for me. Thanks everyone for your attention! Be sure to subscribe, leave your reviews and don't forget to give a good rating!
Surface treatment
Paint or varnish is applied in layers, with intermediate drying until completely dry. When a sufficiently thick layer is formed, the work can be considered complete. However, if you need to create a professional glossy coating, the stage of applying the material is only the beginning of all the work.
After this, two more important steps are needed:
These procedures are the only way to achieve a professional quality surface. Some novice craftsmen are confident that it is enough to pour more varnish or paint, which will spread out in an even layer and form an ideal plane. This is a common misconception that is never confirmed in practice.
However, an ideal surface will not work in any case. Therefore, further processing is required to obtain a high-quality coating.
Gradient
Gradient is the effect of a smooth transition from one color to another. And this is another technique that the master class participants liked.
To create a gradient, you will need paints and a regular dish sponge. First you need to apply stripes of color that will make up the gradient. Then, without waiting for the paint to dry, begin to get rid of the sharp boundary between colors: using a patting motion with a sponge, transfer the color to the neighboring one. You should move from bottom to top as well as from top to bottom, using different sponges (or different sides of a sponge) for different ends of the gradient. If it turns out that the desired color is lost or has become too pale, you can add the appropriate paint. Of course, it’s easier to make a transition from one color to the background color, but you can also achieve rainbow tints, it all depends on patience and desire.
I must admit that in this material we jumped a little ahead and told you how to create “special effects” on furniture before introducing you to the basics of using paints, waxes and varnishes. But we promise to write about this in detail in the next article. Stay tuned for a report from the Massif workshop, where we watched the painting of a 1970s-style bedside table!
People living for a long time in one unchanging environment often feel a strong desire to update their boring interior. Then the natural question arises: how to paint furniture? After all, it is she, in an updated color, that can refresh the boring interior appearance of the house. Tables, chairs, cabinets and bedside tables - this is what the arrangement of the room is formed from, but replacing them with new models every time you want to change is an extremely unprofitable idea. Thus, painting your furniture yourself becomes the best option. The following are painting tips.
Painting wooden furniture is an easy, quick way to update and refresh the look of a room.
Let's consider the attractive aspect of the question of how to refresh furniture with your own hands. First of all, this is a material benefit: you don’t have to spend a fortune on buying new fittings or the services of a professional painting craftsman. In addition, when painting yourself, you are free to show special ingenuity and creativity, giving the product the look you want.
Below are tips on how to paint furniture; We will explain in detail how to paint old furniture with your own hands, without resorting to the services of third-party specialists.
Peeling paint effect
The rest of the participants in the master class, under the strict guidance of Dasha, tried different techniques, but the most popular was the aging technique, or more precisely, creating the effect of peeling paint.
To create a story for furniture, you only need imagination, and to create the illusion of this story, you need paint and a little wax. The technology is simple: you need to paint the item, dry the first layer thoroughly, and then apply soft wax with a brush where there are abrasions. After this, put a layer of paint of a different color, wait until it dries, and use your finger or a cloth to remove it from the places where the wax was applied (you can easily find them: the paint will not lighten there).
The most difficult thing when creating antique furniture is to figure out exactly where the scuffs and chips will be. To make them look natural, it is necessary to imagine how the imaginary owners used the item: what parts they touched, how they carried it, how often they dropped it. It is worth remembering that paint never wears off symmetrically; The corners are almost always shabby, but in the places where parts meet, it remains in its original form, except that it becomes covered with patina. In general, look for photographs of old furniture or doors - they will explain everything better than any words.