Due to the fact that plasterboard is used quite often today in repair and construction work, this sheet material serves as the basis for further decorative finishing of the surfaces of premises for various purposes. Thus, ceramic tiles are laid on drywall using special adhesives, which are flexible and easy to apply.
Why are tiles laid on drywall?
These two finishing materials can perhaps be called one of the most common today. This is due to the fact that they are versatile, durable and have excellent performance characteristics. Drywall is good because it can have a special purpose. For example, it can be used in rooms with difficult conditions, where there is high humidity and sudden temperature changes. Ceramic tiles are also so versatile that no renovation can be done without them, at least in the bathroom and kitchen.
If you plan to use the described sheet material when decorating a room, you will probably be faced with the question of whether it is possible to glue drywall to the wall using tile adhesive. The answer is yes. But before you do this, you should think about whether it might be worth installing a plasterboard wall with a special compound. It is cheaper than the one designed for tiles.
An alternative solution is to use starting gypsum plaster. This will also save money. If the financial costs do not scare you, you can be sure that the drywall will adhere well to the ceramic tile adhesive. This is due to the fact that the latter is well retained on the gypsum board or concrete surface, respectively, and the sheet material will not move away from the base.
Preparing the base for cladding
A procedure such as preparing drywall for tiles must necessarily precede the start of construction work. The step-by-step scheme here will be as follows.
First, you should treat the drywall with a dampened rag or sponge, walking over the surface and collecting microvilli and dust particles from it.
Next, the surfaces of the HA should be properly prepared. In any case, you will have to putty. This helps to level them before covering. And also ensure optimal adhesion of the ceramic coating to them, reducing glue consumption significantly.
Seams and corners are treated first. The joints are additionally strengthened by applying reinforcing material - masking paper or sickle tape.
The priming process completes the complex of work on preparing the base. The primer is applied to the walls many times (usually up to 3 times). The break for drying the layer takes from 40 minutes to 24 hours (the time depends on the properties of the soil and is indicated by the manufacturer on the packaging). Some people doubt whether it is necessary to prime drywall before laying tiles. Experienced craftsmen insist on this step. This way the putty will not fall off, and the glue will stick better. After all, the primer ensures such quality of materials as adhesion (better adhesion to each other).
It is important to note that not every tiler will agree to lay tiles on drywall if it was not installed on a profile.
Which drywall to choose for tiles
Once you have found out whether ceramic tiles can be glued to drywall, you should think about what type of sheet material to choose. You can find GVL on sale. Canvases with this designation are used for rooms with normal levels of temperature and humidity. But if you need sheets with hydrophobic impregnation that will effectively combat the effects of moisture, you should choose a material marked GVLV. It is suitable for:
- bathrooms;
- kitchens;
- bathrooms.
Even if the materials will be used under dry conditions, it is still recommended to choose moisture-resistant gypsum plasterboard, since it will be exposed to moisture from the glue during installation work. It can be absorbed into the structure and warp the sheets.
Technology for installing tiles on gypsum boards
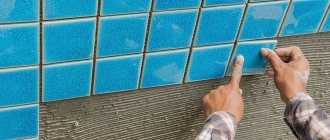
In this part of the process of laying tiles on drywall there are practically no differences from the usual work algorithm. Many people know how to lay tile cladding correctly. The prepared solution must be applied to the base with a notched trowel. This will create grooves of equal depth and distribute the glue evenly under the ceramic. The quality of adhesion of the cladding to the base depends on this.
After lubricating the wall with the solution, you should perform the following steps:
- Press the cladding fragment firmly to the surface. To increase the strength of the connection when laying tiles on drywall with your own hands, you need to lightly tap each element with a rubber mallet. The same technique is useful when aligning adjacent fragments.
- To glue the tiles evenly, you need to insert plastic crosses between the fragments.
- After laying ceramic tiles on drywall is completed, the coating must be dried for the period specified by the manufacturer for a specific brand of adhesive. Remove the support bar and lay the very bottom row (made of cut ceramics).
- Remove crosses. Treat the laid layer of tiles with a grouting compound. Jointing can be done with a rubber spatula, rubbing the mixture into the gaps between the masonry elements.
- After the grout has dried, coat the facing seams with water-repellent varnish. This is true if tiles are glued to drywall in a bathroom, swimming pool, sauna or other room with a constantly high level of humidity.
Laying tiles on drywall must be carried out in compliance with a technological break. To do this, every 4-5 rows you need to stop working for about 1 hour. During this time, structural stresses arising in the base are relieved. After this, you can lay the next few levels.
If a home craftsman knows how to lay tiles on drywall, he can easily do without the services of repair organizations. This significantly saves time and money spent on repairs.
In fact, there are no special secrets in how to glue tiles to drywall. The main difficulties lie in properly preparing the base for finishing. But the process itself occurs in the same way as under normal conditions.
What glue should I use?
Before gluing ceramic tiles to drywall, you should choose an adhesive. Among the most suitable compositions, cement mortar and liquid nails should be highlighted. The first option is the most common and universal. The base contains plasticizers and sand. Modifiers are added to improve quality characteristics.
If you want the layer between the materials to be as thin as possible and the work to be completed in a shorter time, you should use liquid nails based on water dispersion. Before you lay the tiles on the drywall, you will need to seal the grout. Its volume should be such that it can be worked out in a short time, so you should not knead too much of the mixture.
If you are still thinking about the question of how to glue ceramic tiles, you should pay attention to Ceresit CM. It is elastic and moisture resistant. The layer will undergo deformation well and create a waterproofing layer. Experts call this mixture almost ideal for such work. The main disadvantage is that the composition can undergo deformation. This is especially true for drywall, which during operation can change its linear dimensions.
Before laying tiles on drywall in the bathroom, you should also consider the special-purpose adhesive “Moment”. It is suitable for all types of ceramics and has good adhesion properties. The finish does not slide off the walls during the laying process, and after polymerization the glue exhibits moisture-resistant properties.
If you are thinking about how to glue tiles to drywall, you should also pay attention to Knauf Fliesen. This composition is designed specifically for drywall, and is quite inexpensive. The mixture is characterized by low consumption, high elasticity and good performance characteristics. It is suitable for ceramics that absorb moisture intensively. In this case, there is no need to soak the tiles additionally.
Installation of tiles in the bathroom can also be carried out using especially elastic adhesive Ceresit CM-17. It has good quality characteristics, but is highly expensive. So, for 25 kg of material you will have to pay up to 700 rubles.
Preparing the wall for laying tiles
Gluing tiles to a gypsum board wall is even more convenient and faster. Firstly, it is quickly installed. Secondly, the surface of the sheets is perfectly flat, which is important for high-quality installation. There is no need to wait for the surface to dry, as is the case with plaster.
Project
Before gluing the tiles, you need to make a layout design if they are not all the same. Modern collections include not only the background (base) slab, but also various types of decor, frieze (thin edging slab). In this case, it is laid out by type. You can do this yourself by drawing the wall to scale on paper. Or contact specialists.
Now many salons and construction markets provide such services. There are simple computer programs that can be used to quickly create a similar layout. The ideal option is a design project. The designer makes technical drawings, which include the layout of the tiles.
Types of plasterboard sheets
There are several types of gypsum plasterboards:
- Basic, standard (gray). It is used with the expectation that the average humidity in the room will be within 70%.
Types of drywall: Basic, GKLV, GKLVO - In conditions of high humidity, GKLV boards are used (moisture-resistant, greenish in color).
- In conditions requiring increased fire safety standards, with excess humidity standards, GKLVO sheets (moisture-resistant, fire-resistant), light green, marked in red, are used.
Primer
As a rule, tiles are used to lay walls in rooms with high humidity, bathrooms, and kitchens. Therefore, it is recommended to use moisture-resistant gypsum board sheets. Before gluing the tiles, the plasterboard wall must be prepared. First you need to carefully seal the seams with putty.
Scheme for applying a primer to drywall Next, you need to prime the entire surface on which the tiles will be glued. Using a deep penetration primer is an important point. Why do you need to prime a wall:
- priming compounds, penetrating into the micropores of drywall, strengthen the material;
- increase the adhesion of gypsum, that is, the adhesion of materials to each other;
- reduces glue consumption (up to 15%).
Primers for drywall are sold ready-made or diluted with water according to the instructions. Before use, the composition is thoroughly mixed. Pour some into a separate tray. For application use brushes and rollers. Prime evenly, paying special attention to corners and slopes. After application, wait until the composition is absorbed and completely dry.
Treating the wall before laying tiles If you lay tiles on regular drywall, then after priming, it becomes less susceptible to moisture.
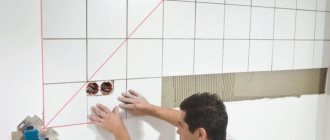
Preparatory markings
Please note that the first row of laid tiles plays an important role. The correct geometry of the entire masonry will depend on it. If you plan to do the repairs yourself, or you don’t have enough experience, preparatory marking is a necessary step. It is necessary to draw a strictly horizontal line along which the first row will be laid out. The following tools are used: level, angle (checks the right angle of 90⁰), plumb line.
Preparatory markings before laying To facilitate laying the first row, you can attach a metal corner along a drawn horizontal line to 2 or 3 self-tapping screws for the profile.
Choosing a layout scheme
After you have succeeded in covering the wall with plasterboard, you should begin choosing a layout scheme. You can start with a whole piece, placing it in a corner.
An alternative solution is to place the entire tile in the center. In this case, you will need to move towards the edges. If you decide to lay tiles in the bathroom on drywall using the first scheme, you should know that it is the simplest and easiest to implement. The minimum amount of waste is generated here.
The second algorithm for carrying out work is considered more complex and professional. Before you purchase the finish, you should draw a diagram on paper to calculate the amount of material.
Wall tiles can be laid vertically. Usually work starts from the floor. But before you start, you need to pay attention to the height of the ceilings and the location of plumbing fixtures. This scheme sometimes involves laying the entire product from the bathroom level. Ceramic tiles are often cut, which can be difficult. When choosing a suspended ceiling system, this task is greatly simplified, because the top edge will be hidden from view.
Attention! If you are thinking about how to level the walls and add insulation to them, drywall will be the best option in the process of resolving this issue. The sheets will allow you not only to level the surface, but also to place sound and heat insulation under your skin. The surface is covered with plasterboard and covered with tiles.
Horizontal row
Before gluing ceramic tiles to the wall, you should consider the layout diagrams. If you plan to form horizontal rows, you need to imagine what the surface will ultimately look like. With this algorithm for carrying out work, the base can be supplemented with decorative stripes, which can be located higher or lower, and also have different widths. For such decoration, one or several rows of tiles are used. The stripes may differ from the main shade of the tile, but should be in harmony with it. This layout allows you to visually expand the space and add volume to the room.
Vertical row
When you have succeeded in leveling the walls in the bathroom with plasterboard tiles, you can begin choosing a finishing layout scheme. Installation of the cladding can be carried out in vertical rows. This will increase the height of the ceilings and add a unique monumentality to the room. But if the room is narrow, it is better not to choose such a scheme, as the space will narrow even more. When you have to work in an elongated bathroom, the vertical arrangement of tiles is usually not used, as it makes the room look like a corridor.
Attention! Tiles are sometimes laid by combining vertical and horizontal stripes. This eliminates the effect of narrowing space.
Features of surface preparation
Using ordinary PVA glue, a polypropylene plaster mesh can be attached to the surface of the sheets. GCR, among other things, is also coated with a primer, which not only helps to increase the adhesion strength of the finish and the main wall, but also makes the material less absorbent.
If the composition is applied in several approaches, each layer must be allowed to dry thoroughly, which will take about an hour. The amount of time must be taken into account, especially if you seal the glue yourself and do not use it ready-made.
A drill or construction mixer is great for mixing the solution. In the first case, you need to additionally use an attachment in the form of a mixer for the tool. If you knead the mixture not by hand, but by mechanization, you need to set the tool at low speed.
How to prepare for work?
Before gluing tiles onto drywall, you should prepare the paper surface for work. To increase strength and create a monolithic surface, it is recommended to fill the joints of the sheets with a mixture specially designed for this purpose. In this case, the marking of the putty should indicate that it is intended for processing gypsum board butt joints. There is no need to completely process the entire wall, since this procedure is carried out only to level out defects in the surface of the concrete base. However, the caps of the screws and damage to the gypsum board should be covered with putty. This will allow you to glue ceramic tiles to drywall without the risk that they will lie askew.
Careful processing of the corners of the room is required. The joints of the walls must be glued with a thin reinforcing mesh or sickle tape. After this, the corner is puttied and dried.
Before laying tiles on drywall, the surface must be primed with a composition suitable for the adhesive that will be used for finishing. The liquid must be applied with a roller and dried. The drying time should be indicated on the packaging, but in most cases it takes 45-50 minutes. After this, another layer of primer is applied.
When installing tiles in rooms where you need to cover the entire wall, before gluing the tiles onto drywall, you should calculate the number of rows. You have to start from the ceiling. This is done so that the cut tiles end up near the floor or the edge of the bathtub.
At the end of the rows with intact fragments, before gluing the tiles onto drywall, you need to attach a support strip to the wall. It must be aligned horizontally. We glue the ceramics starting from this strip, and we will install the cut tiles only after completing the work on laying the tiles on the drywall.
To work you will need the following:
- notched spatula;
- rubber mallet;
- tile adhesive or “liquid nails”;
- ceramic tile;
- cross-shaped inserts;
- grout and possibly hydrophobic varnish.
To successfully resolve the issue of how to lay tiles on drywall, the quality of the adhesive solution is important. When preparing the mixture, calculate its amount so that it is enough for 0.7-1 m2 of surface. Over a larger area, the solution may set before the master begins to glue the ceramics. This will inevitably affect the strength of the coating: high-quality stickers are only possible on a fresh layer.
How to glue ceramic tiles to drywall. Process Features
Before gluing ceramic tiles to drywall, it should be cleaned of the old finish if the walls were sewn up a long time ago. You need to remove the old tiles using a chisel. The base is primed to make it less absorbent and more adhesive. After preparing the glue, you need to attach the first plank to the wall, which will set the level of the masonry.
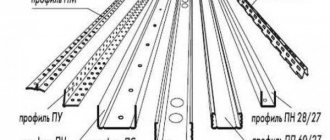
Subtleties of frame assembly
Before installing the sheathing, the wall is prepared. It is marked, the old coating is removed and covered with antifungal mixtures. Guide profiles are installed on dowels. The distance between them will be approximately 50 cm.
You need to start from the bottom, continue working from the top, and only then move on to the walls. Once the frame is ready, you can start working with the rack profiles. Their length should be less than the pitch between the top and bottom guides by 1 cm. The racks are fixed to the wall with hangers.
Calculation of required materials and layout
When the drywall in the bathroom has already been laid, you can proceed to calculating the required amount of ceramic tiles. To do this, determine the area of one product, and then divide the area of the surface to be finished by the area of the tile. This will give you the number of tiles to work with.
An alternative solution is to research how many square meters are contained in one package of cladding. Once you know the area of the wall or floor being finished, this value should be divided by the area of tiles in one package, which will give you the amount of material to work with.
As for the glue, its volume can be found by looking at the instructions. There the manufacturer indicates the mixture consumption. First, the material must be laid out on the floor without glue, which will allow you to understand which products require trimming.
Laying tiles
Once the walls have been leveled, you can proceed to the installation of ceramics. Distribution of the mixture should be done with a notched trowel. With its help it will be possible to form a thinner layer. The composition is applied to the surface of the wall or floor and leveled. You can apply it to the back of the trim. At the same time, glue consumption will not increase, because you will maintain the same layer thickness.
As soon as the tile is on the surface, it should be moved from side to side until excess composition appears at the edges. During the process, you will definitely need to trim the tiles; for this, it is most convenient to use a glass cutter. If the material is more durable, for example, porcelain stoneware, a tile cutter will do. It can be electrical or mechanical.
Attention! At one time, it is recommended to prepare a solution that will be enough to cover one square meter of surface. The consistency of the composition should be like thick sour cream. The starting rail is secured with a dowel. The position of this element is checked by the building level. The rail is necessary not only to set the correct position of the tiles, but also to ensure that the cladding does not slide off the wall.
Drywall installation
Before sewing up the sheathing with plasterboard, you should install insulation inside, if it is provided for by the design. You can use mineral wool for this. If you have installed a metal frame, the gypsum board is secured with self-tapping screws. They need to be recessed a little into the material. The seams should then be puttied and left to dry. Then the surface is sanded.
Grouting joints
Once the installation of drywall in the bathroom has been completed and the tiles are already on the surface, you can begin grouting. For this purpose, cement or epoxy compounds are used. The former have fairly high strength and are easy to work with, so craftsmen often choose just such solutions.
When the walls in the bathroom are covered with glazed tiles, it is impossible to use a grouting solution with a large fraction, since the particles can leave scratches on the surface. Once you know whether it is possible to glue drywall to the wall with tile adhesive, you also need to familiarize yourself with the other stages of the work.
For example, when it is necessary to grout seams, you can use an epoxy mixture, which has such good technical characteristics that it can even be used for external work. The mixture is resistant to sunlight and moisture, and can be used for several decades. These mixtures are two-component, and working with them is quite difficult, so it is better for a novice master to abandon epoxy.
Basic installation rules
How to lay tiles on drywall in the kitchen? The apron in the food preparation area is always subject to significant loads. In order for the finish to last a long time, it is important to strictly follow the technology.
To lay the tiles you will need:
- construction mixer for mixing putty and adhesive;
- tile cutter - if there is not enough trimming, some use a glass cutter;
- large wide capacity of 10-15 l;
- mounting level and plumb line;
- rubber spatula for processing seams;
- a shaped spatula for applying the composition, as well as wide and narrow spatulas for putty;
- roller for applying primer;
- crosses and corners;
- adhesive for ceramic tiles;
- grout for seams;
- starting or universal putty;
- reinforced tape.
We prepare piece material for work. We look through it for cracks and chips. We set aside defective elements for trimming. Since we will begin gluing the tiles from the second horizontal row, at the border with the first one we will need to fix the strip according to the level.
The further algorithm of actions is as follows:
- The tiles are laid out on the floor to reproduce the pattern. The procedure is carried out to determine the uniformity of the tiles, since it happens that material from the same batch has a different shade. An element that stands out from the overall picture is set aside for use in less noticeable places.
- Using a shaped spatula, apply glue to the area of the base that you can decorate in 10-15 minutes, since a thin layer of glue dries quickly. Apply glue to the tiles with an even spatula in a layer of 2-3 mm. If you make the layer thicker, problems with gluing the material may arise.
- We install the tiles from the far corner, inserting crosses between the piece elements.
- Having laid the tiles to the end, most often you have to trim the tile elements; for this you will need a tile cutter. If this is not available, you can do it another way. On the front side of the tile, we mark the location of the cut with a pencil, then use a pobedit cutter to cut through the glaze of the tile and part of the base. We hit the edge of the table or any horizontal plane with the cut. If the tile does not break, we pass the cutter again along the desired line and repeat the manipulation.
- At the end of laying every fifth row, a break is taken for about 40 minutes. This is necessary for the gypsum board to “get used” to the load and for the tile adhesive to harden. If you do not adhere to this rule, then the weight of the upper rows may cause the tiles to “float” or even fall off. We also look at the level every five rows.
- Upon completion of the main work, it is recommended to lay the lowest row after 2-3 hours.
- After the glue has completely hardened, remove the inter-seam crosses, clean the seams of glue and treat them with grout using a rubber spatula. To ensure that the seams dry evenly, the grout is wetted for two days. To increase the service life of the grout, it is opened with a polymer composition.
For your information. The surface of the wall and tiles is covered with a uniform layer of adhesive to prevent voids and increase the strength of fastening of the material to the base.
Those who have not encountered laying tiles on drywall should not be intimidated by the difficulties. This procedure is no more complicated than laying material on other surfaces.
How to avoid mistakes when laying tiles on drywall
- If you decide to line the walls with plasterboard, you can do like many today who glue tiles as a decorative finish. At the first stage, it is important to decide how to glue the ceramic cladding. Universal cement-based compositions are suitable for this. A mistake here could be carrying out work at low temperatures. Such conditions lead to rapid hardening of the mixture.
- Ceramics can be glued to drywall using compounds based on water emulsion. But choosing them incorrectly can be a mistake. Some mixtures are toxic and therefore hazardous to human health.
- Before gluing ceramic tiles to drywall, you should make sure that the back side of the finish is completely flat. Otherwise, you may encounter overuse of adhesive composition.
- Another problem may be that the cladding will not adhere to the surface as well, and you will end up with wide gaps. You should also make sure that the corners of the products are completely even.
- Floor repairs may be required if the solution is not applied correctly. The tiles are glued in such a way that the composition is distributed without voids. Otherwise, under load on the cladding, it may crack.
Attention! When choosing a glue, it is important to pay attention to your skill level. Some formulations are available ready-made, while others are available in dry form. This determines how much time you will have to straighten the position of the tiles. In addition, craftsmen who do not have much experience often encounter a problem in which self-gluing results in improper proportions, so the glue turns out to be too liquid or thick.
- Your curiosity to walk on newly laid tiles is completely understandable, but doing this until the glue has completely dried is not recommended. This is due to the fact that the finish may “float”, which means it will require adjustments. It also happens that the slightest destruction occurs, which gets worse over time.
Incorrect grouting of joints can also be a mistake. If these areas of the surface have been poorly treated, moisture and dirt can accumulate in them, spoiling not only the appearance of the cladding, but also hastening the need for repairs.
Preparing drywall sheets for tiles
After the sheet of drywall is laid on the wall, you need to putty the seams or, in other words, the joints between the sheets. It is preferable to use a special joining compound on a plasterboard board. Experts recommend using dry mixtures, since they can be diluted in the required quantity and the remainder saved until the next repair work. As for the manufacturer, the putty must not only be laid correctly, but also selected.
Sometimes, the actual pigment in the tile grout will stick to the face of the tile. This does not affect the grout cleaner, but can be removed with either denatured alcohol or lacquer thinner. Many modern tile grouts contain latex additives, which increase the flexibility and water resistance of the grout. You may have even added it during the mixing process. These additives may also stick to the tile surface and can be removed using the above mentioned solvents.
User comfort is our main concern
Especially in renovation work, it is important that the work be done quickly and cleanly, with minimal work on existing furniture and minimal comfort for the whole family. Dust is one of the main enemies of interior renovation work.
Simply by choosing a good adhesive, you can significantly reduce the amount of dust generated in your work area and get a faster, cleaner job.
To do this, you should pay attention to such manufacturers as:
- Uniflot;
- Tiefengrund;
- Fugen Füller;
- UNIQMA;
- Ceresite and the like.
If it is preferable to choose domestic manufacturers, then you should choose the Gipsomontazh or Forward brand
To prepare the joints of gypsum board sheets and lay tiles on it with your own hands, you need to pay attention to the features of the putty composition. It must be dry, white, crumbly and without lumps, with a water-repellent additive, made on the basis of polymers
In addition, the process of mixing with water is carried out quickly and without the formation of lumps, and after preparation, a plastic mixture with excellent adhesion is formed.
Factors to consider when laying tiles on drywall
Tiles can be applied to dry tiled walls or on the surface of light partitions. Tiles can be installed in any type of building, either in dry areas or in areas exposed to intermittent wet conditions. Typical applications include domestic and commercial showers, toilets, bathrooms and kitchens. The tiles are fixed using suitable adhesive. Gypsum boards must have hydrophobic properties so that they can be rolled in damp areas. In dry rooms, ordinary gypsum boards can be used.
Such putties are used exclusively for working with plasterboard sheets, and mainly when it is necessary to glue tiles. If the seams between the gypsum board sheets are too large, then additional reinforcing tape will be required. Some craftsmen with extensive experience use a solution for installing tiles for this process, which makes it possible to carry out the sealing with no less quality. As soon as the putty begins to dry at the joints, you need to clean it, holding the spatula at an angle of 30° to eliminate unevenness and unnecessary particles of plaster.
Drywall has a papery surface and is sensitive to water
Paper loses strength when exposed to water over a period of time. Considering the factors that influence the adhesive used to secure the tiles to that particular substrate are. To control the amount of adhesive, as well as to prevent water from seeping into the backing layer, use a high-performance polymer modified adhesive, which is designed for tiles on drywall, along with a notched trowel.
Make sure the drywall is strong enough to support the load on the tiles and adhesives
The recommended plate thickness is at least 5 mm. Increase the structural strength by attaching the noggins to additional frames to provide additional support.
How to choose tiles for drywall
When purchasing tiles, you should give preference to ones that are plain or have a clear pattern and are free from defects. The evenness of the products is checked by folding them right side out and noting the tightness of the fit and the width of the gap. Hardness is assessed by ear - when you lightly hit the tile, a dull sound should be heard.
For covering drywall, you can choose both ceramic and plastic plates with a side length of no more than 33 cm. You should buy them with a margin of about 15-20%. When purchasing plastic products, it is necessary to take into account the low thermal stability of the material and not place such tiles next to heating devices.
To cover plasterboard walls in the bathroom, you can use any ceramic tile of a suitable size.
Adhesive compositions
Can I use regular cement based glue?
Maybe. The cement base provides good adhesion to kraft paper and creates good adhesion for laying tiles. You can use, for example, Ceresit CM 117.
Laying tiles using this adhesive is not difficult. The instructions look like this:
- The tile must first be soaked in water for 10 minutes. This is necessary to allow water to penetrate into the pores and ensure maximum adhesion to the composition.
- The adhesive should be applied with a comb spatula either to the tiles or to the plasterboard sheet, distributing it evenly.
- Press the tile firmly against the gypsum board.
- Alignment is carried out with neighboring ones on the same plane, excluding differences. In this case, you need to monitor the width of the seams, which should be the same.
Is it possible to carry out gluing using cement-sand mortar?
In general, it’s possible. But the result will be much worse than using ready-made tile adhesive. Large fractions of filler and the lack of special ingredients and additives for gluing tiles will be to blame for this.
If you still decide to use such a composition, then its preparation should be approached with the utmost care:
- The sand should be sifted in advance to a fraction of no more than 3 mm. In this case, you need to ensure that there are no stones, debris or other inclusions.
- The mixture is prepared in a ratio of 1 to 3 (cement/sand).
- It is recommended to add a little liquid soap to the prepared mixture. It allows the solution to behave more fluidly with the same amount of liquid, since it is not worth increasing the water content - this leads to a decrease in the strength of the seams.
Is it possible to stick tiles using putty?
Quite. And this is a fairly effective method, since putty can be used as an analogue of tile adhesive. The process has few special features. Therefore, everything can be done correctly, taking into account the following:
- If there is contact of the tile with liquid, you should use a moisture-resistant putty - cement or acrylic.
- If a trace of acrylic putty remains, then it is worth removing it immediately, without waiting for it to dry, since later removal will be more difficult.
Application of construction adhesive Bustilat
And this composition can also be used. However, this material is rarely used when finishing tiles, as it has greater fluidity and shrinkage compared to cement adhesives and putties. This makes it difficult to compensate for unevenness on the base, which in the case of a plasterboard surface is almost ideal. To lay tiles with such adhesive, you must take into account the following feature:
- It is necessary to take into account low viscosity - the initial (from the floor) row must be supported by a profile or rail. Otherwise, the tiles will begin to slide down under their own weight.