Is it possible to paint tiles with paint?
Do you need special products to paint tiles in the kitchen or bathroom, or is regular wall paint suitable? Definitely required. This is due to 2 factors:
- the specifics of the surface (different types of ceramics);
- rather difficult conditions existing in the bathroom, kitchen - humidity, high temperature, splashes of grease.
Surfaces finished with plaster or covered with ceramic tiles are different - they have different structures, they react differently to painting:
- when painting a plastered wall, the paint freely penetrates into the microscopic pores of the plaster, bonding with its base;
- Ceramic tiles are dense, compact, smooth, so paint has no chance to penetrate its structure and does not adhere well to the surface, so it is necessary to use special products.
When planning to paint tiles in the kitchen or bathroom, you need to remember certain conditions that exist in these rooms. The paint must have the following properties:
- adapted to prolonged contact with moist air, water;
- resistant to cleaning and mechanical damage;
- resistant to detergents, so you can wash walls and floors without fear of damaging the coating.
A bit of poetry: a brick wall and can it be painted?
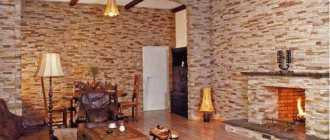
Authentic brickwork can fit into seemingly frankly different design solutions. It emphasizes the brutality of the industrial style, decorates bohemian interiors and combines perfectly with modern trends.
Stylish bedroom interior with painted brick wall
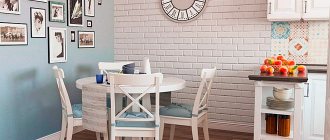
A white brick wall can remain an inconspicuous but expressive accent in a Scandinavian interior and be a faithful companion to a rustic or loft style.
Scandinavian style living room with white brick wall
The rich terracotta or red-brown shade of the masonry has captivated dozens of famous architects and designers. But what about those who are put off by such active design? There are many ways to paint a brick wall in an original way and make it even more attractive.
A black glossy wall in a monochrome interior creates a volume effect
Nuances of technology, or how to paint a brick wall correctly
If you are faced with the question of how to paint a brick wall beautifully, and most importantly, correctly, then you need to know a few features that will help you do everything correctly and accurately. When working with fresh masonry, make sure that it is completely dry and ready for further decoration.
An original combination of two types of brick walls in the interior
Haste can lead to various defects. Most often, painting begins a year after the construction of a brick wall. The long waiting period is due to the characteristics of this building material.
Painted brick wall in an industrial style interior
Brick has a porous structure and an uneven surface, so once it has been painted, it is very difficult to remove the annoying coating quickly and without hassle. Unfortunately, it is no longer possible to restore the base shade: paint particles get clogged into all the veins and cracks, changing the original color.
Creative combination of contrasting walls
What paint should I paint the tiles with?
On store shelves you need to look for products intended for ceramic surfaces, that is, ceramic tiles, terracotta. How can you paint tiles? You should not use the same paints for different types of ceramics. It’s a good idea to buy different products for painting tiles on the floor and walls; these surfaces work with different intensities and are exposed to different influences.
Many paint and varnish compositions are two-component paints for ceramic tiles, mixed immediately before use. These innovative compositions for various types of surfaces are very popular.
From a paint and varnish composition for tiles, we expect strong adhesion to the substrate. You need to choose products taking into account the requirements of a given room - when painting a wall, floor in a bathroom, kitchen, you need to pay attention to resistance to:
You need to think about what type of coating will help achieve the desired effect:
- the matte finish looks elegant and perfectly reflects the subtle appearance of the three-dimensional pattern of the tiles;
- glossy - affects the optical appearance of the room, visually enlarging it.
You can use tile paint to paint the seams of the tiles; you can purchase a special product for painting the seams.
Popular paint options:
- paint V33 – for painting ceramic tiles in the bathroom and kitchen; This is a product for wet areas, resistant to water;
- Instead of V33 restoration paints, you can buy Noxan hydrographic paint - you can use it to paint the inside of the shower stall. While the V33 manufacturer does not recommend constant contact of the painted surface with water, Noxan does not have this problem.
Paint consumption (according to the manufacturer's calculations) providing coverage with one layer:
- Noxan – 5-6 m²/kg;
- V33 – 12 m²/l;
- Flüggera Flutex 10 – 8-10 m²/l.
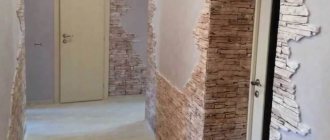
Wall finishing with gypsum board
Installing plasterboard coating on brick walls is a widely used finishing option. This technology has many positive aspects, thanks to which gypsum board is very popular when creating a wide variety of interior interiors for various purposes:
- gypsum board can be used to create a perfectly flat surface, which greatly simplifies the subsequent work of wallpapering, laying tiles or simply painting;
- gypsum plaster walls can bear the load from the weight of household appliances, furniture and decorative elements;
- You can not only cover brick walls with gypsum board, but also make niches, pilasters, columns and other architectural details that can decorate the room being finished;
- When finishing a brick wall from the inside with plasterboard, in parallel, if necessary, you can make additional insulation of the walls by laying insulation between the main wall and the gypsum board sheets.
Cladding brick walls with plasterboard eliminates wet technological operations.
In addition, the popularity of gypsum board is associated with the technology of its installation, accessible to everyone, which consists of performing simple operations:
- A special metal gypsum plaster profile is placed plumb and level on brick walls.
- Gypsum sheets are attached to the frame with self-tapping screws.
- The seams are puttied and taped with reinforcing tape to prevent the formation of cracks.
- The holes in the places where the self-tapping screws pass are also puttied.
- Putty areas are sanded and primed.
The resulting surface can be painted, wallpapered, tiled, or treated with decorative plaster to create a unique interior.
Restoration of old masonry
The most difficult question may be how to repair brickwork if the brick crumbles and does not hold well in place. A collapsing stone must be replaced, since moisture penetrates into the masonry through it, which will ultimately lead to larger-scale negative consequences.
Therefore, such bricks are removed from the wall, for which the seams around them are opened to the maximum depth using a chisel and hammer or perforator.
Removing damaged items
If necessary, neighboring stones are also removed. Those that have not been damaged should be tried not to be touched and left in place. After removing the defective elements, the surface is prepared for restoration, as described above.
Note. It is quite difficult to match new brick to old masonry in color and texture. You may have to artificially age it with your own hands. How this is done will be described a little later.
The photo shows that the restoration “patch” is very noticeable; it will need to be further processed
The whole process looks something like this:
| Image | Description |
| After removing the brick, remove the remaining mortar and dust from the resulting niche. We wet the surface. |
| Lay the solution at the bottom of the niche in a layer of 1-1.2 cm. |
| We dip the brick in water, and apply mortar to all faces except the bottom and front. |
| We install the stone in the niche and recess it, aligning it flush with the wall by tapping the mallet on the front edge. |
| Remove excess mortar and unstitch the seams. |
| Rub the seams around the new element with a damp sponge. |
The instructions at first glance are very simple, but in the process surprises may arise with the destruction of large sections of the masonry. If you are not sure that you can handle it yourself, it is better to invite a specialist.
Reviews about paints
According to reviews, the compositions have the following properties:
- Flügger Flutex 10 is a thick matte paint. It has a noticeable smell, not particularly strong. It's easy to apply, doesn't drip, and doesn't require much leveling. The Flutex coating is not bad - applied with a brush. Full coverage can be achieved in just 2-3 coats. Nothing special? The old bathroom disappeared under 5-6 coats of V33 roller painted. Not a bad result.
Photo of a painted wall – matte white
V33 for tiles is a two-component product - the contents must be poured into a container, then mixed thoroughly. The additional component that guarantees the properties of the product turned out to be problematic, so it is necessary - its smell is unpleasant, spicy. V33 is more liquid, it seems that it “flows” along the wall. After applying two coats, the walls looked much better, although they still needed bleaching. Experience, the right tools, and work technique will be decisive!
Photo of a painted wall – satin white with shine
Photo. 3 coats of V33 applied
Photo. V33 Layer Count Comparison
Applying a layer of rotbands
To test the entire color selection technology, it is better to first do all the work on a small sample made of fiberboard or plasterboard. Thus, it is better to choose the required color for the brick and test the work with the rotband. When simulating brickwork from rotband, it is necessary to take into account that the rotband mixture hardens in 25 minutes and it is necessary to knead such an amount to work it out during this time - approximately 1-2 square meters. meters. Rotband gypsum mortar is mixed in a small bucket and applied with a spatula to the prepared wall surface in a layer of 3-5 mm.
It is better to start from the upper left corner and plaster a certain grip in the form of a rectangle. In this case, whether the surface is smooth or not does not matter much.
Carefully remove the tape from the wall
After the solution has been worked out, but no later than 20 minutes of plastering with rotband, it is necessary to remove the tape until it has completely hardened. After two or three batches it will be much easier to do. Until the plaster has completely hardened, various irregularities, cracks, and pits can be applied to its surface using a spatula, which will create an imitation of brickwork in the apartment. After plastering the entire surface of the wall and removing the tape, you need to let the plaster dry for about a day.
After this you can start painting.
Preparatory work - how to avoid mistakes?
Proper preparation of the base is important.
- First you need to remove furniture, appliances, and equipment from the room that are interfering with the work.
- It is necessary to thoroughly degrease the surface of the tile (get rid of greasy stains and deposits, which can lead to deterioration of the adhesion of the paint layer). You will need water with added detergent and a sponge.
- The seams need to be cleaned. All traces of mold must be removed. For cleaning, special anti-mold products are used.
- Finally, the surface is washed with plenty of water.
Now it's time for renovation work! They include the following steps:
- All scratches, cracks, and cavities must be filled with a special waterproof tile repair compound, which will allow you to achieve a better aesthetic effect. Thanks to grouting, scratches are not visible after painting, walls and floors are effectively protected from moisture penetration.
- For this reason, it is necessary to repair the damaged seams (cracks are filled, grout is applied again). Excess solution is removed.
- The surface is polished and leveled.
- Cleaned from dust.
After protecting the edges of the furniture (if it is impossible to disassemble it), and the places where the tiles meet the wall and floor with masking tape, you can begin painting.
Advice: if possible, you need to dismantle, unscrew, unscrew everything that is possible before painting. This will avoid additional work! Otherwise, after removing the masking tape, you can get the result as shown in the photo below.
Brick surface painting
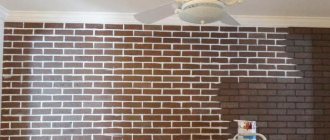
While the plaster is drying, you can prepare the required amount of paint for painting the plaster to look like brick. The dosage of red-brown, red, orange and black can be easily selected when painting a small sample, and then transferred in the required proportions to the entire volume of paint for the entire wall area. Before starting painting, it is necessary to prime the relief surface of the wall with imitation brickwork using a primer. You can use a roller or a wide brush.
After drying the surface, you need to start painting the bricks with the prepared paint with the addition of the required color.
You can achieve a color scheme that absolutely matches the color of the ceramic brick. In this case, it is better to paint with a brush, although you can also use a roller. After painting the entire surface, all you have to do is wait until it dries and paint the seams.
View of a finished wall made of plaster
For this purpose, it is a good idea to use Vetonit LR finishing putty. It is brought to the required consistency and a little black Tex is added. This thick putty is applied with a narrow brush, 3.5 cm wide, to all the seams between the bricks. The effect will be very original, no different from natural brickwork.
All you have to do is wait for it to dry and apply a protective varnish. You can keep it simple and paint all the seams with white Tex paint. Those who are not satisfied with the red color of the brick can simply paint the entire surface with white acrylic paint.
Painting: what to remember?
The most important, mandatory recommendations on how to paint tiles can be found on the paint packaging. It is necessary to strictly follow the information provided about the procedure, painting method, drying time of individual layers.
The room must provide certain conditions of humidity and temperature:
- humidity should not exceed 70-80%;
- the optimal temperature is 24-28 degrees.
Working conditions affect:
- drying speed;
- strength parameters;
- aesthetics of the resulting coating.
For example, if the room is too hot, the layer dries too quickly and may turn out less durable and short-lived.
Most manufacturers recommend treating the tiles with one layer of a special primer for ceramic substrates before painting. The primer gives the wall the necessary roughness, and the paintwork gets better adhesion to the base. Using a primer is especially advisable if surfaces are constantly exposed to water (kitchen, bathroom). When painting other rooms, the initial layer can be made with paint diluted with a small amount of water (up to 10%).
How many layers should I apply?
You should use the information contained in the product instructions and your own wishes regarding color intensity. Between applying layers, you need to allow a drying interval of 12-48 hours (depending on the manufacturer's recommendations).
New paintwork takes much longer to cure:
- mechanical resistance is achieved after a few days;
- chemical resistance – after about a week;
- full functional properties – in a month!
You should not use the room for the first 3-4 days; you need to treat painted surfaces with care for the next few days. You must be careful not to stain the painted surface or splash it with water.
Photos of work: after and before painting
Is it possible to paint the tiles or is it better to knock them down and glue a new one? If the tiles are in good condition, there is no need to replace them. Painting will update the interior, change the color - quickly and inexpensively.
Ceramic tiles are durable and retain their decorative appearance for decades. But sooner or later cracks appear and the glaze begins to crumble or become stained. The easiest way is to remove the old covering and replace it with new tiles. But this is not always affordable. Sometimes it's easier to repaint ceramic tiles and give the cladding a completely different look.
In addition to painting, you can also do artistic painting on new or defect-free tiles installed on the wall. This is a simple technology that differs from conventional painting. This article only covers regular staining of ceramic tiles to update their appearance.
But painting tiles is not always advisable. For example, floor tiles can only be painted around the perimeter, where foot traffic is minimal. As a rule, the middle part of the corridor, kitchen or bathroom is not painted. None of the existing types of paint will withstand intensive use for a long time and will begin to peel off and lag behind the floor. Detergents with abrasive additives have a particularly active effect on paint.
Tiles that are constantly exposed to water, for example, those surrounding a faucet or located on the wall of a shower stall, are also not suitable for painting. It is better to install new tiles here. Small areas of painted tiles can be protected with transparent screens made of impact-resistant glass or monolithic polycarbonate.
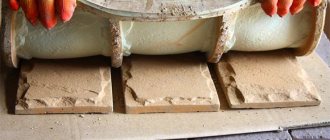
Hard tile bricks
The most commonly used are gypsum, cement and clinker tiles. Due to the natural color of the gypsum material, an ideal white brick wall is obtained, however, such a surface has a significant drawback - water permeability. That is why before purchasing it you need to make sure that there is an additional protective layer. It is also worth keeping in mind that such “bricks” need to be glued onto a solution containing gypsum.
Advice! If you want to save money, then instead of buying cement tiles, you can make them yourself. To do this, you need to mix cement, sand and water in equal quantities, and then pour it into the mold and wait for it to dry.
The most expensive option is clinker tiles. But the qualities of the material are worth it, because it is an environmentally friendly clay product, subject to pressing and heat treatment by firing. Stoves and fireplaces are finished with clinker bricks.
Wall mounting technology
The process of laying solid tiles is no different from each other. The only point is the choice of fastening composition. To choose the right mixture, you must rely on the instructions for using a particular material.
It is important to know! Regarding the tools used, they are similar to those indicated in the section on laying soft tiles. Only equipment for cutting stone is added here (grinding machine with disk or hand-held circular saw).
The fastening technology is also practically no different from soft tiles. The difference lies in the use of calibrators, which are inserted between the bricks and prevent them from sliding, as well as in the final sealing of the seams.
What you need to paint tiles
The process of painting ceramic tiles requires the use of certain tools and materials. This is quite labor-intensive work, not too complicated technologically, but it takes a lot of time. High-quality tools and materials will make it much easier, but will make it a little more expensive.
To work you will need:
- metal and regular sponges for washing dishes;
- sandpaper;
- metal grid;
- plaster float;
- surface grinder;
- brushes are narrow and wide;
- paint roller;
- tape or tape;
- epoxy primer;
- latex, epoxy or oil paint;
- special paint for ceramics;
- solvents.
To protect against dust and chemicals, be sure to have a respirator, rubber gloves, and goggles. The work is done indoors and is quite dusty.
Smooth color or special effects
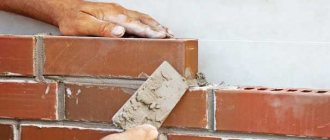
It is better to paint a brick wall with a brush - it is easier to feel contact with the surface and apply even strokes. The direction of painting is horizontal, according to the masonry pattern. For acrylic paint, brushes made of polyester fiber are recommended (but high quality!), alkyd and oil paints require brushes made of natural hair. The universal size and shape of a tool for painting walls is a flat brush with a width of 75 to 100 millimeters. To work out the corners, brushes that are twice as narrow, with an obliquely cut edge, will be useful.
It is better to use a roller if you want to achieve the effect of a primer layer: brick absorbs a lot of paint at once, so it will take a long time to work with a roller on a smooth coating. But a carelessly rolled layer will turn out quickly and easily!
If you apply paint with a sponge, you will get the effect of old faded masonry. In this way, you can whiten the wall and make the paint layer translucent (as in the case of working with a roller). You can use a sponge to apply bronze or silver highlights, add spots of contrasting color to the wall, or paint over images using stencils.
Another common (but more labor-intensive) painting method is to paint each brick with a paint of the same tone using a brush and use a contrasting color compound for the joints.
Preparing tiles for painting
Painting tiles belongs to the type of work in which the preparation process is much more complicated and requires more effort and time than performing the task itself. If you are going to paint several tiles, then preparing them will not be a problem. But if you intend to update a wall or the cladding of an entire room, you will have to work hard.
- At the first stage, all tiles will have to be thoroughly washed to remove dirt, grease, and solid deposits that have accumulated on the surface. Their layer, as a rule, is not too thick even in the most neglected room, but it holds firmly and is not easy to wash off. For washing, first a wire sponge, then a regular sponge and a variety of detergents containing abrasives are used. Fine sand can also be used. There is no point in sparing the glazed coating - it must be removed completely, otherwise the paint will not stick. After washing the tile as much as possible with chemicals and abrasives, it is washed again with clean water and left to dry.
Grinding
The purpose of this stage is to remove the glaze from the surface and level the surface of the cladding for painting. This exposes a ceramic base that is porous enough to provide significant levels of paint adhesion and smooth enough to provide an aesthetically pleasing painted surface.
Sanding is done manually using a plaster float with fine sandpaper attached to it using a surface grinder. Using a power tool makes work much faster and easier, but is accompanied by the generation of large amounts of dust. To reduce dust, the surface of the tile can be wetted, but in this case waterproof sandpaper is used. A sanding mesh is used to clean the seams. It is very convenient to wrap the mesh around a spatula, knife blade or other flat hard object and then process the seams.
Primer
Before applying epoxy primer, the wall should be rinsed with clean water and allowed to dry. After this, rinse again to remove any remaining dust and leave the wall for 24 hours for the water to completely evaporate. If you prime wet tiles, sooner or later the water will find its way out and stains, cracks or blisters may appear on the painted surface.
Brickwork imitation device technology
The technology for applying decorative plaster under brick with your own hands can be divided into several stages:
- wall surface preparation;
- marking and marking the wall according to the size of the bricks and the seams between them, as well as gluing with masking tape;
- applying rotband plaster in separate sections of 1-2 m2 until the material hardens;
- painting the surface like a brick and the seams between them;
- coating the dried painted surface with a protective varnish.
The technology for simulating masonry does not require special skills to do it yourself. In this case, inexpensive materials are used - the approximate cost per square meter of finished brick plaster is 120-150 rubles.
Is it possible to paint tiles?
From time to time you want to update your interior, and the hardest thing is with coatings that are difficult to replace. These include tiles. And it would be necessary to change it, but when you remember the expenses, the dirt, and you don’t want anything anymore. Therefore, when you are tired of the old tiles, have not yet decided to lay a new one, but want to refresh the appearance, we begin to think about whether it is possible to paint the tiles. In principle, it is possible. But this is a temporary option. And, as a rule, it is not very durable. Everything looks decent from a few months to three to five years. The period until everything looks good depends on:
- Type of tiles. On a glazed surface, there is a high probability that the paint will begin to peel off quickly and peel off. If the surface of the tile is rough, then properly selected and applied tile paint will last for some time.
- Preparing the base. Smooth - glazed - tiles must be made rough. All the rest - wash well and degrease. There will certainly not be a normal result on a dirty or greasy surface.
Paint for ceramic tiles - a way to change its appearance without replacement
- Selected materials. The choice of paint for tiles and primer must be approached carefully and thoughtfully. There are not so few materials and new ones are constantly appearing. Read the description carefully, even if you were told that this is what you need.
- Compliance with technology. Materials for painting tiles are produced by famous companies. In any case, we recommend buying these. They often post technological maps. They describe in detail where, when, how and in what order the work should be carried out. If you follow the recommendations, the result is guaranteed. And, it’s better to read the technology of the work before you buy it. Just believe me.
Let’s say right away that cheap paint for ceramic tiles is a fantasy. There is no such option. The price for materials is decent. Maybe just a small area will help you avoid spending too much.
Varnish and materials for floor tiles
Experts recommend painting only those walls that are not exposed to water, and simply paint the wall near the shower stall or bathtub with drawings. To properly paint tiles, you need to prepare certain tools and materials.
Namely such as:
HOW TO PAINT TILES ON THE FLOOR IN THE CORRIDOR | How to repaint ceramic tile floors
Actions: 1. Clean the tiles 2. Degrease with alcohol 3. Prime with adhesive primer (increases adhesion.
- Soft and metallic sponge;
- Cleaning degreasers;
- Gloves;
- Fine sandpaper;
- Respirator;
- Roller and brush;
- Primer and paint.
Read also Do-it-yourself septic tank cover
Painting tiles or floor tiles involves several stages. Initially, you need to carry out preparatory work and thoroughly clean the tiles, removing dirt, grease and other debris. Silicone construction sealant for exterior use?
To do this, you need to use degreasers. After cleaning, the tiles must be thoroughly dried and treated with an alcohol or vinegar solution.
On a perfectly smooth surface, the paint will begin to peel off quickly, which is why you need to run fine sandpaper over the entire surface.
You need to sand it until the surface becomes slightly rough. You also need to process the seams and remove dust. After sanding and cleaning the surface, you need to treat it with a primer and apply paint in several layers. After the surface has completely dried, you need to carefully treat the seams with putty.
To change the condition of the tile and give it a beautiful shine, varnish is used. Varnishing will not only protect the tiles from damage, but will also give the floor a beautiful, fresh look.
Varnishing of tiles is carried out for such surfaces as:
- Ceramic tile;
- Cladding made of natural stone or brick;
- Concrete floors.
You can also varnish clinker tiles. To carry out all the required work, a varnish made on the basis of acrylic with the addition of small particles of ceramics is used. Paint for ceramic tiles for exterior use, ? After drying, the surface becomes glossy and stronger, which helps prevent mechanical damage. If you need to varnish absorbent surfaces, you need to wait until the glue has completely dried, and only then treat the tiles with varnish. The varnish should be applied evenly and not in a very thick layer.
Do not apply paints and varnishes to surfaces whose base is constantly exposed to moisture. You can apply varnish to the surface of floor tiles yourself, which is very simple to do; it is only important to follow the instructions for use and adhere to safety precautions.
Technology and sequence of work
Renewing old tiles in a bathroom or kitchen does not take as long, of course, than replacing them, but the work is not the easiest. Especially if the tiles have a glazed surface. There are only three stages:
Working out the seams when painting tiles in the bathroom is very important
If we are talking about painting floor tiles, another step may be required - varnishing. The varnish is taken with increased wear resistance and tolerates high humidity well. Usually - deck or yacht. They can definitely withstand the load. But make sure they are compatible with the tile helmet you choose.
And yet, long-term results are not guaranteed. To check, you can carry out work in a small area “where it is not visible.” True, the materials should already be there... In any case, this way you can work out the technique, and in the process a lot of things become clearer.
Imitation using MDF and PVC panels
In construction stores there are ready-made panels made of PVC or MDF, on which a three-dimensional pattern of brickwork is applied. They just need to be cut to the desired size and then glued to the wall. For gluing, use silicone glue or “Liquid nails”
The procedure is simple
- They are preparing the wall. They are plastered, treated with a primer, and, if necessary, holes are drilled into which the dowel is driven.
- An adhesive is applied to the back surface of the panel.
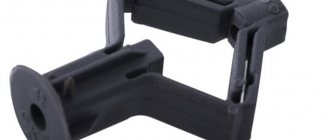
- Apply the panel and hold it for some time, pressing it against the wall (experienced craftsmen use special inclined stops).
- If necessary, use self-tapping screws to screw the panel to the wall, focusing on the installed dowels.
Imitation using MDF and PVC panels
Preparing tiles for painting
From the very beginning you need to wash the base. The paint is applied in a thin layer and even small irregularities - drops of grease, lime stains - everything will be visible. Therefore, we wash and clean thoroughly. If you decide to paint the floor tiles in the bathroom, first remove all silicones, grout, level and clean the seams.
It all starts boringly - with cleaning
Further. If the tile is glazed, it is better to scratch the glaze. There are many ways.
- If you have a grinding machine, this will simplify the task. We use sandpaper with medium grain and make the surface rough.
- You can try a grinder with a grinding attachment. But it will be too dusty.
- Wire brush.
- A block wrapped in coarse or medium grit sandpaper. We select the grain experimentally.
Surface preparation
Let's take a closer look at how to make imitation brickwork with your own hands. Before starting to imitate brickwork using plaster, the wall surface must be cleaned of wallpaper, old paint and, if possible, leveled as much as possible. Sandpaper is suitable for this purpose.
It is better to putty all large irregularities first. The result should be a smooth, dry and clean surface of the wall, which you can begin to outline under the brickwork with a regular pencil.
What primer to take
The soil must be adhesive, but not the type of concrete contact. It leaves a rough surface, which is unacceptable for painting. After applying the primer, the surface should be smooth, so carefully read the description and composition. If the composition contains quartz sand or other abrasives, this is not our option. You will need a primer with polymers: epoxy, acrylic, polyurethane, etc. In principle, you need to immediately select the paint so that the polymers are compatible.
When painting tiles in the bathroom and kitchen, we are looking for a primer for exterior work. It is precisely designed for use in rooms with high humidity. We can recommend several primers with suitable properties.
- Bostik "Bostik"Undir N. Acrylic water-soluble emulsion. Suitable for old tiles, terracotta, stone tiles. After drying it forms a transparent blue film. Color must be taken into account when choosing paint.
- Tikkurila (Tikkurila):
- Otex. Can be applied to glazed tiles without prior sanding. There are bases in two colors - white or with added color of the desired color. The second option is used for rich tones.
- Otex Akva - Otex Akva. Water-soluble, odorless primer. Can be painted in all colors. An excellent base for bright color, but can also be white or very light. This is if you need light shades.
Different markets may have different designs
Tikkurila adhesive primers have been tested. They were used specifically for painting tiles, but on the walls of the kitchen and bathroom. In order to paint floor tiles, this primer will also work. It will be necessary to choose paint and varnish with high resistance to mechanical stress. Surely there are compositions from other manufacturers.
How to make a wall look like it's made of bricks
Decorating the room with wallpaper that imitates masonry
Of course, in a modern home no one simulates the conditions of a medieval castle or a dungeon similar to the one where the prisoner of the Château d'If was imprisoned for 18 years. Only the external model is created. All other delights of today are preserved. They will try to leave heating with all microclimate systems, although there are adventure seekers who need the real truth of life.
There are several options for brick finishing:
- paint the walls with paint the color of which will match the brick, and then draw dividing lines, they will be equal to the length, width and height of the brick;
- pick up wallpaper with brickwork painted on it and stick it on the wall;
- find a brick wall in your own house and tear off the plaster;
- purchase panels with a brick pattern and mount them against the wall;
- cut plates from ordinary clay bricks, glue them to the wall, and then fill the gaps with mortar;
- Using ready-made molds, cast “bricks” using plaster, and then use them to finish the wall; after gluing is completed, complete the work by filling the space with gypsum mortar;
- Cut plates from polystyrene foam and imitate them on the wall.
In fact, there are quite a lot of solutions. Which one to choose depends on the owner of the apartment. Technically, any task can be completed in a short period of time.
Paint for ceramic tiles
The main question is how to paint tiles in the bathroom and kitchen. Ceramics are smooth and non-absorbent substrates, and there are many paints for such surfaces. They are not budget ones, but not all are very expensive. There are from the middle price range. Look at the characteristics so that it has high hiding power, strength, and the ability to wash, and with brushes. The surface can be glossy or matte. The degree of gloss and matte varies. This alone gives a sufficient number of options even in one color. You can also use templates, stickers and other methods.
Paint for ceramic tiles can be:
- superurethane enamel;
- epoxy paint;
How the bathtub changed after painting
When you decide to paint the tiles in the bathroom or kitchen, immediately look for a pair - a primer and paint. They must fit one another. Typically, paint manufacturers recommend specific primers. Look through the recommendations, you may find what you need and you won’t have to think about the compatibility of the ingredients.
Caring for painted brick surfaces
Caring for a painted brick wall is very simple: it must be periodically wiped with a soapy solution using a sponge. If local damage or paint peeling is detected, simple restoration measures are carried out. To do this, you need to carefully clean off the exfoliated fragments using a scraper, then prime and carefully putty the resulting depression. After drying, the sealed area is lightly sanded and painted. To achieve complete invisibility of the repaired area, it is advisable to use paint from the same series as for the initial decoration.
In terms of labor costs, painting brickwork is much more profitable and easier than plastering or cladding. If everything is done correctly, a painted brick facade will perfectly retain its decorative qualities for at least 5 years (interior decoration usually lasts much longer).