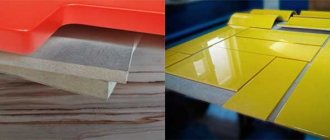
The main reason to change the colors of plastic is to give it a harmonious look with the interior of the room or the exterior of the building. Currently there are more than 2000 shades that allow you to do this. One thing remains - to correctly apply paint to the plastic panels.
In the photo - painting plastic windows
During use, the material also turns yellow due to sunlight, losing its original appearance. In addition, its physical properties are also impaired. In this case, painting will protect PVC plastic from such influences.
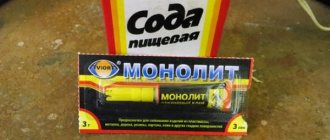
Advice: If you want to protect metal elements in your apartment from corrosion, use electrically conductive paint Zinga for this purpose, which can prevent moisture from reaching their surface.
Dyes for PVC in granules
Paints intended for coloring plastic
Acrylic paint for plastic.
Nowadays, polyurethane-acrylic water dispersions are used for painting surfaces made of PVC, ABS plastic, polycarbonate, and polypropylene.
They are suitable for repair and restoration of doors, windows, siding, sandwich panels, decorative elements, etc.
- Dispersion coatings are environmentally friendly because they do not contain thinners or solvents. They are diluted with water, so they do not have a pungent odor.
- They create a coating that has high decorative qualities.
- The finish is resistant to defect formation and contamination. It dries quickly, gains hardness and has anti-blocking properties.
- Acrylic paints have good water-repellent ability and wear resistance.
- The coating has high levels of hardness, adhesion and adhesion.
- The instructions indicate that the service life of the finish is equal to the service life of the plastic base itself and is at least 7 years.
The described paints are a thick white liquid.
Note! Before painting plastic panels, decide on their future color. The fact is that acrylic compositions are produced as bases marked A, B and C for tinting in pastel, medium and rich tones, respectively.
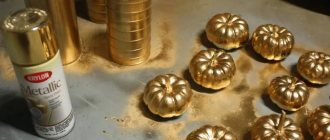
Metallized tinting paint.
Such compositions are painted with universal tinting paints and pastes or metallized analogues for paintwork materials on polyvinyl chloride. Tinting is best done using a computer method using a special machine.
The coating dries completely in 10/24 hours. After 4/5 hours the finish is not smudged. With accelerated heat drying, the paint dries in approximately 120 minutes.
What kind of paint can I use?
Not every paint adheres to plastic panels. Therefore, there are special types of compositions for such material. Today you can easily purchase paint of the desired shade. When choosing paint for plastic, you need to take into account the conditions under which painting will be carried out. It’s one thing when it comes to interior painting work, and another if it’s carried out outside.
If you choose decorative materials, you should know that they are used for decorative designs, and there are special stencils for their application. Technological compositions are designed to reliably protect the surface from damage and wear.
To avoid problems when working with paints, you need to strictly select those materials that are intended for PVC panels. Painting allows you to extend the life of the plastic and make it a decoration for your interior design.
Plastic is often painted with polyurethane water-based paint, the durability of which has been tested in practice. In order for the paint layer to be more durable and last longer, varnish is applied on top of the dried composition. Drying can be done naturally or forcefully.
Today, polyurethane-acrylic water dispersions are also used for painting plastic surfaces. These painting materials are used to paint windows, doors, panels, and other PVC products. The following advantages of using such dyes can be listed:
- These are environmentally friendly paints and varnishes that do not contain solvents;
- The coating applied with such paint serves as an excellent decorative decoration;
- the coating is resistant to deformation and contamination;
- Such paints are water-repellent.
Acrylic paint for plastic panels dries quickly. So if for some reason the owner is not satisfied with the color of the plastic finishing materials, they can be painted with an acrylic composition. A wide range of colors allows you to choose the material to suit the interior design of any room.
Polyurethane acrylic coatings are resistant to pollution, weathering, elastic and environmentally friendly to use. They do not have a strong odor, are easy to clean from dirt and dust, and have a water-repellent composition. The service life of such coating is long. The only drawback of this material is the difficulty of application.
Repainting a plastic surface
Let us answer the question whether it is possible to paint plastic panels with a brush or roller. No, painting should only be done by spraying. When painting by hand, stains and marks from the tool will remain on the coating.
Preparing for work
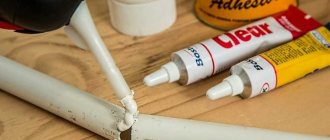
Cleaner for plastic.
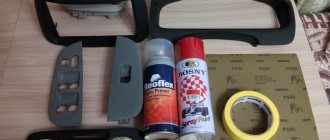
You will need the following materials and tools:
- cleaner for plastic surfaces;
- lint-free cotton cloth and napkin;
- the paint itself, as well as the color scheme;
- spray gun;
- To work with your own hands, you will need gloves and a respirator or protective mask.
The best option is to use a cleaner specifically designed for plastic to prepare the surface. Its price is low and its efficiency is good.
Plastic often bears traces of the silicone lubricant used in its manufacture. The cleaner degreases the base, removes lint, dust and removes static electricity.
In addition, it softens the top layer of the surface, thereby improving paint adhesion.
- Apply a little cleaner to a cotton cloth and wipe the surface with it. Based on the fact that the composition softens the plastic, avoid exposing it to too much force.
When working, observe personal protection measures.
Note! The room in which you will carry out preparatory and main work must have a forced ventilation type. Especially if it's small. Avoid contact of cleaner and paint with mucous membranes and skin; work in a respirator and gloves.
- After cleaning, make sure the coating is completely dry before painting the sandwich panel or other plastic surface. As a rule, this happens after 4/5 minutes.
- Next, treat the surface with fine sandpaper (zero) and wipe with a dry, lint-free cloth.
Painting process
The photo shows the stages of painting plastic panels.
Read more about how to paint plastic panels.
- If the finishing process includes painting, then painting work should be carried out no earlier than 60 minutes after tinting.
- Before painting, determine the viscosity of the composition. If it is thick, dilute it with clean water.
- You will apply the paint using a spray gun. Therefore, before work, put on a respirator and cover untreated surfaces with plastic wrap.
When painting sandwich panels, you need to pay attention to such factors.
The spray gun should be easy to use.
- Desired parameters of the spray gun: operating pressure level - 2/2.5 atmospheres, gun nozzle diameter - 1.6/1.8 millimeters.
- The dye should be sprayed in a layer of 6 mm. If the coating is thicker, it will worsen the decorative qualities of the finish and make drying longer.
- If the base is light in color, one coat of paint is enough. If the plastic is dark, you need to spray two/three layers of paint.
About whether it is possible to paint the plastic panels again. Yes it is possible. Subsequent painting should be done after the acrylic paint has completely dried. The time required for this is indicated on the container with the composition.
- The coating should be dried at room temperature at +20/24 degrees and normal humidity. It should be taken into account that increased humidity will increase the drying time, and increased temperature will shorten the drying period of the paint.
- How wall panels have dried before painting should be checked no earlier than 5/6 hours after painting.
How to paint with your own hands?
If it seems that repainting a plastic window is easy, it is not. It is necessary to carefully follow the painting technology and properly prepare the surface.
Surface preparation
Preparatory measures for the surface are carried out in several stages:
Clean the surface thoroughly. After washing, it is recommended to remove glue, remaining film and silicone from the frame. The surface must be perfectly clean. After this, wash the window again.- Remove the handles from the frame.
- Apply a degreasing solution to a rag and wipe the surface. Wait until the solution evaporates.
Protection and primer
After initial surface preparation, you can proceed to the next stage - protection and priming. In this case, there is a procedure.
- Seal the seals and edges of the windows with masking tape.
- Using a flat brush with natural bristles, apply one coat of primer to the prepared substrate. The layer should be thin and even.
On a note. It is allowed to use automotive primer.
Coating
When all the preparatory activities have been completed, you can begin painting the frame. The technology depends on the dyeing method.
Brush
Painting with a brush should be carried out in two layers, with the second layer applied after the first has dried - about a day later. If you just need to update the color of the windows, you can get by with one coat of paint.
Painting should begin from the corners of the frame, gradually moving to the middle. It is recommended to use a brush to make straight, broad strokes. First, the brush should move gently, then apply more pressure, and finally, move the brush gently. To get the job done well, you can follow a few tips:
- Dip only the tip of the brush into the container.
- Press down on the bristles to make a thin layer.
- The working position of the hand should be the same.
From a can
When spray painting, the sequence of work is as follows:
Cover objects near the window with film.- Seal the edges of the glass with masking tape.
- Shake the aerosol.
- Maintaining a distance of 30 cm from the surface to be treated, smoothly spray paint. The balloon must be held straight.
- After applying the first coat, leave the frame to dry. Repeat the procedure 2-3 times.
- After completing the work, remove the tape from the glass unit.
When the paint has dried, you can apply a finishing coat with a special varnish.
Spray bottle
The best way to paint PVC frames is with a spray gun. With its help, you can quickly carry out work without the formation of smudges.
Note! It is very important to protect yourself when working with a spray gun. You need to wear a respirator and goggles.
The work sequence is as follows:
- Cover the glass with masking tape so as not to stain it with paint.
- The optimal thickness of the paint layer is from 80 to 120 microns. To achieve this indicator, you need to adjust the spray gun: pressure - from 2 to 2.5 atm., nozzle diameter - 1.6-1.8 mm.
- Wear protective clothing.
- Load a dry, clean gun with paint.
- Apply paint evenly to the base.
After the surface has dried, it is recommended to apply a topcoat with clear varnish.
Advantages and features of using paints for PVC products
Often there is a need to paint plastic windows or doors in accordance with the color scheme of the interior, to make external PVC communications less noticeable, or simply to protect the material from fading and destruction. To do this, you need a special paint for PVC, which will adhere firmly to the smooth surface of the material being processed.
Painting PVC: paint for plastic panels, video instructions
The main reason to change the colors of plastic is to give it a harmonious look with the interior of the room or the exterior of the building. Currently there are more than 2000 shades that allow you to do this. One thing remains - to correctly apply paint to the plastic panels.
In the photo - painting plastic windows
During use, the material also turns yellow due to sunlight, losing its original appearance. In addition, its physical properties are also impaired. In this case, painting will protect PVC plastic from such influences.
Advice: If you want to protect metal elements in your apartment from corrosion, use electrically conductive paint Zinga for this purpose, which can prevent moisture from reaching their surface.
Dyes for PVC in granules
Primary requirements
The main requirement that such paint must meet is high adhesion. Unlike wood, plastic has a smooth, slippery surface and a very hard, dense structure that does not provide a high level of adhesion between materials.
Also, the coloring composition must have the following characteristics:
- water resistance;
- strength;
- resistance to mechanical stress;
- resistance to UV rays;
- color preservation throughout the entire service life;
- the absence of toxic and poisonous substances that can be released when heated;
- resistance to temperature changes;
- long service life;
- wide range of colors;
- the ability to give an object a certain texture.
The ease of application of the composition also plays an important role, since plastic windows are often painted with your own hands.
Types of varnishes
Instead of painting, you can choose varnish. To reliably varnish MDF, you need to apply several layers and wait until it dries completely each time. The process will take a long time and require effort.
If you still decide to choose a varnish, then pay attention not only to its cost and composition, but also to wear resistance, resistance to humidity, and high temperature. To coat MDF boards at home, you can use several different types of varnishes.
The cheapest compositions in this segment are alcohol-based and have a short drying time (up to half an hour), that is, they are quick-drying. Traditional inexpensive varnishes include oil-based varnishes, which not only give a beautiful appearance to surfaces, but also effectively protect them from moisture.
Note! For coating MDF countertops, an excellent choice would be two-component epoxy varnishes, which are characterized by increased resistance to impact.
Acrylic varnishes are good because they are odorless, do not emit toxic substances, and are not washed off or diluted with water. Another popular option is polyurethane varnish. It is characterized by enviable wear resistance and good adhesion to wood-based materials.
As for those cases where further polishing of MDF products is expected, nitrocellulose varnishes are the best option.
Polyurethane-acrylic composition
Water-based polyurethane-acrylic paint for PVC has all these qualities. It is characterized by uniformity of coating, resistance to defect formation, high drying speed, and allows for independent tinting. With its help, you can create textured effects by introducing special additives into the base composition.
The wide color spectrum of this paint includes more than 2000 shades. In addition to traditional tones, they include:
- nacre;
- metallic;
- composition with added glitter.
In this case, painting the PVC profile will give the room or facade of the building originality and uniqueness.
Preparatory work
Before you paint a window sill, windows, doors or other surface with your own hands, you should carefully prepare it. To do this you need:
- Remove mosquito nets, blinds, curtains, ebbs and other objects that will interfere with the work.
- Free the surface from mechanical contamination.
- Remove greasy stains.
- Seal rubber seals and other fittings with construction tape to prevent paint from getting in.
- The glass should be covered with plastic film.
For more effective cleaning, degreasing and removing static stress, you can use specialized activator cleaners for PVC. They are applied to a cloth, which is used to wipe the surface to be treated. After this, you need to allow the solution to completely evaporate, which takes from 5 to 10 minutes, and only after that start painting.
If the surface has roughness, scratches and other irregularities, they must be puttied and then sanded with fine sandpaper. Finally, cover the entire surface with an even layer of primer. If you have certain skills, you can do this yourself. But if you have no experience, then it is better to resort to the services of professionals.
Application technology
Windows and other PVC products are painted using a spray gun. Before pouring polyurethane-acrylic paint into it, you need to add a suitable color to it and mix thoroughly.
After opening the can, you can sometimes find a film on the surface of the coloring composition that must be removed. It contains solid particles that do not dissolve when stirred and clog the spray gun nozzle.
If the paint has been frozen, it should be thrown away, since after exposure to negative temperatures it loses its properties.
For coloring, it is better to choose dry, but not very hot weather. Work cannot be carried out at temperatures below +5.
Window paint is applied in a thin, uniform layer with a thickness of 80 to 120 microns. In this case, there is no need to pre-paint corners, edges and hard-to-reach areas. The composition adheres well and does not flow off vertical surfaces. The paint begins to stick tightly to the surface after 2-3 hours. But its complete drying continues for another two days.
In industrial conditions, forced drying is used for two hours at a temperature of plus 50.
Installation of panels on a rough ceiling
For example, let's take panels that imitate a slatted ceiling. The rough ceiling does not require any preparatory work.
Step 1. Saturate the rough ceiling with antiseptic agents, give them time to absorb and dry. It is advisable to make a vapor barrier with aluminum foil or plastic film. Fix the material with a stapler, and carefully seal the joints with tape.
Attaching foil to the ceiling
Tape the joints with tape
Step 2. Measure the distance between the opposite walls of the room and cut the baseboard, making a 45° connection in the corners.
Cutting off the baseboard
Practical advice. Do not attach the baseboard to the wall with self-tapping screws. Under the weight of the panels, it will sag a little, and gaps will form between it and the wall finishing. In addition, this method of fixation requires perfectly flat planes. Self-tapping screws press the baseboard against the depressions, it bends, and the appearance deteriorates significantly.
Attach the elements to the wall using liquid glue; remove excess material immediately. Fix only three skirting boards, the fourth is installed after laying the panels. To guarantee, you can additionally fix the back part of the element to the ceiling with a stapler. Wait 2-3 hours for the glue to dry completely.
Step 3. Ceiling panels should be a few millimeters thinner than wall panels. Keep in mind that the panel can extend two centimeters into each baseboard. Measure the length of the ceiling from edge to edge of the plinth and add 1.5 cm to this value, the remaining 0.5 cm is left to facilitate installation. It is better to measure and cut each panel separately, this minimizes the likelihood of error.
Step 4. Double-check the dimensions and geometry of the ceiling. If there are minor deviations, they will have to be gradually eliminated by changing the width of the gaps between the lamellas. The magnitude of the changes should not exceed two millimeters, otherwise the adjustment will become noticeable. If the architectural features of the ceiling allow, then align the panels in places that are invisible to the naked eye. Open areas will already have smooth joints.
Panels inserted into the baseboard tongue and groove
Step 5. Insert the end of the panel into one baseboard, bend it slightly and insert the other end into the opposite one. Align the panel and tuck the long edge into the third baseboard.
Plastic guides will help hide uneven edges of the panels
Practical advice. What to do if the ceiling plane resembles a rhombus? Such cases happen among hack builders, but this can be corrected. Install ceiling panels diagonally. There is nothing complicated, you just need to cut the end of each panel at an angle. We will tell you how this is done below. The negative consequences of a crooked ceiling are that the amount of panel waste increases significantly.
Step 6. Press the panels tightly together and secure them with a stapler. The closer the locks come together, the stronger the connection. If the ceiling is not very level, then when attaching the panel at the end, a gap may appear between it and the baseboard. To prevent this from happening, push plastic scraps into these places and only then fix them. Under force, the plastic will compress to the required thickness, and the gap will close. There are difficulties with bending short slats. In such cases, make them another centimeter shorter; the width of the skirting boards allows this. The best option is to immediately lay the panels on the wider side of the ceiling. During installation, do not use excessive force, do not damage the baseboard, scratch the walls, or break the panel.
Installation of plastic panels
Step 7. Once all the intact panels are installed, measure the width of the remaining uncovered ceiling. To these dimensions, cut the material using one of the possible methods.
Step 8. Using the method described above, insert the panel into two skirting boards, connecting one edge into a lock. The rest will have to be fixed separately. There are two options. The first is to lubricate the reverse side with liquid nails before installation and glue it. The second is to drill a hole in one plane to the diameter of the self-tapping screw and use it to screw the second plane to the ceiling.
Installation error
Step 9. Cut the base part from the fourth ceiling plinth. Spread the remaining surface with liquid glue and attach it to the wall in the right place.
This completes the installation of the ceiling panels. Of course, during work you need to leave space for electrical wiring, ordinary or spotlights. If after installation there are visible gaps in some places, they can be sealed with sealant of the appropriate color.
Ceiling made of PVC panels
Ceiling made of plastic panels
Aerosols
To paint a small surface of PVC, you can use paint in an aerosol can. This container is convenient in that it reliably protects the contents from air, therefore preventing the formation of a film on its surface.
Other advantages of this paint include:
- ease of transportation;
- the ability to paint hard-to-reach places and small parts;
- no need to use additional tools;
- increased level of adhesion.
Most often, spray paint is used when painting PVC parts in car interiors.
Applying paint evenly requires certain skills and experience, so it is worth practicing a little before starting the painting procedure.
Coating protection
Despite the fact that acrylic paints adhere well to the surface of PVC products, they can be further protected using a glossy water-based plastic varnish. In addition to the protective function, it also performs a decorative function, giving the product shine.
This material can be used to treat painted plastic window sills and windows in kitchens, where they are exposed to aggressive factors.
The varnish is applied with a brush and does not require any special skills. Therefore, these works are easy to do with your own hands.
Fire retardant paints, which are often used on metal surfaces, are also suitable for protecting kitchen window sills and pipes running close to open fires.
Important points
When purchasing paint for processing plastic windows, you must first calculate the required amount of material. To do this, you need to take measurements of the surface that will be processed. The exact calculation will be made by sales consultants.
The cost of polyurethane-acrylic paint composition is quite high. However, the low material consumption and long service life without additional treatments completely justify the costs.
When applying paint, the most important factor is to follow the instructions exactly. The high environmental safety indicators of the presented PVC paints make it possible to use them in residential premises, children's and medical institutions, and public catering establishments.
Is it possible to paint plastic panels
Now we are temporarily moving to a departmental apartment while renovations are underway in ours. The renovation is, to put it mildly, brrrrr. Naturally, I don’t want to invest. There are plastic panels on the walls in the kitchen and bathroom. But they are so scary. I'm thinking maybe I should paint them? Please advise. Is it possible? How? How? Continue reading →
The whole question is in the title. But there are several nuances. The balcony is not heated. The goal, in addition to putting the balcony in order, is also to insulate it a little (well, as far as possible without moving the radiator and heated floor). There is an option to plaster and paint or. Continue reading →
We are replacing windows in the apartment. I'm struggling with choosing slopes and window sills. Continue reading →
Girls, share the contacts of trusted craftsmen in St. Petersburg (I think a couple of people are needed) who could do small cosmetic repairs in a small 2-bedroom (old house): - put linoleum + change the baseboards - put up wallpaper in 2 rooms - cover the bathroom and kitchen with plastic panels - paint windows and doors I would be very grateful! Continue reading →
We decided on both a TP and a convector on the loggia. Craftsmen will arrive in a week to glaze. Because We spent a lot on the windows themselves; about 20 tons are left for finishing (namely finishing and not insulation). What would be a better way to decorate a balcony? My husband doesn’t want any plastic at all, but I don’t want wood. You can’t use a stone - my daughter chews on the walls with such decoration))) I recently saw plastic panels at the Bitsevsky market, large and wide, lilac lace on a white background. They sunk into my soul, and again my husband. Continue reading →
Today the tenants finally moved out. The apartment was trashed, but I didn’t expect it to be so trashed; honestly, I was there very rarely. There were no renovations there for 20 years, or maybe more, they were rented out for just pennies. In short, I understood that it simply wouldn’t happen, but that it was so. As a result, a complete renovation of the bathroom with the replacement of plumbing, pipes and leveling the walls to match the tiles. All, absolutely all the furniture is to be thrown away (my husband promised to negotiate with the Tajiks, I’m just disgusted to touch it, I thought we could handle it ourselves, but no. We don’t like money that much). In the room and... Continue reading →
Thanks to everyone for the advice, girls! chronology: Continue reading →
I continue to show our renovation in a three-room apartment, which was completed about a year ago. And so, the bathroom: initially there were separate toilets and bathrooms. The toilet is small and narrow, it is impossible to turn around. The bathroom is also very small, typical for a panel house, where the washbasin is opposite the entrance to the bathroom, the bathtub itself is on the right, and there is a coil on the left wall, there is absolutely no place to put the washing machine, there is not enough space, in general. Therefore, it was decided to combine these rooms, and we also expanded the bathroom and at the expense of the hallway, we took 40 from it. Read more →
Now it’s our turn to reach the balcony. We did the repairs for the first time, we didn’t take something into account, but now we’ll know for the future, so to speak. The renovation on the balcony, unlike the rest of the apartment, turned out to be surprisingly quick and painless, largely thanks to the person who did it for us. I found him here on babyblog, I can’t describe my delight in his work in words, I haven’t met such responsive, hardworking people for a long time. Anatoly, you will read my review, warm greetings to you! Continue reading →
Hello. I want to share my story about how we made a kitchen for our daughter. Maybe someone will find our idea useful. We were thinking about buying it ready-made or making it ourselves. I really liked the kitchen at IKEA. But somehow everything is not what is needed. I want even more shelves and space. But after typing on the Internet and looking at pictures of homemade kitchens, I was inspired to make it myself. Fantasy ran wild! I couldn’t sleep at night, thinking about how to do this or that. In the end, they did it all. Mine was the fantasy, and my husband was the performer. Lots of photos Read more →
Hello. I want to share my story about how we made a kitchen for our daughter. Maybe someone will find our idea useful. We were thinking about buying it ready-made or making it ourselves. I really liked the kitchen at IKEA. But somehow everything is not what is needed. I want even more shelves and space. But after typing on the Internet and looking at pictures of homemade kitchens, I was inspired to make it myself. Fantasy ran wild! I couldn’t sleep at night, thinking about how to do this or that. In the end, they did it all. Mine was the fantasy, and my husband was the performer. Continue reading →
Probably everyone knows that the hallway in an apartment is its calling card. It is the hallway that greets guests who arrive for the first time, and it is from this that the first impression of the apartment as a whole is created. And many, when they come to our house, do not even go further than the hallway, which means that they form an opinion only on the taste of the owners, and on their well-being, and, of course, on cleanliness. Therefore, the design of the hallway should be given no less, and perhaps even more attention, than the creation of the interior of the living room or kitchen. Continue reading →
So, I’m starting to collect bit by bit everything that I want to arrange in my new home and how. I would be glad to receive any advice. Continue reading →
Do you want to give your child an unusual gift, for example, a DIY house for Barbie? There is still plenty of time before the New Year, so you can slowly start making such a miracle. I’ve also been wanting to make such a house for dolls for a long time. The master class is not detailed, but in general everything is clear. Continue reading →
Psychologists correctly claim that a child needs personal space almost from the very first days. Let's talk about how to properly and safely arrange your baby's room. The main rule is that the room should be quiet, bright and safe, even if it’s small. It can skillfully combine a playroom, a living room and a place to study. There should be many objects, figures and materials around the child. The room itself. In a baby's room, it is unacceptable to use wall panels made of synthetic material or suspended ceilings, as they will accumulate. Continue reading →
This is my first time exhibiting my work, I really hope to hear your feedback. Continue reading →
Copied from mari-maklakova Do you want to give your child an unusual gift, for example, a DIY house for Barbie? There is still plenty of time before the New Year, so you can slowly start making such a miracle. I’ve also been wanting to make a house like this for dolls for a long time. The master class is not detailed, but in general everything is clear. Continue reading →
I present it to your judgment, although I am afraid). The renovations in these premises have been underway for six months, but there are still minor deficiencies. Therefore, I'm looking for advice on how to improve all this. Continue reading →
was viscously dissatisfied. But first things first. On Sunday there was a holiday, Eid al-Adha. The children visited their grandparents, went to the mosque together, my husband went to Kuvandyk for a concert, I stayed at home with Sanyarik. It was impossible to work that day, and I enjoyed the rest, did a little knitting with pleasure, just lay around in silence, even watched TV)) We went to bed late, while the children arrived with their grandmothers from the village, while my husband arrived, while I gave him tea, listened to her , in short, the time was about 2 am. Continue reading →
SIMPLE kitchen renovation Kitchen renovation is a complex and expensive renovation. Its difficulty is that the kitchen is used constantly: you need to cook food, wash dishes, but during the renovation you will have to turn off both the stove and the water. Materials for kitchen renovation should be such that the walls can be easily washed, but at the same time the appearance of the walls should not deteriorate from water; and the floor must withstand the fall of the pan, not become slippery from spilled water and not wear off over time. In addition, kitchen renovations typically include... Continue reading →
Paint for PVC windows and panels - choice, consumption, reviews
The urgency to change the color of plastic may arise due to the need to create a harmonious interior design. There are a huge number of shades of paint for PVC windows. You just need to choose your ideal option and familiarize yourself with the technology of applying the coloring material.
When might you need paint for PVC plastic? The material can fade from exposure to sunlight and lose its original appearance. Physical properties may also be impaired. Painting protects the plastic from any defects.
Cost of work
If you plan to entrust the work of painting PVC windows to professionals, it is recommended that you familiarize yourself with the approximate prices for the procedure.
| Job title | Unit | Cost, rub. |
| Sanding plastic surfaces (one, two, three-leaf windows) | PC. | 2800-7300 |
| Painting a window on one side | m2 | 2000 |
| Painting the window on both sides | m2 | 4000 |
| Painting windows (2 sides) in different colors | m2 | 5000 |
| Spot restoration of scratches | PC. | 650 |
| Replacing the seal | p.m. | 130 |
| Seal installation | p.m. | 70 |
| Surface masking | m2 | 350 |
Choice of colors
First you need to choose paint for PVC windows. If sanding and priming work are not planned, then the paint should be suitable specifically for plastic.
Choosing colors for PVC windows
In construction stores, customers are provided with special catalogs with which they can easily select the shade they are interested in. It is worth deciding on the required amount of paint, taking into account all the windows to be repainted. The approximate consumption of paint for PVC per 1 m is 130 g. It is better to buy the coloring matter with a small reserve. But it is better to approximately calculate the area to be painted so that you do not have to interrupt repair work due to a lack of color. In addition, the required shade of paint for PVC plastic may not be in stock at that time.
The paint must be prepared in advance, diluted if necessary and allowed to sit for a while. Only after this can you start applying.
Preparing for work
Experts recommend choosing water-based polyurethane acrylic paint for PVC panels. The advantages of this color scheme are obvious:
- the surface is prepared quickly and without much effort;
- at room temperature the color dries very quickly;
- at a temperature of 20˚C the coating will dry for about eight hours;
- painting can be done manually or using a sprayer;
- Huge decorative possibilities: imitation wood, mother-of-pearl texture, metallic.
Preparing windows for painting
The surface must be prepared for painting. It is necessary to remove all dirt, silicone residues, greasy stains - all this can negatively affect the adhesion of plastic to color.
Simple recommendations for cleaning the coating:
- remove all dust, shavings, crumbs;
- Wipe the entire surface with a special cleaner for plastic;
- degrease the surface from various dirt and grease;
- wait a few minutes until the surface dries completely and the cleaner evaporates.
It is worth acquiring a special cleaner-activator for PVC. It will not only prepare the coating, but also promote adhesion of the materials.
It is possible to sand the plastic and take care of its primer. But this will take much more time, in addition, this work requires certain skills.
Enamel/model paint
How to paint PVC panels other than traditional paint designed specifically for use on plastic.
Advantages
- durable coating with good overlap of the previous layer;
- fine finely dispersed pigment for uniform coverage;
- ideal for small drawings;
- gives the surface gloss;
- The dried coating is resistant to water and acrylic solvents.
Flaws
- long drying time;
- strong pungent odor;
- the use of solvent to thin the paint must be used with caution for plastics;
- not recommended for surfaces with a large painted area;
- may leave brush marks;
- Requires primer and final varnish.