Wood-like painting of products made from various materials
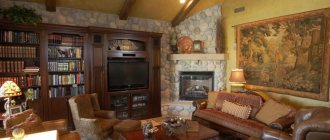
Of all natural materials, natural wood, due to its unique appearance and noble warm tones, is most widely used for decorative interior design. However, due to the fact that the price of solid natural wood is quite high, at present, cheaper and more accessible building materials are often used for interior decoration, which are then subjected to artistic design that allows them to imitate the color and texture of natural wood.
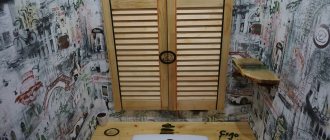
Processing of furniture facades.
When doing renovations in their own house or apartment, many homeowners ask themselves questions such as how to paint plastic to look like wood or how to create an artistic imitation of the texture of natural wood on any other material.
Floor coverings
As for the floor, an imitation “wood” is created on it using special tiles. It repeats the relief, pattern and varnish coating, making it difficult to distinguish it from a real wooden surface.
The design of tile collections is divided into several groups:
- Classic (aged) version. This material repeats the pattern of parquet, laid out in squares, herringbone, etc. It is possible to choose the shade of the seams, which can be gray, cream, milky, black, brown, etc.
- Tiles that imitate boards with a tangential or orthogonal cut. Everything is displayed on its surface: from the relief to the varnishing of the edges.
- Imitation of mosaic and 3D parquet. Such tiles can have smooth or uneven edges, as well as increased sizes. Due to their small thickness (up to 8 mm), they can be placed with a transition to the walls, which is very fashionable today.
- Material reminiscent of palace parquet. Beautiful ornaments, drawings, monograms, and various inserts are applied to it, which makes it luxurious.
- Design in the form of OSB, plywood, chipboard. Such tiles very accurately convey the texture and appearance of natural materials.
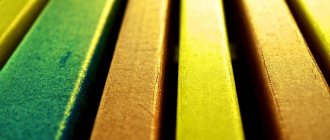
Imitation of natural wood
To help deal with such issues, this article will offer the reader various tips and recommendations, following which it will not be difficult to understand how to paint wood to look like bleached oak or perform a similar imitation on any other material.
In addition, step-by-step instructions will be presented here, which describe in detail the entire process of imitation and, in general terms, make it clear how to paint almost any finishing material like wood.
Imitation of fibers using a hard brush.
General principles of artistic imitation
The surface of natural wood has two predominant color shades: the lighter color of the base and the darker color of the veins and annual rings.
For this reason, the imitation will be performed using two types of paint:
- The main one is lighter;
- Additional – a little darker.
Moreover, they must have a completely identical composition.
In order for the treated surface to have maximum resemblance to a cut of natural wood, first of all, it is necessary to correctly select the shade of the paints used.
Next, regardless of the material from which the interior part is made, you must perform the following steps:
- If possible, vacate the room, remove all unnecessary parts from walls, doors or pieces of furniture (hooks, locks, handles, furniture fittings, etc.).
- Thoroughly clean the surfaces to be treated, completely removing the old coating. Fill cracks, knots and uneven areas with putty, and after the putty has dried, clean it with emery cloth and wipe off dust.
- Using a paint brush, evenly cover the entire surface with a thick layer of base paint. If necessary, you can apply several layers with intermediate drying of each layer.
- After the base paint has completely dried, it must be carefully cleaned using fine-grained sandpaper. This will eliminate roughness and also ensure good adhesion of the base to the next layer of paint.
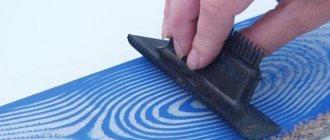
- Apply a layer of additional darker paint evenly over the entire surface, making smooth movements with the brush along the intended wood fibers, and making sure that the paint strokes are parallel to each other.
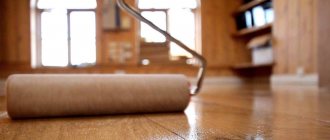
- Without waiting for this layer to dry, run a special rubber or plastic comb over the painted surface. The direction of movement of the hand should be parallel to the intended fibers, and the tool should be passed in one pass over the entire surface. For greater realism, you can try changing the pressure on the tool and performing slightly rocking movements with your hand.
- After the design has dried, you can lightly rub the surface with fine-grained sandpaper, and then cover it with matte or glossy varnish.
The photo shows a rubber comb to imitate wood fibers.
Advice! Various types of combs to imitate natural wood fibers can be purchased at hardware stores or made independently from a piece of plastic or sheet rubber. To do this, on the long side of the rectangular plate you need to make small teeth with different distances between their centers.
Working with wood products
As strange as it may sound, quite often during renovation there is a need to paint wood to look like wood, for example, to update an old coating that has lost its former appearance or to give a new look to tired painted surfaces.
Also, a similar method is used in order to, by choosing a darker and richer shade, give inexpensive wooden products the appearance of noble wood.
In general, the entire processing process is carried out according to the same principle as described above, however, when working with wood, it is recommended to pay attention to some points.
- Before painting, it is recommended to soak the cleaned surface with drying oil or treat it with a special wood primer.
- Instead of base paint, you can use translucent or slightly tinted varnish, choosing its color in accordance with the desired shade.
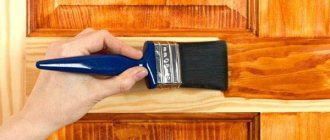
- To enhance the effect, before painting, the surface of the wood can be treated with a wire brush with stiff bristles. This will make it rougher and allow you to reproduce the texture of natural material as accurately as possible.
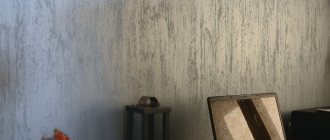
Accentuating the wood structure with tinted varnish.
Advice! To remove dried paint from wooden products, you can use a hair dryer, heating it to high temperature and scraping it off with a metal spatula.
Painting plastic products
Among modern finishing materials or interior details, there may be products made from polymer materials. In this regard, it is likely that during the renovation process some residents will repeatedly be faced with such work as painting plastic to look like wood with their own hands.
Fundamentally, such work is no different from the method described at the beginning of the article, and should be performed in the same sequence, however, when working with plastic, in order to ensure the durability of the coating and not spoil the base product, the following features must be taken into account:
- Some polymer materials (fluoroplastic, polyethylene, polypropylene, etc.) cannot be painted, and therefore are initially unsuitable for such work.
- After sanding, the surface of the plastic must be coated with an adhesive primer, which is intended for this type of polymer material.
- Certain types of paints are solvents for some types of plastic, so they cannot be used for such work.
- It is guaranteed that all types of water-based paints (acrylic, acrylate, vinyl acetate, etc.) can be used for working with plastic products.
Technology of applying a pattern using a plastic comb.
Advice! Advice! To ensure maximum resemblance to a cut of wood, it is not recommended to use a paint roller when applying paint. A flat, wide brush with medium-hard bristles is best suited for this purpose.
Metal painting
Despite the heterogeneity of these two materials, imitation of a wood cut can be performed even on metal products. The technology for processing metal parts is no different from the methods described above.
The only thing you should pay attention to is preliminary surface preparation.
- For good adhesion of the base composition to the surface, metal products must be coated with a high-adhesive primer. To do this, you can use fire-retardant metal paints Polistil, which have the necessary performance properties.
- Parts that will be located outdoors must be reliably protected from corrosion and covered with primer. Zinga electrically conductive paint is well suited for this purpose; it contains zinc particles and at the same time is a good primer for metal.
Zinc-containing primer "Zinga".
Preparing items for dyeing
Before starting painting work, it is necessary to remove the fixed structures. All additional details are removed. If any elements cannot be removed, but the owner does not plan to paint them, it is better to seal them with masking tape.
Pay attention to: Features of metal painting
The base is thoroughly wiped off from dirt and dust. You will also have to remove the old paint. Then sandpapers are used to level the base. First, take options with larger grains, gradually moving to finer ones. You can replace the sandpaper with a sanding machine when processing some materials.
The plastic should not be leveled: this material is produced smooth. It is recommended to apply a small number of scratches to the plastic object: this will allow the liquid enamel to adhere better. For this you need to use a metal brush.
Before painting a metal product, you need to make sure there are no traces of corrosion or rust. If they are found, they are cleaned and treated with special compounds. Use construction putty to remove any remaining unevenness. Then, using an industrial degreaser (for example, white spirit), treat the item.
How to paint a wood-look door yourself
How to paint a door to look like wood? This question is not at all idle. After all, this particular decoration option allows you to transform an old door leaf or decorate a newly acquired one. It should be noted that the work requires a certain diligence and accuracy. It is impossible to simply apply paint to a surface; a number of interrelated steps must be completed.
Requirements for paints for exterior use
When choosing paint for exterior use, you should pay attention to how resistant it is to a number of factors:
- humidity;
- sun rays;
- high and low temperatures;
- detergents and chemicals;
- rotting;
- fungal development;
- reproduction of pests.
Such compositions are allowed to be used in the temperature range from -40 to +50 degrees. It is desirable that they lay easily and evenly on the surface and have protective and decorative properties.
Paints for exterior use must be wear-resistant, vapor-permeable and durable.
To paint outdoor objects, you can safely use water-based façade materials and acrylic enamels. If you have to save your budget, then alkyd enamels are a good option, but you need to take into account that such a coating will last a much shorter period of time.
What material should I use?
There are various compositions that allow you to paint the door. Each of them has its own advantages and disadvantages. It is necessary to carefully consider the choice of materials.
Nitropaint
The coating obtained by applying such a composition has many advantages. They consist in the fact that the surface is very reliable and resistant to various influences. The service life is calculated in tens of years. During this period, the paint practically does not lose its original color.
Nitroenamel - creating a reliable coating
But such advantages slightly spoil the existing disadvantages:
- A separate room is required for work. If the process is carried out at home, then it is necessary to take into account that the smell will be very pungent, and its weathering time will be more than two days.
- Evaporation that occurs within 2 days is unsafe for humans.
- The cost of the material is very high. Especially if the paint is used with a varnish of suitable quality.
Of course, such negative factors relate only to the technology of use.
Alkyd enamel
A fairly common option that has a rich color palette. Preference should be given exclusively to compounds labeled for interior use. A distinctive feature of the material is its low cost. It is this factor that explains the popularity of alkyd enamel.
Alkyd enamel - a finish accessible to everyone
There is one negative point. It lies in the fact that the paint has a very pungent odor. It should be borne in mind that this unpleasant moment persists even after the coating has dried. This feature makes it difficult to use the material.
Acrylic paint
It is safe to say that this composition is the most versatile. The fact is that painting is quite simple, and the absence of odor only increases the advantages of the material.
Many craftsmen rightly note that this enamel has an insufficient service life. But such an omission can be easily eliminated if acrylic varnish is used as a fixing (finishing) coating. It will not only protect the surface, but also retain its original color for a long time.
Acrylic paint - easy to apply and odorless
On a note! The wooden material (MDF, laminate, timber) from which the door structure elements are made is very unstable to moisture. For such work, you should choose compounds that are marked “waterproof”.
Types of wood paints for facade work
Water-based acrylic paints
The water emulsion contains acrylic binders that form a thin film on the surface of the wood after the water evaporates.
The film is elastic, does not collapse due to seasonal changes in wood, is vapor permeable (“breathable”), and has high waterproofing properties.
The composition does not have a strong odor, is highly resistant to temperature changes and adverse atmospheric conditions. It is used for painting wooden facades of houses, lining, timber, blockhouse and imitation timber.
Water-based latex paints
Latex paints are resistant to wet abrasion, do not fade in direct sunlight and are characterized by the elasticity of the layer. The paint also contains acrylic resins, which expands the list of performance characteristics of the composition.
Additives of synthetic latex improve the visual effect and give the surface a silky appearance.
Suitable for use on the facades of wooden houses, painting window frames, doors, wooden fences.
Alkyd compositions
The composition contains alkyd resins, which, when dry, form a glossy texture with increased resistance to temperature and humidity changes. They do not penetrate deep into the wood and fade quickly.
Used for painting frames and doors, wooden surfaces that are not subject to strong mechanical stress.
Oil paints
They are a covering composition, which affects their low consumer characteristics. Paints wear out quickly, lose color, and are unstable at low temperatures.
Used for painting fences and railings.
As a rule, all manufacturers declare the presence of the listed properties in their formulations. But in reality, there is a rapid loss of performance under real operating conditions.
In this article we will highlight the most interesting compositions from leading manufacturers and consider in detail the properties of each paint.
All presented paints from leading manufacturers have been tested in practice and have earned truly high marks. The properties were tested in the middle zone climate with frequent temperature changes in winter (frost-thaw), with intense solar load and rain typical for this area.
Imitation wood on various door materials
How to paint a door like wood with your own hands? There are technologies that make it possible to imitate wood patterns on various materials from which doors are made.
To recreate the surface of wood, you need to repeat the combination of two colors. The main shade is a light tone, the additional one is a darker one. It is important to consider that the finishing composition must be identical for all processes.
General procedure
All work begins with general activities, which are as follows:
- The finished product is removed from its place. If there are protruding, unnecessary parts on the surface, then they are completely twisted. The door to be painted is placed on a flat area. It is much more convenient to do the work if the canvas is on a raised platform so as not to constantly bend over. In order to prevent damage to other items, everything is covered with plastic wrap.
- All areas should be treated with special care. The old coating must be removed. If imperfections are found on the surface, they need to be well puttied. After drying, such areas are treated with sandpaper.
Removing old coating Work with iron door structures is much more difficult; cleaning them requires a lot of effort. Any traces of rust are completely removed, such areas are cleaned to a shine.
On a note! All elements must be thoroughly cleaned of dust and dirt. It should be borne in mind that any deficiencies that are missed will lead to the appearance of numerous defects.
Applying the base coat of paint
- Next, sandpaper (with a very fine fraction) is used. It is fixed on a block, after which the painted surfaces are cleaned. This procedure is performed in order to remove minor roughness and also increase adhesion when applying the next portion of the material.
- A layer of dark paint is applied to the treated surface. It is necessary to perform the work so that the strokes are parallel.
- Now the comb comes into play. It serves as a tool that will imitate wood fibers. The movements are carried out with the condition that they must be parallel to the intended wood fibers. Different pressure forces create an interesting texture.
Creating wood texture - After drying, the wood-look paint is sanded. The surface is varnished.
- Cleaned surfaces are impregnated with solutions of drying oil and a special primer.
- The base paint can be replaced with varnish. Its color should match the desired shade.
- If the surface is well treated with an iron brush, you can get a natural and very relief texture.
On a note! It is better to give preference to combs that are sold in stores. They already have imitation of various fibers. Of course, you can make such a device yourself. But the effect may not be as intended.
Video on the topic:
Processing of wooden doors
Indeed, wooden structures also need to be painted to resemble wood. This can happen for various reasons: the old coating has lost its former appearance, there is a desire to change the overall appearance of the interior, a cheaper material is being upgraded under a more expensive one.
The general procedure is the same as described above, but there are some nuances:
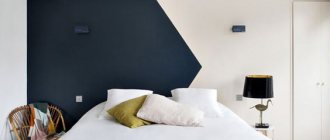
Coating wooden doors with varnish can reveal the structure of natural wood.
Naturally, working with natural wooden doors is much easier. Such rests are also typical for products made from MDF.
Painting plastic and metal doors
The staining process practically repeats the general procedure. But it should be borne in mind that polymer materials are easily damaged, so it is necessary to carry out all the processes in such a way as to prevent damage to parts.
Of course, plastic doors are painted to look like wood much less often, but still, if you decide to do this, then you need to take into account some features:
- Many polymers, for example, polyethylene, polypropylene, are simply impossible to paint. Therefore, you should immediately decide on the type of polymer.
- Sanding must be done with extreme care. A primer, which has high adhesion, is used as an impregnating agent. For work, materials are selected that are suitable for a specific type of product.
- Coloring compounds are used on a water basis.
Plastic doors are painted with acrylic paints
On a note! A paint brush is best for applying paint. The roller should be excluded from this process. The fact is that it does not provide such an imitation of the relief.
Sometimes the question arises: how to paint a metal door like wood? Don't worry, the process is not labor-intensive. You just need to take into account the following nuances:
- It often happens that after painting metal parts, you find that there are unpainted areas or peeling. This situation occurs due to the fact that the surface has not been treated with highly adhesive primer compounds.
- Any areas of corrosion that have not been removed will result in rust marks.
It doesn’t matter what material the doors are made of. To imitate wood, you just need to adhere to existing rules, as well as show a little imagination and diligence.
Source: otdelkagid.ru
Preliminary preparation of the product
General procedure:
- If the part is fixed, remove it from the fastenings and place it horizontally on a stable base.
- Remove fittings and other parts, protect non-removable fragments with tape or polyethylene.
- Clean the surface from dirt and remnants of the old coating, remove traces of rust from metal bases.
- The plastic surface must be made rougher by scratching it with a wire brush. This will improve the adhesion between the base and the coloring composition. Other materials, on the contrary, need to be sanded. To do this, you can sand them by hand or with a sander, moving from coarse-grained to fine-grained nozzles.
- Smooth out any existing defects with a suitable putty.
- Treat the product with a degreaser or solvent (the product is chosen for working with specific paints and bases).
- Apply primer and wait for it to dry.
Do-it-yourself painting of plastic car interior parts
The fresh look of an old plastic car interior part is the result of not only painstaking work on applying restoration products. This is, first of all, their correct selection. Look at the pictures of a bad painting experience, when the owner simply applied paint to one of the interior elements, and it immediately crumpled up. And yet, negative experiences should not discourage you from painting yourself. After all, doing this is no more difficult than removing scratches from windshield wipers from a car window with your own hands. The Autostadt.su team offers to get acquainted with all the intricacies of the technology of painting plastic elements, and analyze the main mistakes that beginners encounter.
Painting methods
There are several painting methods: using a special grater, mixing liquid paints, applying soot. The choice is made taking into account the type of surface.
Using a rubber float
This option is considered the simplest; most beginners choose it.
First, a layer of light enamel is applied, which is then left until completely dry. Then a dark dye is applied. There is no need to wait until it dries: it should only dry out a little.
Then they take a grater made of rubber with a carved pattern that imitates a pattern on natural wood. Using a tool, marks are left on the surface.
At the same time, light dye will appear through the dark dye, which will create the effect of natural wood.
When the master finishes the decoration work, you should leave the product to dry completely. Only after this can you start applying varnish. It is recommended to apply it in 2-3 layers. When the varnish is completely dry, the item can be placed in its original place and used.
Before working with furniture or doors, it is recommended to try using a grater on unnecessary surfaces.
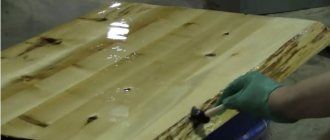
Liquid mixing
This complex technique requires artistic taste and work experience. Suitable for working with large objects with a flat surface; Small, curved things will be difficult to repaint. With its help you can get original color solutions.
First, light enamel is applied; You can use any tool for this. It will have to dry a little; You should not overdry, the surface should remain slightly damp. Then you will need a brush.
With its help, a dark dye is applied on top of the liquid bottom layer. Since the shades will mix during work, streaks will remain on the surface.
Outwardly, they will look like a cut of wood. When the work is completed, the paint is left to dry. After the dye has completely hardened, the base is coated with varnish.
Applying soot
This painting technique is considered simple; it is used for plastic objects (for example, in the interior of a car). Can also be used for other materials: wood, metal. You need to use enamel of only one shade (it is better to take dark ones; on light ones the soot will stand out sharply).
In addition, you will need to take a plastic stick (a cocktail straw, fork, spoon or knife from a set of disposable cutlery will do).
First, the product is completely covered with dark dye, after which it must dry completely. The stick is then set on fire. When it starts to smoke, apply a design with the end, bringing it to the surface. Uneven dark spots of soot will help you get an original pattern.
When the work is completed, the result should be secured with 2 layers of varnish.
How to paint car interior plastic
- Sand it.
- Degrease.
- Find out whether it needs to be primed or not.
- Restore texture if necessary.
- Paint it the desired color.
How to sand
To matt interior plastic under primer, red Scotch-Brite is usually sufficient. It is a felt-based abrasive material, similar to the hard side of a dish sponge. The advantage over fine-grained sandpaper is its softness, which allows this tool to efficiently process various bends and indentations.
How to degrease
Experienced painters advise using only anti-silicone. The fact is that classic solvents in the form of white spirit or solvent can ruin a plastic unit. For example, after using organic matter, stains form that are difficult to hide even with painting. By the way, we have already recommended abandoning white spirit when performing the technology that describes how to remove tar from a car body without damaging the paint.
Do you need primer on plastic or not?
The reason for fresh paint clumping and peeling is that no primer was applied first. This is a composition with a special formula of various additives and plasticizers, which improves the adhesion of paint to the surface. However, not all plastics require primer treatment. To determine whether to prime the interior plastic or not, you need to conduct two experiments:
- Set fire to a piece of the product being processed.
- Immerse the part in water.
If the plastic smokes and sinks, it is not necessary to use primer on the plastic. When a plastic element burns like a wax candle and floats on water, you cannot do without a primer.
It is important to choose the soil wisely. So ordinary automotive compounds are not suitable - the paint peels off instantly. You need a special primer designed specifically for plastic.
When is structural paint needed?
If you have ever touched a black plastic bumper or a dark side mirror housing on an inexpensive car, you probably felt that the tactile surface seemed to be covered with small pimples. The matte rough effect is structural plastic. The paint in question recreates this same effect and is typically used to cover up scuffs and light scratches.
What about the paint itself?
First decide what kind of coverage you want to get. Here are some examples:
- Soft-Touch. Usually used for dashboards. The surface is slightly silky and rubberized. This coating is applied to the panel from the factory.
- Normal, rough. Apply to hard plastic. For example, the side parts of the center console, lower trims on door cards or handles for closing doors.
- Glossy. Used for finishing interior levers intended for opening the door.
Then find out for yourself which shade to choose. If you plan to paint the interior exclusively in a restoration manner, then take the trouble to find a company catalog with the distribution of interior and exterior colors by VIN numbers. The original paint, selected according to the factory catalog (for example, for VW it is ETKA), will preserve the monotony of the overall picture of the interior. This will be because there will be no noticeable difference between the painted and unpainted parts.
For your information. For restoration work, it is better to order original paint and only from the car manufacturer.
If we talk in terms of the examples given, then it is better to purchase the Soft-Touch aerosol can through the official line. To get a regular rough layer, it is enough to use classic paint paired with structural paint. Here are examples for common shades:
- Black. The VAZ black Cosmos (code 665) will do.
- Grey. The VAZ decorative (graphite) intended for bumpers fits perfectly.
However, the color and origin of the paint are purely individual things and are selected solely according to one’s own preferences. Continuing the conversation about rough coatings, it is appropriate to mention the well-known RAPTOR U-POL, a protective coating for the exterior of a car, and its similarity - HB BODY. Glossy objects are regular paint covered with several layers of varnish. The latter is recommended to be purchased in aerosol cans. There are no strict requirements for this component.
We recommend painting plastic parts of the car interior only with a spray can. When applying enamel with a brush, there is a risk of drips. In addition, such a layer takes much longer to dry, which means that the likelihood of catching dust particles is much higher.
What to look for when choosing paint
When choosing the appropriate composition, you should pay attention to several factors.
- Type of wood. Different breeds have their own characteristics, which affect the quality of coloring.
- Terms of Use. Surfaces indoors and outdoors are exposed to varying degrees of impact. When purchasing paints and varnishes, it is recommended to take into account: humidity, the presence of sunlight, exposure to smoke, temperature changes, mechanical stress and some other nuances.
- Preliminary surface treatment. For the most effective protection of wood and long service life, the surface must be primed before painting. This will enhance the protective properties and ensure the leveling of the absorbent base.
- Previously applied compounds. The primer must be compatible with the paint. Otherwise, it is better to completely remove the previously applied layer.
For woodworking, glazes and antiseptics, varnishes, water-based impregnations and stains, as well as covering paints and enamels are used. Let's look at each type in more detail.
- Glazing coatings (impregnations, glazes, varnishes). The texture of the wood is clearly visible through the applied layer. Such materials help preserve the natural appearance of the wooden surface and give a decorative effect, emphasizing the advantages of the surface.
- Covering compositions (oil, alkyd, acrylic paints). These materials are made on different bases, both organic and water-based. Alkyd and oil paints are more traditional and affordable, but less durable.
Acrylic paints are famous for their durability and wear resistance. Their advantages also include quick drying and lack of odor.
- Opaque enamels (alkyd, acrylic, polyurethane). These compositions are also produced with the participation of polymers. After drying, they form a hard layer resembling a “crust”, which provides them with resistance to external factors.
The most affordable is alkyd enamel.
It reliably protects the wooden surface from moisture, however, such compounds are the most toxic. Polyurethane paints are characterized by good elasticity, due to which they are resistant to mechanical stress and last longer than others.
How to paint interior plastic without the paint peeling off
Let's start by analyzing the main mistake: why does the enamel layer peel off? The reason is that the material has nothing to cling to, that is, weak adhesion of the paint layer to the primer or plastic.
The fact is that before applying any type of paintwork on the surface to be treated, it is necessary to create small grooves and scratches, that is, grind. This improves the adhesion of the new coating to the base, making it durable and resistant to peeling. What else is sanding useful for? During treatment with Scotch Brite, stubborn dirt that is difficult to remove with anti-silicone is removed.
Hard plastic painting technology
We have already outlined the main stages of restoration work in the selection of materials. Now let's look at the technical part of each operation.
- Sand it. According to painting terminology, this transition would be correctly called matting. The bottom line is that you need to moisten red Bright tape in anti-silicone and rub it on the plastic part.
- Degrease. Soak a cloth in anti-silicone and walk over the treated surface.
- Prime. Apply 3-4 layers of special primer for plastic and wait until it dries.
- Sand it. Treat the primed surface with Scotch Brite.
- Paint it. Apply 2-3 layers of paint of the desired color. If there is a need to restore the structure, then structural enamel is applied before the main painting. The places where it is sprayed are determined by location: this is either the entire surface of the part, or some of its sections. If the goal is to obtain a varnished surface, then 20-30 minutes after receiving the painted coating, apply varnish in 1-2 layers.
When painting interior plastic, follow the well-known rules for working with aerosol cans:
- Place the part in a closed room with an exhaust hood to prevent dust from entering the processing area.
- Cover untreated surfaces with newspaper, cardboard or thick fabric, securing it around the perimeter with masking tape.
- Shake the can for 1 minute to obtain an even layer.
- Try spraying paint on some cardboard. Check the color match and prepare the can to spray evenly.
- Apply paint/primer to the surface with quick but smooth and non-stop longitudinal movements. Drying time between layers at a temperature of +25°C averages 20-30 minutes. Complete polymerization occurs after 24 hours. When painting, shake the can periodically.
- Turn the can over and press the button. This is relevant if there is paint left in the container. This is done to ensure that the material does not freeze in the sprayer.
Working with Soft-Touch coating
We have already noted that the above painting technique is relevant for hard interior plastic. Plastic with a soft coating, such as dashboards or door cards, requires special treatment:
- The old soft-touch layer must be completely removed. If this is not done, the new paint will peel off again. To easily remove the coating, the part should be soaked in 646 solvent.
- When using original Soft-Touch paints, plastic is usually not primed, and one layer of coating is enough to successfully close the issue of restoring interior elements.
Source: autostadt.su
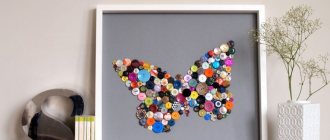
Item decor Master class Applique Realistic imitation of tree bark Paper Glue
A small tutorial on how to quickly imitate tree bark. Very realistic bark. The photo shows the structure very clearly. Bonsai can also be made this way (even small branches). Tried many times.
We will need: 1. Base (I will have a bracelet for my hand). The main thing is that the base is covered with paper, paper tape, etc. 2. The grayest and cheapest toilet paper, which is also called “butt sandpaper.” 3. Medium soft brush (not for glue). 4. Lots of PVA (I recommend diluting it with water 1:1).
This is my bracelet base. Cardboard + paper tape. I have a big piece of toilet paper. If you are making wood, use less. But not “bits”! This is a very elastic material, and even for small parts, take larger strips.
Then everything is done by itself! Almost. Apply a puddle of PVA liberally to the surface of the product and simply rest it on the paper (without ironing). Wrinkles form on their own. Please note that folds form across the paper. That is, if it is a tree trunk, then we wrap it with serpentine.
Layer 1 is finished, we tear the paper with our hands, so the seams will not be visible. Gently coat the top with PVA (also generously). Without strongly pressing or deforming the surface.
It is also advisable to smear your hands in PVA if you touch the surface. Let it dry until it hardens slightly (you can do it completely if you don’t have time). In my previous work, I applied 2 layers at once. A total of three to six layers. Dry, paint, varnish.
Voila! It turns out very realistic! Here is a set of bijou in eco-style.
Sorry for the confusion, MK typed “on the run.”
I hope someone finds my method useful.
ABOUT! Thank you!
Interesting interesting!
Did you paint one color or not?
No! And work is on the verge of starting. Black primer, “dry” brown, a little red, etc.
Thank you. And most importantly, everything is always at hand and cheap.
How to clean plastic panels?
found in the kitchen is most susceptible to contamination ; fatty deposits along with dust particles will quickly do their job, and now dirty stains are visible on the surface simulating marble or tiles, which are best removed as often as possible, in which case the work will be less labor-intensive.
For cleaning you can use :
- Kitchen cleaning powders;
- Dishwashing liquid;
- Sponges and soap solution.
Under no circumstances should scrapers, pumice stones or other hard abrasives be used to clean plastic panels, as this will lead to scratches and deterioration of decorative qualities.
Also, you should not use aggressive reagents with a high content of hydrochloric and sulfuric acid for cleaning.
Fat deposits are easily removed with the help of cleaning powder applied to a sponge, and warm water; however, it should not be rubbed with great effort; the plastic surface is quite easy to clean.
Wood surface imitation technique
They work by mentally dividing the surface into small sections: the solution hardens quickly, and so that it does not have time to set, the wall is treated in parts.
- The finished plaster is applied using a metal spatula or trowel, and the thickness of the layer is evened out with it.
- Brush over a smooth surface with a clothes brush; the bristles will leave tiny grooves imitating wood fibers. Movements should be light, do not put pressure on the brush. The direction of the grooves can be strictly vertical or with slight bends. During the process, the solution will stick to the bristles; you need to wash it off with water, otherwise the stuck mass will leave large damage the next time it comes into contact with the wall.
- Next, using a wide plastic spatula, give the surface the structure of wood: move the tools from top to bottom, leaving smooth wavy lines. Using a small spatula without notches, placing it at a slight angle to the wall, draw knots in a circular motion. When the relief is created, lightly smooth the surface with a wide metal spatula without pressure and move on to the next section.
- After the entire wall is covered with plaster, leave it until completely dry. Then it is rubbed with sandpaper to remove excess solution and smooth out roughness.
The video below shows the entire process.
How to paint plastic panels?
For those who do not accept constancy in their decor, paintable coatings have long been invented, so when you get tired of one color, you just need to choose a paint and repaint it , but it is not at all necessary to attribute this property only to wallpaper or drywall.
Plastic panels are also easy to paint.
Of course, not all coloring solutions are suitable for this; you can immediately exclude such popular water-based paints , since they will simply flow off due to lack of adhesion.
Experts recommend using acrylic paints , they are harmless, do not have an unpleasant odor and are easy to clean, but at the same time they can only be applied using a spray.
Since the basis for the production of plastic is hydrocarbons, the paint must have the appropriate composition.
As a simpler and always reliable option - oil paints , of course you will have to wait until the smell disappears, but this coating can be applied using a roller, and everyone knows about its good stability.
Imitation of timber: what is it and how to make it?
In country houses, you can often find decoration in a rustic style, which is characterized by a design with imitation timber. The tree looks very laconic, nice and reliable here. The material has many advantages, among which are durability, safety for health and ease of installation.
Installing wooden elements does not require much time and effort:
- We attach the waterproofing film and lathing to the wall. For these purposes, timber with a cross section of 30 × 30 mm is used with a pitch of 400-800 mm.
- We fill the space between the sheathing with thermal insulation, on top of which a vapor barrier is laid. This way the insulation will not get wet and deteriorate.
- Let's start installing the material that imitates timber. We carry out installation from the bottom up and constantly check the evenness of the sheathing.
- We fix the products with self-tapping screws or nails.