When looking for something to paint your concrete garage floor, you should first make sure that additional coating is necessary. A concrete floor can withstand significant loads; it is the most durable, reliable option for a garage, but it is not without its drawbacks. Concrete coating generates dust, its surface quickly absorbs oil and other specific substances. The resulting stains look unsightly, and are also capable of collecting debris and sticking viscous particles to the soles.
It is almost impossible to clean a concrete floor; over time, it acquires similar defects, to which are added chips, cracks, and enlarged pores. The floor loses its original quality characteristics. The way out of this situation is painting. With its help, you can restore the appearance of the floor, extend its service life, and provide long-term protection for the coating.
What conditions are needed to paint a garage floor?
In order for the painting to be of high quality, and the resulting coating to serve for a long time and properly, you need to know the features of the concrete floor. This is important when choosing paint and application method. A concrete floor has its advantages and disadvantages, they must be taken into account. The latter are especially important, as they determine the main conditions for painting a concrete floor.
Advantages include durability, reliability, and affordability. Concrete floors are non-flammable, resistant to fungal and mold damage, and resistant to pests, including rodents.
Among the disadvantages it is important to consider:
- Concrete has high porosity, which only increases over the years. Microvoids allow and retain moisture, dust, and debris. This affects the appearance and quality of the coating; excess dust becomes a threat to the respiratory tract. These shortcomings can be overcome by painting.
- A garage is a place where fuels, fuels, and solvents are constantly present, which invariably end up on the concrete floor. These are often aggressive substances that have a destructive effect on the coating. To protect a concrete garage floor, use primer and paint.
- Due to constant increased loads, concrete cracks, deforms, chips and cracks appear. To avoid poor-quality flooring, it is necessary to first repair all uneven surfaces and prepare as smooth a surface as possible.
In addition, the conditions for painting a concrete floor include:
- perfectly dry surface;
- the class of the concrete mixture must be at least M 400;
- litter and dust should be removed with a vacuum cleaner;
- cracks and chips must be carefully rubbed and leveled;
- after this, the floor should dry well again, for this you can use a heat gun or a construction fan;
- follow the painting recommendations included with the composition;
- the type of paint must be correlated with the future intensity of use.
The more thoroughly the preparation is carried out, the better the quality of the coating.
Why does dust and other defects appear?
Under the influence of mechanical loads, small particles are constantly separated from the floor surface. They form concrete dust, which poses a danger to the respiratory system and human health.
The most common causes of dust and other defects are:
- the use of low-quality materials or the wrong brand of cement;
- non-compliance with concrete pouring technology;
- violation of proportions when mixing concrete mass.
These factors lead to the fact that tiny particles of cement powder remain in the porous structure of hardened concrete, which do not have time to react with water. They penetrate into the environment and turn into dust.
Due to mechanical loads, particles are separated from the floor, which are subsequently formed into concrete dust.
The top layer of concrete can be destroyed under the influence of high humidity and low air temperature, aggressive fuels and lubricants and other auto chemicals, and intensive use of the premises (daily driving in and out of the car).
To increase the strength of the surface, prevent the appearance of dust and give the garage an attractive appearance, it is recommended to treat the concrete floor with paint or primer.
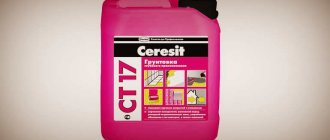
Primers, impregnations and primers for removing dust from a concrete surface are an excellent option when painting is not necessary.
Primers are:
- polyurethane,
- epoxy,
- water-dispersed.
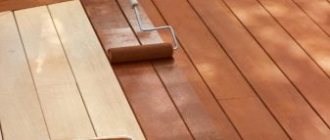
They are easy and simple to apply with a roller or brush, dry quickly, strengthen concrete and protect it from wear, friction and negative influences.
Primers are also used to reduce paint consumption. When choosing a material, take into account the characteristics of the main paint composition - the paint and primer must be of the same type and have the same base, for example polyurethane or epoxy.
The primer dries quickly and strengthens the concrete.
To increase the waterproofing properties and reduce dusting of concrete, you can use liquid glass - potassium or sodium silicate glue. It is characterized by good adhesion, frost and crack resistance, and inertness to mold formation. However, this type of finish sets quickly and requires high speed application and the use of personal protective equipment.
READ MORE: Repairing the floor in an apartment with your own hands step by step
Usually, before painting, a rough layer of primer is applied to the surface, designed to better “adhere” the paint and varnish material to the concrete surface. However, some primer compositions can be completely used as independent dust removal materials. In the case of a garage, where the aesthetic component does not play the most important role, this solution becomes the most profitable.
Not every primer is suitable for such purposes; only two types of compounds can be used for garage floors.
Polyurethane primer has the following advantages:
- fills voids in concrete, making the surface more durable and even;
- has high adhesion;
- easy to apply;
- is a quick-drying material;
- It is resistant to aggressive chemicals and machine oil.
You can also use an epoxy primer that:
- forms a durable glossy film on the concrete floor, which does not fill, but closes the pores of the cement screed;
- is waterproof and resistant to aggressive chemicals;
- does not wear out and retains color for a long time.
As for paint coating manufacturers, there are a number of compositions that experts recommend using.
How to choose paint
How to paint a concrete floor in a garage? Since this coating is quite specific, special types of paints are produced for it. Therefore, when choosing, you should pay attention to the purpose of the paint. Another caveat is that painting a concrete floor cannot be cheap, so if you are trying to save money, it is better to leave it as is.
Epoxy paint with a hardener (two-component) is considered ideal for concrete. It is known for its resistance to wear, mechanical stress, and aggressive environments. This paint fits perfectly on porous surfaces, including brick and plaster. To enhance the durability effect, it is recommended to apply more than one layer, and to avoid a slippery surface, sprinkle the floor with sand between layers.
In addition to epoxy paint, latex, acrylic, polyurethane, alkyd (alkyd-urethane), and rubber are also used. They all have their own characteristics, and for better adhesion of the paint to the concrete surface, a primer is used.
Application stages and technology
Before you begin painting the garage floor, you need to prepare:
- Remove irregularities and cracks, crumbling concrete, cover large defects with cement mortar.
- Check the moisture content of the concrete screed. To do this, you need to stick a piece of polyethylene on the concrete, check after 24 hours, if condensation appears, then it is too early to carry out painting work.
- To increase the adhesion strength of the paint and the floor, it is necessary to level the concrete base using a grinding machine.
- Remove dust and debris.
- Prime the surface using a brush or roller. If an epoxy substance is used for painting, then the priming process does not need to be carried out.
The surface is now ready for paint. Coloring stages:
- Mix the paint components according to the attached instructions.
- Pour the mixture into a paint tray or other convenient container.
- Apply paint in an even layer.
- If it is necessary to apply a second layer, this should be done after 24 hours.
When painting work, it is necessary to observe safety measures: the room must be ventilated, and the use of personal protective equipment (goggles, gloves, respirator) is mandatory.
Types of paints for concrete
Latex and acrylic paints. The main components of the compositions are resins and polymers. Applying such paints to a concrete floor provides a thin, durable layer through which destructive substances - fuel, engine oil - cannot penetrate.
Acrylic and latex coating is resistant to temperature changes and is water-repellent. Dries in two days and can withstand moderate loads. Latex and acrylic paints are environmentally friendly, completely safe, have an aesthetic gloss, are quickly applied (with a spray gun, brush or roller), and are practically odorless. However, this type of painting is not cheap, especially considering that a second coat will be required.
Polyurethane enamel. Polyurethane-based paint can withstand low sub-zero temperatures, down to -30ºC. The high-tech polymer in its composition provides reliable protection against the penetration of gasoline and oils into concrete. Enamel has high decorative qualities and comes in several varieties:
- anti-slip – matte, semi-matte;
- quartz-floor - with the addition of quartz to enhance wear resistance;
- antistatic – with pronounced dielectric characteristics.
The paint should be applied in several layers at intervals of at least 3 hours. One of the features of the enamel is the use of grades up to M 600 for concrete. The coating of such paint is easy to care for, it takes about a day to dry, and three days for final hardening.
Epoxy paint. Used together with a hardener, after mixing with which it is applied to the floor. The surface is very durable, stable, and has a long service life. Epoxy paint is practically odorless, eliminates flaws in porous concrete, dries for 5 days, after which a second coat is applied.
Among the advantages are a large selection of colors, the ability to create a specific surface texture, easy care using detergents without any damage.
When using epoxy paint, you need to remember that the composition becomes environmentally friendly only after mixing the components. Separately, they are unsafe. Since the resulting mixture is quite viscous, it is not recommended to apply the paint with a remote control; it is better to do it with a roller or brush.
Urethane enamels. They contain polyurethane components, varnishes, and resins, thanks to which the paint adheres perfectly to porous surfaces. However, they have a specific smell and are not recommended for application to surfaces that are planned to be heavily loaded. Strong mechanical impacts can damage the coating. However, urethane enamels have their advantages - they dry in 8 hours, are fireproof, durable, and are not exposed to sunlight even after a long time. The enamel is applied with a roller, brush or spray gun, first diluted with a solvent.
Rubber paints. Compositions with the addition of rubber components are able to withstand temperature changes over a very wide range - from -50 to +60ºC. The resulting surface has the qualities of a rubberized tile, with high waterproofing rates, it is smooth, and tolerates mechanical stress and abrasive detergents well.
Rubber paint is applied in several layers, with constant stirring to avoid early hardening.
Painting process
Preparing for coloring
This step is very important if you really want to test the full strength of the paint, and cannot be ignored.
Surface cleaning
Your goal is to achieve as smooth and non-porous a cleaned surface as possible.
- Using a metal brush, grout mesh, spatula or sandpaper, thoroughly clean the surface from dust, dirt, moss and traces of old processing. Pay special attention to traces of slaked lime whitewash, as well as residues of oil-based paints and alkyd paints - these should be removed down to the putty or plaster.
Grease and oil stains should be rubbed until they completely disappear. If the grease is eaten too deeply, then the wall should be moistened with dishwashing detergent for a couple of hours, and from time to time wetting it again to ensure that the stains are washed off.- Glossy parts of fiberboard, MDF and other structures should be thoroughly sanded to a matte shine.
- If there are cracks, you should definitely fill them up, and when everything is dry, sand them.
- Clean all metal surfaces from dirt, traces of old paint and dust using a metal brush, and then sand and degrease with a solvent, for example, white alcohol. If there is a gloss, it is advisable to make the surface matte so that the adhesion to the paint is as good as possible.
- After all cleaning, puttying, sanding and sanding work has been completed, the surface should be freed from dust residues and then washed with an alkaline solution. After half an hour, rinse the surface again, but this time with clean water and leave until completely dry.
Now you can move on to the second step, namely the priming work.
Padding
Before starting the process, metal elements should be coated with an anti-corrosion compound, and then insulated or coated with an inhibitory primer. You will also need to use a special primer with anti-corrosion properties like GF-021.
Important! If after priming the surface remains glossy, then you should sand it a little to a matte shade.
- Cement, concrete, asbestos-cement and other surfaces with a porous structure should be coated at least twice with an antiseptic or deep-penetrating facade primer.
- Coat the wooden parts with acrylic-silicone primer.
- For all other surfaces, a universal primer based on latex or acrylic is suitable.
- If the prepared surfaces are subject to regular negative environmental influences (snow, rain, etc.), then an additional hydrophobic primer coating can be used.
Helpful advice: if you apply the primer in 2 or more layers, then first you should let the first layer dry, and then apply the next one.
Coloring
To paint a concrete garage floor with rubber paint, you will need the following tools: a paint brush, foam rollers or polyamed-type faux fur, and a spray gun.
Optimal temperature and weather conditions for painting:
- Air temperature from +5 to +27 degrees.
- There is no precipitation or bright sun, relative humidity should be no more than 70%.
- Do not apply paint in strong winds that carry dust.
Important! You can dilute the paint with water, but only for applying the first layer and no more than 1/10 of the total volume.
Process Features
- Apply several thin layers rather than one thick one. The interval between applying each layer should be at least two hours (or better yet, 4 hours).
- Stir the paint regularly to ensure an even coating on the surface.
- The paint should be distributed over the entire surface to be painted and get into all, even the smallest cracks and gouges. This is difficult to achieve with rollers, particularly in hard-to-reach places and corners, so all imperfections should be painted over with a brush.
- During breaks when applying layers, you should not leave tools in the open space, as paint residues will quickly begin to harden, and then it will be extremely difficult to wash them.
Please note that you can wash painted surfaces no less than 7 days after painting has been completed, since during this period the coating will completely harden and acquire its wear-resistant properties.
Workflow Recommendations
Painting a concrete floor in a garage is not one universal technology; it all depends on the condition of the concrete floor, as well as the instructions for the paint composition. However, there are general recommendations:
- It is necessary to prepare the floor for painting - seal cracks, chips, and other defects with cement and level it. In case of difficult condition of the concrete surface, for example, with a strong slope, large potholes, it is better to make a new screed.
- Remove all debris, get rid of dust if possible, wash the floor, wait until it dries completely. This may take several days, with the exception of using epoxy paint, which is not afraid of moisture on the surface being treated.
- Apply the paint in the recommended manner and level it out. Leave for the required time and re-coat.
After complete hardening, you can sand individual areas if necessary.
Coloring rules
Painting a concrete screed with your own hands is carried out in several stages. Before proceeding directly to applying the paint and varnish material, it is recommended to clean the surface to be treated of debris and dirt.
Due to the fact that concrete has a porous structure, dust accumulates inside the floor, due to which the surface will not be painted well enough. Small particles can be removed using moisture. Shortly before applying paint or enamel, wash the concrete floor and wait until it dries.
It is also recommended to check the humidity level indoors before processing. To do this, just stick a small piece of polyethylene on the floor and wait a day. If condensation occurs, the floor covering should be treated with epoxy paints.
Enamels are allowed to be applied no earlier than 90 days after pouring concrete. The screed must gain strength before processing.
Primer
Impregnation of concrete with a primer is a mandatory step, after which the strength of the screed increases and the pores close. This material increases the degree of adhesion of paints (enamel) and the floor in the garage.
Paint application stages
Before applying paint or enamel, it is recommended to read the instructions on the package. Each composition contains different compounds, as a result of which it imposes its own requirements on the condition of the floor covering. A number of enamels are allowed to be applied to a wet surface, others - exclusively to a dry one.
Staining is carried out during the following stages:
- The paint is poured into the tray.
- The roller is soaked in paint and wrung out. This can ensure uniform application of the composition to the concrete screed. If you do not squeeze it out, protruding stripes will appear on the surface being treated.
- Coloring begins from the far corner. It is recommended to apply the composition in squares, moving along the walls towards the exit from the garage.
When using quick-drying compounds, the entire floor surface must be painted at once. Otherwise the coating will be uneven.
Depending on the manufacturer's requirements, paints and enamels are applied in 1 or 2 layers. In the second case, you should wait until the composition has completely dried, and then begin re-processing the concrete.
The car is allowed to be driven into the garage after 12-24 hours. The time period is also determined by the manufacturer of the paint or enamel.
Temperature
Different compositions have their own requirements for future processing areas. Polyurethane paints are allowed to be applied to concrete at temperatures ranging from 0-17 degrees. The humidity level should not exceed 70%.
Epoxy primers can be used at temperatures from +5 degrees. Acrylic paints should be applied at +18 degrees and above. Rubber has good resistance to environmental influences. Therefore, such compositions can be used at temperatures from -50 to +60 degrees. The main thing in this case is to avoid rapid hardening of the material.
When working with other compositions, you should follow the requirements of the instructions.
Painting the floor with liquid glass
If you are looking for how to cover a concrete floor in a garage, pay attention to an interesting method - using liquid glass. It has excellent waterproofing qualities. Among its main components are sodium and potassium silicates (in the composition of sand and soda when preparing liquid glass) and water. Depending on the predominant composition, potassium and sodium glass are distinguished. It is better to use sodium for treating floors.
The composition does not require special preparation, just stir it well and you can start applying. Concrete floors must be pre-cleaned and well dried. The solution hardens within a couple of hours, depending on the concentration. The surface is smooth, uniform, with a glossy shine. For strength, after drying the floor is varnished.
Types of primer for concrete floors and methods of applying it
Any construction or renovation process carries with it certain tasks aimed at the construction and finishing of buildings. At a certain stage, the question of applying decorative coatings to the floor arises, and this is no less important than rough work.
How to properly prepare surfaces before installing the finishing coating? A concrete floor primer will help solve this problem and provide a good end result.
Material characteristics
The primer has protective properties and helps improve adhesion, strengthens a weak base and closes small pores. Depending on the components and main functions, it is divided into several groups.
For example, a deep penetration primer is absorbed into the structure of a concrete floor and makes it stronger, an adhesive liquid helps create a strong bond between the base and the finish, and an anti-corrosion compound provides protection against rust.
Main purpose
Without good soil, even expensive and high-quality finishing materials run the risk of deforming and peeling off from the base. With its help, you can significantly extend the service life of decorative cladding and the surface being treated. A quality product helps:
- increasing adhesion between materials;
- protection from moisture and alkaline environment;
- improving the strength of the base;
- optimal preparation before applying the finishing layer;
- uniform application of decorative coating.
Application benefits
Unfortunately, mineral materials (concrete, brick) quickly deteriorate when exposed to negative external factors. The porous surface absorbs moisture, which freezes in winter and, due to expansion, breaks the screed or masonry.
Over time, the entire structure can become deformed, and this leads to irreversible consequences, and often it is not possible to restore damaged elements. The agent for cement screed does not affect the vapor permeability of the surface and allows it to “breathe”.
Also, thanks to the primer composition, it is possible to significantly reduce the consumption of more expensive paint due to the fact that it will be less absorbed into the concrete pores.
Without applying primer, it will be very difficult to putty the base, because the material quickly loses moisture and becomes less plastic.
Types of material
Different compositions are intended for different surfaces. For processing mineral materials, primers are used based on:
- acrylic They dry for a maximum of three hours and do not have a strong chemical smell;
- polystyrene. Toxic solvents are used among the components. The primer is intended for working with plastered surfaces outdoors;
- polyvinyl acetate. They dry in about half an hour and are suitable for interior work before applying PVA compounds.
Also, a primer for a concrete base belongs to various classes that characterize the way the product acts on a mineral surface.
Impregnating
Such compositions secure loose surfaces. They consist of adhesive components that fill micropores and cracks to a depth of 50 mm. After the soil has completely hardened, the smallest particles of concrete bind together, and the surface acquires additional strength.
Impregnating soil is indispensable when working to restore old, dilapidated surfaces that for some reason cannot be dismantled.
Deep penetration
This type of primer penetrates deeply into the structure and strengthens porous, but not loose, concrete surfaces. It increases adhesion thanks to the small latex segments included in the film former.
Adhesive
This primer for a concrete base forms a protective film on the surface, which has increased adhesion. It is applied to objects with weakly absorbent characteristics. These may be previously painted elements that need to be plastered. Externally, a layer of such soil looks like a thin film, but it firmly holds the cement mortar and prevents it from slipping.
Selection rules
The retail chain offers a variety of products for treating concrete floors. In most cases, they contain components that prevent the development of fungal infections and mold, and also regulate surface porosity.