Acrylic surfaces
To remove sealant from a plastic bathtub, you cannot use more than ten types of chemicals, which makes cleaning such plumbing equipment difficult.
It won’t be difficult to purchase exactly the substances intended for caring for acrylic surfaces (from manufacturers of bathtubs and shower stalls). Do not use the following substances to clean acrylic:
- knives, scrapers, scissors, etc.;
- organic solvents;
- abrasive substances.
To remove old silicone-based sealant, leave the surface treated for 24 hours. If there are no chemicals nearby, use a gentle soap-based solution. Constantly lubricate the sealant for 2 days, and then scrape it off the acrylic, wipe dry and finish with alcohol/vodka to degrease.
How to degrease plastic
Plastic compounds are less resistant to chemicals than metal, wood or glass. A too aggressive cleaner can not only deform the surface, change the color of the material, but also completely dissolve the part. Different plastic compositions react differently to degreasing.
Basically, plastic is resistant to white spirit. But to be on the safe side, apply some liquid to the part first. If there is no reaction within 5-10 minutes, white spirit can be used to degrease the plastic.
To clean plastic surfaces, liquids based on gentle reagents are produced. Of the most accessible:
- Baslac Plastic Cleaner;
- Lecher Coatings. Special liquids cost from 400 rubles. per liter They clean gently, leave no marks or streaks, and have an antistatic effect. Do not destroy PVC, rubber, vinyl.
You can degrease the polymer surface with antistatic agent, alcohol or vodka. Other alcoholic drinks are not suitable because they contain sugars, flavors and colorings. These substances are left on the material.
Sealing the bathtub with self-adhesive
Border tape is necessary especially for decoration in wet bathrooms. It is made from polymer ethylene, one side of which is coated with moisture-resistant glue.
Before gluing the bathtub to the wall surface it is necessary to clean and degrease. Then cut the border to the length required. The protective strip from the adhesive layer should be torn off in stages, and not all at once from the cut piece.
Important! The shelf life of the glue is strictly limited; if it is stored improperly and the packaging is damaged, the adhesive layer begins to crumble. This tape will not last long in the bathroom.
How to fix a leak
If you see water coming out of the shower stall, do the following:
- check all joints, seams and threaded connections to accurately determine the location of the leak. You can check the joints on the walls with a directed stream of water;
- if the seam is leaking, remove the old sealant, clean the surface well, treat it with a degreasing compound, and dry it well;
- treat the joint with sealant and let it dry;
- Check the quality of sealing of the seams in the shower stall again.
For your information! You can remove old silicone sealant with alcohol. To do this, blot the seam along the entire length with a napkin soaked in it. After 30 seconds, the composition will become soft, somewhat reminiscent of jelly, and can be easily removed from the surface of the shower. If yellow stains remain, wipe the area with a cloth soaked in the same alcohol. They can be easily washed without leaving the slightest trace.
There is no need to reseal the joints if you follow all the rules and tips when assembling the cabin. The main thing is to apply the sealant to a dry surface, then it will not peel off from it, forming a leak site.
Be sure to watch the video of how to seal a shower stall with your own hands. Pay attention to even the smallest details and all moments. Remember well which joints and which connections must be treated with a sealing compound.
Creating a beautiful bathroom is a dream for any owner. But during the work you need not only to install beautiful tiles or a shower stall. Care must be taken to ensure good insulation of seams and joints between materials.
After all, the bathtub is more susceptible than any other room to the negative effects of steam, moisture and is in constant contact with water. Bathroom sealant should be used to seal the joints.
Other surfaces
We sort of sorted out the acrylic bathtub. But what to do with other surfaces that have silicone-based sealant left on them?
To clean a glass surface, you have three options:
- The first and most common is to use a sharp blade. The disadvantage of this option is that it takes a lot of your time, and there is also a chance of scratching the surface of the glass.
- The second is to use Penta-840, which is designed specifically for removing sealant.
- The third is to use white spirit or gasoline. They are cheap, and in addition they are easy to purchase at any specialty hardware store.
Here's what you can use to clean ceramic tiles:
- Remove more of the silicone-based sealant from the tiles, but be careful not to damage or scratch the tiles. Then, using a soft cloth soaked in gasoline or white spirit, rub the product into the remaining glue. Once it has softened, use a wood scraper to remove any remaining sealant. When using a scraper, do not use too much force to avoid damaging the ceramic tiles.
- You can rub kerosene into the sealant until the glue softens and it doesn’t take a lot of time to remove it. Instead of kerosene, you can use a solution of a liquid product, although it will take longer to act. You decide.
- You can use extractants Penta-840 or Silicon-Entferner. But before you start full-scale work, you need to check whether your tiles are resistant to them, otherwise you may damage the surface of the ceramic and it will crack and harden.
We suggest you familiarize yourself with How to get rid of an unpleasant odor in a bag
You can remove sealant from the countertop using similar means:
- If the sealant has not completely dried, you can remove the sealant from the countertop using gasoline. Apply a little product to it, and when it softens, remove it with a cloth.
- If, for example, the sealant has hardened, then cut off as much of the layer as possible with a sharp knife or blade. Then apply a detergent to it until it is completely softened and remove it using a wood scraper.
- If you want to use modern solvents on the surface of the countertop, then carefully read the instructions so as not to break the material from which it was made.
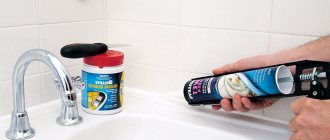
Features of cleaning bathtubs from silicone
To avoid damaging the bathtub coating, you need to choose a cleaning method suitable for acrylic, cast iron or enamel.
Acrylic
Acrylic requires delicate, regular care. A simple way to avoid damaging the product is to test on a small area whether the cleaning agent is suitable or not. Apply the cleaner for half an hour.
If roughness and other defects do not appear, the product is suitable.
Mechanical and chemical cleaning methods are suitable for acrylic Jacuzzis. Use a knife, pumice stone, or blade to remove the top layer of material, then scrub with a rough washcloth or soft brush.
Liquids that are highly effective are SanClean, PaniVanna, Triton, White - Spirit.
Cast iron
At the end of the procedure, yellow marks remain. They are easily washed with powder, dishwashing detergent, liquid and laundry soap. Acetic, citric, carboxylic acid, and baking soda remove stains forever.
Pour the granules onto a cloth, moisten it with water and rub the surface until the marks disappear.
Products made of cast iron are not afraid of damage. Can I use acrylic primer over old paint? During processing they are exposed to high temperatures, ensuring their durability.
Popular cleaning products are ideal for combating silicone.
Enameled
The enamel must not be cleaned with powders or metal brushes. They damage the coating, leaving huge scratches and dirty streaks. Cleaning products in the form of pastes and creams (Penta, Mellerud, Silicon-Entferner) will help you get rid of sealant.
Problem and solution
Work related to finishing is the last stage of each renovation. According to any advice, when sealing cracks in the bathroom, it is necessary to use a silicone-based sealant. However, few people tell you how to spend it correctly, so that you have as little of it as possible left on the surface of the bathtub or walls, since then you have to clean it up. And since the sealant has high adhesive characteristics, you will have to work hard.
Currently, you only need to enter the query “removing sealant” into the search bar on the Internet and many pages will open where you will be assured that this is the method that will quickly and efficiently remove sealant from a plastic bathtub. However, as practice says, not everything is gold that sparkles.
- Removing sealant mechanically. For this you will need a simple razor blade. Apply it to the surface of the plastic bath and smoothly cut off the remains of the sealant. Moreover, you have the smallest chance of scratching any bathroom, including acrylic ones. The only thing you need to look very carefully at is that you personally do not cut your hands. Using a brush, sweep away the remaining silicone. A stationery or sharp construction knife. That is unless you happen to have a blade in your house. In this case, you do not immediately cut off all the sealant, but act in stages, cutting off layer by layer. You should not try to peel off the sealant, otherwise you will remove it at the same time as a piece of plastic tub to which the silicone adhesive is firmly stuck. In this case, haste can cost you dearly. So be patient and have enough time. Keep in mind that silicone-based caulk is more difficult to cut than acrylic caulk. The first one is better removed using other means.
- Removing sealant using chemicals. First of all, we are talking about solvents. For example, like Lugato, Quilosa, Penta-840, CRC Gasket Remover and others. Many people suggest using Dow Corning OS-2. They are shown in the form of liquids, aerosols or pastes. The way to use liquids is quite simple: you apply it to the sealant, it softens and is very easy to remove. If you suddenly decide to use aerosols, then stock up on gloves and a protective mask. Shake the can and apply it to the surface near the bathroom. And after 20 minutes you will be able to remove the sealant by wiping the surface with a napkin. Or if there is still something left, use a spatula.
We suggest you read: How to clean spoons from tea deposits
To avoid damaging the acrylic bathtub, apply a minimal amount of solvent to the surface in a place where it will be least noticeable in the event of an unexpected reaction of the enamel or paint to the preparation. In general, when a solvent penetrates the sealant, it either turns into a kind of slurry or softens, which in any case makes it possible to easily remove it from the surface of the bathtub.
Second, you can use white spirit, especially since it is cheap. First, you will need to cut the maximum potential layer of sealant with a knife or blade, then rub white spirit into this place using a soft cloth. After a certain period of time, the glue will soften and you can carefully remove it with a wood scraper without damaging the surface of the bathroom.
If you have to dismantle an acrylic bathtub, and not just remove a couple of drops of sealant, then we are talking about completely removing the old glue and installing new sealant in its place. Then you will need to do the following:
- First, remove the bathtub tray. Since the sealant has strong bonding properties, then you will have to work hard. It is also best for you to have an assistant for this work. To begin with, try to pick up the thin silicone layer with a construction knife and use a screwdriver to pry off the bathtub in some places. When the bath gives way, move it away from the wall surface.
- You need to start cleaning the tiles and the surface of the bathtub from the old sealant. Moving in a circle with a rag soaked in solvent, remove the silicone, and when finished, wipe the tray with a dry cloth.
- Having done all of the above, apply a layer of new silicone-based sealant to the tile surface and tray and install the acrylic bathtub in the old place. If there are cracks or gaps left anywhere, also seal them with sealant. Immediately remove the remaining glue so that it does not dry out and you do not need to start all over again.
Instructions for sealing the joint between the bathtub and the tiles using a fillet
- Clean the edge of the bathtub and tiles from construction debris and dirt;
- Degrease with solvent and wait until they are completely dry;
- Cut fillets corresponding to the length of the adjacent side of the bathtub;
- Saw the fillet corners at 45° and clean the edges using sandpaper;
- Apply liquid nails, suitable for use in damp spaces, to the inside of the fillet. Leave the fillet coated with glue for 2-3 minutes;
- Carefully apply the fillet to the joint and press firmly for a few seconds;
- Carefully separate the fillet from the wall and give another 2-3 minutes so that the glue can dry;
- Place the fillet in place again and press firmly until the glue sets firmly enough;
- At the final stage, carefully apply silicone to the glued fillet and run a wet soapy brush over it in one direction.
As you can see from the instructions, sealing the joint between the bathtub and the tiles is a fairly simple procedure. If you choose the right method, building materials and carefully follow the recommendations for performing the work, the result will exceed expectations.
How to seal a bathroom: choosing a method
Depending on the material of the wall decor and the size of the gap between the bathtub and the wall, you can use the following to seal it:
- self-adhesive tape border;
- silicone-based sealant;
- tiled fugue (grout);
- decorative border made of plastic or ceramics.
All options are quite simple to implement independently. But the final decision on how best to seal the bathroom can only be made by the owner. After all, the question is not only about reliability, but also about beauty.
Choosing a sealant for the shower tray and cabin
Sealant is a paste-like material widely used for sealing various joints. The sealant has found its use in strengthening joints in building materials, gaps around windows or doors, heating and water pipes, and when installing ceramic tiles and plumbing fixtures.
Along with special silicone sealants, you can use transparent aquarium silicone.
Silicone sealants are used to close cracks and glue parts together. Due to its water resistance, this material is well suited for kitchens and bathrooms. Silicone sealants are UV resistant.
Natural antibacterial silicone is used as a sealant for installing washbasins, installing shower cabins, gluing ceramic surfaces, aluminum, glass, and metal.
High-quality silicone sealant is made from a hydrophobic filler pigment (more than 45%), silicone rubber (more than 45%), a related plasticizer, a catalyst, fungicides, and a thixotroping agent. This type of sealant is produced by ANTIA, STERN, Somafix. The best sealant for a shower tray is one that consists only of silicone without the addition of other impurities. This material has the smallest shrinkage (up to 2%). The following impurities may be present in small quantities:
- organic solvents;
- organic extenders;
- mechanical fillers (quartz flour, chalk).
If the composition of the material contains a fungicide, it can also be used for the bathroom tray, since the fungicide prevents the development of fungus and mold in a damp room. When choosing between neutral and acidic silicone, the first option is preferable. It does not have a strong odor and is more versatile.
The booths are sealed not only with widely used special silicone sealants intended directly for use, but also with transparent aquarium silicone.
Return to contents
How to remove sealant from ceramic tiles on a wall
Ceramic plates are wear-resistant and practically unaffected by chemicals, but they must be wiped carefully, following the following sequence:
- Remove the excess with a stationery or household knife, without cutting right to the slab, so as not to scratch it.
- Soften with Silicone Entferner, Penta 840 or White Spirit.
- Mechanically work on the excess with a homemade wooden scraper.
For more information on cleaning walls from silicone, read the article How to remove silicone sealant from tiles.
Degreasing metal
For metal, kerosene, white spirit, acetone, and alcohol liquids are most often used. Solvents 646, 647 and anti-silicone also work with metal. Among the anti-silicone compounds we can highlight: Body antisil 770 or Astrohim.
To clean a heavily soiled metal surface:
- Use sandpaper to remove rust, paint residues, and old primer.
- Wipe the area with a rough cloth.
- Using a lint-free material soaked in cleaners, wipe the elements again.
- If the material remains clean, you can dry it and proceed to the next stage of work.
Prevention is better than control
It is difficult to wash dried sealant off a bathtub, so follow specific rules for its application:
- apply a thin layer of sealant to the joint of surfaces;
- try not to apply silicone specifically to the bathroom and tiles;
- immediately after finishing the seam, lubricate it with gasoline and level it;
- remove the excess and you need to pay great attention to the sides of the bathtub - wipe off any not dried, dissolved sealant.
We suggest you read: How to remove chewing gum from pants
These measures will allow you to remove fresh sealant, which is much easier to do than fighting with dried-on sealant. Improper removal can become a source of black mold and depressurization of seams.
It will not hurt to familiarize yourself with industrial and folk methods of combating mold.
You can see how silicone is actually removed from a bathtub in this video review:
Larisa, April 12, 2021.
Sealing the floor - the first stage
Before proceeding with the installation and sealing of the shower stall, you need to complete. This will protect the base from moisture and mold.
The area of the floor where it is planned must be perfectly flat. This will allow the installation to be carried out correctly, avoiding distortions of the structure that could lead to a violation of its tightness. If there are any unevenness on the floor, they can be eliminated by creating a sand-cement screed. Next, polystyrene foam boards should be glued onto it to avoid the formation of condensation under the cabin pan. The seams between the plates must be treated with a waterproof compound.
The next stage is preparing the base for installing the pallet. A special mounting mesh must be laid on the waterproofing layer. Pour a screed on top of it to mount the product. When the surface is dry, all seams and joints must be treated with waterproofing material. It is better to use polymer-based products. Liquid rubber is perfect for such purposes. After the processing of the seams is completed, you can begin installing the shower stall itself, after which all that remains is to treat the joints with sealant.
Important! When assembling the shower, you need to carefully monitor the assembly's compliance with the manufacturer's recommendations. The pallet must be firmly secured to the base and walls, set to the building level so that it is positioned strictly horizontally.
Products for removing sealant
Fresh silicone, before all the solvent has evaporated from it, can be easily removed with a traditional scraper and a dry woolen cloth. Silicone that has turned into a solid material can only be cleaned using different tools or using different chemicals.
Silicone is easily dissolved by chemicals. However, if you don’t want to use chemicals, you can get by with one of your grandmother’s proven remedies.
- Salt. A minimal amount of salt is applied to a damp soft cloth and traces of silicone are rubbed in a circle. The salt must be kept wet regularly during the cleaning process.
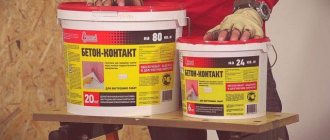
The best sealant manufacturing companies
The most famous company producing such materials is Ceresit
, providing its customers with the widest range of products. Such sealants are intended for sealing joints between walls and the bathroom; they can also be used as a special adhesive for ceiling tiles.
The advantages of this company's products include:
- excellent adhesion;
- safety of use;
- plasticity and lack of fear of water.
CIKI FIX sealants are popular
(Turkish production). This product has excellent quality characteristics at a minimal cost. Other advantages of this material include good adhesive properties - you can even use this sealant to glue anything in the bathroom.
Remove sealant from tiles
After renovation, it is often necessary to clean the silicone in a tiled bathroom. Part of the grout remains on the surface after sealing the joints and hardens fairly quickly. It is impossible to wipe it off after hardening without the use of special means.
Contaminants are removed in several stages:
- Use a knife to pry up large pieces of silicone and tear them off. If the surface of the tile is covered with glaze, it is better to use a wooden scraper to avoid scratching it.
- The remaining silicone is treated with a solvent (kerosene, gasoline) to soften it. To soften, apply a cloth to the silicone for 1-2 minutes. This period is sufficient for the material to dissolve.
- After softening, the sealant is wiped off with a rag.
- Grease stains remain on the treated surface, which can be washed off with dishwashing detergent.
Sealing joints - how it is done
When assembling the shower, you can apply sealant to each of the joints during the assembly process, or you can process the seams already on the finished structure. Particular attention should be paid to areas that are sealed with rubber gaskets or cords. When processing joints, you need to pay attention to the fact that all fastenings with screws and bolts are located outside in relation to the sealant layer.
The shower must be assembled in strict accordance with the instructions provided by its manufacturer. At each stage, seams and joints need to be processed. To get a more complete understanding of the matter, watch the video of sealing a shower stall. A clear example shows which joints must be sealed.
Attention! Try to process the seams so that the sealant does not get on the inner or outer surface of the pallet. Once dry, it is quite difficult to remove. To avoid such troubles, cover the areas near the application line with masking tape.
After sealing the seams, you need to check them for leaks. This is done after drying. To do this, just close the drain and fill the pan with water, then flush it down the drain. If you find that it will have to be eliminated by repeating the sealing.
How to clean bathtub sealant: specifics of finishing various surfaces
The main thing is not to forget to take into account the material from which the bath is made. To clean enameled cast iron and steel bathtubs from traces of old sealing, it is more convenient to use a gentle mechanical method or a method using chemical cleaners and reagents. You just need to test the product on a small area in advance.
Bathtubs finished with ceramic tiles also reliably resist any cleaning method. For bathtubs coated with acrylic, specialized compositions with o. These products will carefully clean the acrylic surface, specifically targeting silicone contaminants.
https://www.youtube.com/watch?v=
Professionals recommend Dow Corning OS-2 cleaner. Naturally, in any situation you need to act carefully, trying not to damage the top glossy layer of the bathtub. The process of removing the previous layer of sealant is quite complicated and requires patience, accuracy and time. The result depends on the correctness of actions in each specific case.
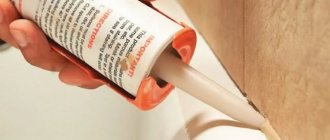
Which sealant is best for the bathroom?
A special sanitary sealant is better suited for the bathroom. These sealants contain special additives that prevent mold from appearing. They are also very moisture resistant and will withstand cleaning with household chemicals.
Among the professional ones, we recommend silicone acid sealant for the bathroom of the Tytan Professional brand - “Sanitary”.
Of the cheaper, but no less bad, an excellent alternative would be the trademark “Tytan Euro Line” - “Sanitary” - or “Soudal” - “Sanitary silicone”. If this seam needs to be painted, then “Tytan Professional” - “Rainbow Silicone” is perfect.
Sealants that are suitable for acrylic bathtubs: “Tytan Professional” - “For acrylic and PVC bathtubs” - or “Soudal” - “Neutral silicone”. They will not damage or stain the surface of the bathtub.
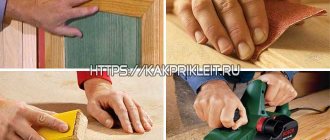
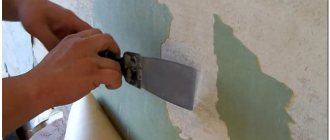
Preparing wooden surfaces for painting
Repair of building structures should begin with their cleaning and leveling. The question arises: how to remove paint from a wooden surface?
Currently, several methods are used to perform this operation, described in the special section below. The surface, cleared of old coatings, must be leveled using putties, thoroughly primed and degreased. After the base has dried, you can proceed directly to applying paint.
Preparing surfaces for applying paint and varnish coatings
Methods for cleaning wooden surfaces from old coatings
There are several technologies for removing previously applied layers of paintwork, based on the use of different principles.
Removing paint from wooden surfaces is carried out in the following ways:
- Mechanical. The work is performed using sandblasting equipment or rotating wire brushes. On relatively small areas of the wooden surface, old paint is removed manually.
- Thermal. Involves the use of industrial hair dryers or blowtorches. Under the influence of high temperature, the coating swells, after which it is easily removed with a spatula.
- Chemical. It involves the use of special compounds applied to wood. They partially dissolve the paint and ensure its peeling.
Having chosen a method for removing paint from a wooden surface, you need to take care of protective equipment. Goggles, respirators or masks and protective gloves will be required, and safety precautions should be observed during the work. At the end of the operation, the wooden structure is cleaned of dust and debris manually with a brush or by blowing it with compressed air.
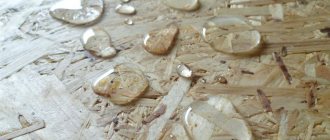
Degreasing surfaces
The base from which the old coating has been removed usually has contaminants of a very different nature. They reduce the adhesion of putties, primers and paints to the surface; they need to be cleaned up. How to degrease a wooden surface before painting and preparing? To carry out this operation, solvents based on white spirit or compositions developed specifically for this purpose can be used.
There are other degreasing technologies: immersion in special ultrasonic baths, treatment with solvent vapor or dry ice. This technique involves the use of special equipment and is used in specialized enterprises.
Degreasing and sanding wooden surfaces
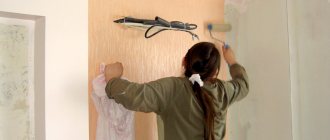
Application of primers
The next stage of preparatory work is to strengthen the foundation with special means. For these purposes, acrylic penetrating primers are used.
Application of the composition to the base is possible in different ways:
The first option using a compressor has maximum performance. This technology, among other things, ensures uniformity of the layer and does not allow gaps.
Applying primer to a wooden wall with a brush
Wood leveling
As the base dries, you should proceed to applying putty to the wood to eliminate indentations. For these purposes, ready-made acrylic-based compositions are used. This putty after polymerization becomes hard and has good adhesion to the material. Preparing wooden surfaces for painting involves sequential application of the composition in several layers and drying each of them.
The operation is performed in the following way:
- The master takes a small amount of putty from the container and removes the excess with a second tool.
- Applying the working edge at an angle to the surface, fills the recess with the composition.
- Excess putty is removed with a tool, and it is leveled.
- After the previous layer has dried, the next one is applied.
The prepared base is left alone for complete polymerization of the putty. This is followed by sanding with fine sandpaper and applying a primer. The drying time for putties and primers can range from several hours to a day.
Filling gaps between boards
Choosing a coloring agent
Without preliminary surface preparation, painting bathroom tiles is impossible. That is, you can’t just take it and apply paint to the tiles. This is monkey work, which will become unusable after several water procedures. Tiles simply painted with any paint will not differ in appearance or durability.
To paint ceramic tiles, you need to apply a layer of primer, then putty, and only after both layers have dried and the top one has been sanded using sandpaper, you can begin the actual painting process.
Is it possible to paint tiles without a primer and putty layer? Even if it’s someone else’s apartment, urgently being prepared for sale, it’s still not allowed. The tiled surface will inevitably demonstrate joints, chips, unevenness and defects through all layers of applied paint.
Even the putty must be purchased in gray or white if you are planning a light tone for the walls, and as dark as possible if you suddenly have the fantasy of making dark walls in the bathroom or toilet. But you will have as much money to paint tiles over a leveling layer as there are types of putty on sale:
- oil paints;
- nitro paints;
- epoxy enamels;
- alkyd enamels;
- acrylic paints.
If you come across a competent seller, he will advise you to take all three construction products from one source, for example, for epoxy enamel - an epoxy-based primer, and for alkyd - alkyd. He will also tell you how to paint ceramic tiles of different materials so that the layer lasts as long as possible.
Main advantages and requirements for sealants
Many people are interested in the question of which sealant is best for the bathroom. The requirements for such materials are extremely simple and clear.
The sealant must primarily seal the seams and joints being treated. This means that after formation the composition must be strong enough.
At the same time, the elasticity of the sealant is also important. After all, the plumbing fixtures are not tightly screwed to the walls. It can move under the weight of a person.
Protection against the appearance of fungi and other harmful formations is mandatory. The sealant must be vapor-tight and not exposed to high temperatures.
The second point is especially important, since some baths tend to heat up.
The sealant for the shower stall should cling well to the plastic and PVC panels. After all, it is from these materials that the cabin body is created.
Environmental friendliness and safety of the composition are also important. Still, we will use it in the bathroom, and this is the main room for hygiene.
Advantages of sanitary sealants:
- Sealants are not exposed to steam and moisture.
- The composition of the sealants prevents the appearance of harmful fungi, mold, etc.
- Sanitary sealants are relatively inexpensive and easy to use
- If desired, the sealing seam can be removed using a sharp spatula or utility knife.
- Even a person without experience can cope with applying the sealant.
- Most products of this type practically do not react to excess amounts of steam, high temperatures and temperature changes.
- Modern sealants adhere perfectly to any surface. Moreover, there is a special adhesive sealant for the bathroom. This material is capable of gluing surfaces together.
Cons of sealants:
- Cheaper samples become dirty over time, which spoils their appearance.
- Without masterful skills, it is difficult to create a perfectly even and beautiful seam.
- Sealants dry fairly quickly, and once dry they are difficult to remove. You have to remove the residue using tools and solvent.
Types of material
Sealants consist of a polymer, a filler and several by-products. As a rule, they are distinguished by the type of polymer. All other particles are optional and can be present in sealants of any type and purpose.
The varieties are as follows:
- Silicone sealants
can rightfully be called the most popular sealing compounds for the bathroom. Silicone has all the properties that are so necessary for materials of this type. It is elastic, clings well to any surface, does not allow moisture to pass through and does not react at all to temperatures. It is worth noting the durability of silicone seams, which can be used for 40-50 years. - Acrylic sealants
form a stronger seam. But this is also their disadvantage. Once the sealant dries, it forms a substance that looks more like plastic. Acrylic sealants are cheaper than silicone and are easier to apply. They contain no solvents or acids, so you can work with them without additional protection. - Silicone-acrylic compounds
are a combination of the two above-mentioned substances. Products of this type combine all their positive qualities. The only disadvantage we can note is the impressive price. Silicone acrylic is used to create sealants with adhesive properties. - Polyurethane sealants
are used less often in the bathroom than silicone ones. They are more suitable for working with concrete, tiles and plaster. The polyurethane composition forms a durable and moderately elastic seam. The adhesion of polyurethane sealants is considered the best in its class.
Separately, I would like to note such a phenomenon as sealant tape for the bathroom. This is a separate building material for sealing joints between the bathroom and the walls.
It is a tape made of protective insulating material, which just needs to be glued around the perimeter of the structure. It's easier to work with tape, and it looks good.
But it has the property of peeling off after a certain time.
Preparing for work
It is very convenient to use sealant for a shower or bathroom. The application process is simplified to the limit. Attention should be paid rather to the preparatory processes.
First you need to prepare the work surface itself. It should be cleaned of dirt, dust and unnecessary elements. If you are sealing a joint on old surfaces, it is best to lightly rub them down with sandpaper or something similar.
This way you can remove excess particles from the base. For example, powder from the wall or remnants of old paint.
It is advisable to degrease the surface with acetone or gasoline. After degreasing, the room should be ventilated and left for 30-40 minutes. During this time, everything will dry and the odors will disappear.
It is recommended to cover the area of the future seam with mounting tape or masking tape. It will protect the nearest parts of objects from excess sealant. Beginners should definitely use masking tape.
It is important to remember about personal preparation. After drying, the sealant may emit pungent odors, and once it hardens, it will be difficult to remove. It is advisable to have gloves, a respirator and goggles with you.
Preparation is completed by installing the cartridge into the gun and cutting a hole of the required diameter in a plastic cone.
It is difficult to name the best sealant for the bathroom. Each composition is better suited for a specific case.
It is advisable to use polyurethane sealants on concrete or plaster. Such compositions have better adhesion with these materials. Polyurethane can be used to successfully insulate baseboards and seams between tiles.
Knauf acrylic compounds can be used if you don’t want to deal with unnecessary hassle. Acrylic is easier to apply, it costs less, and in operation it is practically no different.
It is advisable not to use acrylic on wide joints. There the seam can develop a microcrack.
Silicone is suitable in any situation. If you are wondering which sealant is best for a shower stall, then choose silicone sealants. It is difficult to name a more versatile and reliable material.
Silicone-acrylic sanitary sealants are needed for more specialized work. They are used by professional builders during mixed work and creating decor from special materials.
Sealant tape is the simplest option and is worth buying if you want to quickly and cheaply seal the seams between structures. It is also useful to use before major repairs.
Of the specific manufacturers, I would like to highlight the company. Bathroom sealant moment is a fairly well-known building material with a reasonable price and excellent characteristics.
Application of material (video)
The immediate process of transformation
Before painting the tiles, you need to apply a primer. Commercially available primers usually come in different types, and are a liquid composition for restoring an old surface or creating a new, uniform surface.
If you need to paint a smooth, dense surface (laminate, tile, glass, plastic), primers are used on surfaces that do not absorb water (high adhesion). They adhere perfectly to very dense and smooth surfaces. This is the optimal solution to the problem of how to paint tiles. But you can’t paint over the primer either. First, the primer is allowed to dry, then a putty layer is applied, and this is also allowed to dry.
On video: how to choose the right primer.
There are tips to paint the tiles in the bathroom without resorting to a second layer, but even special paints and primers that do not contain quartz sand will not give the wall such a refined look as applied putty. Special compositions with all biological additives, antimicrobial and antibacterial properties, water-emulsion and waterproof, adhere much better to a puttied surface that has been sanded with sandpaper to a perfectly smooth state.
The kitchen interior may not require such a specialized coating as the walls in the bathroom, where it is constantly damp, but perhaps it is worth taking care of purchasing a high-quality and long-lasting product so as not to have to deal with new repairs in the near future.
Sandblasting
After the surfaces have been cleaned before gluing, they are washed in clean water to remove small particles, dried thoroughly and degreasing begins.
How to degrease the surface before gluing? Typically used for this:
The main thing is to remember that even if there are no visible grease or oil stains on the surfaces, it is necessary to carry out the degreasing procedure. This is necessary to improve adhesion and joint quality.
How to degrease a car body
There are two types of degreasers: complex factory-produced products or simple ones, such as solvents. Today, auto chemical manufacturers supply many modifications of degreasers. Every well-known brand has developed a proprietary composition. Their release form can be different:
- solvents with an organic or artificial base;
- alkaline emulsions in water;
- lint-free wipes impregnated with the active substance.
The most famous grease remover is white alcohol. It removes organic grease well, as well as rubber and bitumen stains.
The list of solvents also includes:
- acetone;
- kerosene;
- The solvent available in every garage is gasoline.
However, all of them are highly fire hazardous. Handling them requires strict adherence to safety rules. They can have irreparable negative impacts. Without danger, these substances can only be used on metal surfaces that are in plain sight: pipes, profiles.
To remove inorganic fatty contaminants, other chemical compounds are suitable - Nefras-2 and Solvent.
A new word in the auto chemicals market is universal “anti-silicones”. Their properties:
- perfectly removes all types of fat deposits;
- do not have an aggressive effect on the metal.
Anti-silicones are suitable for painting, polishing or thorough car washing. But another degreaser, conventionally called “antistatic,” works better on plastic parts.
Before polishing
The best body degreaser before polishing is a fine composition mixed with lubricant in the following format:
- clay;
- scrub wipes;
- scrub gloves.
Note! The diameter of the abrasive chips should be minimal, otherwise there is a danger of damaging the paintwork with scratches.
Before painting
Antisilicone is a universal degreaser before painting. It can be for coarse, medium or fine processing, and options have appeared specifically for plastic. The second required component is the final degreasing composition with a water-alcohol base. It removes contaminants to which classic antisilicone is immune - salts, weak acid solutions.
Popular compositions for degreasing before repainting are BR-2, Nefras S2, Sitranol, DINITROL.
In this case, it is better not to use solvent 646 and its analogues. The same goes for acetone.
Before applying tape
The use of aggressive agents should not be allowed. The best option is factory-made anti-silicones. Classic alcohol-based degreasers are also suitable.
Before washing
If traditional car shampoo is not able to remove grease stains on the body, anti-silicone will also help. It is necessary to use a finishing composition - wax, polish. They:
- protect paintwork;
- give the car a “rich” look.