Why do you need to prime drywall?
Do I need to prime drywall before applying putty? This question causes ambivalence among many. But anyone who is familiar with gypsum board first-hand knows how things are with its finishing. Especially when the plasterboard surface is prepared for wallpapering or ceramic tiles.
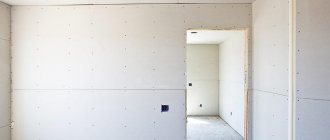
The thing is that the cardboard surface is very flat and smooth, so the adhesives do not attach to it one hundred percent. But that's not all. When attaching gypsum board sheets to a metal frame, slight warping of the sheet itself occurs. In places where screws are installed, the plane is pressed in, and, conversely, where fasteners are missing, it becomes convex.
And such a plane must be leveled. This is where putty mixtures are used. And so that they adhere well to the cardboard surface, a primer solution is used. In addition, primers act as antiseptics. So after applying them, neither mold nor fungi will appear.
Possible errors when applying primer
Let's turn to the experience of professionals. What mistakes can beginners make, and why should they simply not be made?
- Many people forget to prime the joints of gypsum board sheets. Usually these are grooves formed by chamfers, which are cut with a plane during the installation of the material. They must be dusted and primed before applying putty.
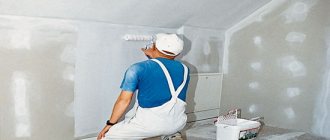
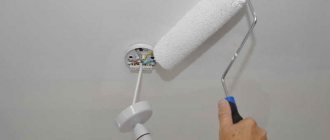
- Be sure to prime the entire plasterboard surface before
applying putty. This must be done with a roller. There are no requirements here, the main thing is that the mixture is applied to the entire area. - Each applied layer must be dried. This usually takes four to six hours. Much will depend on the temperature inside the room.
- If the plasterboard wall will be painted or wallpaper will be pasted onto it, then you can use a simple shallow penetration primer. Finishing materials of greater mass, for example, ceramic tiles or heavy wallpaper, then only penetrate deeply. This type will strengthen the cardboard layer and make the adhesive composition more effective.
- If there is any doubt that the primed surface has good adhesive properties, then a second layer can be applied. But the first layer should dry well.
We hope that we have dispelled your doubts about whether it is necessary to prime the walls before puttying. The most important thing to understand is that this cheap material, which you can easily apply with your own hands, works wonders
And it doesn’t matter whether the wall in front of you is an old one or a newly built one. In any case, a primer must be used
We look forward to your comments on this article. It would be interesting to know your opinion. Maybe someone will add more information and tell you about their personal experience.
A primer for walls under putty prepares surfaces for finishing work. The solution is able to create a reliable, strong adhesion of the base to the finishing layer, which facilitates further actions.
Variety of soils and finishing materials
Types of solutions and features of their choice
For interior work, cement, lime gypsum plaster or special compositions based on gypsum and cement mixtures can be used, the use of various fillers gives such materials special properties, such as plasticity, additional wall insulation, and sound insulation.
Before you start plastering brick walls, you need to determine how you will do this and what solution to use.
To perform this work, the following materials can be used:
- drywall, used for dry plaster;
- cement sand mortar;
- mortar;
- clay mixture;
- gypsum plaster.
Until recently, brick walls were usually plastered with cement mortar, but now gypsum plaster is increasingly used.
The technology for performing work using various mixtures is the same, but when using gypsum solutions, it must be taken into account that they set quickly , so they need to be prepared a little.
Which is better
Experts consider cement plaster to be the best option for brick walls. This is due to the fact that it is easy to apply and its cost is low.
Another advantage of this solution is the ability to make a layer up to 7 cm thick, which allows you to qualitatively level the surface of the walls.
If there is a need to create a layer of plaster more than 2-3 cm thick, then the wall is reinforced using a special mesh.
Do I need to prime before applying?
Gypsum compounds are often used to finish a brick wall; their advantage is that the surface does not need to be primed, since this solution has high adhesion.
If there is a need to plaster finishing bricks, then a primer and, in some cases, reinforcement must be used.
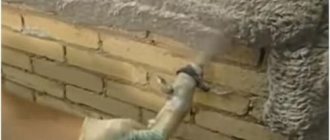
Such surfaces are very smooth, so to ensure normal adhesion of the plaster to the brick, additional measures must be taken.
What is the best primer before applying the solution? To carry out priming of brick walls, it is necessary to choose compounds that have the inscription “deep penetration”.
Subtleties of application
It is best to apply the primer in two layers: the first is placed between the wall under the plaster and putty, and the second after putty. Then the applied materials will not be able to peel off or crumble. The primer forms a protective layer, allowing the two layers inside to firmly connect (adhere).
Everyone has the right to choose the soil that they consider most suitable for the walls in their home. The variety of assortment allows you to replace them one with another, it is only necessary to take into account the degree of humidity and air temperature in the room. A universal material that can treat any surface is an acrylic mixture. Before applying to the wall, the composition is diluted with water.
The mixture of medium penetration is applied to surfaces under wallpaper or before painting walls. Wallpaper should not be heavy.
For others, deep penetration mixtures are used. In this case, the wallpaper will last for a long period of time.
The process does not require any special skills or abilities.
The mixed primer is poured into the container. If the mixture is dry, then it is diluted with water. If the solution is concentrated, then it is prepared taking into account the proportions indicated on the package.
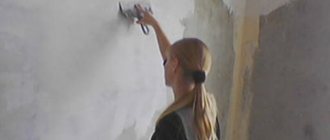
Next, the walls are coated with a brush evenly and thoroughly, especially in places where there were cracks or damage. When the walls are old, then in order to strengthen them efficiently and reliably it is necessary to apply the mixture in a thicker layer. If the base is porous, then the soil is applied until the hollows are completely filled. The solution is applied with a roller from bottom to top. Distribute the solution over the entire area of the base.
Drywall can also be processed in a similar manner. The entire surface is evenly treated with the prepared (diluted with water) mixture. Use a brush to clean the joints and areas for screws. The subsequent drying time of the solution depends on its type.
After the primer has dried, a thin layer of finishing putty is applied to any surface. This is how the walls are leveled. Reinforced tape is glued to the drywall at the joints. After drying, it is necessary to apply the final primer again.
Preparatory work
Any primer for walls under plaster requires preparation of the walls. To work you will need a brush, a solution tray, a roller or a spray bottle. Before applying the composition, it is necessary to carry out mechanical treatment of the surface in order to eliminate unevenness, seal cracks or remove the old coating.
For example, before priming concrete walls before plastering, a number of additional operations should be carried out:
- Scraping;
- Grinding. It precedes the painting process and also allows you to remove unevenness;
- Puttying. Required for damage spread over a large area;
- Repairing cracks and deep scratches;
- "Fine" alignment.
Before applying the composition, it is necessary to perform mechanical treatment of the surface.
Walls
Standard wall treatment before plastering prepares the surface for two types of finishing:
- Coloring. It is advisable to remove all layers of old paint, clean and sand the front side. Sometimes leveling may be required - there are special putties for this. To achieve good coloring, it makes sense to choose a special color primer;
It is advisable to remove all layers of old paint, clean and sand the front side. - Plastering. The quality of the preparatory work will determine the durability of the decor. For example, a primer for gypsum plaster “loves” the presence of roughness and stabilizing the porosity of walls.
The primer for gypsum plaster “loves” the presence of roughness and stabilizing the porosity of walls.
A properly prepared surface will both ensure the necessary strength of the finishing layer and create the most even base possible.
Primer mixture
When choosing which primer to treat the walls before plastering, you should consider two key points:
- Surface type. “Crumbling” structures are recommended to be plastered with deep penetration primer. A base with a weakly absorbent surface can be treated with the so-called concrete contact. In other cases, standard universal impregnation is selected;
- Special properties. Sometimes, which primer is best for walls for plastering or painting will be determined by its specifics. There are mixtures with anti-corrosion additives, with an anti-fungal effect or insulating ones, for rooms with high humidity. In addition, combination primers-varnishes or primers-paints may be useful.
A base with a weakly absorbent surface can be treated with the so-called concrete contact.
Materials
Often the primer for plaster and the material of the walls determine the strength with which the decorative layer binds to the substrate. This aspect should also be taken into account:
- Cement, concrete (or equivalent). Soil with a mineral base;
- Chipboard, fibreboard. Alkyd compounds are the best option for priming walls before plastering;
- Glossy surfaces, synthetic paint. Acrylic primer is the best choice;
- Gypsum board. Mixtures with high penetrating power will be required.
Often the primer for plaster and the material of the walls determine the strength with which the decorative layer binds to the substrate.
Primer for drywall for wallpaper, painting and tiles
- After treatment with this material, the pores of the drywall are compacted, which can significantly reduce the consumption of paint and glue;
- The soil mixture has many positive qualities. Depending on the composition, it can protect against fungi, prevent fire, increase the service life of walls and partitions;
- The surface of the sheets is noticeably leveled after applying the mixture. It helps eliminate small depressions.
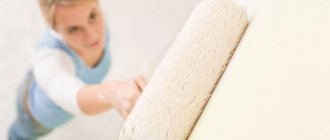
Adhesion is an increase in surface density, a decrease in pores in drywall. A very useful quality for this building material. In particular, such soil mixtures are necessary before painting or wallpapering. They help not only to wash dust and dirt out of microscopic cracks, but also to reduce their size and, as a result, significantly increase the service life of gypsum board. Photo - applying primer to drywall
Depending on the type of primer chosen, you need to wait until the surface is completely dry. Experts recommend waiting at least 24 hours regardless of the type - this will allow all components to penetrate deep into the drywall; Afterwards, another layer of primer is applied to consolidate the result. It also takes 1 day to dry. Next, you can begin finishing processing.
For the repair process, it is very important to choose a primer that is suitable for a specific type of work. There are many types of this building material, which vary in their qualities, composition and cost.
The first step is to clean the wall of dust and dirt. To do this, take a slightly damp cloth and wipe the surface. If necessary, repeat the process several times. This will allow the primer to penetrate deeper into the pores and eliminate unevenness. After this, you need to wait for the drywall to dry completely. On average, at normal room temperature it will take 2 hours. If the drywall is impregnated with primer, to achieve the required thickness of the finishing coating, you will have to apply 2-3 layers of putty, when one pass on an unprimed surface with good skill is enough. Betocontact consumption is approximately 0.350 kg/m2, you can work at a room temperature of at least 5 degrees. The price for betocontact is slightly higher than for a regular primer that does not have its properties. But this is the case when it is not worth saving - the result is more expensive. Cheap and high quality can only happen in an alternative reality, where mutually exclusive phenomena can calmly coexist.
- metal painting;
- concrete plaster;
- wood varnishing;
- surface treatment before puttying;
- applying finishing materials to old surfaces.
What is the best primer for drywall? This question can be answered unambiguously. Acrylic, deep penetration, from well-known manufacturers.
As for drywall, this is exactly the case when “you can’t spoil the porridge with oil.” All those properties that a high-quality, general construction primer has when processing gypsum plasterboard will be used and will most favorably affect the quality of subsequent finishing work. During renovations, you want to save as much as possible and not spend money on unnecessary materials. Is it possible to refuse to use primer without fear for the finished coating?
This question must be answered depending on what kind of finishing coating will be used. To understand in what cases a primer is not necessary to use, you need to understand why it is needed at all
What positive qualities does this material have? It is worth paying attention to the primer consumption for drywall per 1m2. This indicator is always indicated by the manufacturer on the packaging
You should always add about 10% to it to get a real result. It should also be taken into account that the consumption is indicated for one layer, but you will need to apply the primer in two layers (the second is applied after the first has completely dried).
Consumption usually ranges from 100-150 grams per square meter.
Additional information on the topic:
- Finishing a bathroom with plasterboard in a wooden house
- Plasterboard ceiling for living room finishing options
- Tutorial for installing a plasterboard ceiling with lighting and lamps
- How to repair a hole in drywall that was opened by mistake
- Plasterboard ceilings photo living room interior design
Types of primers for walls
- Ground-strengthening solution. It is an aqueous acrylic dispersion with additives. Used when treating walls with plasterboard and gypsum boards, lime or cement-lime plaster. In addition to improving adhesion to external paint materials, such impregnations prevent discoloration of the painted surface in problem areas and impart strength to the base. Used for interior work.
- Primer latex-acrylic mixtures. Used for interior and facade work. Primers penetrate deep enough into the surface, which allows them to be used under emulsion and acrylic paints.
- Solvent based primer. They have good absorbent and moisture-repellent properties, but are highly flammable. They have high vapor permeability. Suitable for priming painted surfaces, plastic, wood and asbestos-cement panels.
- Primer acrylic varnish. Used to treat the outer surface of walls. Cost of wall putty per square meter for painting? Improves the adhesion of subsequently applied materials, binds particles of installation dust and ensures normal hydrocirculation.
Treatment of external walls with soil solution
- Water-based silicate primers. They are well absorbed into external old cement-lime plasters, sand-lime bricks and concrete. They do not create a mineralized layer on the treated surface. Used for plastic substrates and previously applied silicate paint.
- Epoxy compounds. They consist of two components that are mixed and diluted with water. Such primers are suitable for interior work, when it is necessary not to disinfect, to strengthen the surface and to give the desired shade.
Builder tips
There are not so many of them, but nevertheless, you should not ignore these tips:
- Do not mix formulations from different manufacturers, even if their purpose is the same. The chemical composition is different, which will lead to deterioration in the functionality of the primer.
- Do not expose the soil to freezing. Short-term freezing will deprive the primer of the necessary performance characteristics.
- Use primers in accordance with the manufacturer's stated recommendations.
- Degreasing is best done with a nitro solvent or extraction gasoline.
- When applied to a wooden base, the knots are treated with special insulating materials.
- You can check the strength of the primer film by lightly pressing with a sharp metal object - the coating should not show tears or cracks.
Additional information: Deep penetration primer for walls for painting
This substance makes it possible to even out the colors of the final paint. Structural plaster for walls to be painted? In addition, during operation it will allow you to maintain the brightness and saturation of the applied color longer.
It is used for both internal and external surfaces subject to painting or plastering.
- improves paint adhesion to the surface;
- makes the base more durable;
- smooths out small irregularities;
- reduces absorption, which saves paint consumption;
- protects against fungi and mold;
- regulates moisture circulation by creating a vapor-permeable layer;
- accelerates the subsequent uniform application of finishing materials.
In addition, depending on the type of surface to be treated, the operating conditions, it depends on what kind of deep penetration primer is needed, antiseptic or, for example, universal, or maybe in general it is necessary to use a composition with increased adhesive characteristics.
Such compositions not only fail to cope with their functions, but also contribute to the destruction of the base, even if we are talking about durable concrete. “Eminent” manufacturers always carefully monitor the quality of their products - this is the key to being sold on the market.
- What is remarkable about an adhesive primer for painting walls? This composition improves the adhesion between the surface being treated and the finishing material. Such primers are used right before painting, puttying, wallpapering and other facing work;
- Strengthening compounds - they are used to increase the density, stability, and hydrophobicity of the surface that is being treated. It’s like this: if the wall is made using porous materials, special primers will penetrate deep into the pores and then harden. The result is a high-quality reinforcing frame - which is what is required.
To prime or not to prime, that is the question
In order for the finishing putty or plaster to adhere tightly to the walls, not fall off or crack over the entire area, and also not to deform and not allow fungi and black mold to grow, the walls must be covered with a layer of special primer
That is, correctly carried out, high-quality priming of the walls before puttying is a prerequisite for the quality and durability of your repair work, and this is extremely important
Important
Plasterboard or wood, concrete blocks or brickwork, all these surfaces have completely different compositions, therefore different levels of density and porosity. A primer before puttying, especially with the help of a properly selected composition, will strengthen all surfaces, making them more monolithic and significantly increasing the level of adhesion.
It is thanks to the unique compositions of modern primers offered by the industry that excellent adhesion to almost any surface is ensured, so the plaster or putty will stick like a glove. But these are not all the advantages that a high-quality primer, carried out in a timely manner according to all the rules, gives before putting on walls, which is worth understanding in a little more detail.
- The primer applied before plaster or putty qualitatively fills all the cracks and cracks and natural pores of the material, not only providing greater adhesion, but also significantly reducing the consumption of plaster material per square meter of area. Moreover, the cost of putty mixtures is much higher than that of primer solutions, so the savings are obvious, and with major repairs, and even more so during construction, every penny usually counts.
- If the walls are not freshly built or have some kind of colored spots, then people often face such a problem as the appearance of the outlines of dirt on the surface of the final, fine finish, which can spoil the entire impression of the renovation. A good quality primer for wall putty will allow you to “seal” all this on the wall, preventing it from appearing in the future.
- It will be much easier to putty the walls yourself if they have previously undergone a priming procedure, since the mixture lays on a similarly prepared surface much better and smoother, it adheres to it more strongly, does not flow, does not slide or float.
- Applying a primer on and under the putty with a certain composition can prevent a number of biological threats, for example, the development of black mold or mildew, which can not only be unsightly, but also dangerous to human health and life.
Thus, the answer to the question whether it is worth priming the surface of walls and ceilings before applying putty to them is absolutely clear. This will not only help you get the job done much faster, but also protect yourself and your loved ones from the harmful effects of mold spores, prevent premature destruction of the plaster layer, and also significantly delay the need for repeated repairs over time.
There is another rather complex question that must be voiced, in view of the distribution of the material, whether plasterboard is required to be primed before puttying, since many builders are not at all unanimous in this regard. True professionals who follow technology understand that the top layer of this material is essentially just multilayer paper, and it doesn’t hurt to fasten all its layers together, which a special composition of the primer mixture will successfully do.
How to prime a wall
Before plastering, experts recommend applying two types of primers:
- deep penetration;
- special compositions for concrete and other smooth surfaces.
The first ones are similar in structure to milk. The smell of the drugs is neutral. When dry, they form a thin film. If overheated, an unpleasant aroma may occur that disappears after drying.
The second group includes concrete contact and similar mixtures. The product is high quality, reliable, penetrates very deeply. The most expensive, but the highest quality drugs include Feidal products.
Apply primer only to prepared surfaces. They work like this:
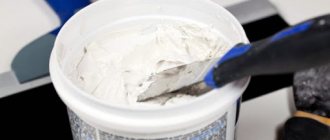
- The product is diluted with water in the proportions indicated on the package and mixed thoroughly.
- The required amount of composition is poured into the dosing container. Impregnate a roller or brush with the product.
- Treat the wall with a primer, regularly moistening the tool in the mixture.
- To allow the primer to dry, take a break for the time specified by the manufacturer.
- Processed again.
- After the composition has hardened, plastering is performed.
You should not neglect the application of primer, nor should you skimp on them. The video below shows how to properly prime a wall.
Types of Primers
Types of primers and prices
Having established that primer is an important component of any renovation, the next question should be: “What is the best primer for putty walls?” It’s impossible to answer unequivocally here, because there are at least 7 varieties of them on sale.
And in order to choose the one you need, you should familiarize yourself with its composition, action and what materials it interacts with. Because each primer for walls before or after putty interacts with the base differently.
Types of primers
- One of the most common is acrylic primer. It is an excellent tool for treating loose surfaces. The advantage of this primer is that it dries quickly (up to 5 hours), is easy to apply with a roller or brush, and at the same time adheres well to surfaces made of concrete and wood, plasterboard, or gas silicate blocks. But it interacts poorly with metal, which affects its further corrosion. It has excellent adhesive properties, giving the loose and porous surface the necessary strength and stability. Priming walls for putty with this material will ensure the durability of your finishing repairs, and your pocket will be full of money. Acrylic primer is suitable for use both outside and inside a residential building.
- The next equally popular type of primer is alkyd. It is used primarily for wood flooring. Provides a durable contact layer that is rough to the touch, on which putty, plaster, or gypsum can be subsequently applied. It can also be used for both external and internal work in a residential building. Drying and complete hardening of this material occurs at room temperature for 15 hours.
- Glyphthalic primer is often used for finishing work. It is advisable to use it exclusively for dry rooms. The full hardening cycle is 24 hours at room temperature. The advantages of this primer include the ability to treat metal surfaces.
- The next type of primer, classified as synthetic, is polyvinyl acetate. It has an exclusively special purpose for painting with polyvinyl acetate-containing paints. Recommended for use for outdoor work. The polymerization process takes only 30 minutes.
- The next, no less toxic, but more effective is perchlorovinyl primer. It is prohibited to use it indoors due to the high concentration of chemically active substances. But for outdoor work this is one of the best options, despite the fact that it dries in just 1 hour. And it can also be used on a metal base.
- The next type of highly toxic primer is polystyrene. It adheres well to any materials, which makes it an excellent option for outdoor use.
- The next type is phenolic. It adheres well to wooden and metal surfaces, which is why it is not recommended for use indoors. The complete hardening cycle is 15 hours.
How to choose?
Since it is problematic to thoroughly study information about primers in a store, learn several nuances of choice.
- In a dry room, it is advisable to use a glyphthalic primer on a metal surface. It dries within a day.
- Perchlorovinyl primer can only be used for exterior use. It is toxic, suitable for any surface, dries in 1 hour.
- The polyvinyl acetate variety is not suitable for purchase for plaster. This is a variety for subsequent painting.
- Phenolic primer is not suitable for treating indoor surfaces. It is good for finishing facades and dries in 14 hours.
- The synthetic polystyrene variety is suitable for covering solid wood surfaces and plastered substrates. It is extremely toxic.
- The best option for indoor work is an alkyd primer. It dries in 10–12 hours and can be used to prepare the ceiling for decorative plaster.
- Acrylic is applicable for concrete and brick bases, foam blocks, and it can also be gas block, wood, chipboard. When working with a metal surface, it may cause rust.
In addition, look at the expiration date: if it is close to the end, it is undesirable to take the material. However, if the volume is small and repairs are planned immediately, you can buy soil. After the expiration date, the quality and performance characteristics of the soil change. Experts recommend choosing a set of products from one manufacturer for plastering.
Wallpapering on drywall
Before gluing the coating onto drywall, it is worth preparing the walls for the appropriate type of wallpaper. Most often today in repairs they use: non-woven, vinyl types of wallpaper, as well as trellises for painting and paper.
How to glue non-woven wallpaper
A finishing coating, distinguished by its size, is often used for gluing plasterboard surfaces. They allow you to save on waste and reduce the time of pasting.
Non-woven wallpaper
Before gluing non-woven trellises onto drywall, you need to carefully prepare the walls:
- reinforce joints;
- cover the plasterboard surface with a primer mixture;
- putty the plasterboard surface with 1-2 mm gypsum putty;
- coat the entire surface with primer again.
Surface priming
Otherwise, the surfaces of the sheets of finishing material will be visible through the finish.
Otherwise, the technology is the same as when pasting conventional wallpaper.
How to glue vinyl wallpaper onto drywall
Plasterboard walls are puttied and the surface is primed. After preparation, the vinyl material is glued using conventional technology. Coat a piece of canvas, then apply glue to the wall and smooth it over the surface.
Vinyl wallpapers
Wallpaper for painting
After reinforcing the joints, the plasterboard surface is prepared for painting. For this purpose, puttying and priming work is carried out.
Special wallpaper for painting
The coating for painting must be glued end-to-end, which means there should be no unevenness on the surface of the plasterboard walls. Before gluing, the walls are primed with deep penetration compounds, this will greatly improve adhesion.
Paper wallpaper
These trellises are great for gluing them directly onto drywall.
It is only important to properly seal the joints with sickle tape or paper tape. It is also important to seal the attachment points, otherwise when smoothing the canvases, you can ruin them. Any adhesive compositions are suitable for gluing paper types of wallpaper; it is best to buy universal ones
Any adhesives are suitable for gluing paper types of wallpaper; it is best to buy universal ones.
Paper wallpaper
Before starting work, be sure to apply primer to the sheets 2-3 times, let it dry and only then stick it on. After such preparation, the drywall will not absorb moisture as intensively, and the glue will hold much stronger. Paper trellises are glued end-to-end or in an invoice; the gluing technology will not differ in any way from the usual one.
This video may be of interest to you:
How to glue photo wallpaper
To hang trellises with photo effects, you should not only prepare the surface, but also decide on the wallpaper option. Photo wallpapers are diverse, in addition to the usual created photo on the wall, there are many 3D options, as well as LED coating. They are sold by construction stores and online resources on order.
To apply wallpaper you need to fulfill the following requirements:
- The plasterboard wall is reinforced, primed, and puttied. If under ordinary trellises it is possible to leave minor defects, then for photo wallpaper the surface should be smooth and made to zero. Every small missed defect will spoil the created picture, in a certain light.
- Glue for this type of coating can only be purchased as recommended by the coating manufacturer.
- For LED wallpaper, the correct electrical wiring is carried out, according to the electrical diagram supplied with the trellises.
Options for realistic wallpaper are included in this video.
Accuracy and accurate calculations are required when purchasing photo wallpaper. The bright tone of the wallpaper may not suit the overall interior of the room, thus the entire plasterboard finish of the wall or partition will be damaged.
Properties and purposes of using primers
The need to use a primer when finishing premises depends on the characteristics of the surface and the material used.
The primer increases adhesion between materials, penetrates deeply into the wall and strengthens it. After this, the applied putty is smoothed out more evenly on the surface, and the layers adhere well to each other.
Another function of the primer is its ability to resist the development of fungus and bacteria. This composition significantly reduces repair costs - the surface after priming can be covered with a thinner layer of putty.
According to its characteristics, the putty is not capable of creating strong adhesion of separately applied layers. It serves another purpose - eliminating imperfections on the surface. The composition of the mixture, how it should be used and how it will help, can be read in the instructions on the package. But there are characteristics inherent in almost any primer composition:
- Increases the adhesion ability of the materials used - the applied primer mixture increases the adhesion ability of the putty. This directly affects the ability of the applied putty to adhere to the surface being finished.
- Fills even minimal cracks and micropores present on the wall surface. The components of the composition used, being absorbed in defective areas, gradually polymerize. This layer does not allow moisture to penetrate the wall material, disrupt its structure, or spoil the finishing layer. The primer protects against most destructive influences.
- Forms a thin protective film over the entire treated surface. Due to this, the layer of applied putty is placed evenly. Strength also increases, the smallest particles of the material bind together and dust removal occurs.
Note! When choosing a certain type of primer, you need to take into account not only the cost of purchasing the material, but you also need to take into account the operating conditions of the structure. By analyzing these factors, you can figure out the composition that is suitable for specific conditions.
Wallpaper primer: which one to choose?
Construction hypermarkets are overflowing with various types of primer and this makes the choice much more difficult for buyers. The type of wallpaper primer depends on the components included in its composition. Let's look at the most popular types:
Acrylic is a universal, easily soluble primer that is odorless and will become dry after 5-6 hours. Suitable for walls made of wood, plywood, concrete and brick, but it is strictly forbidden to apply it to metal.
Alkyd – providing strong adhesion, suitable for external and internal walls, dries in 15 hours. Ideal for treating wooden walls in country houses.
Hyftal is a special impregnation created for surfaces made of wood and metal. This is the only type of primer that will keep wallpaper inside your metal garage.
photo from the site https://kraska.guru
Choosing which primer for walls under wallpaper is best should be based on both the type of surface it will cover and the type of wallpaper chosen. Acrylic primer for wallpaper is used on almost any surface, as it intensively penetrates its structure and provides reliable adhesion to the finishing material, due to which it is considered to be a universal and most commonly used type.
Among the advantages are the following points:
Reduces the surface's ability to absorb moisture.
Saves you money because it reduces the consumption of wallpaper glue.
Preserves walls from cracks.
It is diluted with water without losing its properties.
photo from the site https://strport.ru
Acrylic primer is divided into four subtypes:
Deep penetration primer for porous substrates. In other words, a deep-penetrating primer can be called strengthening. It is used when finishing weak surfaces (eg old plaster).
Adhesive for dense surfaces. It is preferable to use with decorative plaster or dense concrete walls.
Primer (universal primer), which creates moisture resistance of the surface and, when applying several layers, corrects the appearance. A water-repellent primer will be a good option for finishing main walls.
Impregnating primer that smoothes rough surfaces.
Many people are concerned about the choice of primer for liquid wallpaper, which is a finishing decorative coating made from a dry mixture of cellulose fibers, silk and other fillers, which in its properties is more similar to plaster than to classic wallpaper. Using wallpaper glue, the dry mixture turns into liquid. This is how liquid wallpaper appears on the wall, which has become popular due to its ability to cover any surface and have a variety of shades.
photo from the site https://etotdom.com
When preparing a wall for finishing with liquid wallpaper, it is recommended to apply 2-3 primer layers.
The most suitable primer option for liquid wallpaper is acrylic, because it is easily and evenly applied and dries quickly.
Deep-penetrating primers are also used because they penetrate well into the base and, when dry, create a dense film through which moisture does not pass. Another advantage of a deep-penetrating primer is that it smoothes out uneven surfaces.
You can apply a primer that contains quartz dust. The layer of quartz primer for liquid wallpaper will be somewhat rough, which will promote strong adhesion of the surfaces. You may even want to make your own by adding quartz dust to your regular primer.
Putty work, priming
After preparing the joints, the drywall should also be primed before wallpapering and putty. This will improve adhesion. Failure to apply a finishing layer leads to some problems:
- the elevation of the seams above the surface creates unevenness on the canvases after gluing;
- It will not be easy to remove the wallpaper when replacing it: it will come off along with pieces of cardboard and plaster;
- the joint lines of the plasterboard sheets are visible through the thin wallpaper.
Puttying is performed in the following sequence:
- a solution is made from the finishing mixture with the expectation of working for 45 minutes so that it does not set;
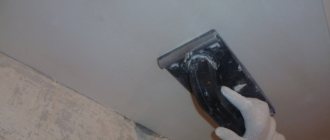
- using a wide spatula, apply it evenly to the wall;
- After drying, the applied layer is sanded with sandpaper (grater) until a smooth surface is obtained.
When the sanded surface is ready, some craftsmen may have a question: is it necessary to prime the drywall before gluing the wallpaper directly? Practice shows that this is necessary, as it prevents the rapid absorption of glue and provides better adhesion of materials (wallpaper to the wall). To learn how to finish a gypsum board base, watch this video:
When processing walls, the floor must be covered with polyethylene
To prime a prepared plasterboard surface, it is enough to purchase the composition in a ready-made (canisters from 5 to 10 liters) or concentrated (containers of 1-3 liters in volume) state.
The first can be used to immediately treat the work surface, and the second after dilution according to the specified recipe. The floor should be covered with plastic film to avoid stains.
The fewer defects on the treated surface, the better the wallpaper looks. We must strive for this.
The considered technology for carrying out preparatory work makes it possible to obtain a decorative wallpaper covering for many years without repair. Even a novice in finishing can handle all the work.
Before carrying out work, ensure that the area is well ventilated. Although acrylic primer is not a highly toxic material, it is still not recommended to breathe its fumes for several hours. If a home craftsman does not have experience in performing this type of work, the question quite naturally arises: is it necessary to prime the drywall before puttying. It will be useful to find out the opinion of professionals about in which cases it is necessary to use a primer, and in which cases this procedure can be skipped.
The color of the primer, which will appear from under the thin wallpaper, is of great importance. For light wallpaper, you need to choose a mixture of only white color; for heavy bright or dark materials with embossing, a composition of any shade is suitable. Drywall is one of the most popular and relatively inexpensive materials for leveling walls; it has many valuable characteristics for creating a comfortable environment, among which is lightness in installation, high speed of operation, excellent sound and heat insulation, absence of foreign odors, fire resistance, environmental friendliness. In the process of DIY repairs, the question inevitably arises: is it necessary to prime drywall before wallpapering and how to do it correctly.
Work on finishing the outer corners of a room is the most labor-intensive. This is primarily due to the low strength of these areas. Further processing of plasterboard walls for wallpaper begins with sealing the seams.
This process uses reinforcing tape, and it comes down to a number of actions: As can be seen from the above technology, preparing gypsum plasterboard walls for wallpapering includes a number of procedures, including priming. In this case, the primer is applied before each new layer of finishing: puttying seams, puttying walls, between layers of putty and before wallpapering. Finally, dust is swept away from the walls and they are impregnated with a deep-penetrating acrylic primer. It is necessary for better wallpaper adhesion and saving glue. Serpyanka is a lavsan or fiberglass tape with an adhesive applied to its surface.
Outwardly, it looks like a regular medical bandage. Serpyanka should be glued as tightly as possible to the joints between the sheets, avoiding the appearance of air cushions. If the serpyanka does not stick well, you can add a small amount of PVA glue. Preparing drywall for wallpapering begins with a preliminary inspection of the walls. The joints of the slabs that require preliminary trimming are determined, and the depths of the screw heads are controlled so that they do not interfere with the finishing of the surfaces.
If necessary, defects are eliminated.
Related Posts
- Wallpaper for the bedroom
- How to calculate wallpaper: how many rolls and glue are needed to cover a wall. methods for calculating and determining the quantity of materials
- How to glue wallpaper on painted walls: water-based, oil and acrylic coating
- How to glue vinyl wallpaper on non-woven backing?
- How to glue wallpaper: common mistakes in gluing yourself
- Technology of painting wallpaper with water-based paint
- How to tear wallpaper off the walls if it won't come off
- How to prime walls before wallpapering?
- How to glue fiberglass correctly?
- Acrylic deep penetration primer: selection, purpose and application technology
- Liquid wallpaper. types, how to make, how to apply and more
- Primer "concrete contact"
- Liquid wallpaper
- Wallpaper combination: modern options and rules for use in the interior. 105 photos and videos gluing master class
- How to glue corners with non-woven wallpaper
- Is it worth replacing wallpaper with paint in an apartment: what to paint with, is it possible to do the work yourself, and what paint to choose for the wall
- Which wallpaper to prefer: vinyl or non-woven
- Vinyl wallpaper with non-woven glue
- Do I need to apply a primer before wallpapering drywall?
- How can you glue old wallpaper that has come off the walls and how to do it correctly?
- Is it necessary to apply the finishing putty after the starting putty if the walls are being prepared for wallpapering?
- Choosing paint for wallpaper and recommendations for painting
- How to glue wallpaper on drywall
- Black primer: all about bitumen primers
- How to putty drywall for painting: tips from the experts
Read with this
- Wallpaper for the bedroom
- How to calculate wallpaper: how many rolls and glue are needed to cover a wall. methods for calculating and determining the quantity of materials
- How to glue wallpaper on painted walls: water-based, oil and acrylic coating
- How to glue vinyl wallpaper on non-woven backing?
- How to glue wallpaper: common mistakes in gluing yourself
- Technology of painting wallpaper with water-based paint
- How to tear wallpaper off the walls if it won't come off
- How to prime walls before wallpapering?
- How to glue fiberglass correctly?
- Acrylic deep penetration primer: selection, purpose and application technology