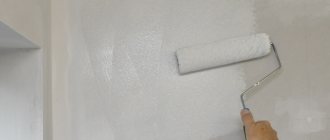
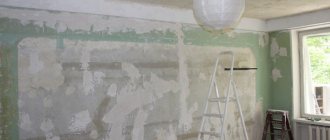
Sanding allows you to achieve a perfectly smooth ceiling
Correctly plastering the ceiling is only half the battle; to make it perfectly smooth, you will need to grind the surface. In this article we will take a closer look at how to sand a ceiling and figure out what tools and equipment you need to use to get the best result.
The work is not difficult, but requires accuracy and careful adherence to the technological process.
Is the procedure necessary?
Whatever layer of putty is applied to the wall, it must be sanded. Even the finest application with the best tools will not give a perfect surface. On the wall remain:
- small inclusions;
- roughness;
- gaps;
- other defects.
The tubercles that remain after working with the sharp end of a spatula may be visible.
It is best to use a large spatula to achieve maximum leveling area of the wall. But no matter how carefully and accurately the work is carried out, irregularities remain, which in the light stand out strongly from the main surface. When applying wallpaper subsequently, you should not allow even gaps invisible to the eye. Small distortions will cause poor adhesion of the wallpaper to the base.
The putty is sanded over the last applied ball. This will give the base evenness, eliminate invisible bumps and defects, and create a surface with an ideal texture where any finishing material will adhere well.
Sanding is done with a trowel mesh or paper abrasive. This is done manually or with a special electric sander with a mesh, which will be needed for finishing large areas, but at the end of the operation it is impossible to do without manual sanding.
Nuances, tips
A few simple recommendations. By following which you can improve the result, which is especially important if grinding is done for further coloring:
- Don’t neglect protection - a respirator and glasses will help you do better than without them. If dust gets into your eyes, you will rinse them with water for a long time, but you don’t need dust in your lungs at all - protect yourself to the maximum.
- Install the illuminator so that it shines from the side onto the plane. This way the existing flaws will become visible - the shadows from the unevenness will show where there is still work to be done.
- Clean both the tool and the work surface from dust. Small and almost weightless dust particles can greatly affect the result - you don’t want to get scratches on an almost finished surface. Use a rag or brush to regularly remove dust from everything used in your work.
- Do not try to cover a large area with your attention at once - you will definitely increase the speed insignificantly, but the risk of defects increases. It’s better to spend more time than to redo it again later.
The rest is just your effort and accuracy. If you approach the matter responsibly and do not rush to work anywhere in a measured manner, then the result will please you and you will not have to spend money on hired craftsmen who are not guaranteed to do better.
How to sand the finishing coat of walls and ceilings?
Sander
The sanding machine can quickly process large areas. The mechanization process is progressing at a good pace. Sanding takes on a higher quality appearance than hand-done work. There are 2 types of grinding machines:
- Pneumatic. It is light in weight and easy to use. The price is quite affordable, it runs on a compressor. The unit directs compressed air and makes the entire mechanism work. It is very profitable to use it for large volumes of work, since the cost of the equipment is justified for one major overhaul. But it is not profitable to use a sander to finish one room.
- Electric. Mobile devices that are slightly heavier in weight than pneumatic ones. They are also more expensive in price, but are perfect for home use. There are belt, orbital-eccentric and flat vibration models.
To sand thick layers of putty, use a belt sander. It is best used after applying and processing the starting composition. A special feature is the complete absorption of existing construction dust into the engine cooling fan.
Abrasive sponge with rounded edges
It is convenient to treat the surface with a sponge with a hard abrasive and round grains.
This method is good for the final finishing stage. The difference between abrasive sponges is where the grains are located. The grain size is important and will affect the quality and structure of the final layer. An abrasive sponge with rounded edges will replace sandpaper, as it has excellent wear resistance, flexibility, and it lasts a long time. There are universal types (for dry grinding and wet work).
The ideal surface is achieved by the manual processing method ; for this, it is good to use devices with an abrasive layer of polyurethane foam. They are needed for processing hard-to-reach places. The sanded base turns out to be very soft and moderately porous. Silicon carbide or aluminum oxide is bonded to the base of the tool. They provide the grit required for successful sanding.
Advantages of abrasive sponges with rounded edges:
- flexibility, impossibility of breakage even in hard-to-reach places;
- elasticity;
- the inability to make a curved layer due to the soft plastic included in the composition;
- spraying, which gives the tool durability;
- Alumina-based grains form the cutting base.
Thanks to the flexibility of the tool, the surface does not receive damage and is carefully ground at any angle of the grain tool. At any time , you can make any plane smooth if you take a sponge with an abrasive layer.
Sanding block
Such blocks have a compartment where all the collected dust accumulates.
This property of the tool allows it to be used in the most inaccessible and dirty places. The mesh in the bar has a perforated structure, all the putty passes through it. It needs to be replaced when it is partially worn out so that the appearance of the entire surface is not spoiled. To replace the base, you need to choose the right size, which depends on the width of the block. The wider the block itself, the larger the base will be. Meshes that are not suitable in volume may work, but the work will take longer. You have to press hard on the surface to achieve the desired smoothness and hide all visible defects on the wall.
Cleaning the finishing putty includes the same steps as the starting putty. Polish thoroughly, but carefully so as not to damage the putty layer. It is better to sand the finish coat with sandpaper if you do not have a sanding block.
Fine sandpaper
Sandpaper quickly becomes clogged with dust when used vigorously. It is changed more often than the mesh. You can purchase three types of sandpaper:
- a large roll from which the required size is cut;
- a small roller that may be suitable in size for the job;
- a rectangular block of standard sizes convenient for any type of work.
How to sand properly without dust?
Step-by-step instruction
The grinding process must take place in several stages:
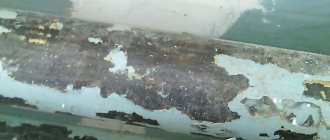
- After puttying, inspect the surface for minor defects. There should be no unevenness, voids, wet areas, or deformations on the wall that could interfere with work.
- Before sanding, wear all protective equipment: gloves, glasses, durable clothing.
- Turn on the lights if it's cloudy outside. If the day is clear, then the curtains are removed from the windows to make the lighting in the workroom brighter.
- Take a spatula of suitable size and use it to mow down all the large bumps and chips on the surface. Carry out the work as carefully as possible, so as not to waste additional effort on it later.
- First, primary grinding is performed to understand the boundaries of the processing area and the depth of sealing of small seams. They work with sandpaper from above, only after that they gradually, with smooth movements, move down and complete the processing stage.
The sanding process is much simpler than, for example, puttying or plastering. All you need to do is take a block, secure a piece of sandpaper or sanding mesh to it with clamps and start working.
You must follow the rule: first the movements are made from top to bottom, and then from left to right. You cannot sand for a long time in the same place. The tool must be moved constantly, not staying in one place to avoid gaps. If depressions have formed, do not try to smooth them out, but putty such places again, and only then sand them after they have dried.
- After sanding the main wall, emphasis is placed on corners and hard-to-reach areas.
- Then they begin wet cleaning, during which all debris is removed and dust is shaken off.
- Final sanding is carried out with small abrasive tools. At this stage, good surface lighting is necessary. After finishing sanding, the quality of the finish is determined.
Rules for laying the mixture
The mixture is laid according to certain rules so that later there are no problems with sanding. To do this, the wall is inspected, irregularities and flaws are found, due to which the quality of putty or decorative finishing will suffer.
The first layer should be applied as thick as possible. It is basic, basic, and does not require much alignment. They need to repair all visible imperfections and give rigidity to the wall itself. After drying, it will be possible to apply a thinner, neat layer (often the final, i.e. decorative) layer on it.
The first ball is applied with a spatula with a wide working base, the second can be applied with the same tool. But if you need to put a third one, you need a thinner one with rounded edges. This finishing layer, after drying, is subject to sanding.
Sand the putty on the walls carefully, without making much effort. It's better to use sandpaper. Do not press too hard on the canvas to prevent holes from appearing. There is also no need to align the recesses with the general level.
How to reduce defects to a minimum?
To ensure that as few defects as possible arise when sanding the putty, they work carefully and step by step. When the solution has completely dried, only then can you begin to level it, especially if the flaws on the surface are not very noticeable at first glance.
Sanding must be done with new tools, selected according to the type of surface being treated. If a coarse putty based on cement or lime was used, significant defects will be visible, which can be eliminated with coarse sandpaper. This stage of defect elimination is carried out only during primary processing. At the end, you should always sand the walls with the gentlest sandpaper.
Sanding after puttying the walls is a mandatory step , as it creates a good basis for further cladding.
If the leveling is initially done poorly, then further finishing does not always hide flaws and defects.
Technology
In general, what you have to do is one of the most tedious and time-consuming processes. You will have to keep your hands up all the time and the dust that appears during work will fall on your head - it’s unpleasant and you should protect your head with a bandana or at least a cap made of newspaper. A respirator is generally necessary - it will prevent fine dust from entering your lungs. And then everything will be very primitive - a child will figure out how to sand the ceiling after puttying:
- Having secured a sheet of mesh or sandpaper in a grater, you need to climb closer to the working surface - on a stepladder or sawhorse. Take a couple of nets or sheets of sandpaper with you so you don’t have to constantly run up and down.
- Work - using spiral movements, you will have to carefully “wipe” the entire existing surface without particularly strong pressure. Everywhere you need to put equal pressure on the instrument and therefore, as soon as signs of fatigue appear, take short breaks. There is no need to save time here - it will affect the result for the worse.
- Periodically change the mesh or skin in the grater. At first it will simply become clogged with dust and you can shake it out, but after a while the dust will be removed along with pieces of mesh or sandpaper and they will have to be replaced.
Actually, that’s all the wisdom is – it’s more tedious than complicated. It’s not worth saving a few pennies on purchasing a special grater, it will make your work easier and you will need much less time - tested. Of the two types of canvas - sandpaper or mesh, it is better to give preference to the latter. It will become less clogged with dust and will last a little longer, although it costs more.
In what cases is leveling not required?
Leveling walls with sandpaper should always be done. But there are small exceptions that justify refusal. For example:
- When it is planned to lay a new layer of plaster on top of the plastered layer. This is possible in heated garages, warehouses, utility rooms, where the appearance of the walls is not important.
- Surfaces treated with universal compounds should not be sanded. These mixtures fall on the walls independently and are distributed as evenly as possible.
- If wallpaper is pasted onto the treated surfaces or cladding with an interesting decorative material is to be done, then puttying and sanding can also be skipped.
- Leveling is not necessary for surfaces that will be coated with paints with visual effects. For example, when applying a picture in the form of a natural landscape. The special coating effect in the form of a thin layer of paint and varnish composition completely fills dents and small irregularities, and therefore does not require additional processing with grinding tools.
Sanding the base after puttying is necessary in almost 90% of cases. This makes the walls visually smooth, beautiful, even. Surfaces treated in this way look great and are suitable for further processing - for example, for painting, tiling or paneling.
How to sand a ceiling after puttying? All ways
If the ceiling is being prepared for painting or wallpapering, then after rough leveling the surface is smoothed with putty and sanded after drying. In everyday life, sanding the putty layer is more often called sanding or sanding - from the slang name for sandpaper “sandpaper”.
Highly qualified craftsmen perform the finishing leveling with putty so smoothly that in daylight or temporary lighting, the surface of the ceiling from a height of human height appears flawless, not requiring any additional processing. But this impression is deceptive - when the angle of incidence of light changes on the ceiling, small defects become noticeable, which in the light of a chandelier or wall lamps will be visible even after painting. The purpose of sanding is to eliminate such defects.
What you need to sand the ceiling
The range of sanding devices on the market is quite wide and allows you to choose a tool for both one-time small-scale work and professional use.
All sanding devices can be divided into two groups:
- hand tool;
- mechanized equipment.
Let's look at each solution in more detail, starting with the most popular among home craftsmen.
Hand tool
This group includes hand graters - a time-tested tool, the models of which differ slightly from each other in design and geometry.
The popularity of manual devices is due to a number of advantages of these devices:
- Wide availability of the entire price range, starting from one hundred rubles;
- Easy to use, does not require professional skills;
- Versatility in equipping with consumables - abrasive mesh or sandpaper of various grain sizes;
- High quality results.
The following versions of graters are available for sale:
Basic option
– a handle in the center and clamps with threaded wings at the edges. Proven for decades, hand-friendly design. The disadvantage is the time-consuming procedure for replacing the skin - unscrew the wings, tuck and center the new flap, align the jaws of the clamps before tightening the nuts. Plastic tools are less durable than steel ones, but they are lighter.
Grater of a classic design or in the form of a bar
, but with mechanical spring-type clamps for covering with sandpaper - more rational solutions that simplify and speed up the procedure for replacing the sandpaper. There are grooves for fingers on the long sides of the block - this method of holding the device is more convenient when sanding walls, but taking into account the ease of replacing sandpaper, the tool is practical and suitable for sanding ceilings.
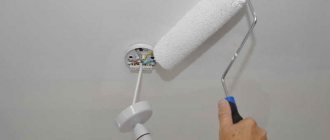
Sanding floats with articulated connection for removable telescopic handle
. The fitting can be designed for a standard handle included in the kit, or for a homemade one. The device is convenient when working from a scaffold or stepladder - it allows you to process a larger area without rearranging the support. With low ceilings, you can work with such a device without a scaffold, from the floor.
Hand graters with dust removal.
The device differs from a conventional hand tool in the connection pipe on the body, to which the suction hose of a household or construction vacuum cleaner is connected. Such a grater is more convenient when sanding walls, since the hose somewhat limits the movements of the performer, but if it is necessary to perform the work with minimal contamination, some inconvenience of using it on the ceiling is completely justified. Hand graters with dust extraction are 2-3 times more expensive than conventional devices
Elastic polymer sponge bars
with an applied layer of abrasive. This is an auxiliary tool of various configurations - rectangular, trapezoidal cross-section for processing corners and decorative interfaces (chandelier rosettes, stucco molding) with flat surfaces.
Abrasive for hand grinding tools
Two types of grinding material are used on graters and whetstones:
Abrasive mesh.
A rectangular piece of fiberglass mesh canvas onto which ground silicon carbide powder is applied by adhesive. The grain size of the abrasive coating is indicated on the mesh. Surfaces with a rough texture made from materials for basic leveling are sanded with meshes No. 40–80. The finishing putty for painting or wallpapering is treated with mesh No. 100-120 - finer grain size. Abrasive meshes numbered 180 or more are used to refine the putty layer for painting with glossy paints and varnishes. This type of equipment is convenient in that it does not become heavily clogged with putty dust during operation, and the float can be easily cleaned of it by simply shaking it.
Sandpaper
– a cheaper consumable, but quickly becomes clogged with dust. On the back side of the rolled tape or cut pieces, the degree of grain is applied - the higher the value, the less grain (from P-20 to P-220 - coarse-grained sandpaper, from P-240 to P-2500 - fine-grained). Usually, for rough processing of the ceiling, sandpaper from P-80 to P-180 is used, for finishing sanding - P-320 - P-400.
Hand sanding of putty ceiling
To sand the ceiling surface you will need the following tools and accessories:
- Wide spatula with a smooth, hard blade;
- Portable lamp in a socket on a wire with an extension cord;
- Pencil;
- A grater or block with a set of abrasive mesh or sandpaper;
- Personal protective equipment – sealed glasses, a respirator, overalls (preferably overalls), a cap (preferably a baseball cap – a visor will protect your face from dust falling from above).
First we prepare everything
You can't start working if you don't have the right tool and need to buy it or borrow it from friends. You will need to find the following things:
- A lamp - a carrying lamp, a spotlight or something else that you will use to illuminate yourself during the process.
- A brush, rag or other type of device for removing dust - there will be a lot of it.
- To cut off small protrusions you will need a sharp, flat object - a spatula will do.
- The main tool is a grater with a mesh or with an attachment for sandpaper.
Important: sandpaper is only needed on a textile basis, since the abrasive that will be used to rub everything down will stick better to it.
It’s also worth preparing a vacuum cleaner right away - you need to remove dust not only from the surface, but also from the floor, as well as from everything around you. Eyes should be protected with goggles, and hands should be wiped with a rag or rag.
Mechanical devices for grinding putty ceilings
The use of special equipment greatly facilitates sanding ceilings and speeds up the work, but purchasing such a tool for a one-time home renovation is inappropriate - the simplest device in this group costs several times more than a hand grater or block. However, if it is possible to borrow a mechanical device, this should not be neglected, so we will briefly consider the most common types of such equipment in order to try on our skills with them.
According to the principle of operation, all grinders can be divided into two groups:
Pneumatic sanders
They use the energy of compressed air supplied through a hose by a compressor, so they do not have an engine. The operating principle used determines a number of advantages of pneumatic tools:
- Light weight;
- Relatively low price;
- Simplicity of the device;
- Good performance;
- High resource.
However, the operation of these devices on compressed air also has negative aspects - dependence on a compressor, which is expensive and cumbersome, and noise.
The most affordable pneumatic devices are eccentric (orbital) sanders, equipped with a rotating disk with Velcro, to which a circle of sandpaper is attached. The disk performs a complex movement in one plane - rotating around an axis passing through the center of the circle, and at the same time rotating around another one - located a short distance from the central one. The tool is compact, lightweight and easy to maintain.
Models of pneumatic devices with dust removal and a removable telescopic handle are also produced.
Electric sanders
By design they are divided into 4 types:
- Belt - a powerful tool with an abrasive belt rotating in one direction, mainly used on wood, but also suitable for rough sanding of coarse layers of putty;
- Vibratory surface grinders - driven by a motor to a rectangular sole with a removable abrasive pad vibrating at high frequency;
- Eccentric - similar to pneumatic devices with identical action, effective for rough and finishing grinding;
- Special devices with a telescopic rod (“giraffes”) are a professional tool with high quality workmanship, but cost from 20 thousand rubles. The advantage of electric grinders is their high mobility - connecting to a power source in a residential building or area is not difficult. But the presence of an engine causes significant weight and high cost of the power tool.
Step-by-step instructions for sanding walls
It is better to sand the wall while wearing a respirator or a bandage that protects the face. Putty dust does not contain toxic substances, but its quantity makes staying in the room extremely uncomfortable. It will be difficult to breathe without protective equipment. You will also need glasses and clothes that you don’t mind getting dirty.
One of the important interior details of any house or apartment is the ceiling. An even and smooth ceiling gives our home a noble and well-groomed appearance. You can achieve a well-maintained ceiling yourself if you know how to properly putty the ceiling using technology. Even if you are not going to do this yourself and hire builders, you will need this information in order to check the quality of the work performed.