To paint the ceiling with water-based paint without streaks, you need to know some nuances and rules.
The choice of materials and tools is important. Today, paints are widely used to decorate the ceilings in apartments. The popularity of this material lies in the fact that it is highly resistant to external factors. The painted ceiling is easy to clean with wet cleaning. Painting the ceiling is as easy as whitewashing. Today we will look at how to properly paint or how to paint a ceiling with water-based paint without streaks.
Selecting paint and preparing tools
Finishing the ceiling with water-based emulsion is the most economical type of repair. The main advantages of the material are lack of toxicity, ease of use and impeccable results. In order for the surface to be smooth and look aesthetically pleasing, you need to evaluate its original condition.
Before painting the ceiling with water-based paint, it is advisable to remove the old coating, eliminate surface defects, and level it. If necessary, remove mold or mildew.
Features of the compositions
The range of paints is currently huge, and you need to choose a product based on the optimal price-quality ratio. Depending on the additives, the following compositions are distinguished:
- Polyvinyl acetate is the cheapest option. But they are used only in dry rooms. The surface cannot be washed;
- Acrylic with latex, expensive and high-quality compositions. Withstands moisture. The surface can be cleaned using detergents;
- Silicate or silicone based. An excellent choice for decorating plastered, concrete, stone surfaces;
- Acrylic water-based emulsions, the most popular materials. Can be used to decorate almost any room. Resistant to negative factors and abrasion.
The quality of the result directly depends on the composition; when choosing a material, you need to pay attention to the following characteristics:
- What type of work is it suitable for?
- Material consumption per square meter;
- Durability, possibility of surface care;
- Hiding power is an important characteristic; not all types of paint are capable of creating a continuous, even canvas when applied.
When purchasing, you should carefully study the label, paying attention to the technical characteristics of the composition. Compositions with high abrasion resistance and dirt-repellent properties are best suited for ceiling coverings.
It is recommended to purchase paint intended for finishing ceilings.
Water-based paints come in matte and glossy. The first ones mask surface imperfections quite well, but are difficult to maintain. A glossy surface is easier to clean, but almost all, even small, flaws will be visible on the ceiling. It is more advisable to purchase semi-matte or semi-glossy paint.
Selecting Tools
When painting the ceiling with your own hands, you need to prepare the right tool, easy to use and of high quality. Most often the work is carried out using a roller. This painting tool should be fairly wide, 18-25 cm, with medium bristles. It's more convenient for them to work. For processing corners and edges, a brush or a narrow roller with short pile is useful.
It is more convenient to take paint from a special tray with a corrugated bottom. Masking tape, sandpaper, polyethylene, and spatulas of different sizes will be useful for the job. Don't forget about protection - overalls and glasses. It is more convenient to monitor for streaks and unevenness using a sufficiently powerful portable lamp. It is more convenient to paint high ceilings from a stepladder or using a telescopic roller stick. You can use a spray gun.
What to paint: choosing and preparing paint
Several types of coloring emulsions are used to paint ceilings (their main characteristics are given in the table).
| Types of paints | Characteristics |
| Water-based | They do not have a strong odor, do not emit toxic substances, and fit well on any surface. In addition, in the future, a ceiling painted with water-based emulsion can be coated with any other paint. |
| Acrylic | Resistant to moisture, easy to apply, easy to clean and excellent color retention. |
| Latex | Less resistant to fading, but they perfectly repel moisture. Well suited for application on embossed wallpaper. |
| Silicate | Developed on the basis of liquid glass and are only suitable for painting mineral surfaces (for example, concrete). Polymer materials cannot be coated with such paint. |
| Silicone | Elastic, breathable paints without any pungent odor or harmful fumes. |
Despite this variety, the most popular among home craftsmen is the “ordinary” inexpensive water-based emulsion. It is easy to work with it without having much experience in painting.
Water-based paint has proven itself to be excellent for painting ceiling surfaces, and is also a fairly budget option
But experts say that the best option for painting the ceiling would be an acrylic mixture. If you are going to renovate the bathroom, buy more expensive and moisture-resistant latex paint. Whatever you decide on, use the following tips when choosing a color emulsion:
- For DIY repairs, it is better to choose matte paint - it hides surface unevenness and painter’s mistakes.
- The emulsion must be fresh. Expired, frozen, peeling paint is not suitable for work.
- If possible, paint the ceiling any light color other than white. Paint imperfections are most noticeable on a white surface.
VIDEO:
On a note! Before work, you should prepare the paint according to the instructions on the can (bucket). Some emulsions need to be diluted with water, others need to be mixed thoroughly with a construction mixer.
Painting the ceiling structure
So, let's move directly to the question of how to paint the ceiling with water-based paint without streaks
What points should you pay attention to to ensure high quality of the final result:
- Water-based paint is applied in two or three layers.
- No need to wait for each layer to dry. That is, the water-based emulsion is applied “wet on”.
- The paint is applied in even stripes with a width equal to the length of the roller, with one strip overlapping another within 5 cm.
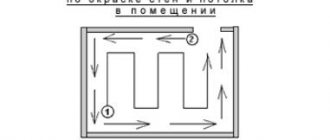
- The process begins from the corner located near the window opening, towards the front door.
- The last layer of paint is applied perpendicular to the wall where the window is located.
Regarding the last point. If the ceiling is painted in two layers, then the first is applied parallel to the wall where the window is located, the second perpendicular. If the paint is applied in three layers, then the first and third are laid perpendicular to the window, the second parallel.
Scheme for applying water-based paint in two layersSource deluxemm.ruDetermining which roller is best for painting the ceiling
How to paint a ceiling with water-based paint without spots or streaks
In order to immediately cover all the materials from which the nozzles installed on the clasps are made, let’s look at how the rollers are classified by Finnish manufacturers, this will be more clear. So, there are only 4 main groups. The first includes all polyester-based materials: the familiar foam rubber, vestan or faux fur, as well as the more durable yellow vestan. The second group consists of natural materials: felt, rubber, mohair, velor, as well as goat, sheep or llama fur. The third group is polyacrylic products: modacryl, Kanekaron, Meryl (many people are even unfamiliar with these materials). The fourth and last group contains polyamides: nylon and perlon.
The markings may differ for different manufacturers; we will only point out that the Finnish manufacturer Sakeva calls the above 4 groups respectively PE, N, RS and RA. Not every roller attachment material can be used for one or another finishing composition; each has its own purpose
. So, for example, foam nozzles are applicable for varnishes and water-dispersion compositions, and those of high quality are painted dark blue, while cheaper and short-lived ones are yellow. The denser their structure, the longer the service life. For finishing with compounds based on synthetic resins, it is better to use mohair.
Domestic samples of the instruments in question are marked differently and quite simply. The roller is designated by the letter “B”, which is always present in the name. In second place is the designation of the material, and here difficulties arise that limit the list of possible options. So, foam rubber is designated by the letter “P”, with which perlon begins. Fur rolls, accordingly, are marked with the letter “M”, but, firstly, it can be the fur of different animals, and secondly, meryl, modacrylic, and mohair begin with the same symbol. The third position in the abbreviation is the purpose, and the floor here is denoted by the letter “P” (perhaps the same option is suitable for the ceiling), the inner corner is “U”.
If we talk about which roller is best for painting the ceiling, fur is recognized as the best material for this purpose. Moreover, thanks to the test of time - sheep (the first attachments were made exclusively from sheep fleece). However, some modern artificial materials are almost as good as natural ones; in particular, foam rubber is no bad, a universal option for almost all occasions. Ideally, this material is suitable for working with water-based, acrylic and oil-based compositions. Nylon has also proven itself, which is applicable for the same paints and varnishes.
Video description
The video shows how to paint a ceiling with a roller without streaks:
So, we have figured out the process of painting the ceiling with water-based paint. I would like to consider one situation that occurs during the process of repairing ceilings. It is characterized by the question of how to paint the ceiling with water-based paint over old paint.
The thing is that the water-based emulsion peels off from the treated surface after many years. And only if the humidity in the room is high. A layer of such paint itself is durable. The only thing is that the ceiling is located at the top, so it quickly fades, that is, it gets dirty. Of course, it can be washed. But if repairs are being carried out, then there are no prohibitions on painting it with new water-based paint. Sometimes even one layer is enough.
If peeling of the old material does occur, then answering the question of how to properly paint the ceiling must take into account the complete removal of the old decorative coating. It will not be possible to level the ceiling surface with paint. Some craftsmen simply go over it with coarse sandpaper, making the surface rough. And a leveling putty layer is already applied to such a ceiling. There is no need to take risks; the best option is to remove the paint completely using a sponge with water, and after soaking, an ordinary spatula. The water-based emulsion can be easily removed and you won’t encounter any big problems.
Cleaning the ceiling with a spatulaSource domostrou.by
Device for painting with a water-based composition
A water-based emulsion was chosen to treat the ceiling area. Let's figure out which roller is best to paint the ceiling with water-based paint.
The type of surface intended for processing depends on how competently the selection of tools for painting is made. When choosing, proceed from the weight of the roller, size and productivity during operation
Pay attention to the tool with metal handle mounts. This type is rarely deformed during operation.
To cover a larger area when painting the ceiling space, choose a large tool. Be guided by the width of the fur coat, the coverage of which should be approximately 1 m². To paint hard-to-reach places, you can use a brush, or purchase a smaller device (a fur coat with a width of 5 cm).
A roller for water-based paint for the ceiling must have a design in which the coloring composition impregnates it from the inside. When working, a certain amount of paint comes out, when pressed carefully, and paints a large area.
The advantage of a roller for painting the ceiling with water-based paint is that it covers long distances. It takes less time to work, and the coloring composition is saved.
Look at the photo of a roller for painting the ceiling with water-based paint above
In addition to various options for fur coats and designs, when choosing, you need to pay attention to additional accessories for dyeing. Regardless of the chosen design of the painting tool, you will need a special tray where excess paint is removed from the roller when rolling
Water-based paints for ceilings come in the following types:
The composition includes water, liquid glass and various pigments. It is good to apply paint with rollers with a wide and thick coat.
Important: this composition does not tolerate high humidity, unlike water-dispersed compositions
Acrylic polymers in water-based paints dry quickly, are resistant to sunlight and are quite durable
If you have a question about which roller to paint the ceiling with water-dispersion paint, pay attention to the following points:
- the need for a textured or smooth ceiling surface;
- absorbency of the roller coat;
- the ability of the pile to carefully distribute the coloring composition.
Modern materials from which the working surface of the rollers is made are suitable for applying almost any coloring composition. Make a choice according to your preferences and financial capabilities.
Carrying out repair work on painting ceiling areas requires certain rules. As for deciding which roller is best for painting the ceiling, check out the following recommendations and tips before making a purchase:
- a better result can be achieved if you choose a roller with soft, elongated bristles, preferably made from natural material;
- seamless options are made of rubber, and wool or nylon rollers are fixed by turning around the supporting part;
- removable versions of the fur coat are determined by the seam running along the instrument; the glued ones have a transverse seam.
When deciding which roller to choose for painting the ceiling, inspect the handle for removal and adjustment. For work with ceilings, the best option is a device fixed with a coupling. A good nozzle option is a cylindrical one. This design is suitable for painting large areas, including ceilings.
Which roller is best for whitewashing the ceiling is decided depending on the condition of the surface being treated, the presence of defects and bottlenecks on it. The selection and purchase are influenced by such points as:
- ease of use;
- fur coat material;
- villi length;
- design features.
The desired result can be achieved based on the correct choice of painting equipment for the ceiling. Before purchasing, carefully study the features of each variety and compare the characteristics.
- Your sky
- Potolki812
- Potolki-House
- Leningrad windows and ceilings
- Potolki-help
- Ceiling Alliance
Products for you
- Electric lighting device with energy saving 830.70 ₱
- 6-volt LED lamp 1372.50 ₱
- LED light bulb 5 Volt 587.70 ₱
- Ceiling recessed flat panel light bulb ₱1213.20
- Energy-saving ceiling flat panel spotlights (5 pcs.) 3640.50 ₱
- Energy saving LED lamp for chandeliers ₱2429.10
- Your sky
- Potolki812
- Potolki-House
- Leningrad windows and ceilings
- Potolki-help
- Ceiling Alliance
- Senior - Ceiling
- Art Seeling
- Euroceilings
- Coziness technology
Expert advice
Now about how to properly paint the ceiling with water-based paint, according to experts:
- If the order of applying the stripes was disturbed during work, the light will be reflected differently from different parts of the surface, resulting in dark spots being visible. In this case, it is necessary to wait until the ceiling is completely dry, and then apply a new layer of material, taking into account the direction of the sun's rays. If this does not help, you will have to remove the coating and do everything again.
- When finishing plasterboard ceilings, do not dilute the paint with water. A large concentration of liquid can cause the paper layer of the material to become wet, resulting in the surface becoming unusable. If the surface has previously been plastered, it is better to use a spray gun, but only with prior priming. In some cases, the old paint coating does not need to be removed; it is enough to simply rub it with fine-grain sandpaper.
- After each layer has dried, it is necessary to inspect the surface. Immediately after painting, smudges and stains are not visible, so you need to wait. The following layers must be applied especially carefully in areas where defects appear. Excess paint on the coating can be removed by rolling the entire area with a dry roller, but this can be done before the material dries.
You can paint ceilings with water-based compositions yourself, even if you have no experience in painting work
It is important to follow the above recommendations and take your time. It’s better to let the finishing work take longer, but the result will be of high quality
Also, do not forget about the recommendations of the material manufacturers.
Additionally, we suggest watching a video where beginners can learn a lot of useful information.
Preparing the ceiling for painting
Before starting work, all small pieces of furniture are removed from the room. Dimensional elements are covered with plastic film. The floor is protected with newspapers.
When preparing a suspended ceiling, special attention is paid to puttying the joints.
After this, you can proceed to perform the following actions:
- Surface cleaning. If there are many defects, the old coating is completely removed. To do this, wipe the surface with a sponge moistened with warm water. After soaking, the plaster is cleaned with a spatula or brush. To remove the water-based emulsion, use a grinding machine. After completion of the work, the ceiling is cleaned of dust.
- Puttying. Cement mortar or leveling plaster helps eliminate protrusions and depressions. The mixture is diluted with water according to the instructions, after which it is evenly distributed using a metal spatula. The coating is left until completely dry, then treated with a grout mesh.
- Grinding. Use fine-grained sandpaper to remove defects left in the previous step.
- Padding. It is recommended to use penetrating compounds that fill pores and reduce the consumption of the coloring composition. The average drying time for the primer is 6 hours.
- Painting skirting boards. These parts are treated with a narrow brush. Before starting work, seal the edge of the wall with masking tape.
How to properly apply whitewash to the ceiling
Whitewashing the ceiling yourself is not as difficult as it seems.
The main thing to remember is that when working with a brush and roller, there is a strict sequence for applying whitewash. First it is applied towards the windows, then parallel to them. This simple technique will create the illusion of a completely smooth coating, without streaks or streaks. The roller should be thoroughly squeezed out in the ditch before applying paint to the ceiling. Layers of paint must be applied with an overlap of about five centimeters, this will allow the entire surface to be painted. If you use a roller to cover the ceiling with a layer of water-based paint, then after there is almost no paint left on the roller, you should walk it over the already painted area. This way you can remove excess paint from the surface.
When working with a roller, the paint will adhere better if you apply it in a W-shaped motion. Unfortunately, the roller cannot completely cover all the corners, so hard-to-reach places must first be painted over with a brush.
Apply whitewash using a spray bottle using gentle circular movements.
During work, care must be taken to ensure that there are no drafts in the room and that direct sunlight does not fall on the surface to be painted. This will protect the whitewash from falling off.
You must work very carefully, avoiding drops and sagging. The whitewash composition must be stirred from time to time, and a new layer can be applied only when the previous one has completely dried.
https://youtube.com/watch?v=Potq35u8sLM
Learning to use a roller
Having chosen the main tool, purchase the rest of the equipment:
- a special plastic tray (trough, tray, cuvette) for working with a roller;
- wide paint brush;
- masking tape.
Painting the ceiling with a roller requires some skill. If you have never done this kind of work before, practice on an unnecessary surface. Try your hand at a piece of drywall or a section of wall that will later be covered with wallpaper.
There is nothing difficult in painting with a roller, but if you have no experience at all, then a little training on an inconspicuous area will only be beneficial
How to paint with a roller:
- Pour paint into the tray.
- Dip the roller into it.
- Roll it along the ribbed side of the tray to squeeze out excess paint from the pile. If this is not done, smudges will form on the ceiling. After good rolling, the surface of the fur coat should be saturated with the emulsion evenly, without dry areas. Doesn't the paint come off the roller by itself? Help her with a brush.
- Attach an extension to the tool or extend the telescopic handle.
- You can start painting. Press the roller to the surface and move it back and forth along the surface, rubbing the emulsion to prevent smudges from forming.
Painting the ceiling with a roller
Important! After painting work, wash the tool thoroughly. Then it can be used again. If you leave a paint roller for even a few hours, it will be hopelessly damaged.
How to paint a ceiling with water-based paint without streaks? A simple thing to do on your own
How to paint a ceiling with water-based paint without streaks, without resorting to the help of professional painters or without redoing everything several times? What preliminary work needs to be done in order for the coating to lay down in an even and clear layer? We answer these questions, most frequently asked by newbie repairmen, in this article.
The key to success: proper surface preparation
- After drying, the entire surface is treated with a penetrating primer for putty. It will provide not only better adhesion of the composition to the ceiling, but also a thinner, more uniform layer of putty.
- The next step is starting putty. People often tend to ignore this stage, but not a single floor slab can boast a sufficiently flat surface. And after painting, even a minor defect will be very noticeable, literally attracting the eye.
- When the layer has dried, the entire surface is cleaned with a sanding mesh (it would be a good idea to rent a sander if you don’t have one - the work will be significantly faster and will give a smoother result).
- A minimally thin layer of finishing putty is applied to the completely dry starting putty. It is advisable to do 2 approaches, with intervals for drying.
- The final layer is sanded clean, this time with a fine mesh, and primed with a compound that matches the chosen paint. In addition to increasing the degree of adhesion, the primer will ensure more economical use of paint and better distribution over the surface. After all the procedures performed, the ceiling will be mirror-smooth, which will eliminate the main reason for the appearance of streaks.
- The paint is applied to the surface in at least 2 layers. For the 1st, a roller cover with long pile is required, and the direction of its movement should be perpendicular to the light falling from the window. For the 2nd, take a cover with medium pile, and movements are made across the previous ones. If there are more than two layers, the direction of each is calculated so that the latter is longitudinal.
- Avoid foam rollers - they produce bubbles and less even coverage. The first layer is applied with a thinner paint: clarification about this is on each can.
- It is better to pour diluted paint into a paint tray: this way the roller will not move the paint, and the excess can be squeezed out onto a flatter side.
- Each painting approach should cover the entire surface. Smoke breaks and lunches in the middle of the process are unacceptable: dried paint, on which a fresh layer is applied, will give a clearly visible streak.
- From time to time you should move slightly to the side from the area to be painted and inspect it from a different angle: this way you will notice the gap not captured by the roller.
- If a gap is discovered when the paint has already begun to dry, under no circumstances should you rush to touch it up. Such actions will lead to the appearance of a clearly visible patch on the ceiling. The defect is painted over during the application of the next layer.
- Stripes on the plane also appear from uneven pressure on the tool. It is often caused by the roller being loose on the handle.
- If you feel that it is loose, it is better to run to the store for a new one: repainting will cost much more.
- Stains also occur when the paint is not mixed well. Where there is more pigment, the color will be darker. Also, streaks may remain if the paint has thickened or not enough water was added when thinning it.
- Before applying the next coat of paint, the previous one must dry completely.
Before the initial main painting, professional painters advise walking with a brush along the joints of the ceiling and walls. The roller will not reach there, so there will be unpainted areas. Since the layer applied with a brush is thicker than when using a roller, the applied paint immediately rolls towards the center of the room. There is no need to worry that this will lead to streaks: a basic rolling with a roller will cover small strokes even when painting for the first time. The second will make the color completely uniform.
- Take the finest sandpaper. They gently and carefully pass along the unsuccessful joint from beginning to end.
- The ceiling is cleaned of dust with a soft cloth.
- A new layer of paint is applied, this time following all the rules and remembering all the secrets.
- In some cases, the first 2 points are sufficient if you didn’t overdo it when cleaning and the paint retained its shine.
How to choose a roller for applying paint to the ceiling
When purchasing a ceiling roller, you must consider the following rules:
For large flat ceilings, a wide tool is suitable
And for little ones, it’s more convenient to paint small and multi-level surfaces.
You should pay attention to its diameter. As the area of the ceiling to be painted increases, a larger diameter roller is required.
But, it should be taken into account that when painting the ceiling with a large tool, its weight increases, which becomes significant after the paint is absorbed. If the ceiling has a large area, you can quickly get tired, which will reduce the final speed of painting.
Tip: If you can’t get by with a small roller, the task can be made easier by using an attachment that extends to the handle of the tool or a special telescopic handle, which makes it possible not to use a stepladder, which will make the painting process easier.
The shape of the ceiling surface plays a role. which in modern premises can be two or more levels, and sometimes with rather intricate outlines. Painting such ceilings with large rollers is practically impossible due to the presence of a large number of hard-to-reach places. In this case, you should purchase small tools, and use brushes to paint hard-to-reach places.
Tip: When choosing a roller for applying a coating on the ceiling with your own hands, you should take into account the type of paint used, the characteristics of the surface to be painted: its area and relief, your financial capabilities and the personal preferences of the painter.
Painting the ceiling with a roller and brush
To the question of what is better to paint the ceiling with a roller or brush, some tips will help answer:
- The larger the area, the higher the productivity of working with a roller. On large areas, when painting with a brush, stains, smears, and uneven coating application will be more noticeable. If you spend a lot of time painting the ceiling or walls, the quality will be very low.
- When applying paint with a roller, you can practically stay in place, performing a reciprocating movement of the tool, which is especially convenient in cramped conditions or when there are a large number of objects, including furniture. To work with a brush, you will need to simplify access to the work surface.
- The roller requires a special container or tray for paint, as in the photo.
Roller tray
This creates additional costs, but when working with a brush, the painter must hold several objects in his hands at the same time while painting the ceiling, which is not very convenient.
Almost no lint falls out of the roller
This is very important when applying the thinnest layers of coating. It is more convenient to whitewash the ceiling with lime with a large brush, but it is more difficult to work with such a solution with a roller. A roller is often used to work with stencils, but it is impossible to draw any design with it. Tip: Even a high-quality and professional roller cannot replace a brush in hard-to-reach places
To paint the ceiling, you should purchase several brushes, preferably different sizes.
Tip: Even a high-quality and professional roller will not replace a brush in hard-to-reach places. To paint the ceiling, you should purchase several brushes, preferably different sizes.
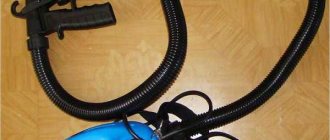
Painting the ceiling with a spray gun has its pros and cons.
When working with it you must:
- Carefully protect furniture and surfaces that are not to be painted.
- The tool must be located at a certain distance from the ceiling. If it is too close, paint will smear, and if it is too far away, paint will splatter on the walls and windows.
Tip: When painting the ceiling, start from the edges with a brush, then with a spray gun or roller. To work with a spray gun, solvent should be added in a ratio of 1:10 to the required volume of paint.
How to prepare a surface for painting with a roller can be seen in detail in the video in this article.
How to dilute and calculate the quantity?
Having decided on the type of paint and tools, you can move on to the preparatory work. First you will need to dilute the required amount of material.
Paint consumption depends on how large your room is; the area of the ceiling is very important. As a rule, all the necessary information that will help you calculate the paint is on the packaging. Please review this information.
Having chosen water-based paint, you will see on the packaging that you should not dilute it. If the product you purchased has already thickened, you can slightly dilute it with water. Otherwise, just mix the paint, roll it onto the tray and start painting.
The preparation of other ceiling paints is not much different. You will also need to add a little water to the acrylic mixture. It is best to use the product immediately after you have mixed it. It should not be allowed to harden.
Surface preparation
No matter how high-quality the roller and paint used are, the result of the work depends 30% on the preparation of the ceiling for painting. To ensure that the coating is even and uniform, the remnants of old paint and putty are completely removed, height differences of 5 cm or more are leveled using plaster.
Preparing a ceiling for roller painting involves the following steps.
Step 1. Cleaning the surface. At this stage, all layers of the old coating are mercilessly removed down to the concrete base - paint, plaster, fungus (if any). It is most convenient to clean with a metal spatula; especially thick layers are broken through with a hammer drill.
Advice! To minimize the amount of dust and dirt, generously moisten the surface to be cleaned with water (you can use a spray bottle or simply run a wet rag over the ceiling). After half an hour or an hour, the remains of the old whitewash will get wet and easily separate from the concrete.
Preparing the ceiling for painting
Step 2: Primer. Treating the surface with an antiseptic primer before painting will provide reliable protection against fungus. In addition, the putty applies much more evenly to primed surfaces. Special antiseptic compositions for treating ceilings are available on the market. If you want to save money, you can use any chlorine-containing composition (for example, “Whiteness”).
Step 3. Primer treatment. This is a polymer-based primer that strengthens the surface being treated and increases its adhesion to the putty layer. Some DIYers ignore this step, but experts do not recommend it. The putty applied to the “bare” primer begins to bristle, which makes painting much more difficult.
Ceiling priming
Step 4. Direct putty. The work is carried out in several stages. First, a starting, “rough” putty is applied to the ceiling surface treated with the primer and, when dry, it is thoroughly sanded. Then a second layer is applied to the places where the putty composition shrinks and sanded again. Finally, the ceiling is completely covered with finishing putty in 2 thin layers and finally rubbed down. This stage of work is very tedious and routine, but the presentability of the coloring will depend on the quality of its execution. Irregularities and depressions in the ceiling will appear as if under a magnifying glass, especially under electric lighting.
Leveling the ceiling before painting
Now take the roller in your hands and soak it in the primer. Walk over the entire surface of the ceiling, not forgetting the corners. Remove furniture, carpets (if possible) from the room, cover the remaining furniture and household items with polyethylene or old newspapers. When painting the ceiling, drops will inevitably fall on the floor, so its entire (floor) surface must also be covered with polyethylene. It is better to secure the film to the walls using paper tape - unlike regular tape, it will not spoil the wallpaper.
At this point the preparatory work is completed, painting can begin.
Advice! To make your work easier and not miss a single coating defect, take care of sufficient lighting of the surface to be painted. An energy-saving lamp mounted on a removable tripod under the ceiling will help. It can be moved as you paint.
Choice of paint. Let's feed pigeons with paint - make the world brighter
Before you paint the ceiling with water-based paint, you have to make a difficult choice. Perhaps no other segment of building materials has such diversity. This is due to a number of significant advantages:
- Dries very quickly. A few hours are enough to dry;
- The paint is harmless and safe for the environment and human health;
- Does not have a specific pungent odor;
- Excellent tinting;
- The coating job is not difficult. And the tool is easy to clean after painting.
Perhaps no other segment of building materials has such diversity
The main disadvantage can be considered the presence of an indoor temperature of at least +5°C. Emulsion paints differ not only in manufacturers, but also in the base. Based on composition and scope of application, they are divided into 5 groups:
- Mineral. One of the inexpensive ones. Can be painted on a concrete ceiling or used on brick walls;
- Polyvinyl acetate. It is obtained by mixing PVA glue, water and coloring pigment. Very low durability.
- Silicate. The main component is a silicate base, popularly known as “liquid glass”. Moisture resistance is very low. I do not recommend using it in bathrooms and kitchens.
- Acrylic paint for the ceiling. The most common. When applied, a strong and durable coating is obtained.
- Latex. The latex base included in the composition adds elasticity and water resistance. As a result, the coating hides microcracks and can be used in damp areas.
- Silicone. Most expensive. After painting, the coating becomes vapor-permeable and washable. Silicone paint is suitable for both the bathroom and any other room.
Emulsion paints differ not only in manufacturers, but also in the base
Before choosing a material, pay special attention to such technical characteristics as:
- Compound.
- Consumption. Material consumption for 1 layer is approximately 150-200 ml per m2. The number of layers depends on the absorbency of the surface. Usually 2 layers are used.
- Viscosity. Use thick paint for a brush or roller. For a spray gun you need to use a more liquid one.
- Storage conditions and shelf life of the product.
- Surface structure. The surface structure can vary from matte to glossy. A glossy surface is easier to clean, but imperfections are more visible on it. The matte surface, on the contrary, masks well, but is very difficult to clean. The best choice, in my opinion, is semi-matte or semi-glossy paint.
Types of water-based paint
Water-based paint is a water-based emulsion that contains polymer particles undissolved in water. The composition also includes pigments and various additives that change the characteristics of the final product. After applying the paint, active evaporation of water occurs and a thin polymer film remains on the surface.
Painting the ceiling with water-based paint begins with choosing the composition. They use four types of polymers:
- Acrylic. An aqueous emulsion based on acrylic resins allows you to obtain a smooth surface, has good hiding power, and hides small surface defects, even cracks up to 1 mm wide. Its disadvantage is its high price, but it is easier to work with. In their pure form, acrylic compositions are hygroscopic and can only be used in dry rooms, but they do not interfere with the passage of steam. To create a waterproof film, latex is added to the acrylic water-based emulsion. The same additive increases the elasticity of the dried film. Such compositions can be used in damp areas. Acrylic-based water emulsion - a smart choice
- Silicates. This type of water-based paint is based on liquid glass. The coating is resistant to precipitation and does not interfere with the release of vapors, has a long service life (10 years or more), and can be used for outdoor work. Silicate paints are vapor-tight
- Minerals - lime or cement. Mineral water-based emulsions have good adhesion to any surface, but are quickly washed off. As a result, they are gradually losing popularity. Water-based paints based on minerals (lime) are the cheapest
- Silicone. Silicone-based water emulsions are the latest achievement in the industry. These compositions are good because they “tighten” cracks up to 2 mm thick. As a result, the surface painted with them, even without excellent preparation, turns out to be even and smooth. The film turns out dense, but vapor-permeable. Silicone water-based emulsion can be used to paint ceilings in bathrooms and other wet areas. The disadvantage of this type of paint is its high price.
Silicone water-based paints can even paint over cracks
Latex can be added to any of the compositions. Latex water-based paint is water-repellent. It is not afraid of moisture and can be used in damp rooms.
Based on the main characteristics of these compositions, you can choose the best type of water-based paint for yourself. Each case requires its own properties and the “best water emulsion” is different each time.
Process Features
Painting the ceiling is not as difficult as it seems at first glance. As a rule, before this process, workers remove the old layer of finish. The fact is that a thick layer of old paint can show through and spoil the appearance of the surface. If cracks appear on the ceiling, then the matter is completely hopeless - no matter how you paint them, they will still be visible. If repairs have not been carried out for a long time, then under a layer of old paint you may even find mold, which will negate all your attempts to update the surface.
If there are no such serious problems, then you can safely apply a new layer of water-based emulsion or acrylic to the old paint. Take a close look at your ceiling. If you are satisfied with its appearance, and pieces of paint do not fall off, you can leave everything as it is.
Professionals also advise you to pay attention to the following: if you have previously painted the ceiling with water-based paint, then you are in luck. She's better than whitewash
Even if this type of paint begins to flake off and fall off in pieces, it may not be completely removed. You can easily limit yourself to superficial cleaning by removing loose pieces and cleaning the area around them. After this short work, you can safely apply a new coat of paint.
Painting technology
The painting process can be divided into several main stages:
Stages of painting the ceiling with water-based emulsion
Next, I will introduce you to all the nuances that exist at each of these stages.
Stage 1: preparing tools
First of all, you need to choose a suitable paint roller. This task must be approached responsibly, since it is the roller that determines how beautifully and evenly the paint will lie on the surface .
The fact is that there are many varieties of this painting tool on sale, however, not all of them are equally suitable for painting the ceiling. For our purposes, it is best to use a medium-nap roller.
Medium nap roller
Avoid using a cheap foam roller, as foam rubber absorbs too much paint, causing the paint to apply unevenly and bubble. Rollers with short pile, for example, velor, absorb little paint, which is also bad.
If the ceiling is covered with decorative plaster, then it is better to use a roller with long pile so that it can properly paint over the deep texture.
The price of such rollers starts from 150-200 rubles. There is no point in purchasing a cheaper tool due to its poor quality. Keep in mind that you will need a long handle for the roller, since painting from a stepladder is not very convenient.
Roller tray
In addition to the paint roller, you need to prepare the following equipment:
- roller tray (cuvette) – will allow you to dip the roller into paint and wring it out on a special rolling platform of the tray;
- masking tape – will be needed to protect areas adjacent to the ceiling that you will not paint from contamination;
- ladder stepladder – needed for touching up hard-to-reach areas with a brush.
Deep penetration primer
If the ceiling is not prepared for painting, you should also prepare:
- deep penetration primer;
- putty;
- set of spatulas;
- spray.
After preparing all these tools, you can proceed to the next stage.
In the photo - removing wallpaper from the ceiling
Stage 2: preparing the ceiling
First of all, I note that painting the ceiling requires high quality preparation. The thing is that, contrary to the opinion of beginners, even the smallest flaws, which are practically invisible on the ceiling before painting, are clearly visible after painting. Therefore, the surface prepared for painting must be perfectly flat and smooth.
Also, keep in mind that paint should only be applied to a secure base, i.e. does not peel off and has good adhesion. The durability of the paint depends on this.
Old whitewash can be washed off with a sponge
Therefore, the instructions for preparing the surface are as follows:
- First of all, you need to prepare the room - remove all the furniture from it and cover the floor with plastic film. If the walls are already finished, they also need to be protected. For these purposes, you can use newspapers that are glued with masking tape. Do not use regular tape, as it will only ruin the finish;
- Next, you need to remove the old finishing coating from the ceiling. If the ceiling is covered with wallpaper, the canvas should be soaked with water using a spray bottle, and a draft should be created in the room . The surface must be periodically moistened for half an hour. When the canvases are wet, they can be easily removed by prying them off with a spatula. If you need to remove vinyl wallpaper, you must first treat it with a needle roller or make cuts in the top layer of the coating to ensure access of water to the substrate.
You can remove old paint using a scraper with a special attachment.
Whitewash can be removed by blurring it. Another option is to stick newspapers onto the whitewash with wallpaper glue, and then tear them off with a sharp movement along with the glue.
As for paint, it is usually removed mechanically. To do this, you can use a special brush attachment for an electric drill or grinder;
- then you need to wipe the surface with a damp cloth to remove dust, residues of wallpaper glue, chalk or other contaminants;
The cracks must first be widened
- If there are cracks on the surface of the ceiling, they must be filled with putty. Pre-expand the cracks, and then prime them and fill them with putty, leveling the surface with a spatula. After the putty has dried, the surface must be sanded with fine abrasive sandpaper. True, if you plan to subsequently putty the entire ceiling, sanding may not be necessary;
Puttying cracks
- then the surface to be prepared must be primed using a paint roller. To do this, pour the soil into the pan, dip the roller into it, and lightly squeeze it on the tray area. Then apply the liquid in an even, thin layer. After the first layer has dried, the procedure must be repeated;
Ceiling priming
- if the ceiling has uneven surfaces, it should be puttied. To do this, first apply the starting putty using a wide spatula or trowel. The thickness of the starting layer should not exceed 1-1.5 cm. The exact value is usually indicated by the manufacturer on the packaging. You can get more detailed information about puttying techniques from other articles on our portal.
Leveling the surface with putty
After the starting layer has dried, the surface should be sanded with a mesh with P80-P120 abrasive.
Then the ceiling needs to be cleaned of dust and primed again. Next, a finishing layer of putty up to 3 mm thick is applied.
Sanding the finishing layer of putty with a fine mesh
After the finishing layer of putty has dried, it must be carefully sanded so that the surface ends up perfectly smooth. To do this, you need to use a mesh with fine abrasive - P150. It is necessary to carry out the work in bright light so that you can clearly see even the smallest flaws on the surface.
All the above steps are performed only if the ceiling has minor flaws. If the surface has serious level differences or areas with peeling plaster, it must be plastered or a suspended plasterboard ceiling must be installed. You can learn about the nuances of this work from other articles on our resource dedicated to this topic.
Of course, many people want to simplify and speed up the preparation process. Therefore, people often ask on forums whether it is possible to paint the ceiling with water-based paint over old paint?
Peeling paint must be removed regardless of its type.
It all depends on the type of paint. If the ceiling is painted with water-based paint, then it is not necessary to remove it, unless, of course, the old paint is peeling off. As a rule, the presence of “water emulsion” on the ceiling indicates that it was well prepared for painting and, accordingly, does not need puttying.
Painting over old paint
The only thing is that before painting the water-based emulsion, the surface must be wiped with a damp cloth to remove dust. This is necessary to ensure normal adhesion of the new coating.
If the ceiling is painted with a water-based emulsion that is not resistant to moisture, then it must first be primed. To determine what kind of paint a surface is painted on, run a wet cloth over it. If the rag becomes stained, it means that the old coating is not moisture resistant.
Colors for water-based paint
Stage 3: paint preparation
Now that the room and ceiling are ready for painting, you need to prepare the paint itself. If the coating is already painted in the color you need or you will paint the ceiling white, then all preparation of the water-based emulsion comes down to mixing it. If it is thick, the paint can be thinned with a small amount of water.
If the water-based emulsion is white, and you want to give it some color, then it needs to be tinted, i.e. add a special coloring composition (color).
This is done as follows:
- First of all, you need to decide on the proportions of the color scheme. To do this, take a small amount of paint and gradually add color until you get the desired color. Be sure to write down the proportion;
Paint tinting
- Next, mix the main part of the paint with the color in the resulting proportion. The paint must be mixed thoroughly. To do this, you can use an electric drill with a mixer attachment.
If you plan to paint with water-based paint over old water-based paint, it is advisable to use the same color as the ceiling or a tone close to it. Otherwise, you will have to paint the ceiling multiple times to achieve the desired color.
Painting the ceiling with a roller
Stage 4: painting
Now we come to the actual painting.
This stage is the simplest and most enjoyable, however, it also contains some nuances:
- pour the prepared paint into the roller tray;
- then take a brush and apply paint to all the hard-to-reach places where the roller cannot reach. Apply the paint in an even, thin layer. Make sure that there are no drips on the surface;
- Now you can paint the main part of the ceiling with a paint roller. To do this, dip the roller in the paint and roll it out on a special platform to remove excess paint.
Scheme for applying the first and second layers of paint
Then apply a thin layer of paint to the ceiling along the direction of the light coming from the window. Try not to roll the roller over the same area twice.
Also, do not try to completely “cover” the surface the first time, getting the desired color;
- After the first layer has dried, apply a second layer of water-based emulsion across the first. As a rule, it takes several hours for a layer of paint to dry completely at room temperature.
Painting hard-to-reach places with a brush
Start painting from hard-to-reach places, then paint the main part of the ceiling with a roller;
- If the second layer was not enough, apply the third layer along the direction of the light from the window, i.e. across the second layer.
Here, in fact, are all the nuances of painting the ceiling that I wanted to tell you about.
Choosing a tool for the job
Contents of the material
The quality of painting depends on many factors, one of them is the tool for applying water-based emulsion
. In the case of this paint, there are two options: roller and spray. You need to choose in accordance with your experience: if you have previously painted various surfaces, then it is better to buy a spray bottle, as it paints better and faster; if you have no or little experience, then choose a roller.
Which roller to choose
As for the material from which the instrument is made, ideally it should be natural. While synthetic bristles tend to leave streaks and bubbles on the work surface, natural bristles absorb paint well and leave no traces behind. The cost of a roller with natural bristles is approximately one and a half times higher than with synthetic bristles, but it is completely justified. In addition, it is more durable: rollers with artificial pile tend to become inoperative after one painting
.
Types of rollers: which one is better to choose?
The type and quality of the tool used influence the final result no less (and sometimes even more) than the coloring composition itself. We sweep away the brush right away - it is convenient to paint bevels, wall joints, various recesses and niches, but it is not suitable for painting the ceiling. For this purpose, a roller is used, which provides much greater coverage of the painted surface in one movement.
Main types of rollers
In hardware stores you can see many different rollers, which differ in the material used to cover the working surface; in particular, these are:
- sheepskin;
- plush;
- terry;
- foam;
- with reinforced pile.
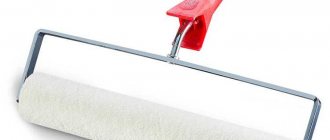
Rollers coated with natural sheepskin are some of the highest quality. They reduce paint consumption to a minimum and provide an even, uniform coating without lumps. Sheepskin rollers are universal, they are suitable for paints on any base - water-based, acrylic, oil. The only disadvantage of such tools is their price: rollers made of natural material are more expensive than their synthetic counterparts.
Plush and terry rollers are a more budget-friendly option. Their main drawback is their low durability, but they are also inexpensive, so a damaged tool will be easy to replace. The texture of the coating depends on the length of the pile. Rollers with long pile allow you to achieve a smooth, glossy surface, tools with short pile provide a relief texture with microbubbles.
Polyacrylic terry roller
The worst suited for painting ceilings are rollers with a foam rubber working surface . They are cheaper than others, but significantly increase paint consumption (it flows off the surface of the roller, staining everything around) and lead to the formation of bubbles on the freshly painted surface, which spoil the texture of the coating.
Foam rollers
Rollers with reinforced pile are considered the most durable. Due to the interweaving of synthetic fibers with metal threads, the cover of the working surface is not deformed, maintaining the same length in all areas. Another name for such rollers is “golden thread”. They are even more expensive than sheepskin, but the quality is worth the investment.
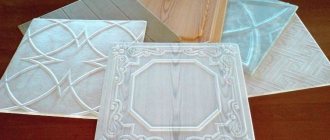
There are also special rollers for embossed finishing of the ceiling , allowing you to leave different patterns on its surface. The working surface of such instruments is made of leather.
Embossed paint rollers
How to paint a ceiling with water-based emulsion with your own hands
Each of the water-based paints has instructions for use on the can. The operating procedure is described there. Some compositions just need to be stirred well before use: undissolved polymers may settle at the bottom of the jar. Some formulations require dilution. The amount of water added is also specified in the instructions and depends on the application method. For spray guns, the dilution is stronger; when using a roller, thicker formulations are required.
Paint tray makes the job easier
When diluting the emulsion with water, add it in small portions. Stir thoroughly and try on a surface area. If the paint goes on evenly and almost completely covers the base, you can paint.
It is more convenient to pour the paint into a special container with a tray and a ribbed platform. You can use a regular basin and a clean piece of oilcloth spread nearby. It's not as convenient, but less expensive.
Which roller to choose
A roller for painting the ceiling with water-based emulsion is needed with dense short pile. You need to examine him carefully. The pile should “sit” firmly and under no circumstances should it “climb out”, even if you pull on it. Then inspect how the seam is made. Under no circumstances should he stand out. It must be difficult to find. It is best if it is made obliquely.
Rollers for painting the ceiling with water-based emulsion
Pay maximum attention to choosing a roller: the quality of painting - the absence of stripes on the ceiling - largely depends on how good a tool you have chosen. It is more convenient to whiten the ceiling with water-based emulsion not from a stepladder, but from the floor. To do this, the roller is placed on a long handle and secured well.
How to paint without streaks
To avoid streaks on the ceiling, painting the ceiling with water-based paint should be completed no later than in 20 minutes. Immediately after application, water begins to actively absorb/evaporate and stripes appear at the junction of the dried and “fresh” paint. Therefore, it is advisable to prepare the room. It is necessary to turn off (wrap up) the heating radiators and prevent a draft. It is also advisable to wash the floor immediately before whitewashing; even if you work during the day, turn on the lighting, this will allow you to better control the quality of the paint. Afterwards you can start working.
Ready-to-use water-based paint is poured into a container, a roller is dipped into it, then rolled well over the site, achieving uniform distribution over the entire surface. When the roller has a uniform color, they begin to paint.
The corners are painted first with a brush. After applying a little paint, take a small roller and roll it out well. Then they begin to paint the main surface. The first layer is applied parallel to the window, the second - perpendicular.
You need to stand so that you look at the area to be painted at an angle. This will give you a good look at how evenly the paint has spread, as well as where you have already painted and where you haven't. Move systematically, without jumping from one piece to another.
It is more convenient to paint from the floor, and to do this, the roller must be attached to a long but light handle
The width of the strip painted at a time is slightly larger than the width of the roller. After wetting the roller, place it approximately in the middle of the strip. Quickly roll the paint in both directions from one wall to the other. Don't waste a lot of time: you don't have much of it. On average, the water emulsion dries in 10-20 seconds. If you didn’t have time to apply the strip next to it before, the border will be clearly visible, which you won’t get rid of. Having distributed the paint more or less evenly over the strip, dip the roller into the paint and roll it out again from the middle of the ceiling. At the same time, go beyond the already painted strip by about 10 cm. All this at a good pace without stops and smoke breaks. The edges of the painted strip should not dry out. In general, these are all the rules.
After applying the first coat of paint, some areas may not be painted as well. You need to wait for it to dry completely and paint it a second time. This should already be enough to obtain a flat surface. If even after the third layer of water-based paint you still have streaks and stains on the ceiling, you will have to redo it again. It is necessary to level the surface with sandpaper, prime it again and paint again.
Do-it-yourself effective ceiling painting technology
You need to paint the ceiling using quick, even movements. The difficulty lies in maintaining an even application.
The surface must be treated within an hour. The process of applying ceiling paint with your own hands includes the following steps:
- Preparing tools. You will need a roller with the required attachment, a paint composition, and a container with a grooved edge. The volume of the water-based composition is selected in accordance with the area of the room. When applying the primary coating, the paint is diluted with water to the consistency of kefir. When forming subsequent layers, thicker material is used. To give the composition the desired color, color is added in small portions.
- Applying the first layer. The nozzle is moistened with coloring agent so that the cylinder is covered on all sides. The excess is removed by rolling the tool on the grooved side of the tray. This will prevent liquid paint from getting onto the floor and causing smudges. A handle is placed on the base of the clasp. The telescopic structure is given the desired length. At the first stage, hard-to-reach places are painted with an angled roller. After this, they begin processing flat surfaces, moving from the window to the front door.
- Applying subsequent layers. After pre-staining, wait 10 hours. The coating must dry completely. The coloring agent is applied in narrow strokes perpendicular to the previous one. After the last layer has been applied, the surface is treated with a clean nozzle, which helps eliminate defects.
Tools and materials
For high-quality painting of the ceiling, we need to prepare the following:
- water-based paint;
- rollers with medium and long pile;
- brushes (150 and 50 mm for painting corners and joints with walls);
- painting tray;
- protective equipment (thick clothing, hat, gloves, safety glasses).
An important point when painting is the initial preparation of the surface, and in order to successfully complete it we will need:
- medium metal spatula;
- fine mesh grater;
- putty;
- primer;
- brush and roller.
At the preliminary stage, you may also need a composition for antiseptic treatment of building structures and masking tape.
Preparing for coloring
Before you start applying paint, you need to prepare the surface of the ceiling.
- If drywall was used for leveling, putty the seams and the locations of the screws, apply a layer of primer and 2-3 layers of putty over the entire surface, and sand.
- It is possible to paint ceilings using old paint, but it is not advisable, especially if water-based dyes were used. The old layer should be removed with sharp spatulas or special solvents, the dust should be washed off using detergents, cracks should be filled with putty, uneven surfaces should be treated with sandpaper, a layer of primer and several layers of putty should be applied, followed by sanding.
- The whitewashed ceiling must be completely cleaned of the old layer of whitewash and the same steps must be followed as when removing old paint.
Materials and tools for preparing the ceiling:
- metal spatulas of different widths;
- solvent;
- soap solution;
- sponge;
- sandpaper of varying degrees of grain;
- putty;
- reinforcing mesh for sealing wide cracks;
- primer;
- brushes for removing dust and debris;
- trash containers.
Materials and tools for painting:
- water-based paint;
- trays or convenient containers for paint;
- masking tape for elements not intended for painting;
- wide and narrow, flat and round paint brushes;
- rollers of different widths.
USEFUL INFORMATION: Adhesion - what is it?
Repair is not only labor-intensive, but also dirty, so you should stock up on a set of clothes and shoes for these purposes. In addition, you will definitely need:
- stepladder or durable construction sawhorses;
- construction gloves;
- a hat to protect your hair from fine dust and paint stains;
- protective glasses;
- respirator (for protection from dust during preparatory work).
How to avoid stains
To get a good result, follow the instructions for applying the mixture. Provide high-quality lighting during work. You should also control the position of the roller, which should be at an angle of 45° to the base, so that the mixture is applied evenly. Work should be carried out without interruptions. If more than 20 minutes elapse between applying each stripe, the boundaries will be visible.
In addition, to prevent streaks from appearing, it is necessary to provide conditions for the composition to dry. It is necessary to turn off the heating, and if this is not possible in an apartment building, cover the radiators with thermal insulation material.
You will have to close the windows from drafts for a while (water-based paint does not have an unpleasant odor).