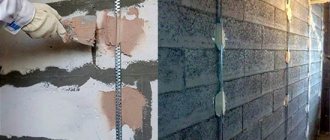
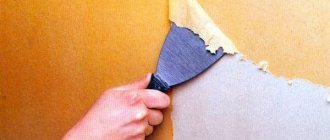
When leveling walls with their own hands, many people wonder how to properly sand walls after puttying? After all, even with the most skillful application of layers of plaster, small irregularities and bumps always remain.
The reason for this is not necessarily a mistake during work. Defects often occur due to sharp corners of the spatula, when connecting two treated walls, or not of the best quality of the material.
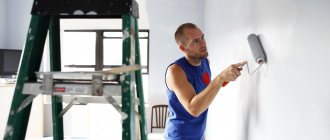
And for subsequent finishing - painting or wallpapering - it is important that the wall is perfectly flat. The quality and durability of the final coating depends on this.
To minimize the number of such problems, professionals advise using a large spatula and working as carefully as possible. The better the quality of the layer of gypsum plaster and putty, the less hassle sanding will cause. And if desired, the process can be turned into exciting work: many admit that the sanding stage is their favorite in the process of finishing walls.
Required Tools
How to sand walls after puttying? For this purpose, special tools are used for grinding surfaces. How to sand the walls after puttying to make the wall as even and smooth as possible:
- For sanding, a sanding block is most often used. This device acts like a grater with a manual base. The block is equipped with sandpaper or an abrasive mesh.
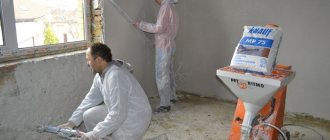
- It is better to use a grinder if grouting needs to be done as quickly as possible. The choice of device is selected depending on the required power - the higher the power, the faster the grinding will be completed.
How to sand the putty becomes completely clear. Now it is important to decide not on the device itself, but on the auxiliary materials. Therefore, the question arises: what kind of sandpaper to rub the putty on and what kind of mesh is needed for sanding the putty.
What kind of sandpaper to use and what advantages are determined here:
- Mesh for grouting putty. It is the most convenient option, since grinding is carried out efficiently and quickly, and most importantly, without dust. In this case, there is no clogging of the material, and its high wear resistance is maintained. The sanding mesh requires periodic change during active work. The dimensions and quality of the mesh can be determined before purchasing.
- Sandpaper for grouting putty. It is a less successful option, but quite effective. It is better to choose sandpaper with a grain number of 60, 80, 100, and then number 120. It is better to take the material in small quantities, as you should check the compliance. Most often, grit number 60 is suitable. For final sanding of walls, sandpaper with grit number 120 is used.
Sanding putty not only requires special tools and devices, but is also performed in accordance with a certain technique. It is important to carry out the treatment without using a primer.
On video: how to sand a wall after puttying.
Stage of enlightenment No. 3: what grain to grind with?
I have already mentioned a couple of times above that the grains of different sandpaper samples can have different sizes. The marking clearly demonstrates this. But why is this necessary, and what kind of skin should you buy then?
Everything is very simple:
- In our country, this issue is regulated by GOST 3647-80, according to which the size of the fractions of the abrasive part is indicated by a two-digit number and the letter “N” . Moreover, the lower the value, the smaller the grains themselves. So, for grinding putty, as a rule, several samples are used one after another: “20 N”, “16 N”, “12 N” and “10 N”, which make it possible to obtain a perfectly smooth surface, suitable even for painting;
- If you buy sandpaper from European manufacturers, then on it you will see the letter “P” and a number from 24 to 600 . And here it’s the other way around: the higher the value, the smaller the faction. For our case, it is best to take “P 60”, “P 80” and “P100”.
Example of a roll of sandpaper “P 100”
How to sand walls
How to sand walls after puttying so that the surface becomes perfectly smooth? It is important to know the technology and methods of how to sand walls after puttying. But first you need to decide on some characteristics of the walls in order to choose what to sand the putty with.
Grouting putty begins with choosing a tool. If the question arises about what kind of sandpaper to do the work with, then you should decide on the degree of processing: the initial sanding is 60 grains, and the final sanding is 120. How to sand the walls of a room with a large area? A machine is best for this, although corners, recesses and depressions will still have to be sanded by hand using sandpaper.
Sanding the walls after puttying is carried out in accordance with the following instructions:
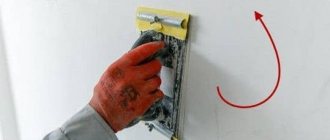
1. First, the most visible irregularities and defects on the surface of the walls are highlighted. What kind of technology is needed for this? A powerful spotlight or lantern that is installed as close to the wall surface as possible. Thus, shadows appear on it from the protrusions or depressions of the putty. These places should be circled with a pencil.
2. How to rub putty correctly? It is better to start cleaning the putty from the corner. You need to move from top to bottom, occupying a strip of about one meter. After processing the designated strip, you should proceed to the next one. The movements should be spiral.
3. The putty on the walls should be sanded carefully, without applying much force. In this case, it is better to use sandpaper. Do not press too hard on the canvas to prevent holes from appearing in the putty. And there is no need to align the recesses with the general level.
4. Cleaning the finishing putty consists of the same steps as the starting one. In this case, polishing is done carefully, but with extreme caution so as not to damage the putty layer. It is better to sand the finishing putty using sandpaper.
To sand walls, you do not need to have experience in the construction industry. It is enough to adhere to a certain technology that is very easy to learn and apply.
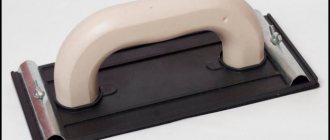
Necessary tool for manual sanding of putty walls
Photo of a manual skinner.
The process of manually sanding walls after applying the finishing putty to them and drying it should begin with preparing the necessary tools.
This list includes the following list of items:
- ladder;
- sandpaper or abrasive installed on the sandpaper;
- manual skinner;
- sanding sponge with cut corners;
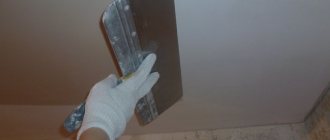
- small spatula.
portable lamp;
Note! You will definitely need to prepare items that protect the master from various negative factors that may arise during the work process. These include a respirator, hat, gloves and special glasses.
Nuances taken into account when choosing sandpaper and abrasive mesh
The photo shows sandpaper with different grain sizes.
When sanding a surface already covered with finishing (construction) materials, there is a main traditional rule: initial sanding should always be done with coarse-grained types of sandpaper, and finishing sanding with fine-grained devices . As for sandpaper, according to this parameter it is divided into types that are assigned a special number.
So, according to FERA standards, there are macro sizes - from No. 20 to No. 240 and micro sizes - from No. 240 to No. 2500. To sand the first layer, depending on the condition of the surface, putty sandpaper with numbers from 120 to 180 is often used.
If the question arises of how to sand the finishing putty, then for such a layer, finer sandpapers with numbers from 240 to 280 are usually selected. To level the surface for painting, you can use types with a higher grit number. In other words, remember that the higher the number, the finer the sandpaper.
Abrasive meshes are also divided into numbered models. For example, a format with an index of 60, which allows you to eliminate large unevenness, is used for sanding surfaces after the initial application of putty.
Photos of abrasive meshes with different grain sizes.
In order to more finely process a wall, for example for wallpaper, a similar sandpaper for grouting putty with a number index from 100 to 120 is often selected, and for painting - from 120 to 150. In a word, the principle of grain size and number index of the mesh is the same as that of sandpaper.
Note! The abrasive mesh costs a little more than sandpaper. But it should be noted that during the sanding process it does not become as clogged as sandpaper, so it will not need to be changed often, so when using one or another option the master will not feel a noticeable difference in the cost of these devices. The only thing is that the abrasive mesh significantly saves physical and time costs.
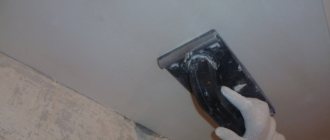
Ceiling sanding rules
How to sand a ceiling after puttying correctly, what tools and methods should be used for this? The ceiling is sanded using almost the same technology as the walls. To perform the work, you should prepare sandpaper. An abrasive mesh may also come in handy.
Wet grinding is ideal in this case. But in this case, the procedure takes much longer, since after each session you should wait until the surface dries.
The ceiling is usually rubbed using a tool such as a grinder. Sometimes the procedure is done manually. How to properly sand the ceiling:
- The sandpaper for puttying the ceiling is the same as for puttingtying the walls. First, with 60 grit, and 120 sandpaper as a polishing tool. If you use the surface for wallpaper, then sanding is done thoroughly and completely.
- It is necessary to produce illumination, which will highlight all the defects against which the skin will be produced. The grater is carried out along a designated strip from one corner to another.
- Secondary putty should be disposed of in the same way. The choice of tool is the same as for the first layer of putty surface.
- After this, the ceiling is primed and treated with antifungal agents. It does not matter whether the ceiling will be painted or wallpapered in the future.
- To process the corners between the walls and the ceiling, use a tool such as a round sanding block. We use this technology for rubbing protrusions and shaped objects.
In any case, the grout base should be sandpaper or graters in the form of a sanding mesh. If it is necessary to paint the ceiling, it is necessary to carry out the treatment with puttying.
In places where depressions appear, it is necessary to carry out secondary treatment with putty.
Stage of enlightenment No. 1: mesh or sandpaper
The first thing you need to answer for yourself before starting work is which abrasive material do you prefer: mesh or sandpaper ? Yes, yes, sandpaper is not the only way out of the situation, but here’s the best or worst way, let’s try to figure it out:
Mesh Features
Samples of grinding mesh with cells of different sizes.
A distinctive feature of this abrasive material is its perforated structure . That is, in this case, the excess putty is cut off by the sharp edges of the cells, after which it falls through them without clogging the working part itself, as happens with sandpaper, which I will discuss below.
The cells are end-to-end, so they don’t get clogged
But we should immediately note a couple of disadvantages characteristic of using the grid:
- Relatively high price of consumables. This means, of course, in comparison with sandpaper;
- Cannot be used in combination with some electric sanders . Sandpaper is much more versatile in this regard.
Features of sandpaper
Enlarged view of sandpaper surface
Although we are accustomed to using the word “paper,” the base of the sandpaper can also be textile. Moreover, it is these models that are more practical, since the abrasive grain has much better adhesion to fabric than to paper.
Now I want to tell you why I personally, as a rule, still choose sandpaper rather than mesh, despite the fact that it has such an unpleasant property as rapid wear.
This is facilitated by the following qualities present in this material:
The rate of clogging of the abrasive surface with putty waste can also be slowed down. To do this, try to sweep away the dust generated during work from the wall as often as possible with a brush.
- Low cost . It’s quite affordable to stock up on sandpaper even for future use, so as not to run to the shops every time you need it.
Here are examples of prices that you can find in construction stores for the product in question:
- With coarse grain:
| Parameter | Description |
| Roll length | 30 m |
| Roll width | 77.5 cm |
| Marking | 80-N |
| The basis | Fabric |
| Cost of one roll | 5900 rubles |
Sample roll of 80-N sandpaper
- With fine grain:
| Parameter | Description |
| Roll length | 30 m |
| Roll width | 77.5 cm |
| Marking | 10-N |
| The basis | Fabric |
| Cost of one roll | 6490 rubles |
- Versatility , which I already mentioned. The sandpaper is cut in the form of any tape or circle, in any size, after which it can be installed on any electrical grinding equipment;
Sanding belts for belt sander
- Ease of processing hard-to-reach areas . To do this, just bend a piece of sandpaper, which will result in a fairly rigid bend with an abrasive coating, which can be used to sand the corner and get behind the battery. With a grid, this trick simply won’t work;
- High quality results due to the use of models with different grain sizes. There are also meshes with cells of different sizes, but sandpaper is more varied in this matter. This allows you to start with large grains, removing noticeable errors, and finish with the smallest ones, bringing the wall surface to a perfectly smooth state;
Round eccentric blades with different grain sizes
Surface treatment after grinding
After surface treatment, further finishing cannot be started immediately. First you need to remove all construction dust that has settled on the walls and ceiling during the sanding process. To do this, you can use a tool such as a construction vacuum cleaner.
You need to walk around the entire perimeter of the surface and carefully remove all dust. If it is subsequently mixed with paint or wallpaper glue, lumps and lumps may form.
The second method of cleaning surfaces from dust does not require the use of a special tool, so it is the most acceptable in many cases, although it is much more labor-intensive. The methods used are as follows:
- Use a wide brush with soft bristles to brush off as much dust as possible. You can use a regular broom. The main thing is not to press too hard, since putty is a very plastic building material.
- After this, a secondary cleaning method is performed. Wet a cloth in cool water and wring it out well. Run the cloth over the walls and ceiling. Textiles should not fade, otherwise marks and stains will remain, which may subsequently appear through the paper layer or paint.
- You need to wait until the putty is completely dry, and only then proceed with further finishing. To avoid washing out the construction mixture, the fabric should be slightly damp.
In any case, dust must be removed completely to avoid corrosion of secondary building materials. You should not use only a rag, as it is almost impossible to remove dust in this way.
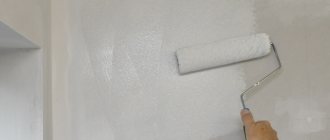
After cleaning, you need to proceed with further actions: priming and treatment with antifungal agents.
High-quality grinding and further processing before finishing is the key to a successful repair. The sanding surface can be several types of sandpaper or mesh.
Sanding after plastering the walls must be done, as this solution will be an ideal option for a good basis for repair work. Even if the leveling was initially performed poorly, then with the help of further finishing it is possible to visually compensate for this defect. It is possible to carry out such a procedure, that is, to rub the putty, without the involvement of specialists - independent processing is quite suitable.
Recommendations for cleaning walls (2 videos)
What you might need for work (25 photos)
Dust treatment
Now all that remains is to get rid of the dust. This can be done in two ways.
- Use a construction vacuum cleaner to go around the entire perimeter. Don't forget about the corners, where most of the small crumbs from putty can get clogged. Additionally, after vacuuming, you can brush away any remaining dust with a large soft brush or a special brush.
- In the second case, you will need a wide brush with soft bristles or a regular soft broom. You can use a special broom brush to remove dust. Gently brush away all dust. Then soak a rag or sponge in water and wring it out well so that the material is slightly damp, but the water is not dripping. Walk along the walls, lightly touching to remove any remaining dust without damaging the putty layer.