01/12/2020Repair0
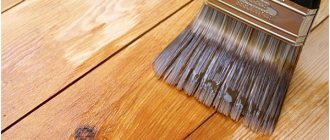
If you have to paint a wall for the first time, the question inevitably arises of what to do with the surface topography. It is clear that huge potholes need to be repaired, but whether it is worth bringing the area to perfect evenness is a question that is important to answer for yourself even before painting begins.
- 1 Does the topography of the wall greatly affect the result?
- 2 To what extent should the wall be leveled?
Creating a flat surface
Leveling the walls with plasterboard will solve the problem of curved surfaces
In new houses that have just been built, as well as in some old apartments, the quality of wall coverings is not the best.
There are different differences on the walls, in some cases reaching 2-5 cm.
In addition, cracks and holes always accompany buildings, so you can level the base for painting using several methods:
- If there is significant curvature on the surface, the corners of the walls do not match, and there are displacements, then it is recommended to use frame technology. To do this, a sheathing is created, which is attached to the curved walls, after which sheets of plywood, plasterboard, chipboard and other flat materials are installed. Then the entire plane is leveled and only then paint is applied. In the modern world, people use drywall for this technique because it is inexpensive and easy to work with.
- The second leveling method is the use of plasters or mortars based on sand and cement. This method is also called raw or wet. The method is used for minor defects and differences that do not exceed 5 cm. If the curvature is more than 5 cm, then it is better not to use the method. The use of cement mortar is the best option for brick.
Painting smooth walls will be a pleasure if you do them using the frame method. The wall turns out to be smooth, and insulation can be laid between the sheets of drywall and the wall itself.
Plastering
Gypsum plaster
Applying plaster involves preliminary preparation of the load-bearing surface. Depending on the material, it may vary slightly in nuances.
Step by step process
Before preparing the walls for painting, you should familiarize yourself in detail with all stages of the work. In a new house with untreated walls, it is necessary to determine how smooth they are. To do this, use a long building level or plumb line. By measuring the entire wall area with a tool in both vertical and horizontal directions, you can get a complete picture of all deviations from the norm.
According to the SNiP regulations, the permissible value of the “blockage” of the wall is no more than 0.5 cm for every 3 m. If the deviation is larger, it is necessary to level it using plaster mortar.
For ease of work, beacons are installed along the entire wall - marks made of smooth metal tubes or wooden slats. They are installed on mortar patches as follows:
- 2 starting beacons are placed in the corners of the wall.
- Twine is stretched between them in the upper and lower parts.
- The remaining beacons are placed along it every 0.8 - 1 m.
When installing intermediate beacons, they should not be pressed tightly against the stretched twine. Otherwise, there is a possibility of its gradual deviation outward. There should be a gap of 1-2 mm between the beacons and the thread.
Installation of beacons
Types of plaster solutions for different walls
Then plaster mortar is applied to the wall and left for 0.5-1 hour. After it has dried slightly, it should be pulled out using a rule or a wide spatula, and the beacons should be removed. After 12 hours, when the plaster has set, final leveling is carried out with metal grout or a wooden polisher. Plaster mortar can be purchased at a hardware store in the form of a dry mixture, or you can make it yourself - the proportions of various solutions are given in the table.
Increased adhesion
It is easiest to plaster a brick wall, thanks to its relief structure, to which the mortar clings well. In this case, the plaster can be applied directly to the wall, only by cleaning it from dirt and treating it with a primer. The need and method of priming when preparing walls for painting with your own hands will be discussed below.
For high-quality plastering of walls made of monolithic reinforced concrete, it may be necessary to increase its adhesion. Modern technology for pouring a monolith involves the use of collapsible formwork made of sheet steel or laminated panels. This makes it easier to install and dismantle the formwork, as well as obtain a more even surface.
But an overly flat concrete surface also has its disadvantages. The wall, smooth to a glossy shine, has a very low adhesion rate with any finishing compounds. As a result, coating with any solution will not be durable.
The building is a concrete monolith
To increase adhesion, the concrete wall is pre-treated with various abrasive or impact tools: a grinder, a mason's pick, a hatchet, a chisel, etc. As a result, the surface becomes covered with notches or acquires a rough structure.
Another option for increasing adhesion is plaster mesh. It is attached to the concrete using dowel nails and serves as a strong base for the plaster mortar.
Wooden surfaces have poor adhesion to plaster mortars. This is due to the physical characteristics of wood, as a result of which any mixtures will not stick to it.
The wooden wall must be additionally prepared for plastering. For this purpose, a plaster metal or fiberglass mesh is also used, or shingles - thin wooden slats - are criss-crossed onto the surface.
The mesh can vary in cell diameter: the thicker the layer of plaster, the larger the mesh must be used.
Stage 1. Removing old coatings
www.stroy-podskazka.ru
If you have started the initial finishing of a new building, this stage will be quick and easy. In older homes it can take several days or even weeks.
At this stage, all old and weak coatings that interfere with the new finish and/or threaten its durability should be removed.
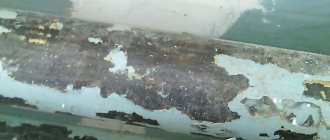
Please note: we are talking not only about old finishing materials (wallpaper, whitewash and chalk putty, tiles, etc.), but also about plaster that has lost its strength. It definitely needs to be removed. You cannot build a house on a dilapidated foundation. New plaster applied over worn old plaster will simply fall off.
As a result of the work at this stage, only solid foundations should remain; they are primed and dried.
How to check
Feel the walls and ceilings in different places. The palm should remain clean and dry.
The nuances of leveling for painting
Finishing of walls with paint is carried out in several cases:
- Wallpaper was hung for painting;
- applied decorative plaster requires an accented color scheme;
- I want to change the color of liquid wallpaper;
- The decision was made to paint the walls.
In the first three cases, the walls are painted without leveling; in the latter, a complex of work is required to prepare the surface for painting. After all, slight curvature or surface defects (various shells, dimples, tubercles) are not hidden under a layer of paint, but, on the contrary, are accentuated by various lighting sources.
In the process of preparing walls for painting, the bulk of the work falls on leveling the surface to be painted. However, before this preparation stage begins, a number of technological operations must be performed. Let's give a step-by-step algorithm.
Step 1. The room is cleared of furniture, paintings, mirrors hanging on the wall, etc. Sockets and switches are removed. As a last resort, the furniture is moved to the center of the room and covered with plastic wrap. The floors are covered with old newspapers, film or cardboard from various packaging.
Step 2. Remove the old finish. This could be wallpaper, paint or tile. For each of these materials there are long-established removal methods.
Wallpaper
To remove wallpaper you will need:
- warm water;
- putty knife;
- soft sponge;
- spray.
In difficult cases the following will help:
- wallpaper "tiger";
- construction steamer or iron with a towel.
Most types of wallpaper can be removed with a spatula after wetting with water. For moisture-resistant wallpaper, you need a wallpaper “tiger” or a needle roller to break the water-permeable film. Damaged wallpaper is moistened with a sponge or spray bottle, after which (after 20-30 minutes) it is removed with a spatula. You can also influence the molecular structure of wallpaper glue with hot steam. To do this, use a steamer or iron with a damp towel.
Professional builders often resort to special washes to speed up work, which is not advisable to use when doing work yourself due to the toxicity of the solutions.
Dye
In the recommendations for preparing walls for finishing, the order of work is as follows:
- old finishing is removed;
- the walls are tapped to identify places with loose plaster;
- loose plaster is removed, etc.
For some reason, this chain ignores the fact that some of the paint can be removed along with the plaster. And if the plaster is completely removed, then there is no need to remove the paint. If you still have to remove the paint, you will need to find (buy, borrow, rent):
- hair dryer or blowtorch;
- a grinder with various attachments: a round metal brush or chains;
- narrow spatula;
- hammer;
- chisel;
- axe;
- knife.
If the work needs to be done quickly, literally in a couple of hours, buy paint removers and a brush. The choice of a specific paint removal method depends on the availability of tools, the type of paint (oil-based or water-based), experience in performing similar work and personal protective equipment. For example, you cannot use an angle grinder with attachments if you do not have a respirator - the probability of ending up in a hospital bed tends to 100%.
The most acceptable methods for removing paint from walls at home are a chisel with a hammer or a hair dryer with a spatula. In extreme cases, the paint is cut off with an axe.
Easier with whitewash. Here it is soaked with a sponge and then washed off with a rag or the same sponge. The processes of removing wallpaper and paint are described in detail in the work posted on our website: “How to prepare walls for wallpapering?”
Ceramic tile
The tiles, just like old plaster, are removed with a hammer drill. The work can be done manually, using a hammer and chisel - less dust, a little quieter. But then the process will last for several days, for which you need to be prepared in advance.
Step 3. The walls are inspected to identify loose plaster. Experience shows that in most cases it must be removed completely.
Step 4. Remove the old plaster.
Step 5. The surface of the walls is cleaned of various contaminants: soot, grease, mold, if any, etc. You can see how to do this work yourself in the material “How to prepare walls for plaster?”
Step 6. The walls are being repaired. Small cracks are widened and deepened using a hammer and chisel or a grinder with a special circle. This is done so that the repair solution has contact with a larger surface area of the resulting gap - there is a higher probability of keeping the wall from further cracking.
Before sealing the defect with a repair mixture made of cement (gypsum, polymer sealant or repair putty), the crack must be cleaned of dust and primed, twice. As the building shrinks, wide cracks may appear in the walls. Before sealing with mortar, they must first be tightened with reinforcing bars or metal staples.
Reinforcing bars are embedded in prepared grooves, and metal strips are placed on bolts. All metal parts are treated with an anti-corrosion compound before installation in the wall, and then after installation, to prevent rust. The crack is sealed with a repair compound or polyurethane foam with a low expansion coefficient.
Step 7. The walls are hung. The process is described in detail in the article “How to properly plaster a brick wall?”
In new buildings, work on leveling the walls begins with hanging. Based on the results of the hanging, a decision is made on the method of leveling the walls: wet or dry.
General information on preparing walls for painting
You should not neglect preparing the walls for painting. This will allow you to get a high-quality and even coating. Defects and irregularities easily appear through a thin layer of paint and varnish composition. If they are not eliminated, the coating will look sloppy.
Preparation includes dismantling the old cladding, puttying, and priming. Sometimes it is necessary to additionally treat the surface with antiseptics and antifungal compounds to reduce the risk of mold development.
It is necessary to carry out preparation strictly step by step and sequentially. Before the next step, wait until the wall is completely dry.
You should not neglect preparing the walls for painting.
Preparing for work
Before you start leveling the walls, you need to clarify that a variety of surfaces are suitable for painting. As a rule, the following options are distinguished:
- plastered and putty surfaces;
- smooth surfaces (plastic and wooden panels, tiles, wallpaper);
- textured plaster;
- relief finishing materials.
In each of these cases, wall alignment has its own distinctive features that need to be known and taken into account.
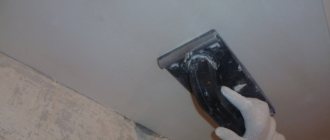
The most effective and popular is leveling walls using putty.
Wall alignment diagram.
Before leveling the walls, you need to carefully study all stages of the work and understand what techniques are used in certain conditions.
Before starting work, prepare the following tools:
- several spatulas of different sizes;
- marker;
- chisel;
- small axe;
- portable lamp;
- hammer.
Return to contents
Stage one: inspect the wall covering
Before deciding what to do next, inspect the walls and try to figure out what kind of paint they were painted with. This will determine how the putty will lie on the surface and how long it will last. To smooth out defects in concrete, putty EP 0010 is often used.
As a rule, water-based or oil-based enamel is used to paint walls. To understand what type of paint was used in your case, moisten a sponge with warm water and scrub the wall thoroughly. If foam forms on its surface, it is emulsion paint. It cannot be puttied - the mixture will not last long and will fall off at the first opportunity. This paint must be washed off.
If the paint does not foam or wash off due to water, it is made on the basis of a non-aqueous solvent, for example, drying oil. This paint can be puttied - it will not react. But before you start working, go over the surface of the wall with a wire brush or spatula and remove all flaking pieces of the old coating. The putty will only hold if the paint does not peel off.
Building mixtures for leveling
To level the walls, you will need to prepare auxiliary materials, the description of which is given in the table:
| № | Materials | Description |
| 1 | Ready putty | The diluted putty must be used within a short period of time, otherwise the residue will thicken and the remaining amount can be discarded. It is recommended to purchase materials strictly according to the estimate. |
| 2 | Dry putty | It is more economical to buy dry mixtures, which can be diluted with water if necessary. Often mixtures are sold in bags of 25-30 kg, consumption is approximately 1-1.2 kg per 1 sq.m. The powder is poured into water according to the proportions indicated on the package, and then thoroughly mixed with a mixer. |
| 3 | Primer | Additional material that allows the putty to better adhere to the wall. The soil prevents the appearance of mold and dampness on the walls. On average per 1 sq.m. About 100 grams of primer are consumed. Often sold in metal cans or canisters. |
You need to prepare the putty in such a quantity that it is enough for the work and does not remain for a long time.
You need to work at average temperature, the room should not be more than 25 degrees.
Dry air is also not allowed in the room; humidity must be maintained so that the plaster dries evenly.
Before using the primer, it must be thoroughly mixed, and if necessary, diluted with water or solvent.
Tools
When doing the work yourself, you will need the following tools:
- it is better to purchase several spatulas of different sizes for work, they will help in applying the composition;
- a marker is required for initial preparation and marking;
- a portable lamp, it will provide complete lighting;
- small axe, hammer and chisel;
- abrasives: mesh, sandpaper, bars.
For puttying with your own hands, you may need: spatulas, a lamp, sandpaper and other tools.
When performing processing, all tools should be in the direct access area so that it is convenient for you to use them.
Methods for determining surface roughness
The degree of unevenness is determined visually or instrumentally by taking measurements. Knowing the size and type of deviations from the ideal geometric shape allows you to make a rational decision when choosing a correction method, as well as calculate the approximate volume of necessary materials. How to check how uneven the wall surface is?
To identify unevenness and their size, use a long (2-2.5 m) flat strip with a cross-section of 20 x 50 mm or a rule of the same length, as well as a level or plumb line. Applying the strip to the wall vertically, horizontally and diagonally, observe the deviation of the wall surface from the plane. To check the perpendicularity of the structures to each other and to the ceiling, use a square or measuring devices (tape measure, cord).
Lines are drawn horizontally on the walls forming the corner and measured from the corner on one wall - 2 m, on the other - 1.5. The legs of a right triangle are formed, the hypotenuse of which (the distance between the marked points) should be equal to 2.5 m. The distance less or more will show, respectively, an acute or obtuse angle between the walls.
Verticality or fall is checked using a plumb line or level. This and previous geometric checks can be done quickly and easily with a laser level.
Leveling a brick wall
A thick layer of mortar requires reinforcement with metal mesh
If the leveling is carried out without using a frame technique, then the wall is immediately puttied. For brick you will need to complete the following steps:
- The old coating must be dismantled.
- All remnants of glue or finishing materials are washed off and then impregnated with antifungal agents. This will prevent mold and black spots from appearing on the surface.
- If the differences are small, up to 2 cm, then no additional work will be required. If the difference between the walls is large and the solution will be applied in a layer of more than 2 cm, then a special reinforcing mesh is applied to the surface of the wall.
- Next, vertical beacons are installed. They are leveled and attached to the walls using cement or plaster at a distance of 50 to 150 cm.
- Now the cement mortar is mixed and thrown onto the wall between the beacons. Using the rule, the solution is stretched along the wall from bottom to top; the movements of the rule should be in the form of a zigzag.
- When the entire space is filled, it is necessary to evaluate the evenness of the surface and, if necessary, add solution to the depressions and repeat the work.
- After the solution has dried, primer is applied to the wall and left for several hours to absorb. Then the finishing putty is spread and the surface is brought to perfect evenness.
After the work has been done, the surface is considered ready for painting. If necessary, you can additionally walk along the wall with sandpaper to smooth the surface. For more information about leveling brickwork, watch this useful video:
Before throwing the solution between the beacons, you should take care of laying out new wiring, as well as installing boxes for sockets and switches.
Preparing drywall
After the frame of the profiles has been made and installed, sheets of drywall should be secured to it using self-tapping screws. Then the plane is leveled, but for the final completion of the work, the sheets of drywall must be puttied.
The work process looks like this:
- When attaching sheets of drywall, it is necessary to remove chamfers from the material along the edges, this allows you to get rid of unevenness and obtain smooth joints with small gaps.
- All screws should be slightly recessed.
- Next, you need to dilute the putty according to the instructions indicated on the package and apply it to the joints, and then use a large spatula to apply the mixture over all sheets.
- All seams on the sheets must be sealed with reinforcing tape. To do this, after the first applied layer, a tape approximately 5 cm wide is glued to the mixture and covered with a second layer, which helps prevent the appearance of cracks.
- The depressions made from self-tapping screws are puttied, and the surface is brought into a common plane.
- When a couple of layers have dried, the walls need to be sanded for perfect evenness.
Putty when leveling walls: how to do it
- Carefully inspect the walls; if they are uneven or rough, you must first treat them with plaster.
- If there is old coating, such as paint, plaster, they must be removed.
- If they are leveling with drywall, check that all the screws are screwed in and do not protrude on the surface.
- When leveling with putty, you must use the rule to determine the evenness of the walls: apply a strip or level to the surface of the wall, monitor the size of the existing gaps between the wall and the tool, and determine the scale of subsequent alignments.
- Next, putty is applied. Putty is putty in two stages - starting and finishing.
- The next step is to apply the primer. It is necessary to save paint or glue in subsequent stages.
There are two types of putty. Starter – coarse-grained, suitable for the first layer of application, smoothes out shallow unevenness in the wall. The finishing putty is fine-grained, suitable for the final application of the layer, making the surface smooth.
Preparation stages
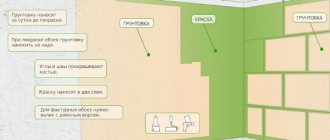
The specificity of the painting technology is that the wall must be prepared with special care. A thin layer of paint and varnish composition will not be able to hide even the smallest flaws of the surface being painted. The technology for preparing walls for painting depends on the type of surface to be painted, the material from which it is made, and the type of paint. In general terms, preparation for painting walls in a new building without preliminary finishing consists of the following steps:
- Rough leveling using base plaster.
- Surface putty: starting and finishing.
- Primer.
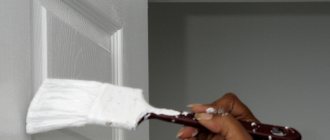
- Coloring.
The wall, which has already been treated by any means, must be cleaned of the old finish right down to the very base. Only after this can you begin to prepare the wall for painting.
Leveling a concrete wall
A nylon mesh located between two layers of plaster will protect the coating from crumbling
Leveling a concrete wall for painting is a little different than a brick base. Those who do not know how to level concrete walls for painting can use the step-by-step guide:
- The walls are cleaned of old coating.
- A primer is applied to the surface, which is intended only for concrete.
- After 6 hours, this is exactly the time needed for the primer to dry, you should dilute the starting putty and begin applying it to the walls.
- After the first layer of plaster has been laid, you will immediately need to apply a nylon mesh directly onto it, the cells of which are 2 x 2 cm. Such a mesh will not allow the plaster to crumble over the years and will keep it in a heap.
- A second layer of solution is applied on top of the mesh. In this case, there is no need to wait until the previous layer hardens.
- The movements of the spatula should only be cross-shaped, gradually stretching and leveling the putty. It is better to use wide types of spatulas.
- When the second layer is laid, the wall should be allowed to dry for 24 hours.
- To ensure the most even surface possible, apply finishing plaster in a very thin layer. She will be able to level out and remove even minor holes.
- After another day, the walls are sanded with sandpaper to give them perfect smoothness and evenness. Watch all the intricacies of concrete leveling in this video:
Now the concrete base is ready for painting. To improve the adhesion of materials, primer is used before applying paint, and the surface is left to dry for the time specified in the instructions.
For concrete walls, gypsum-based plasters are used. Such mixtures are inexpensive and show excellent performance characteristics. They are flexible, easy to work with and adhere well to the surface.
How to properly prepare walls for painting
Preliminary preparation of walls involves an impressive range of work. The result of their consistent and careful implementation will be perfectly smooth surfaces. The list includes cleaning the wall from the old coating, removing crumbled plaster and applying new one, leveling the base, filling potholes, cracks, priming, and treating with an antiseptic solution. Owners of new buildings with so-called “gray” renovations are luckier - at least they won’t have to remove the old finishing and organize garbage removal.
A new house may settle in the first few years and eventually cracks will appear in the paint. The situation will be saved by fiberglass or facade mesh for exterior use, glued to the wall at the plastering stage.
The first step is to clear the room of furniture, curtains, and hanging structures. After this, you need to carefully examine the surfaces and choose the right algorithm of action.
Assessment of wall unevenness
To properly level the walls for painting, you need to find out the degree of unevenness of the wall. To do this you will need a level, a plumb line, thread and nails. With their help, beacons are set, which identify unevenness and differences. Depending on their size, the technology for leveling walls for painting is selected:
- To level smooth concrete walls with differences of up to 5 mm, you only need putty.
- It is better to plaster differences of up to 3 cm first, then putty.
- Differences greater than 3 cm are plastered using reinforced mesh. For final leveling, putty is used.
Removing defects and leveling
As already noted, such preparation of walls for painting is necessary if the surfaces are far from being ideal.
Defect control
Small and relatively rare imperfections (no more than 25% of the entire area) are a reason to carry out restoration only in such areas. For example, it is not too difficult to rid the base of cracks.
- First, the defect is expanded - the “crevice” is enlarged for better adhesion of the base to the putty. At this stage, use a chisel and a hammer, and help yourself with a spatula.
- The widened crack is cleaned of debris and dust with a brush. Then they are treated several times with a deep penetration primer, making sure to go to “healthy” areas.
The prepared hole is filled with putty using a spatula. After the composition has dried on its own, the area is sanded with sandpaper or a sanding mesh. In the same way, areas with chips or dents are restored. Deep “holes” will require several layers: before applying the next one, the previous one must dry on its own.
Alignment of walls
If the walls are uneven, then the surfaces require adjustment. You cannot skip this stage, since almost any decorative coating will not save the situation. An exception may be some types of finishing (for example, liquid wallpaper, decorative plaster); there are no other options for paint. Potential materials for this stage are drywall or gypsum board, as well as plaster and putty.
Drywall or gypsum fiber
If the curvature is slight, then the sheets are glued directly to the walls using the frameless method. The “leveler” is gypsum glue. Serious changes require the construction of a frame made of metal or wood. In this case, the area of the room will be reduced, so this option may not appeal to everyone. In addition, to hang shelves, a TV and other heavy objects on the wall, you need to build wooden inserts into the frame.
Plaster
This type of material gives you the chance to get flawless walls. With this alignment, special “assistants” are used - beacons. They can become “piles” of plaster mixture and a profile. The operation consists of several stages.
- First, the base is primed. After the composition has dried, markings are made on the wall for installing beacons. The recommended distance between them is 600 mm. Then they are placed on the surface.
- Then plaster is applied to the wall using a trowel. After completion of the work, the mixture is leveled using the rule, focusing on the height of the beacons.
- To prevent the formation of cracks, a reinforcing mesh (fiberglass) is glued onto the raw material.
This operation does not involve creating a perfectly flat base, since small flaws will be covered by the following material.
Useful tips
- Since the quality of painting work in general depends on the quality of each stage, try to put the entire complex of plastering and painting work into one hands. The master will know that he is responsible for the final result, and will not deliberately slack on the preparatory stages.
- When drawing up an estimate with the foreman, break the entire scope of work into more or less large parts. If you have to part with the master, you will know how much to pay for this or that type of work.
- At the very beginning, discuss the quality you want to receive. Specify how you will check it. The higher the desired quality, the longer and more thorough the work will be, and the more expensive it will be. Draw up a contract on paper and specify in it the quality requirements and methods of controlling it.
- Ask the master more questions. A qualified specialist will never refuse to explain to the customer what he is doing and why.
Good luck with the renovation!
We begin to dismantle the old coating.
Removing plaster from the ceiling usually takes a third of the time of the entire job. It's easy when you know exactly what layer is applied and what it consists of. But, if you moved into an old apartment and decided to do the ceiling plaster yourself, expect multiple layers. Often, without completely removing the whitewash, they glue wallpaper, then leaving pieces of wallpaper behind, glue the tiles, and then apply plaster to the remaining glue. This is a real problem, because each of these layers is removed differently. To help you, there is a list that answers the question of how to remove plaster from the ceiling of different layers.
Composition of the layer and method of its removal.
Options for dismantling water-based paint:
- Use a spatula in combination with a hair dryer, heat the surface and scrape it off.
- An electric drill with a metal attachment will remove an additional layer of putty.
- A special liquid (Dufa remover), after applying which after 30 minutes you can freely remove everything with a spatula.
Dismantling lime whitewash:
The whitewash must be removed; the mixture will not adhere to it, at least qualitatively. The consequence is shedding and the appearance of bubbles. This is due to low adhesion to whitewash. To remove, the surface is soaked with water and passed with a spatula. Having reached the concrete, it is advisable to also rinse it with water. The same actions are performed when removing thin lime plaster.
Plastering in difficult places (corners and places where heating pipes pass):
A spatula and a hammer will come to the rescue, with the help of which all the irregularities will be knocked down
It is important to remember that it is prohibited to remove reinforcement and functional unevenness of load-bearing floor slabs
Mold and other growths:
For such cases, everything has long been invented. It is enough to buy a special mixture and spray it on the base of the ceiling. After the specified time on the packaging, everything is washed off with water. One of these mixtures is called “Homeenpoisto” from the Tikkurila company.
Cost of work
Leveling surfaces for painting compared to leveling for wallpaper requires special care and precision, so if you are not confident in your abilities, you can entrust this part of the repair to specialists. Prices for services will be approximately as follows:
- In Moscow, leveling walls with plaster using beacons will cost from 300 rubles. per 1 m2, plasterboard using a frame - from 500 rubles. for 1 m2, using the adhesive method – from 350 rubles. for 1 m2, putty - from 100 rubles. for 1 m2;
- in St. Petersburg, plastering walls on lighthouses costs from 280 rubles. for 1 m2, plasterboard cladding on the frame - from 460 rubles. for 1 m2, without frame - from 320 rubles. per 1 m2, puttying work - from 80 rubles. for 1 m2;
Prices for leveling walls in regions vary greatly, in large cities approaching the level of capital cities.
In order for the apartment renovation to be completed successfully, you need to know how to level the walls correctly for painting or wallpaper, what actions need to be performed and in what sequence.