It would seem that it could be easier to tear off the wallpaper and cover the walls with paint. But on the way to the perfect finish there are many obstacles, from cracks in the walls to choosing the perfect paint color. Not long ago, I myself had to decide how to paint a tiny toilet room, so today we will start the conversation about renovation from the end: in the article you will see 10 painting options that you can take note of, and in the following materials we will figure out how to level the walls with your own hands and what paint is better to use.
Two colors
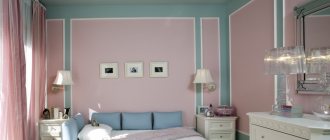
The easiest and most popular way to paint walls is to leave them white at the top and make the bottom part colored (you can do the opposite). White color will prevent the room from becoming too dark, and the color will add emotion and hide small stains that inevitably appear on the wall closer to the floor. Unfortunately, two-tone paint is too reminiscent of a typical rough-and-tumble renovation, so avoid blues and greens, or at least choose or create a complex shade instead of just adding one standard color to a white base.
photo: fourgenerationsoneroof.com
Features of using paint in the bathroom
Using the painting method in bathroom design has a number of advantages:
- A wide range of colors allows you to create a unique interior.
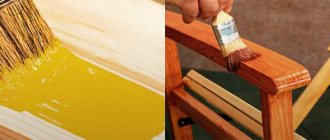
- Unlike the labor-intensive and costly task of laying tiles, painting is a quick and inexpensive way to transform a space.
- High-quality modern products create a protective layer, preventing the appearance of fungus and mold.
- Compliance with the stages of painting walls is a guarantee of the durability of the created decorative coating.
Painted walls will help create a unique bathroom interior.
If necessary, you can paint already laid ceramic tiles. The main thing is that the surfaces are properly prepared, cleaned, sanded and primed.
Sloppy border
Variation on the theme of two-color walls. It looks more interesting due to the uneven border between the colors and, on the one hand, requires less accuracy, and on the other, a certain artistic taste. One important point: it is better that the walls are perfectly smooth, then there will be no feeling of an abandoned renovation halfway through.
Photo: Dennis Brandsma / Styling Fietje Bruijn
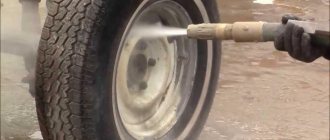
Ways to paint a bathtub
To restore bathtub enamel, three main methods are used and everyone decides for themselves which one is better:
- bulk;
- enamelling;
- aerosol.
The pour-in restoration method, at first glance, is one of the simplest. More often it is used to restore a cast iron bathtub. Acrylic is poured onto the sides of the bathtub. Liquid paint flows down, forming a new coating. The pouring technique allows you to correct unevenness, close cracks and make the surface perfectly smooth. But using acrylic without experience or minimal skills is quite problematic. Drips may form.
Pouring technique
Painting a bathtub with enamel
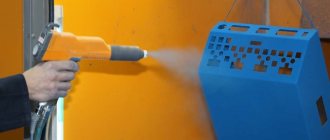
The aerosol method is really the simplest. Spray paint does not need to be pre-prepared. It is possible to immediately choose the appropriate color. Before use, shake the can well for two to three minutes.
Aerosol use
An alternative way to update your bathtub is to install an acrylic liner. Particularly suitable for restoring an old cast iron bathtub. This coating is installed using glue. The method is fast, simple and effective. The only difficulty is in caring for acrylic. He does not like aggressive cleaning agents and is sensitive to mechanical damage.
Acrylic liner
This is interesting: Properties and rules for applying paint for road markings AK-511
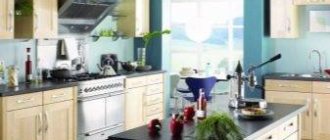
Dark backdrop
You can paint just the far wall dark. This version of two-tone painting does not cause unpleasant associations, but retains all its advantages, except that you will have to pay more attention to the cleanliness of the white walls. If you decide to brighten one wall, make sure that you carefully press the masking tape around the perimeter, and that the remaining walls, if they are already painted white, are covered with something: it will be very difficult not to stain them.
Photo: pinterest.com
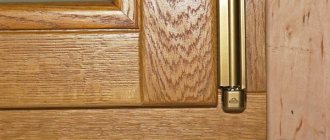
Features of sitting with a microlift
The newest versions of toilets are models with micro-lift seats. Such designs are popular not only for private use; they are often installed in sports or shopping centers. Configurations and models may be completely different, but they are all easy to use and maintain.
The bowl does not have a foot in similar products, and the tank is mounted into the wall. The metal frame can be installed in any convenient place. The variety of modern designs allows you to use original models even in compact rooms.
Large drawing
The rule that says that a bright and large print has no place in a small room is not universal; it can and should be broken. In the example in the photo, wallpaper is used, but if you wish and have artistic talent, you can paint the walls yourself. It will at least not be boring: no one expects bright walls in a small room, especially if it’s a toilet. In addition, experimenting in the most hidden corner of the house is convenient if you decide to decorate your apartment in the same style, but are afraid of getting tired of the monotony.
Photo: duitang.com
Sealing cracks
To hide defects after removing the coating, the walls are puttied. Professionals level surfaces in several stages:
- Applying primer. It strengthens the base and improves adhesion between it and the leveling layer. Processing is carried out in two passes.
- Then the walls are plastered. To do this, use a wide spatula to evenly distribute the composition. The procedure is performed carefully to save time on grouting.
- If necessary, cover with finishing putty.
- At the final stage, the irregularities are sanded with fine-grained sandpaper.
Important! If the floor in the toilet is covered with paint, unevenness can be eliminated with a self-leveling mixture. This procedure does not take much time.
Ornament
Walls covered with ornaments look a little colorful, but not boring. The example again uses wallpaper, but you can achieve a similar effect using homemade or store-bought stencils. In the photo the walls are not pressing due to the fact that the ornament is interrupted by a painting, and there is a window in the wall. In Russian houses you won’t find windows in the restroom, so you can just leave one wall a single color or hang a larger poster.
Photo: lonny.com
Preparatory stage
Before you start painting the toilet, you need to carefully prepare the surfaces to get a good result. Since the paint practically does not hide any irregularities, due attention must be paid to the finishing procedure. Stages of preparing a wall for painting:
- Removal of old paintwork and various facing materials.
This can be done using sandpaper, a grinder with an emery disc, a spatula or all kinds of solvents. To remove wallpaper, just soak it with water. Cleaning the ceiling from whitewash is best done with a sponge or soap solution. There are several methods you can use to remove old paint from ceilings or walls:
- mechanical - removing the old coating using a scraper;
- chemical - using a special solution called a wash;
- thermal - heating the paint with a blowtorch or hairdryer, after which a spatula is used to remove it.
- Cleaning the surface of walls and ceilings from dust using warm water. After this, the walls are carefully primed with one layer of mortar. Also at this stage it is necessary to prepare the pipes for painting by removing the layer of rust from them.
- Covering uneven areas with waterproof putty containing acrylic. For this purpose, it is best to take a wide spatula, which allows you to evenly distribute the putty over the surface in a thin layer. All movements should be as careful as possible in order to subsequently reduce paint consumption. If there is such a need, the walls and ceiling can be additionally treated using finishing putty.
- Sanding all irregularities and defects with fine-grained sandpaper. At this stage, it is better to treat the walls with antiseptic solutions, copper sulfate or regular bleach, which will avoid the appearance of fungus.
- Priming a carefully leveled surface must be carried out in several layers. This manipulation is best done using special latex solutions that contain antibacterial components. In this case, before applying each subsequent layer, you must wait until the previous one has dried.
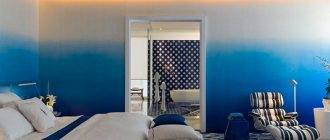
Perspective
The easiest way to make a small room seem larger is with a photo wallpaper with a suitable image, but perspective can be created in other ways. The illustration below is my favorite example of a pattern on the walls, which would be appropriate not only in a country house. Yes, this is wallpaper again, but such a pattern, unlike a realistic landscape, can be reproduced yourself, armed with brushes or markers. When painting walls, remember the laws of perspective: the further away the object, the smaller and paler it is.
Photo: pinterest.com
Painted walls in the bathroom and toilet
dated January 12, 2015
Tiling is the most popular, but by no means the only way to decorate walls in the bathroom and toilet. In recent years, another solution has become increasingly relevant and widespread - coloring. This was facilitated, firstly, by the emergence of reliable moisture-resistant water-based paints. Secondly, there was the influence of the West, from where a favorable attitude towards painted surfaces inside residential premises came to us (or rather returned). It's no secret that for many years we perceived paint on walls as something completely unattractive, suitable only for government institutions. Today everything is a little different.
Golden peas
The combination of an always charming print and a color that makes everything better is suitable for those who do not like to be too strict. To make a room with such walls look good, you need bright light and perfectly selected accessories. A bright green cat litter box or a red plastic bucket will ruin everything hopelessly.
Photo: Jennifer Bewerse / abeautifulmess.com
Add to favorites11
- Tags
- toilet
- wall decoration
- walls
- paints
toilet, wall decoration, walls, paints
How to paint instead of tiles?
To apply paint in a toilet, you need paint of a base color or additional shades, equipment, and tools.
Important
Positioning a stepladder or other high stand in the toilet is very difficult, especially with a fixed toilet. Therefore, it is more convenient to paint with a special telescopic extension for the roller.
Characteristics of good paint:
- good vapor permeability while maintaining the strength of the coating with increased wear resistance;
- excellent moisture resistance, which materials with a glossy finish have.
Tools and materials
When painting, you will need to stock up on the following tools and equipment for repairs:
- trowel, spatula;
- roller, brushes, including those with a round base;
- primer;
- base paint, additional colors;
- masking tape, level with alcohol capsule;
- gypsum putty;
- polyethylene film;
- sandpaper.
This is a basic set of tools and materials. Depending on the design and other features of the room, other items may be needed, such as paint for metal surfaces.
Composition selection
Many paints and varnishes can be equally used for finishing a toilet. What colors are popular :
- Oil compositions based on drying oil .
They were used very often back in the USSR with good protective properties against moisture, cheap. They create a durable film that cracks after a few years. However, the material is the most affordable in terms of price. When applied, it emits a very unpleasant, pungent odor, which spreads through the ventilation even to neighbors. It dries completely only after a few days. - Alkyd enamels . The product has good protective properties, protecting against moisture and bacteria, and can even be used to cover metal surfaces or facades. Due to the unpleasant odor, the compositions are used very rarely in residential areas.
- Chlorinated rubber paints . Compounds with absolute water resistance are used for finishing swimming pools.
- Silicone-based materials with high vapor permeability , expensive, are used for finishing building facades.
- There are different types of water-based compositions:
- containing PVA glue - cheap, rarely used for painting walls in the toilet, since they do not cope well with direct contact with moisture;
- latex - expensive materials, combined with excellent quality surface coating that protects against any contamination and water;
- acrylic - often used, with an optimal combination of wear and moisture resistance of the composition and price.
Important
It is necessary to adhere to the technology of working with the paint and varnish composition, applying a second coat only after the lower one has completely dried.
Based on the type of surface effect created, textured, glossy and matte paints are distinguished. Flaws and irregularities are least noticeable on textured coatings, and most noticeable on glossy ones. It is necessary to either properly level and prepare the walls, or buy suitable material.
How to decorate with glitter
Even using gold sparkles, you can give the toilet a look that will look very original. But even here, the specialist will have to fully demonstrate his art in the field of professional decorative arrangement, so that the original product, under his “sensitive guidance,” is transformed into an unusual object that amazes with its appearance alone!
Of course, in addition to the external finish of the toilet (which can be important for giving status to a certain person), which takes on a golden hue, the practical element of its use is also important. But this brilliant touch does not in any way affect the functionality of the thing described, but only gives it a unique “outer contour” that everyone around can appreciate and enjoy this look!
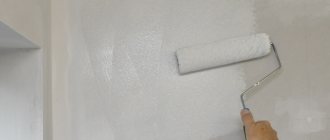
How to beautifully apply a coating with your own hands?
In order for the wall covering in the toilet to be smooth and create a pleasant impression, it is necessary to treat painting very responsibly. To do this, you need to choose the type and color of the paint composition, purchase all the necessary tools and equipment, and prepare the surface to be treated. All work should consist of the following stages:
- Planning, selection of materials, equipment, tools.
- Preparation and leveling of walls, cleaning, drying.
- Applying a layer of primer, drying.
- Coloring.
The finishing result depends on the quality of work at each stage.
Removing old coating
If there is any previous coating left on the wall, it must be removed before painting. This is a film of paintwork material that is already cracked or damaged by fungus. For this procedure, several methods are chosen, differing in the level of mechanization and complexity:
- Application of solvent and acetone to remove oily and similar materials. This does not always lead to complete cleaning, but it significantly softens the structure.
- Mechanical hand tools, for example, metal brushes, hard brushes, scrapers, spatulas.
- Burning with a technical hairdryer or burner. This will release an unpleasant odor and toxic compounds into the air. You need to use respirators.
- To quickly remove the old coating, you can use a regular ax to cut off the paint in entire layers.
- You can remove paint from a wall with a hammer drill or grinder very quickly, but this raises a lot of dust and creates noise.
- A drill with brush attachments made from a plexus of metal wires achieves quick cleaning with little effort, but like a grinder, a lot of dirt and dust is formed, which is carried to other rooms.
Among other devices and compositions, they are often used:
Leveling the surface
When choosing finishing with paints and varnishes, the wall surface must be very well leveled. If textured paint is chosen for the coating, then such perfect alignment is not required, although it will not hurt at all. The scope of work at this stage:
- Removing the previous layer in any convenient way.
- Cleaning the surface before priming: it is best to wash off dust and small debris with a damp cloth or sponge.
- Apply primer only to a dry wall in an even layer.
- Gypsum putty is diluted in the required proportion. The starting one is used for leveling, and the finishing one is used to create a coating for painting.
- Each layer of plaster should be thoroughly dried, followed by re-application of a deep penetration acrylic primer.
Gypsum has increased absorbency . By refusing to prime the final plaster coating of the wall, paint consumption may increase significantly, as well as the need for finishing with a large number of layers.
Application of the composition
To ensure an even coating, you need a special tray to remove excess paint from the roller or brush. Thanks to the grooves and textured coating of the compartment, the layer of material on the coat of the instrument is leveled using rolling movements. If this is not done, smudges and streaks will appear on the surface to be painted.
To prevent drops of paint from falling on other surfaces, such as the ceiling or floor, the borders must be covered with masking tape.
- Finishing begins from hard-to-reach places and corners with careful application of a layer of material. It is better to use a special round brush that will fill these areas well.
- Each subsequent layer must be applied only after the previous one has completely dried. If several colors are used, then separate clear boundaries between the coatings with stencils or masking tape.