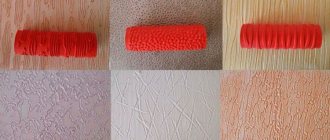
Finishing material performs several important functions. Main: decorative component and protection of the wall surface from external factors. Many materials cope with these tasks, however, there are products that combine the beauty and strength of natural wood, as well as the practicality of analogues. These are laminated chipboard panels. Their scope of use is huge, the material has a lot of advantages and is widely used throughout Russia. And thanks to developed production, the construction market is full of various types of materials.
What are chipboard panels
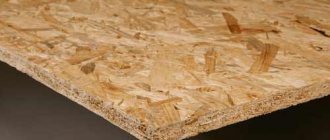
To understand the peculiarity of the material, it is enough to decipher the abbreviation. Chipboard is a chipboard. The material consists of sawdust, wood chips and other wood processing waste. From these raw materials, slabs of certain sizes and standards are formed. Its dimensions are geometrically ideal. Chipboards are used for different purposes:
- production of cabinet furniture;
- formation of the subfloor;
- to create a suspended ceiling;
- construction of internal partitions in rooms with normal humidity;
- production of door blocks;
- as a material for interior decoration.
As for the exact composition, unlike fiberboard, chipboard does not have fibrous elements. About 91–97% of the composition comes from wood sawdust, the remaining 3–9% is the binding material. It allows you to shape the slab to the desired size and make it durable.
Sawdust for chipboards is chosen differently. These are deciduous wood and coniferous. The lowest quality products are made from construction waste. They are visible to the naked eye, as there are areas of dark color on the surface. This indicates the presence of wood bark. And the cut of the products is not uniform.
The quality of the output slabs directly depends on the source raw materials. The sawdust is chosen to be homogeneous, not small, not shavings. The presence of heterogeneous inclusions makes the slabs less resistant to fracture and not as hard.
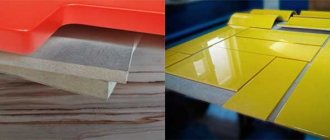
HPC
HPC (high protection coating) – a coating consisting of two paper layers. The first layer is decorated paper, the second is transparent over-lay paper. The layers are impregnated with thermosetting resin. This production technology provides HPC with resistance to abrasive wear two to three times higher than that of other coatings. Furniture lined with HPC will not be cheap, despite the fact that this material is not natural, like veneer, for example.
PVC
Linings in the form of films are quite common. This is the most popular substitute for natural veneer used for cladding furniture parts. There are paper-based films, as well as plastic films with a polyvinyl chloride (PVC) or acrylic butadiene styrene (ABS) base. Both types of films have approximately the same physical characteristics.
PVC is a synthetic material that is obtained from petroleum products and table salt. It is highly durable, resistant to moisture and easy to clean.
ABS
ABS is more environmentally friendly than PVC and also has sufficient strength.
Unlike melamine, PVC and ABS films are less sensitive to surface imperfections due to their greater thickness. These films can be of various colors; there are also shades that replicate the structure of wood; there are also metallized and fluorescent films.
The advantage of polymer films is the possibility of using them as cladding for profile products. The disadvantage of films is that when facing they do not provide the finished product with the required physical and mechanical characteristics.
The production process of chipboard panels
To obtain finishing material from wood, special equipment is required. The process itself is simple and automated. To make chipboard panels you need several steps:
- Procurement of raw materials.
- Size calibration and drying.
- Mixing sawdust with binding material.
- Creating a specific form.
- Pressing raw materials into a slab.
- Sanding, which makes the sheet smoother.
- Applying a protective layer or decorative coating, if applicable.
Finished products are divided into 3 grades, depending on quality.
The first grade is a homogeneous material, there are no inclusions of different sizes, as well as bark impurities. Chips, depressions, protrusions - there are none. The price is, accordingly, the maximum.
The second grade does not have the same parameters as the first; it may have some scratches and chips on the edge. Of the total material, defects are allowed in the amount of 10%.
The lowest quality is the third grade. There are many visible damages (scratches, chips, cracks). Raw materials may be heterogeneous. But the price is the lowest, allowing you to use chipboard sheets for the subfloor, creating formwork and for further finishing.
Chipboard safety classes
The safety class of chipboard depends on the quality of the adhesives used in the manufacture of the material. Domestic and foreign-made slabs are divided into groups according to the following safety classes:
Super E. The highest safety class. This icon on the chipboard packaging means that the sheets can be used for finishing work in any room, including children's rooms. In addition, this material can be used to make children's furniture.
E1 . This safety class is assigned to sheets in which the content of free formaldehyde does not exceed 10 milligrams per 100 grams of material. Such boards can also be used in the production of children's furniture or for decorating children's rooms.
Wall covered with chipboard sheets
E2 . This safety class is assigned to a material in which the free formaldehyde content ranges from 10 to 30 milligrams per 100 grams of material. Such chipboards for interior wall decoration are prohibited from being used for decorating residential premises or making furniture.
Return to content
Advantages and disadvantages of chipboard boards
In the finishing industry, chipboard panels are used quite often. This is due to the positive qualities that the product has. List of advantages of panels:
- excellent strength;
- practicality of the material and versatility of use;
- withstands high temperatures;
- not afraid of direct influence of UV rays;
- has a beautiful appearance;
- sold in a large assortment, available material;
- Chipboard boards are resistant to fungi and other microorganisms;
- excellent level of sound/thermal insulation;
- products are resistant to mechanical stress;
- has an affordable price;
- will last for decades.
In addition, chipboard wall panels are treated with paints and varnishes. Thanks to this, you can refresh the interior or simply change the shade. And although chipboard has many advantages, it also has its disadvantages. For example, although the panels are made of wood, they have few of the properties of natural wood products. They have less strength; the sheet may crumble during processing. And most importantly, the slabs are afraid of moisture. Therefore, you won’t see sheets in the kitchen or bathroom. Any damp room is an enemy for chipboard. The same applies to temperature fluctuations; the slabs will not withstand them.
Moisture-resistant tongue-and-groove chipboard: dimensions, price, brands
With standard thicknesses from 12 to 22 mm (and non-standard thicknesses used by some manufacturers, 10 and 38 mm), tongue and groove slabs have two main sizes:
- 600 x 2440 mm;
- 600 x 1830 mm.
Due to its small dimensions, the weight of one slab is small and for a 16 mm thickness reaches only 5 kg. Ceiling elements weigh even less - up to 4 kg. This feature increases the ease of installation of structures.
On the domestic market you can find products from different manufacturers. The assortment of each company differs in both cost and sheet thickness - only the length and width of the sheets are the same. If you are going to buy chipboard for furniture, the price per sheet is indicated in the table below. The most common types of slabs are:
| Brand | Material | Minimum price, rub. |
| QuickDeck | Chipboard 12 mm | 270 |
| Laminated chipboard 16 mm | 324 | |
| "StroyExpert" | Chipboard 12 mm | 335 |
| "Sphere" | Chipboard 12 mm | 340 |
| "PlitTorg-S" | Laminated chipboard 12 mm | 580 |
The most popular brand, whose products can be found in almost every building materials store, is QuickDeck. The material retains its characteristics for at least 6 years when used for flooring in rooms with high traffic. And walls finished with its help do not require major repairs for at least 20 years.
QuickDeck Products
Related article:
Features of choosing tongue-and-groove moisture-resistant chipboard for the floor
When choosing slabs that play the role of subflooring, pay attention to their moisture resistance:
- brand P-A has maximum resistance to moisture, however, the price of moisture-resistant chipboard per sheet is much higher;
- P-B board is less moisture resistant, which is why it is less often used in rooms with high humidity.
Another factor is taking into account the concentration of formaldehyde. Class E1 has no more than 10 mg of substances per 100 g of chipboard, E2 - up to 30 mg, E3 - up to 60 mg. The lower the indicator, the more environmentally friendly, and therefore safe to use, the slabs are.
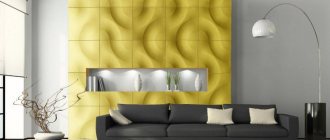
Types of wall chipboard panels
A wide variety of products allows you to use the material to create any interior. Everyone’s tastes are also different, so each consumer will be able to find the best option for themselves. There are several types of chipboard panels for walls:
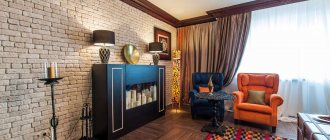
- Veneered boards. These are products with veneer applied to the surface. Veneer is made from valuable wood. To create it, veneer – a thin slice of wood – is glued onto the finished chipboard panel. The peculiarity of the species is its excellent decorative qualities. The cladding imitates wood as much as possible, but this is only externally. The disadvantage is the high cost of chipboards, so most often they are combined with other finishing materials. This is an elite class of finishing.
- Laminated boards (LDSP). Such wall panels made from chipboard are the most popular. Production is based on the hot pressing method. The facing coating is multilayer paper, which is impregnated with special resins to improve characteristics. The output is high-quality raw materials with good decorative potential and wear resistance.
- Laminated slabs. This is the cheapest option among analogues, which is easily confused with laminated chipboard. The material rarely goes on sale because it has low resistance to direct impact. Production method: Chipboard panels are covered with paper with a ready-made pattern or texture.
- Lacquered slabs. They have good potential. The products are decorated in advance (pasted with paper, repainted or laminated), and then varnished. Several layers of varnish. The result is an excellent visual effect. In addition, it serves as a protective layer against moisture and scratches. Looks great and will last longer.
These are all types of DPS panels, if we talk about decorative features. But there are other types of products that differ in their shape:
- Slatted panels with tongue and groove. The peculiarity is their small thickness, and the fixation of the plates occurs thanks to a tongue-and-groove locking connection.
- Tiled. They have a square or rectangular shape.
- Leafy. A universal option for finishing.
Important! Regardless of the type of product, all of them must have a certificate of compliance with environmental requirements. It is important to read this document before purchasing.
How to attach laminated chipboard to the wall?
Andrey Anatolyevich GusevskyThis is what wall cladding with chipboard panels might look like
Increasingly, when finishing internal and external walls, hanging installation methods have begun to be used, eliminating plastering, leveling and other “wet” work. It is much easier, faster and cleaner to cover them with panels or sheet materials. One of these materials is chipboard cladding panels, the types, features and installation methods of which will be discussed in this article.
About the material
Chipboard wall panels are used for intermediate and final finishing, partitioning, and furniture manufacturing. They are made by hot pressing of sawdust and shavings with resins of artificial origin and special additives.
Technology and installation principle
Most often, in private housing construction, laminated chipboard wall panels are chosen for interior decoration. They are beautiful, durable and reliable. However, their service life will directly depend on the correctness of the installation work performed. There are several options for fixing chipboard panels to the wall. Everyone can choose for themselves which is the best method in their situation, because they have their pros and cons.
Fixation with glue
The simplest option, but requiring careful preparation. It is best to use it when working with tile products, which can be the size of tiles. Thanks to a similar method of laying tiles, an excellent visual effect is obtained.
Installation technology:
- Much attention is paid to preparing the walls. Requirements: no defects, chips, greasy stains, protruding elements. The wall must be perfectly flat. Then it is primed in two layers intermittently. This will improve grip. And in order to glue the chipboard panels evenly, you can make level markings in advance.
- In order for the finishing material to adapt to operating conditions, it must be placed in the room before work begins. 2 days will be enough. Now the boards are ready for processing and gluing. The reverse side is made rough using sandpaper, this will improve adhesion to the surface.
- All that remains is to apply glue to this side of the chipboard. The glue can be polyurethane foam, liquid nails or a special composition. The mixture is applied dotted or zigzag.
- The final stage is to place the slab in its place according to the markings and press it so that it sets.
The entire room is treated according to this principle. This method has a clear disadvantage - the wall needs to be leveled to perfection, as unevenness will be visible. And the method is relevant if you need to treat a small area. Another drawback is that it will be very difficult to replace a damaged panel in the future without damaging the wall. The chipboard will come off with the plaster or putty.
Installation on special components
Special components are moldings made for chipboard panels. The list is as follows: corner, starting, end and connecting. Thanks to this method, the joints are well hidden and do not affect the decorative component of the finish.
Installation principle:
- Leveling the surface.
- Installation of profiles. If the cladding needs to be done in a vertical position, then the corner molding is installed first, and if the cladding is horizontal, then the starting one.
- A connecting molding is mounted between the chipboard panels.
Thanks to this method, labor costs are reduced to a minimum. It is possible to dismantle without damaging the structure.
Installation on the lathing
In this case, the quality of the walls, their evenness and preparation are not important. It is enough to make a frame of metal or wood, and then fill the panels with chipboard for the walls.
The technology is as follows:
- Everything unnecessary is removed from the walls. If there are obvious cracks, then it is better to remove them so that they do not get worse over time.
- Markings are made on the wall for the sheathing. To do this, use a tapping cord or a tape measure with a plumb line.
- The material from which the sheathing is made must be selected according to the situation. For example, if the wall is too curved, then it is better to use a metal frame. The racks are installed level. Wooden slats can be fixed to the wall or on hangers. Another advantage of the lathing is that the frame can be insulated with mineral wool or polystyrene foam.
- Next, the chipboard boards are stuffed onto the finished frame. There are two options for work. The first is that the slabs are laid end-to-end to each other using a tongue-and-groove connection. Then they are fixed to the sheathing with self-tapping screws. They are recessed flush. The second option can be accomplished using installation profiles, which are laid in the required order.
The profile for wall panels is purchased separately. In this way you can decorate a room from chipboard panels. Which option to choose, everyone decides for himself. They have their clear pros and cons.
Fastening chipboard sheets
This material can be mounted in four different ways.
Lathing . The sheets are mounted on the lathing, which is pre-installed on the wall surface. This method is used in the case of uneven surfaces or when it is necessary to leave some space between the chipboard sheets and the wall. The method is used to hide utility networks. The lathing is fixed to the wall using dowels, and chipboard sheets are installed on the frame using self-tapping screws.
Lathing for chipboard sheets
Skobyanoy . This method is used to install panels on a wooden or level base. For installation, use a construction stapler, screws or nails.
Profile . This method is applicable for rooms with high levels of humidity or with uneven wall structures. The aluminum profile is first attached to the wall, and chipboard sheets are already installed on it. Provided that laminated material is used, the resulting structure will be moisture resistant.
Mounting on profiles
Adhesive . This method is easy and minimal in time, but after installation it will not be possible to dismantle the slabs without damaging them. In addition, finishing walls with moisture-resistant chipboard using this method requires a flat base and the use of a special adhesive composition. The base requires priming and treatment with an antiseptic substance.
Return to content
Current advice
In order for the finishing of the room to be done correctly, there are some nuances that require attention. For example:
- When purchasing chipboard, it is important to ensure that the material is from the same batch. The slabs must be checked for defects, damage and swelling. Ideally, all slabs are packed in a protective strap, which is removed before installation work.
- In order for the boards to adapt to future conditions, they are placed in a room for a day or two. After this time, you can begin work.
- To properly fix the slabs using self-tapping screws, it is better to make markings in advance, placing all the points exactly along the same line according to the level.
- When working with panels without tongue and groove, it is better to use moldings and additional components that will help make the appearance more attractive.
If you choose the right chipboard panels, comply with all transportation and storage conditions, and also carry out their installation correctly, you can ensure the perfect finish. It is beautiful, reliable and will last for decades. All that remains is to choose the installation method and start working with your own hands.
Advantages and disadvantages
Tongue-and-groove chipboard, like any other building materials, has a number of advantages and disadvantages. The first to consider are the advantages of cork slabs:
- high density guarantees rigidity and strength of the structure;
- production processing of chipboard allows you to obtain the most even surface of wall, floor and ceiling coverings;
- convenience and ease of installation, so there is no need to call a specialist to install the slabs;
- high resistance to humidity helps to install tongue-and-groove chipboards in rooms with high humidity;
- affordable price;
- the ability to re-lay previously used slabs.
Next, we invite you to familiarize yourself with some of the disadvantages that still plague tongue-and-groove chipboards.
- The appearance of the slab cannot be called aesthetic, so this material is most often used in rough finishing or for carrying out hidden work.
- Before purchasing chipboard, you need to look at the composition of the material. Some cookers use formaldehyde resins, which are toxic and can be harmful to human health.
- Grooved chipboards have a smooth, straight surface. Accordingly, it is not possible to use slabs for processing curved structures.
Finishing a spacious hallway
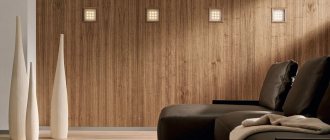
MDF panels can be installed vertically, horizontally, or in a herringbone pattern.
It looks beautiful if individual elements are laid out as a decorative panel. The color scheme is selected taking into account the overall interior design. The choice of colors of plastic strips allows you to choose the most optimal option. They are made with drawings, patterns or imitation of natural materials. There are many finishing options, here are some of them:
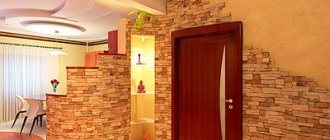
Wood panels come in many shades, both light and dark. They approach the hallway, which the owners do not want to highlight. The design will be modest, calm and unobtrusive. The classic design of the room can be done in any style. Bleached oak and wenge are shades for modern decor. To ensure that the furniture does not merge with the wall surface, it is necessary to maintain contrast. Finishing with stone panels is an original solution that gives the room elegance and luxury. When creating an ascetic image in a loft style, you need to imitate a brick wall
The room becomes original and immediately attracts attention. It is recommended to combine different materials if the room is spacious enough. MDF panels go well with wallpaper, decorative stone, as well as decorative plaster and fresco. When zoning the hallway, it is recommended to use different finishing materials
For example, near the front door you can decorate with stone, and the rest of the area with slatted panels. In this case, it is good to use not only different materials, but also to combine tile and sheet materials. The combination with the fresco fits perfectly into the design of the hallway. Mirror inserts will be a worthy addition; they are best placed above hanging shelves, in a niche or under the ceiling. 3D panels are perfectly combined with mirror polystyrene, since it is this material that visually increases the volume of the hallway. For this option, diffuse lighting should be installed.
For which styles is plastic finishing suitable?
When choosing options for decorating a bathroom with plastic panels, you need to take into account the overall design of the room. For example, if we are talking about classics, it is better to avoid plastic altogether. The same advice applies to a bathroom in the Provence, country or art deco style - here it is more appropriate to use natural materials and decorate the walls with plaster or waterproof wallpaper, in combination with tiles for the bathroom.
Modernism or minimalism is another matter; in such directions, plastic is used very actively.
The design of the panels is very diverse - from imitation of ceramic tiles, natural wood or stone, to ornaments reminiscent of wallpaper and spectacular panels with photo printing. Therefore, you should not be afraid that plastic will not allow you to bring creative design ideas to life.
In addition, the panels can be perfectly combined with other finishing materials. A striking example: the lower part of the walls is covered with clapboard and the upper part is plastered.
Bathroom decoration in Provence style using plastic panels
Bathroom decoration in Provence style using plastic panels
Decorating a bathroom in a minimalist style using plastic panels
Bathroom decoration in art deco style using plastic panels
Techniques for finishing a bathroom with plastic panels
- A bathroom made of plastic panels with different patterns, which are combined in a certain sequence, looks modern and stylish. For example, around a mirror or in the shower area a panel with a pattern is made, and the rest of the room is made one color.
- Sometimes three types of panels with different prints and textures alternate in stripes, creating an interesting play of surfaces. This technique is especially good for large rooms with low ceilings - the walls visually “stretch” upward and the proportions seem more harmonious.
Bathroom finishing with plastic panels with frieze | imitation tiles
Bathroom finishing with plastic panels with frieze | imitation tiles
When studying the photos of PVC panels for the bathroom in the catalog and thinking about the design of the bathroom, you should pay attention to the varieties with 3D images - they will decorate any interior. “Volume” panels visually expand the space, as if they create another dimension
One significant “but”: panels with 3D paintings are suitable only for spacious rooms, since they need to be perceived from a great distance.
Bathroom finishing with plastic panels with 3D images
The design of a bathroom made of plastic panels can be different, but you definitely can’t call it boring or unaesthetic. This is exactly the case when budget does not mean “too simple and cheap.” Do you need quick and high-quality bathroom renovations? Then, without a doubt, you should choose plastic panels.
Installation recommendations
Due to the size of the tongue-and-groove chipboard, installation of a subfloor using it can easily be done alone without the involvement of third-party assistants. Although to obtain a satisfactory result, it is necessary to follow a strict sequence of work. The installation stages can be presented in the following table:
| Installation stage | Image | Description |
| Installing joists before laying chipboard | Work begins with laying logs (wooden beams of a suitable cross-section), the distance between which is selected according to the thickness of the slabs. For 16 mm chipboard, 300–400 mm is sufficient. For 22 mm, take 500–600 mm. | |
| Filling the space between the joists with insulating material | When laying sheets, leave a distance of about 20 mm from their edge to the wall. The space under the beams is filled with sand, and between them - with insulating materials. | |
| Checking floors with a level | The horizontality of the plane is checked with a building level. | |
| Fastening slabs to the base | The sheets are laid from the wall opposite the entrance. The first is secured to the joists with self-tapping screws, the distance between which is chosen from 200 mm at the edges and 300 mm in the middle. The hats are recessed into the floor a couple of millimeters. | |
| Installation of tongue and groove slabs one into another | The edges of the edges of the slabs are sealed (with mastic or PVA glue). Each next one is inserted into the groove of the previous one, trying to ensure that the seams fall on the logs. |
The process of installing floating floors differs from conventional work. At the same time, moisture-resistant chipboard for floors replaces dry screed. And the structure is called “floating” due to the absence of a rigid connection between the coating and the concrete base. It consists of several layers of material, the last of which is chipboard. And the installation process itself looks like this:
| Installation stage | Image | Description |
| Vapor barrier for floating floors | First, a vapor barrier is laid on top of the concrete base, for which you can use ordinary polyethylene film. | |
| Backfilling sound insulation for a “floating floor” | Expanded clay or expanded polystyrene sheets are laid as the second layer. | |
| Substrate device for chipboard | Another layer is a substrate made of membrane, plastic and other materials. | |
| The tongue-and-groove installation method used for tongue-and-groove slabs. | The work is completed by installing tongue-and-groove chipboard. |
When using the same materials to finish ceiling surfaces, partitions and walls, the work is done even faster. Due to the fact that installing sheets on vertical structures does not require the manufacture of sheathing, installation becomes simpler and the cost of repairs is reduced. For wall mounting, standard self-tapping screws are used, the distance between which should be within 300–400 millimeters. The thickness of the ceiling tiles should be no more than 12 mm, and for their fastening, a slatted frame rather than a lathing is installed.
Frame for mounting plates
Panels in the kitchen
Moisture-resistant PVC panels are used in kitchen interiors due to their fire resistance and environmental friendliness. Also, when properly lined, they do not allow moisture to pass through and are easy to wipe clean. Kitchen thermo-panels made of polystyrene foam insulate corner apartments and cold rooms. Internal insulation does not allow cold air to pass through and does not deform in a humid environment such as a kitchen.
Glass panels are designed to print and preserve images in their original form. Durable protection and tempered glass are suitable for an apron in the kitchen interior.
The photo shows a glass kitchen splashback with a green backing that will always look bright. Glass is easy to clean and, due to its smoothness, does not accumulate dirt.