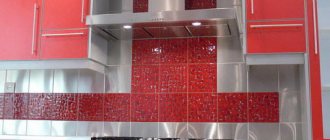
During a kitchen renovation, special attention is paid to various communications and their concealment. Everyone wants to have a beautiful and functional space. However, problems arise with the hood and the ventilation hole in the wall. Usually the stove over which the hood is installed and the ventilation window are not located next to each other. Therefore, it is necessary to make a plasterboard box in the kitchen to hide this nuisance.
For a long time, a flexible air duct (rectangular or round) was considered the best solution for connecting a hood to a ventilation window. However, it also had to be hidden behind (above) the kitchen wall cabinets. A plasterboard box can be used with any layout and with any amount of kitchen furniture. With its help, a flexible air duct can be hidden anywhere without spoiling the appearance of the room .
Advantages and disadvantages
You can use a plasterboard box for an exhaust hood in the kitchen, making sure that such a design is functional and its advantages outweigh all the disadvantages. Let's look at the advantages of such a solution.
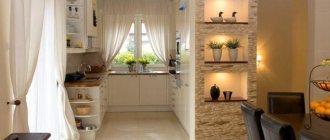
Standard layout for a kitchen hood
- Cheapness. To create a box, not many profiles, gypsum boards and fasteners are required. Considering their low cost, such a solution in the kitchen seems very affordable.
- Reliability. The assembled box will serve in the kitchen for many years. It will remain in place until the next major overhaul without being deformed.
- Any shape available. This is not only about the cross-section of the structure, which can be square or have the shape of a flat rectangle. You can assemble a plasterboard box in the kitchen on the ceiling or on the wall. Also, the design can change the direction of movement if necessary (go up the wall, then to the side, then up again to the ceiling, etc.).
- Ease of installation is a definite advantage for those who decide to do their own kitchen renovations.
- Low amount of waste. There is no need to spend a day cleaning up everything that gets dirty during the work process.
- You can carry out all the work yourself without outside help.
We would need to talk about the shortcomings, but they are difficult to find. Some may not like the fact that you need a lot of tools to get the job done. Some will say that making ventilation using ordinary corrugation is much simpler and cheaper, and appearance is not so important. For some, the process will seem labor-intensive, because you need to drill the walls, attach profiles to the wall and to each other, install drywall and carry out finishing. For some, installing a drywall box may seem like such a complicated and time-consuming process that they will give up on it. It is better for such people to look for a simpler, less beautiful or more expensive solution to the problem.
Advantages of a plasterboard box
The box for the hood in the kitchen can be made of plasterboard, metal, plastic, MDF (chipboard). Each of these materials has its own advantages and disadvantages. Plastic boxes are not inferior in functionality and durability to metal ones, and at the same time they are much cheaper.
A plasterboard hood box also has advantages:
- Low cost. Moreover, you can save not only on materials, but also on installation, since you can build a gypsum board box with your own hands;
- Variety of shapes and sizes.
- Large selection of finishing options.
- Durability. The product will last until the next major overhaul.
Varieties of design
I would like to dwell a little on what shape a kitchen box for a hood can be. This will help everyone decide what suits them best. After all, there is no universal recipe, since the layout of kitchens can be different, and everyone has their own concept of beauty.
For some, a vertical square box will be the ideal solution. For others, this will turn out to be absurd, because there is nothing more beautiful than a compact rectangular box under the ceiling. Before you assemble a plasterboard box, you need to understand what it should be like.
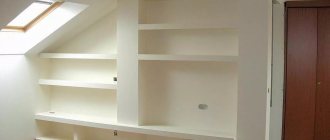
- Plasterboard box for built-in hood. In this case, only the lower part of the hood is visible, since everything else is hidden behind the drywall. The design does not seem bulky.
- The hood is completely visible, and the box starts from its top and goes to the ventilation window.
Everyone decides for themselves which option to choose.
Making a kitchen hood box from plasterboard
Modern kitchens are designed in such a way that the entrance to the ventilation shaft is at a minimum distance from the place where the hood will be located.
But when arranging premises with an old layout, the distance can be significant, and then hiding the pipe is problematic. Ready-made cabinets may simply not fit into the overall interior of the kitchen, but a plasterboard hood is an option that will suit any style. It can be designed in different ways. The shape and size of the box depend on the type of hood.
Tools and materials
To work you will need the following set of tools:
- screwdriver for frost;
- metal scissors for cutting profiles;
- hammer drill for creating holes in load-bearing walls;
- hammer for driving dowels;
- level.
This is a minimal set of tools that can be significantly expanded for greater convenience. But if you do everything yourself, then getting “cool” devices (laser level, belt screwdriver, grinder, etc.) will be expensive.
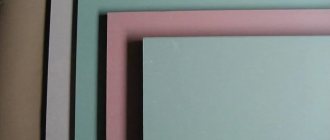
To assemble a plasterboard box in the kitchen, you need the following materials:
- moisture-resistant plasterboard 12.5 mm thick (other dimensions are not important);
- ceiling profile 27x60 mm and guide profile 28x27 mm;
- black phosphate screws 3.5x25 mm;
- dowels 6x40 mm;
- sealing tape.
All these tools and materials are needed to assemble the intended structure. To finish it under the finishing coat you will also need a spatula, a brush, a primer, putty and reinforcing tape.
Selecting the type of box and preparing the diagram
Before you start installing the hood with your own hands, you should consider whether the hood will be visible or whether the plasterboard box will hide the built-in unit.
Despite the relative simplicity of installation work, you should not get down to business without a carefully designed drawing.
First, you should draw the perimeter of the room to scale. Then measure the space allocated for the hood and mark it on the diagram. You also need to reflect on paper the overall dimensions of the future plasterboard box and indicate the dimensions of individual elements and niches.
Attention! To prevent vibrations in the pipes from being transmitted to the box, and also to increase service life, the box on the ceiling must be designed in such a way that there is a 5 cm gap between the pipes and the drywall.
If the ventilation hole is located at a distance from the stove, it is necessary to calculate the dimensions of the air duct box. Those who plan to cover the walls in the kitchen with plasterboard can hide the air duct using a multi-level suspended ceiling.
Marking walls and ceilings
Whatever the box is called, wall or ceiling, in the kitchen it will always be in the corner between the wall and the ceiling, since this is the most optimal installation option. The construction of a plasterboard box on a ceiling or wall requires the presence of a frame, under which markings are made.
Tapping cord and laser level significantly speed up the marking process
First you need to decide where exactly the pipe will go from the hood to the ventilation window. Traditionally, it first rises up the wall, and then goes under the ceiling parallel to the floor. The box for the hood in the kitchen should be 5-10 cm larger than the diameter of the pipe. Therefore, from the lowest point of the ceiling, you need to measure the appropriate distance down the wall and make a mark. Using a level, a horizontal line is drawn along this mark along the entire wall. It will mark the lower boundary of the kitchen hood box.
You can make a box not the entire length of the kitchen, but only up to the hood, but in this case it will not look very nice.
A similar distance is set back from the most protruding upper part of the wall. A corresponding mark is also made on the ceiling and another line is drawn along the entire ceiling using a level. From the two extreme points of the lines on the wall and ceiling, you need to draw two more lines at right angles to each other. To do this you will need a plumb line and a level. Do the same with the other edge of the marked area. This is how outlines are created for a box made from a profile for plasterboard in the kitchen.
How does the hood work?
The main purpose of an electric hood is to remove combustion products and unpleasant odors from the air, which can spread throughout the house. That is, the air is actually purified. The installation of such equipment is especially important when using gas stoves, since they run on fuel, which, when burned, emits a large amount of harmful substances. Among them are carbon dioxide, nitrogen and other impurities. If there is no hood, they will be removed through a ventilation shaft leading into the room or through an open window, but until this time they will remain in the room for some time.
Find out how to clean grease from a hood, and also read useful recommendations on how to clean it at home in a special article on our portal.
Using a forced action hood allows you to speed up the process of removing combustion products to minimize your contact with them. Being in a small room with poor ventilation while cooking can have a particularly strong impact on your well-being (shafts and passages are often clogged).
The heroes of our review can purify the air in two ways. The first is the removal of exhaust gases from the room, the second is additional passing through a filter system.
Interesting to know! The hood itself is a very useful and necessary device, but in some cases its use will be ineffective. Such situations are possible in the absence of normal supply ventilation, so it is worth taking care of this during installation.
Installation of the frame for the hood
There are three horizontal lines on the walls, one long and two short. A 28x27 mm guide profile is attached to the wall along them. It is most convenient to make a V-shaped cutout on the guide in order to bend it at a right angle and place the profile in the corner between the walls. You can do the same with the second corner. Or you can attach short profiles simply by cutting them to the required length, whichever is more convenient for you.
Holes are drilled in the profile and wall in increments of 60 cm
Since the load-bearing wall often ends up in the kitchen, you will need a hammer drill for the job. The profiles are attached to the wall using driven dowels (at least two per profile).
A sealing tape can be laid between the profile and the wall. It will reduce vibrations and provide good additional sound insulation.
On the ceiling we repeat all the steps that were done with the wall and also install guides. When assembling a plasterboard box in the kitchen, we will get a frame made of profiles, the parts of which rest against each other at right angles. Next you need to secure the profile, which will be the protruding corner of the frame. There are two ways to do this.
- Cut the jumpers to the same length and lower them from top to bottom. Then attach a guide along the entire length of the wall to them below.
- Attach drywall to the front wall. Lower the jumpers from top to bottom, securing them to the drywall. Then attach the profile to the jumpers.
If you can get by with one profile (the length of the guide exceeds the length of the kitchen), then it is better to insert it, fixing it in the corners. This profile will just fit into the horizontal guides on opposite walls. After this, the inserted profile will need to be secured with small metal screws (2 pieces on each side).
Types of exhaust systems
The devices differ in operating principle, mounting method and shape.
According to the principle of operation, hoods are divided into:
- Active, with a built-in motor or fan.
- Passive, working only due to good traction.
There are two ways to attach a hood in the kitchen:
- Open – when the entire structure is visible. This option looks aesthetically pleasing thanks to the designers’ developments. But the price of such a hood is higher.
- Built-in - when all elements except the facade are hidden from view.
There are 4 forms of hoods:
- Island - attached only to the ceiling. Often used in kitchens with island-type work areas.
- Wall-mounted – attached to the wall.
- Built-in – great for small spaces. There are no air ducts here; the product is attached to a wall or duct.
- Corner is essentially a wall-mounted kitchen hood. Designed for cases where the stove is located in a corner.
Installing jumpers and laying corrugations
Jumpers from a 27x60 mm profile descend from top to bottom, which are fastened with small self-tapping screws. To complete the design of the plasterboard box for the hood in the kitchen, all that remains is to install horizontal jumpers.
The jumpers are fixed with self-tapping screws for greater reliability of fastening
However, these jumpers will fit into the profile groove at the wall, but will rest against the edge of the corner profile. Therefore, they go along one of two possible options:
- The lintel is cut so that the back goes under the profile, and the ribs are curved at a right angle. In this case, you can attach the jumper to the profile, both through the back and through the ribs;
- The guide is cut into 10 cm pieces, and these pieces are attached to the side of the corner profile so as to form a groove into which the jumper can be inserted.
Jumpers can be installed in increments of 60 cm, because large loads on the structure are not expected.
Together with the corrugation, you can install communications
You need to know the place where the corrugation will go down to the hood, so as not to accidentally install a jumper there. The corrugation is used as an air duct, connecting the ventilation window and the hood. Before sheathing with plasterboard, the corrugation must be attached to the ventilation window and carried inside the frame of the box to the exit point (above the hood). Basically, a plasterboard box is installed above the kitchen unit, so that if desired, you can lay another corrugated pipe for future lighting.
Hood box in the kitchen made of plasterboard
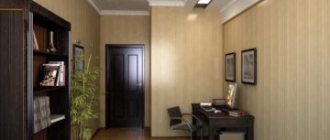
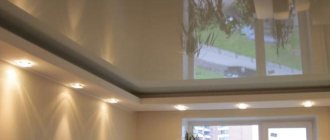
The kitchens of apartments, especially those built during the Soviet period, are distinguished by one feature: a large number of communications located in plain sight and spoiling the overall impression of the interior of the room. These are heating pipes and gas communications, “decorated with various valves and metering devices. The corrugated air duct of a kitchen hood also does not look very aesthetically pleasing. During the renovation process, it is advisable to hide them, while simultaneously improving the ergonomics of the kitchen. For example, in the box above the kitchen shown in the photo, made of plasterboard, you can also place additional lighting. Is it really possible to do it yourself?
Final work on gypsum board sheathing
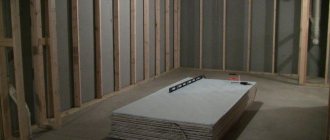
In fact, all the difficult work has already been left behind. Now you just need to cut the gypsum board into strips of the required size and screw it on. In fact, in the kitchen the box for the hood is almost ready, because it needs to be sheathed on the front and bottom. First we sew the front.
The sheets are pressed against the profile and screwed with self-tapping screws in increments of 20 cm. At the jumper points, self-tapping screws also need to be screwed in. So the box is completely sheathed from the front side. After this, the sheets are screwed from below, from the wall to the newly screwed gypsum board. The installation diagram is similar. A long sheet will be difficult to lift and hold above your head, so you can cut it into several pieces.
At a given location, you will need to drill a hole in the drywall for the ventilation pipe. You can make it on the floor in advance, if you don’t have a special attachment for a drill, and then attach the sheet with the finished hole.
When the plasterboard box for the kitchen hood is assembled, all that remains is to putty all the joints and screw heads. This is how the structure is prepared for finishing.
Fastening and puttying drywall
Drywall, pre-cut according to the drawing, is attached to the profile frame with self-tapping screws in increments of 25 cm. The screw heads must be recessed a little.
You should not join sheets of drywall in the corners; it is better to place whole fragments there, otherwise there is a high probability of cracks appearing in these places.
After installing the drywall, all seams are cleaned, taped with sickle tape and puttied. Special perforated corners are attached to the outer corners. After drying, a layer of finishing putty is applied to the drywall.
The final stage is the installation of the external parts of the lamps and finishing. Of course, the fastening and supply of electricity to them is done in advance. It is most convenient to carry it out immediately after marking and before attaching the profiles.
DIY plasterboard hood in the kitchen: step-by-step instructions
Note! If the box has smooth and curved lines, then we cut the profile with metal scissors and bend it in the way we need.
- We glue serpyanka onto the joints;
- We cover the joints and places where screws are screwed in with putty;
- We smooth out all the unevenness with sandpaper and apply the final layer of putty.
- we carry out the final grouting;
- We treat the entire structure with a deep penetration primer.
Holes can be drilled directly through the profile. After this, dowels are inserted into them. You need to attach the stand to the wall with self-tapping screws using a screwdriver.
If you wish, you can make any hood from gypsum plasterboard with your own hands, without spending a lot of money, effort and energy. Following step-by-step instructions, installation is quick and easy. Then, using a meter, all dimensions are taken.
They are recorded on the constructed drawing. Don't neglect millimeters. All fastener locations should be marked on the drawing. Recirculating hoods act as trapping filters; they purify the air rather than expelling it.
They are not connected to the ventilation duct, but are either built into a wall cabinet, or they have a “self-sufficient design with high design properties. The efficiency and speed of this type of ventilation is ensured by the difference in height between the entry point and the removal point. The main condition for the operation of a passive hood is that the thrust must be sufficient to overcome the aerodynamic resistance of the walls along the entire length of the tract.
Therefore, the air duct from the dome should have a minimum number of bends and a short length of horizontal sections.
Plasterboard box for kitchen hood
Systems in which the panel with the grille remains visible or is decorated with a dome that imitates a fireplace chimney. Usually in such models the air duct is already included and is made in the same style as the front part. Therefore, open hoods are most often installed in spacious kitchens, the area of which allows the appliances to be used not only for functionality, but also for decoration. The most popular interior styles: high-tech, minimalism, techno, classic, country and its varieties.
On a note! Some craftsmen advise treating joints with sealant to increase the rigidity of the structure. But such a box will be difficult to clean from the inside, especially if it has more than one bend. If the structure has a short length or additional support (for example, the roof of a cabinet), it is not worth sealing it. The design of the hood box directly depends on the type of the device itself.
There are corner hoods, island hoods, wall hoods, hanging hoods, and telescopic hoods, but only devices that operate on the exhaust principle require connections to the ventilation system. On a note! Previously, metal boxes simultaneously served as an air duct and decoration.
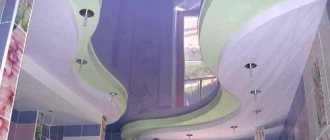
Today, such structures have been replaced by more convenient flexible corrugations and plastic models, and metal systems are used mainly in professional kitchens or industrial premises. Important! When choosing a kitchen ceiling design, you can use not only a plasterboard structure, but also stretch ceilings that will be attached directly to the frame.
Drywall processing
When making a box, not only drywall is used. However, it is more suitable for these purposes and easier to process. And its surface is suitable for various finishing methods. Drywall provides high reliability and durability of the future “coating”, without limiting the choice of design. This design also includes batteries. Making a box without the help of craftsmen is not difficult.
To make a box you will need a hammer, a construction knife, a construction angle, a hammer drill, a spirit level (preferably a bubble one), and a tape measure. A sheet of drywall is purchased from materials. If you want to assemble the box in rooms with high humidity, it is better to choose a moisture-resistant material.
The frame is made of galvanized profile, and lovers of natural materials choose wooden bars. If the choice falls on wood products, they undergo pre-treatment. This will protect the frame from rotting and subsequent destruction. It is more practical to use a metal profile. Does not require pre-treatment and is easier to process. The frame is made of a profile - a special fastening (CD) and a guide (UD).