Details Published 07/14/2013 17:17
Hello dear sculpting lovers! Sometimes it is not at all profitable to buy polymer clay of a color that you do not use at all. After all, some products require very little clay, but you can’t do without this color at all! Some clay is sold at 100 grams. from which you will spend a small part of it, and where is the extra?? After all, it is not needed….and will dry out over time…it’s a pity!!! So what should we do??? In the article you will see a short video clip that clearly shows how clay is colored in different ways.
Rules for working with plastic
To ensure that the creation process delivers only pleasant sensations, follow these rules:
- It is advisable to wear gloves when working with clay.
- Upon completion of use, plastics, hands, tables and other objects that were used must be thoroughly washed.
- It is not recommended to use plastic or polymer boards.
- All additional tools for working with plastic cannot be used for other purposes (boards, knives and other tools should not be used for cooking).
- When working, take into account all the rules and advice from the manufacturer regarding the storage, hardening or baking of clay.
What you need for sculpting
Many people are interested in how to sculpt from clay and what products even an inexperienced “master” can make.
The following video covers clay tools and where to start for beginners.
However, before starting work, you need to acquire available materials for modeling. These include the following items.
- 1. Metal string. It is convenient to separate small pieces from the overall array. The country should not be too thin, as it will easily injure your hand while working.
- 2. Special knife. It is easy for them to separate small pieces of clay. You can use an old kitchen knife, not very sharp and wide enough.
- 3. Flat wooden planks. You need to prepare in advance wooden boards of different calibers that will be used for rolling out pieces of clay.
- 4. Wooden rolling pin. It is convenient to roll out a prepared piece of material.
- 5. Set of stacks for modeling. They can be purchased at a specialty store.
A box with a variety of small items can also be useful. It needs to be filled with a variety of “junk” that is usually thrown away׃
- a piece of coarse fabric with a relief pattern;
- caps from pens or felt-tip pens;
- buttons;
- paper clips;
- toothpicks;
- empty old ballpoint pen refills;
- caps from baby cream or sparkling water, etc.
All these familiar and even no longer necessary things can, when pressed into the clay, leave exactly the imprint that will help give the finished look to a masterfully executed creation. The creative process involves not only manual dexterity and dexterity, but also creative thinking, coupled with imagination.
Firing clay products
The main condition for clay products to last for a long time is that they need to be fired. Clay will turn into ceramics only at a temperature of 850-900˚C. To prevent the product from exploding in the oven, it must be thoroughly dried so that it is not wet.
Home gas and electric ovens, as well as microwave ovens, are not suitable for roasting. However, do not despair - there is a way out. You can purchase special clay in the store that does not require firing, or you can arrange to have your products fired in a muffle furnace at any pottery workshop.
Artisanal firing
Those who love experiments can try firing their products in a fire. Since the temperature in it will only rise to 750˚C, the crafts will have to be kept in the fire for a long time, constantly maintaining the heat in it.
They dig a shallow hole in which the products are placed, and make a fire on top. However, there are not many people who want to resort to this method of firing, since the fire must be maintained for several hours. The quality of the fired product is checked by the sound made when tapped. If it is ringing, the firing was successful.
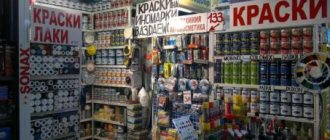
Using paints to work with clay
Despite the fact that there is polymer clay in the desired color, and you can do without additional coloring compounds, it is the paint that allows you to make the product brighter and improve the quality and appearance of the product. Several types of dyes can be used for coloring:
- acrylic;
- oil;
- ink;
- aerosol;
- crayons and pencils;
- powder.
The amount of paint used depends on the desired color. In order to give the product a delicate and pastel color, it is necessary to use a minimum amount of material, and in order for the color to be bright and saturated, the amount of material can be safely increased.
After adding the coloring material, the clay must be kneaded thoroughly, otherwise the product will end up with uneven, colorful stripes; such variations are also used in jewelry and products.
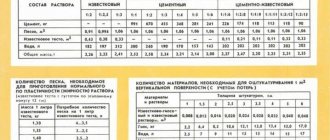
When using several color options, paint must be selected from the same type and manufacturer in order to avoid combining different densities, colors and different characteristics. Manufacturers provide tables that help achieve the desired color by combining and mixing available paints.
DIY cooking
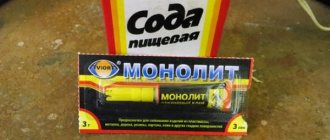
There are many recipes for preparing a composition for modeling at home. The mixture is based on three ingredients:
- Starch is a filler;
- PVA glue – binder;
- Oil is a plasticizer.
You can use potato and corn starch. The first is more suitable for sculpting large products, as it dries evenly and does not crack, the second is ideal for small parts, the composition based on it is more durable, but is not suitable for large accessories, because when drying the surface may become cracked.
The packaging with glue must be new. The composition that has been in contact with air is no longer suitable. For clay, PVA glue for wood or stationery is suitable.
Special requirements are placed on the quality of the plasticizer. The oil should be transparent and without a yellow tint; cosmetic or baby oil is best.
If you use oil with a yellow tint, the product will quickly turn gray and crack.
To prepare the mixture you will need enamel or glassware. A jar and a saucepan will do, since the mass will need to be heated in a water bath. You must first prepare household gloves and a plastic kneading board.
Ingredients:
- Starch 100 gr;
- Glue 100 ml;
- Oil 2 tsp;
- Hand cream (white, natural based, without silicone) 1 tsp.
First you need to heat a glass jar in a water bath and pour PVA glue into it, immediately add a spoonful of cream and mix thoroughly until completely dissolved. Then add oil to the mixture and add starch in a thin stream, constantly stirring the mixture. When the mass has curdled and gathered into a single lump, you need to remove the jar from the pan with water and cover with a towel. Let it cool slightly and remove the resulting composition from the container - it should still be hot.
Knead on a board greased with cream for several minutes and try to roll the mixture; if you get an even ball, without folds, then the clay is prepared correctly. It needs to be lubricated with cream and packed in cellophane, removing all the air.
The composition must be kept in a cool, dark place for about 12 hours. When the mixture is ripe, you can use it for its intended purpose; the remaining clay is stored in the refrigerator for 2 months.
Characteristics of coloring compositions
Paint products are distinguished by their light resistance, which the paint labeling will help you understand. The lightfastness of paints is indicated by asterisks. The most suitable dyes are those with two or three stars.
For the base of the product, markings with a black square or a half-filled square are suitable - such colorful materials can get rid of the transparency of polymer clay. The white square indicates transparency, which will give the product the properties of cold porcelain. A crossed out white icon indicates that the colorant is translucent.
Preparatory stage
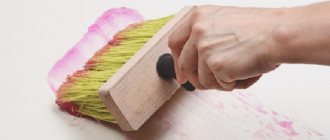
Before working with polymer clay, you need to prepare all the tools you will need to paint the material:
- palette for paints;
- brushes;
- container with water;
- napkins or paper;
- sponge.
Before applying coloring materials, a primer must be applied to the clay. Priming the surface will allow you to achieve a more uniform and high-quality color when applying paint.
Acrylic paints
Painting with acrylic products has the widest application. As a material for painting, it is necessary to use high-quality artistic acrylic paints. It is better to take them for working with clay that does not require baking. However, if such material is available, several staining experiments can be carried out.
It is important to take into account the peculiarity of acrylic paint - darkening after drying. When you first experience working with plastic and paints, you need to practice using dyes on paper, paying attention to the color and the time spent on drying.
The main disadvantage of acrylic painting is that it dries quickly. However, there are options and work opportunities to help avoid this:
- The first option is a drying retardant. Additional tools for the job can be purchased along with the paints.
- Using a small amount of pigment on the palette to save drying material.
- To prepare more color, it is recommended to use jars that can be closed for the next use.
How to paint plastic: step-by-step instructions
The result of painting work largely depends on how carefully the surface of the part was processed. Often the preparatory stage requires more labor and time than the process of applying paint.
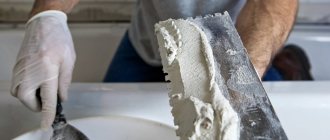
Preparing plastic before painting
A thorough inspection of the model will reveal printing flaws - deep gouges and cracks that cannot be removed during sanding and priming. Such defects are eliminated using epoxy resin. Small dots and visible boundaries of layers will be hidden when processed with abrasive materials and filled with soil.
- Grinding. This is done with sandpaper or an abrasive sponge. For roughing, use material with a grain size of P180, finishing is performed with sandpaper P400. It is not advisable to use a finer abrasive - the primer will not stick to the glossy surface. During the grinding process, minor errors made during printing are removed, and the surface is matted for better adhesion to paintwork materials.
- To sand ABS and PETG, you should choose a water-resistant abrasive material and sand with water. With intense movements, the surface of the part heats up, and the fluidity of the plastic, especially PLA, increases. You need to be patient and work slowly.
Important! Even if the part was treated with a solvent to smooth out defects, it needs to be sanded to remove the gloss.
- Cleaning and degreasing. The model is washed in soapy water and dried. Soap surfactants work as degreasers. It is recommended to additionally treat it with an antistatic agent so that the electrified surface does not attract dust.
Primer
Primer is a type of paint that forms the uniformity of the surface and increases its adhesive properties. Available in aerosol cans and brush containers.
- The primer is applied in two or three layers with the obligatory waiting time for the layers to dry, specified in the instructions for the composition.
- Re-sanding. Abrasive treatment of the primed part is necessary to maximize the surface quality. For sanding, it is recommended to use sandpaper with a grit of P600 or higher. Since the adhesion of the paint to the primer is quite high, there is no need to worry that the pigment will not adhere to the glossy surface.
Important! The priming and sanding cycle can be repeated if the preparation result is not completely satisfactory.
- Re-cleaning. The model is washed again with soap to remove dust after sanding and degrease. It is best to prepare a soap solution from dishwashing detergent.
Advice. When working with an aerosol, the composition is sprayed in a circular motion from a distance of about 20 cm in a thin layer to prevent drips.
What do you need for painting?
- Organization of work space. The place for applying primer and paint must be prepared - create an improvised box that will protect interior items from flying pigment particles.
- Materials. Paints to choose from: aerosol, in jars. Varnish.
- Tools. Brushes - art or manicure brushes, airbrush, abrasive materials for polishing.
Reference. To get the handmade effect, you need to use brushes. An airbrush is a tool for professionals; working with it is quite difficult.
Painting plastic
During the painting process, it is important to follow the main rule - apply the pigment in as thin a layer as possible. It is better to make several translucent layers than one thick one. This will avoid drips, which can be difficult to get rid of.
The main tone is formed with aerosol paint, the details are highlighted with thin brushes. During spraying, the can is held at a distance of 10–30 cm: the distance from the surface to be painted affects the density of the layer.
Attention ! The room temperature should be within the limits specified in the recommendations for the use of paints and varnishes. During drying, the product must be protected from dust. Until the final polymerization of the paint, the surface must be protected from mechanical stress and high humidity.
Wash
To emphasize the relief, highlight recesses and protruding fragments, and create shadows, the washing technique is used. It is done using liquid paint: the pigment is diluted in a 1:1 ratio with a solvent; for acrylic paint it is water. The technology consists of generously applying a liquid remover, the tone of which is much darker than the base one, to an already painted model.
The paint fills all the recesses and remains in them. This visually emphasizes wrinkles, joints between bricks, bolt heads and other small details. After treatment with a wash, the model looks most natural. For the best flow of paint, the figurine is pre-coated with glossy varnish.
Final processing
Varnishing is the final stage of painting. Clear varnish will complete the look, protect the paint, and increase its durability. To create a transparent layer, different varnishes are offered - matte and glossy. Not every model needs a glossy finish. To avoid excessive “toy-like” appearance, it is better to use matte varnish for the final coating, for example, the walls of buildings, clothing items, and animal figures.
Reference. The varnish is selected based on a composition identical to the paint. For acrylic pigments, water-dispersed acrylic varnish is suitable. Sold in cans and cylinders.
Oil paints for polymer clay
Oil paints are great for working with any type of polymer material. When choosing a paint, you need to pay attention to reviews of this product, the paint base (oil) and test results. To experiment, you can apply a small amount of paint to baked clay and leave the material to dry. A positive result will be the absence of stickiness of the paint a month after application.
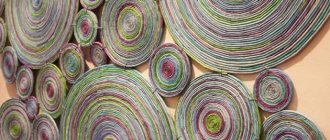
Oil painting options allow you to create amazing details and jewelry elements:
- A small amount of material is used to make products in bed and delicate tones;
- Using a sponge or cloth, you can create the appearance of an antique surface. To do this, you need to apply paint to the product and remove most of the material using a cloth;
- The paint will help create an imitation of precious stones in the product;
- To create a “marbled” product, a colorful substance is mixed with clay before baking the decoration.
The main disadvantage of using oil-based dyes is the drying time. The complete period can take up to six months, depending on the size of the product and the amount of material used.
Acrylic painting
Using acrylic paints is the most common way to paint polymer clay items.
What is necessary
As a matter of fact, you can create such paints yourself, you just need to mix:
- with gouache or watercolor acrylic varnish - and you get absolutely incredible delicate colors that you can control by changing the volume of mixed components;
- acrylic varnish already with PVA glue - as a result, the palette may not suit you too much, but you will get incredibly white paint of very high strength after hardening.
Here, on the contrary, there is a lot of paint, but the instructions for work are still the same - be careful and careful with the material
However, there is no great need to create your own paints. The market offers an incredibly wide selection of ready-made acrylic paints.
To work you will need:
- a finished clay product, not yet baked;
- acrylic paints - and this is the most suitable answer to the question of how to paint polymer clay;
- brushes, the bigger the better, of different sizes and of the highest quality possible, hair should not come off under any circumstances;
- palette - you can’t do without mixing colors and selecting them;
- a rough plan, a drawing in color of your future creation - this is already in the realm of creativity and ability; some people simply keep this plan that they dreamed of in their heads.
White clay is best suited for painting, as it allows for complete flight of imagination.
Immersion in work
Presenting the work itself is both simple and difficult.
Just because:
- we take the finished product in our hands, even before the oven, and begin to paint it, according to the idea, and constantly preparing the necessary paints;
- Let's not forget, after baking the colors will become a little darker;
- You can apply paint after the oven, but in this case it is best to pre-polish the surface;
- if you want to create a metal effect, you can mix acrylic solvent with pearl powder, apply the mixture to the product, let it dry and varnish;
- if clay is supposed to be painted, then it is chosen in a snow-white color, but we advise you to play with colors here too, because artists often do not paint it to create the main background, but simply use a primer of a certain color, on which the necessary strokes of paint are then applied;
- If the work takes place on a flat surface, then it is very convenient to first apply the design through a stencil.
You can’t do without a selection of colors
But it’s difficult, because the world of creativity:
- does not tolerate fuss and indifference;
- requires the ability to draw conclusions from one’s achievements and failures;
- requires being consistent and patient;
- and again, it requires learning and grasping new ideas on the fly.
Helpful advice! And again from the category of experiments. We advise you to try using watercolor paints for coloring, but in this case, be sure to apply it over a primer. Let's say - under no circumstances use oil paints, they will never dry completely.
But on the other hand, he still encourages – experiment! Try using ink, they are also used. And to create a beautiful gradient, some experienced craftsmen use an aerosol.
Secrets of the masters
Over time, each master develops his own techniques for solving the problem of how to paint polymer clay.
Here are some of the most famous:
- If you want to make a doll or a product of similar complexity, then use Living Doll clay, which is the leader of preference among professional dollmakers. It is a little expensive compared to other options, but it is incredibly convenient to use and incredibly durable after firing. Specially produced only in light shades, counting on future painting.
In the end, this is the kind of work whose craftsmanship can only be envied
- If your goal is colored mosaic, then the best choice would be Premo brand clay. It does not crumble when working, it is often used for decorations. One very useful feature of Premo is that it is competitively friendly and can be easily mixed with other types of clays, increasing their strength.
Powder, crayons and pencils
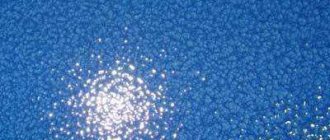
You can create a metallic effect and additional colored elements that highlight the product using powder or crayons for coloring polymer clay.
Pearlescent powder gives details the effect of radiance and shine. Powder dye can be mixed with acrylic or oil paint base. The big advantage of using powder is its quantity, and you need to use very little material to get the job done.
Crayons and pencils are also used in small quantities. However, they require additional work. To use them, you first need to grind the coloring materials to a powder state. Pencils are used to create additional drawings and decoration elements.
Aerosols for coloring clay
Aerosols as dyes allow you to paint clay in a variety of colors with smooth and neat transitions. Before using the aerosol, the clay is polished and coated with an acrylic base.
The main disadvantage of this coloring option is the price of aerosols. Therefore, this method of painting a product is used only by professional firms and specialists.
Working with polymer clay requires extensive preparation and time. To do this, you can study video tutorials and understand the basic rules and features of clay products.
The effort and time spent will reward the “sculptor” with exclusive jewelry, original accessories and unique interior details.