Before cutting vinyl siding and doing any installation of panels, it is advisable to learn more about the product itself. The base is polyvinyl chloride, which belongs to the category of thermoplastic synthetic materials. It allows you to make the finishing of a building relatively inexpensive and reliable. Therefore, in recent years there has been a significant increase in sales.
Longitudinal cutting of a panel using a grinder
Selecting a cutting tool
During the installation process, in any case, you will have to cut the panels, and they will need to be cut across, lengthwise and even at an angle. Although many manufacturers provide instructions, problems still arise in some cases. It is most advisable to address these issues specifically to companies that manufacture tools for working with siding. The various options are discussed below.
Electric saw
Many manufacturers offer to carry out work using a saw with fine teeth. However, making any cut is very difficult for her. In addition, looking at the assortment of the main leaders in production, you simply may not find such a device. A large number of experts agree on one thing: such a device is poorly suited for work.
Electric jigsaw
The tool can be used for cutting with certain reservations. After all, the vinyl panel is not hard enough to act as a support when making a cut. Thus, you will have to face the problem when strong vibration of the plate occurs during the work. If for some reason it is necessary to perform these actions with a jigsaw, then it is better to choose the T101 blade.
Hacksaw for metal
Almost all vinyl siding manufacturers claim that this tool can make cuts in any weather. A hacksaw, of course, copes with its duties, but it takes a lot of time, which is not acceptable in modern life. However, she will be able to trim off additional elements quite quickly.
Metal scissors
Metal scissors can also be used to cut profiles for sheathing. This is the tool that installers most often use, since it does not require electricity, and the work is carried out quite quickly. However, it is not recommended to use scissors at sub-zero temperatures. Although many manufacturers advise starting from the top edge, where the fastening part is located, experts, in turn, believe that it is better to start the cut from the bottom.
angle grinder
Many vinyl panel manufacturers are extremely hostile to this device. They justify this by saying that the edges become brittle. However, in reality, the notorious “Bulgarian” has proven its worth. In a short period of time, cuts are made in any direction.
Conclusion!
It is better to use a grinder or metal scissors as a cutting tool. They have shown themselves to be positive, and the work is progressing quite quickly.
Product manufacturing
To obtain this modern synthetic polymer, chlorine and oil are used as raw materials. Therefore, the resulting substance has low toxicity. That is, decomposition products can irritate the eyes and upper respiratory tract. There are three production methods:
- The suspension method involves processing into products by rolling, injection molding, pressing or extrusion. At the same time, a relatively limited molecular weight distribution, low water absorption, excellent dielectric properties, thermal and ultraviolet resistance are observed.
- The emulsion method involves transformation into products using injection molding, pressing, extrusion, and also through pastes. In this case, the molecular weight distribution is much wider. Therefore, the product is characterized by a fairly high content of impurities and water absorption. The dielectric capacity, as well as color fastness, are slightly worse than in the first option.
- Mass technology can be used to produce various products by rolling, pressing or extrusion.
Note!
Over time, the proportion of emulsion PVC is noticeably reduced. However, it has found its application in the manufacture of plastisols, which act as a protective coating for various materials.
Useful in construction
Of the total number of polymers, this product is most widely used in the construction industry. In European territory, the majority of polyvinyl chloride produced falls into this market segment. In the US these figures are even higher. Such positive dynamics are primarily associated with numerous advantages:
- Fire safety , thanks to which additional protection of a wooden structure is achieved. The material is difficult to ignite and stops smoldering and burning immediately after the source of high temperature disappears.
- Dielectric capacity , which allows for a certain insulation in this regard.
- Long service life , making it possible to operate the product for about fifty years.
- Light weight , helping to get the job done to a large extent. In addition, transportation and processing of products is facilitated.
- The price is relatively low , providing enormous opportunities for people even with little income.
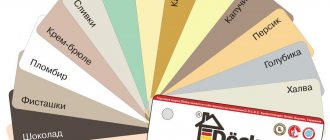
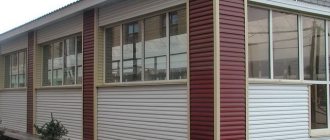
PVC finishing to transform the look
Note!
The listed advantages, along with the ability to regulate properties within the required limits and the availability of raw materials, have a beneficial effect on increasing production.
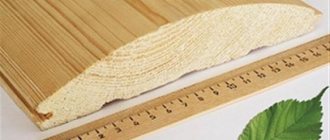
Characteristics
Any material must comply with the quality indicators and technical requirements of the standardization organization.
Plastic panels have the following characteristics:
- Standard sheet length. From 3 m to 3.85 m ;
- Width. From 20.5 to 25.5 cm ;
- Thickness. No more than 1.2 mm ;
- Resistance to sulfuric acid. More than 14 days with constant contact;
- The strength of the temperature barrier. Up to 88°C ;
- Tensile strength (break). 422 kg/cm² .
Basic installation diagram
Before cutting the siding and installing all the elements begins, preparatory work must be carried out and the supporting structure must be made. The coating can easily withstand sudden temperature changes and withstand strong winds if the installation of vinyl siding was carried out correctly.
Material calculation
- The length and height of one of the side walls are measured, after which these numbers are multiplied by each other. For example, 4×2.5=10 sq. m.
- Due to the fact that the opposite plane has exactly the same area, the resulting number is multiplied by two (10 × 2 = 20 sq. m).
- Next, the area of the other two walls is calculated. Again, the length is measured and multiplied by the height. For example, 6×2.5×2=30 sq.m.
- After this, the two results are summed up. Thus, the area of all the walls of the building is obtained (30 + 20 = 50 sq. m).
- It remains to find out the area of the two pediments. To do this, you will have to measure the height from the ridge to the base of the triangle, as well as the length of the base itself. It turns out: 5×6=30 sq. m.
- The indicators add up: 30+50=80 square meters.
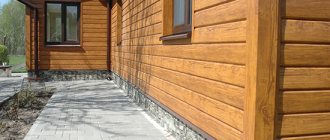
Visual finishing planning
Note!
To correctly calculate the area of the facing surface, you must add ten percent for waste to the resulting figure. As for the cornices, the number of soffits is calculated in approximately the same way.
Preparatory activities
Although this stage is quite simple, the quality of the facing surface largely depends on it. In preparation, you will have to stock up on the necessary tools, as well as eliminate unnecessary parts. The whole process boils down to this:
- Removing interfering elements, which include platbands, grilles, canopies, drainpipes and the like.
- Tamping lagging planks or replacing them. Especially if the wooden parts are rotten.
- Eliminate plants around the perimeter of the building that could interfere with the assembly of the vinyl siding.
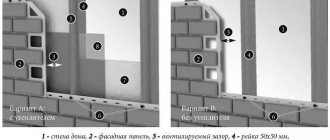
Lathing installation with thermal insulation
It is best to make a high-quality supporting structure with additional insulation for this type of façade finishing. As for the thermal insulation of facades, its installation is voluntary. Well, lathing is recommended even with perfectly smooth walls, so that the inside is not deprived of ventilation. It’s quite possible to build such a structure with your own hands:
Option with metal sheathing
- First you need to make a horizontal lathing from bars with a section of 50x40 or 50x50 mm. Its pitch is determined directly by the width of the thermal insulation material. In this case, a building level will not be needed, since leveling is not required at this stage.
- Having secured all the bars in this way, you can move on to insulation. Mineral wool slabs are inserted between wooden elements. Thermal insulation should not protrude too much.
- The insulation must be covered with a waterproof membrane, which will protect it from the harmful effects of moisture. Fixation is carried out to the transverse slats using brackets.
- The main sheathing is installed immediately after installing the waterproofing layer. A 25 mm thick edged board is perfect for this. First, two such planks are combined so that a right angle is formed.
- This product is installed using a building level on the side edge of the building. For leveling, as a rule, leftover lumber is used. All corners of the building are displayed in the same way.
- Next, a cord is pulled from one of them to the other in several places (most often at the bottom, in the center and at the bottom). The rest of the boards are installed on it. Horizontal lintels are made next to the openings.
Additional layer of thermal insulation for a brick wall
Note!
If there is no need to insulate the building, then you can skip the first three points. That is, in this case, the sheathing should be attached directly to the walls of the house, and not to the transverse bars.
Assembling the cladding
Having reached this stage, you will have to choose how to cut the siding and other components. Additional accessories are needed to complete the look. Therefore, their main function is decoration.
Installing siding on vertical sheathing
Attention!
During the work, no less than 1.5 mm should remain between fasteners and panels. Nails or screws should be located at a distance of approximately 30-40 mm.
When the question arises about how to cut metal siding, the answer suggests itself. Of course, you can use a hacksaw and metal scissors, as well as electrical devices designed for this material. Happy renovation!
How to choose siding fasteners
When installing the material you must:
- Protect fasteners from corrosion.
- It is best to use self-tapping screws or self-tapping screws.
- Self-tapping screws must be aluminum or galvanized with a head with a diameter of 8 to 10 millimeters, and a leg length sufficient to penetrate to a structure depth of at least 20 millimeters.
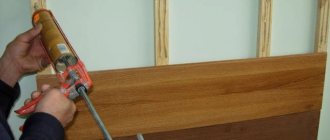
- It is not recommended to use vinyl siding adhesive when installing the material. Liquid plastic or sealant is used only to seal the seams.
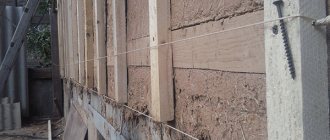
Preparing boxes
For siding, a frame must be installed on the wall. Lattice. It can be made from both metal profiles and wooden beams. .
The metal frame is used for siding, which is heavy (ceramics, cement). The wooden box is ideal for plastic panels.
To make a box, you first need to clear the walls of debris, peel off the paint, close the cracks, remove protrusions, and treat the surface with an antiseptic .
Next, install the box:
- Firstly, the outermost corner beams must be installed strictly in a vertical position on which the fishing line (or rope) is extended: it serves as a guide for other elements;
- On the markings on the fishing line, mark the places for attaching brackets (or hangers) under the log and drill holes for their fastening;
- If thermal insulation is required, one of the ways to install it (depending on the insulation) is to tension it on insulating brackets, after which the profiles should be installed on hangers;
- The box pitch for plastic siding should be 40 cm with a guide cross-section of 44 cm.