What is an engineering board
When creating an engineered board, the multidirectional fibers in the layers of plywood are observed, which makes this material more stable and durable compared to other multi-layer floor coverings.
Engineered board is a two-layer material consisting of the following elements:
- Cutting natural wood with a thickness of 2.5 to 7 mm. Hard wood is used, since this layer can withstand heavy loads, it is coated with varnish or wax.
- The base is multilayer plywood, its thickness is 10-16 mm. All layers are glued together under pressure and high temperature, which eliminates the possibility of delamination.
What materials and tools are needed to install engineered wood boards yourself?
An engineering board can have several types of connecting elements:
- tongue-and-groove is a classic connection method that is used for laying solid boards and engineered boards using glue or fastening to the base using self-tapping screws;
- The Click lock is a tight, self-clicking connection used in floating installations;
- groove-groove - there are recesses at the ends; a key is inserted into them, which prevents the boards from moving relative to each other; it is used for the adhesive installation method.
The shape of the planks is usually rectangular, but some manufacturers offer curved engineered planks; this material looks very impressive and unusual, but its installation should only be carried out by specialists, as this is a complex process.
To work you will need the following tools:
- hacksaw or electric saw;
- sandpaper;
- screwdriver with bits and drills;
- mixer;
- construction vacuum cleaner;
- mallet;
- notched spatula;
- roller;
- hardware;
- spacer wedges;
- measuring instruments;
- pencil.
Important!
It is better to use materials from the same manufacturer, otherwise chemical reactions may occur, which leads to damage to the engineered board. In addition, you will need a material for leveling the surface , this can be plywood, chipboard or OSB, cement or self-leveling mortar, engineered board adhesive, primer, underlayment and waterproofing film, their choice will depend on the installation method used.
The backing for the engineered board is:
- Multilayer backing (tuplex) - provides additional sound insulation, has high moisture resistance, and improves ventilation. Sold in rolls of 10 m2.
- Coniferous substrate - used as a sound-leveling and heat-insulating material, environmentally friendly.
- The cork backing is a damping material, has good sound insulation, is hypoallergenic, and antistatic. Allows you to smooth out uneven floors.
Proper care of the coating
In order for an engineered board to last a long time, it is necessary to properly care for the flooring. When cleaning, the surface is slightly moistened so that there is no excess water. When washing floors, it is better not to use powder detergents and aggressive chemicals that can ruin the surface; for this you can use detergent compositions suitable for parquet boards.
If you plan to install furniture that is too heavy, then special rubber elements are placed under the legs. The engineered board gives a beautiful aesthetic appearance to the flooring and is characterized by high reliability, thermal insulation, and sound insulation properties. With the right installation method, you can get a durable surface with a long service life. This type of coating requires proper care, without the use of aggressive chemicals and excessive humidity. By following the basic installation technology, an original surface with excellent qualities is obtained.
Engineering board laying technology
it must lie in the room for some time before installation Depending on the time of year, the difference in temperature outside and in the building, this may take from 1 to 5 days. After bringing the material into the room, do not forget to unpack it.
Before installation begins, several boards are first laid out on the floor and a sketch is made in which further installation will be carried out. Since natural wood is located on top, it has a non-uniform structure and in order to match its pattern as beautifully as possible, you may need to change the boards in places.
What are the methods for laying engineered wood?
Installation can be done in several ways:
- Installation with glue . Special polyurethane compounds are used, which form a strong and waterproof connection between the floor covering and the base. Laying engineered boards on plywood, concrete, OSB, chipboard or wooden floors can be done using glue. When installing an engineered board on a screed, you can use universal parquet adhesive for fastening, such as Homakoll 214. Strengthening multimol is also used, which in its properties is similar to reinforcing fiberglass used to strengthen walls.
Rolls or mats glued to the base eliminate the possibility of it falling off, slightly level the surface and relieve the material of stress that arises from bending and shearing loads. You cannot lay engineered boards in this way on self-leveling and heated electric floors; floating installation is suitable for these coatings.
- Using glue and fasteners . Here, in addition to the adhesive composition, the planks are additionally attached to the base with special hardware that are screwed into their grooves. The advantages of this method are the strength, reliability and durability of the fastening, but it requires more consumables and time for installation.
- Floating installation. Provides for the use of Click locks and the floor covering is not connected to the base. To use this method, you need a perfectly flat base.
- Glue method into a “dowel” . Installation is carried out using groove-and-groove boards using a special key; this option is suitable for regions where there is high air humidity and significant temperature changes.
When performing installation, it is recommended to offset the planks by 1/3 to ensure the surface is as strong and dense as possible.
What determines the price of engineered coating?
Before we find out how much engineered flooring from a particular manufacturer costs, let’s figure out what the price of this material depends on. Several factors influence the cost of elements:
- The type of wood used to make the face layer. The most inexpensive boards are made from traditional species - oak, ash, cherry, maple, etc. The most expensive products are made from exotic woods - merbau, wenge, kumaru, teak, American walnut, sapele, etc. The assortment of Finex, Wood Bee, Coswick, Marco Ferutti and other well-known companies includes products from different breeds.
- Design features. All elements of this variety can be divided into two types: two-layer and three-layer. Naturally, you will have to pay more for the three-layer version, because all three layers in it are made from deciduous trees. Usually the top layer is a valuable species, and the remaining layers are made from budget wood. In addition, the thickness of the three-layer floor is greater. It reaches 20-25 mm. The basis of a two-layer board, for example, Wood Bee, is moisture-resistant multi-layer plywood. Only the top layer of such products is made from valuable wood, so the purchase costs will be lower.
It is important to know: some manufacturers, for example Finex, have double-sided three-layer boards. Both the top and bottom layers are made of valuable wood. But when laying such floors, you can create various visual effects by alternating one side or the other, because they have different colors.
- Protective covering. The cost of engineered boards, like parquet boards, is influenced by the type of protective coating. Thus, to protect an engineered floor, a varnish coating or oil impregnation is applied in the factory. Thus, after installing the flooring, you do not need to spend money on purchasing special products. The most expensive is considered to be a multi-layer coating of wear-resistant varnish that hardens under ultraviolet rays. It can be matte, glossy, satin, with a tinting or whitening effect. Oil impregnation is usually applied to brushed boards to highlight the beauty of the wood texture. It can also have a whitening or tinting effect, with a matte or semi-matte surface.
- Type of fixing connection. To collect all the floor elements into a single covering, a fixation mechanism is cut into the ends of the engineered board. There are two types of them: “tenon and groove” and a special locking connection, like a parquet board. The first type of lock allows installation only using the adhesive method, so the cost of such flooring will be higher due to the cost of purchasing glue. Products with such a lock are presented in the Finex assortment. Boards with a locking joint are more expensive, but also more practical and convenient to use, since they can be laid without gluing to the base, which will save on the purchase of glue. In addition, if necessary, such a floor can be disassembled and laid in a new location; it is also easy to replace a worn-out element. In addition, installing boards using a floating method is easy to do yourself, which will allow you to save on paying for the work of installers. You can find boards with locking joints in the Wood Bee product range.
- Design options. Depending on the design of the board and its decorative treatment, the price of the coating may increase. For example, brushed boards with an aged surface, as well as tinted elements, are more expensive than products of natural color and texture. But treated engineering boards, like parquet boards, look more expensive and respectable. You can choose a coating to suit any style and color of the interior. For example, laying brushed oak boards of the Wood Bee brand can be done in rooms decorated in the style of country, fusion, chalet, Provence, and smooth bleached oak floors of the Finex brand will suit classic and modern styles.
- Product dimensions. Engineered boards can be wider than parquet flooring. The thing is that the plywood base protects the floor from deformation and gives boards of any size geometric stability under any operating conditions. That is why the range of most manufacturers (Finex, Wood Bee, Coswick, Marco Ferutti, etc.) includes boards with different dimensions. The wider the product, the more expensive it costs. However, the thickness of the product also affects the price of the coating. Thickened floors are more expensive because they are stronger and more durable.
- Manufacturer. Also, the price depends on the manufacturer. The popularity of the brand, the raw materials used, the features of production equipment and many other factors affect the cost of the products produced.
Floating installation
Since this installation method requires the production of engineered boards with special locks, it is used quite rarely. This technology makes it possible to install the flooring quickly, since it is not attached to the base , and installation is carried out on a special substrate.
The elements are connected to each other using a lock; in the case of an engineered board, it is usually adhesive. The use of special glue allows you to obtain a strong and high-quality connection that does not weaken over time. This type of installation makes the floor covering movable, therefore relieving the stress that occurs in the floor plane due to changes in humidity or temperature changes.
The technology of laying engineered boards using a floating method includes several stages:
1) Preparatory work
It is recommended to first draw the installation diagram on a sheet of paper, especially if you plan to install curved planks. Before installing the floor covering, the walls and ceiling must be completely finished, and all existing debris must be properly removed.
Important! Experts recommend laying a solid covering without expansion joints over an area of no more than 120 m2, and the distance from the floor covering to the wall should be about 10 mm.
You can choose the direction of installation at your discretion, but in narrow rooms it is recommended to do transverse installation, and to emphasize the texture of the coating, installation is carried out along the light (perpendicular to the window) or it can be done along the wall.
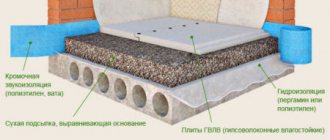
2) Preparing the subfloor
Before installing an engineered board, it is necessary to properly prepare the base, so it must meet the following requirements:
- the humidity of a coating made of wood, plywood, chipboard or OSB should not exceed 8%, and if it is a concrete screed, then 2% humidity; use a moisture meter to check;
- height differences should be no more than 2 mm per 2 m;
- the floor must be above ground level;
- indoor humidity within 40-45%;
- temperature +18…+22 °С;
- the base must be perfectly clean, without greasy stains.
If you are leveling the floor with plywood or chipboard, then they are attached to the base using dowel-nails or self-tapping screws at intervals of about 30 cm. The concrete screed should dry for 28 days, and self-leveling mixtures for at least 14 days. Concrete coatings must be primed, which improves their strength, protects them from moisture and increases adhesion; the primer is applied with a roller in 1-2 layers. Plywood and chipboard are not primed.
3) Installation of engineered boards
Waterproofing is laid on the subfloor to protect the floor covering from moisture, this is done with an overlap of 10-15 cm. Work begins from the long wall located on the left. On the first board, the protruding tenon is cut off on one side, a row is laid, and spacer wedges are installed between the planks and the wall. Further installation is carried out as when laying laminate: the plank is brought at an angle of 45 degrees, the lock is snapped in place (glue can be applied) and the joint is sealed using a mallet or block.
Thus, they move to the last plank, its dimensions are adjusted to the required parameters and it is fixed with the rest of the covering. All that remains is to remove the wedges and close the gaps with baseboards.
Carrying out adhesive installation
The first two stages are carried out in the same way as in the previous case. After you have cut the planks to size, apply an adhesive composition to the rough coating, straighten it well using a notched trowel and lay the boards; their adjustment should be carried out for 30-90 minutes until the glue has set.
Spacer wedges are installed between the floor covering and the wall, and if necessary, self-tapping screws are screwed into the locks, doing this at an angle of 45 degrees in increments of 30-40 cm, which allows you to securely fasten the slats. After installing the boards, it is recommended to press them down with a weight for a day until the glue completely hardens.
It happens that the top layer of the engineered board is not covered with anything, in which case, after laying it, the surface is sanded, and then, using a vacuum cleaner, the debris is removed and it is coated with varnish or wax. The gaps between the wall and the floor covering are covered with skirting boards; they can be wooden, PVC or MDF. In a week you can fully use this coating.
Material advantages
Engineered board is characterized by many positive features. In particular, these are:
- Versatility of use;
- Variety of sizes;
- Durability and reliability;
- Long service life;
- Easy to install.
Some of these advantages simplify the work with the product and help reduce installation time. This coating can be laid directly on a concrete base. Combination with the “warm floor” system is allowed.
The installation methods used for engineered boards may vary. Thanks to the locking connection, even a floating method is possible, in which adhesives and screws are not used. But experts do not really approve of this installation option, since the coating can bend if the humidity in the room is unstable.
Let's see the characteristics of the product:
During operation, the top layer is sanded if necessary and coated with protective compounds. The number of restorations depends on the thickness of the veneer. Some samples, periodically updated, can last more than half a century.
It is impossible not to mention the environmental friendliness of the coating. It is made from natural materials and using varnishes and glue that are harmless to the human body.
Another important advantage is the presence of a protective coating, which is applied at the factory. This eliminates the need to spend additional money on sanding, purchasing varnish or oil. After installation, the floor is immediately suitable for use.