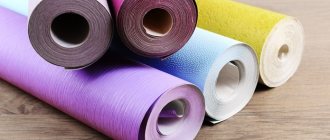
The magic of natural wood
Wood flooring materials are made from a wide variety of wood species. Oak is considered the most durable and representative candidate, but also the most expensive. Oak flooring can withstand heavy loads. Maple, beech, elm and ash are also hardwoods used to make durable, hard-wearing flooring. Soft types of wood, from which floor coverings are also made, include linden, birch, cherry, and pine. The disadvantages of floors made from such wood include susceptibility to the influence of the biological environment (rotting) and a high level of hygroscopicity (moisture absorption).
One of the types of wooden floors is laminate - a multi-layer material, the top layer of which consists of wood. This floor covering is protected with a special fire-resistant varnish. The material is easy to install and requires significantly less financial investment than natural parquet, regardless of the type of wood.
Flooring material such as carpeting is also widespread today. In the section you can see that the material consists of pile, a base (primary pad), a securing layer and a secondary pad (usually latex). Based on the quality of the fibers, carpets can be divided into synthetic (nylon, acrylic) and natural (wool or silk). A big plus of this coating is the ease and simplicity of installation and replacement when abraded. The biggest drawback is that in high traffic areas the material tends to fray. And the myth that “carpet is harmful because it collects dust” can be interpreted differently: by collecting dust, carpet significantly (almost by half) reduces its content in the air we breathe.
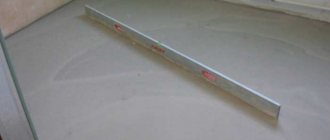
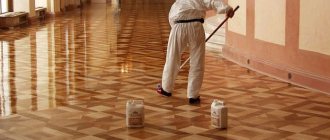
Self-leveling coating
To install such a floor in a private home, special mixtures are used, which self-level after application. This is one of the most popular methods of installing floors in country houses. The cost of a self-leveling floor directly depends on the manufacturer and brand of the mixture.
In addition, there are flooring options with a pattern or color, which is also reflected in the price. The base of self-leveling floors is a concrete screed, the surface of which is treated with special primers to improve adhesion. Using a drill with a special attachment, dilute the bulk mixture with water. The solution is applied to the primed base in small portions and rolled out with a needle roller to remove air bubbles.
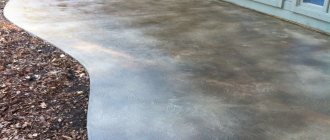
For better strength gains, the finished floor is covered with plastic film, if this is specified in the instructions for the mixture. After the solution has completely hardened, it can be coated with polyurethane varnish to add shine.
Decorative elements made of stone as an integral part of landscape designVideo editing courses
- Oxford awnings are a reliable, durable and durable option.
The coating will be ready for full use in a week, and you can move on it within 12 hours after pouring. The peculiarity of this floor is that it is often used as the main one. But you can also lay carpet on top, lay parquet or laminate.
If you have the financial opportunity and the floors are being made in a residential area, then it is best to use three-dimensional or decorative self-leveling floors. To do this, you need to think about what kind of pattern will be placed on the floor, and then contact a company that specializes in these issues. She will take a photo of the floor in the house, printing it on a banner of the required size. Subsequently, using a special technology, this banner will be installed on the floor, making the room stylistically very attractive.
Types of sound and heat insulation materials
Sound insulation of TechnoNIKOL floors
Since a wide variety of materials can be used for heat and sound insulation, the method of laying them will also differ.
Foamed polyethylene as an additional layer can only muffle noise to some extent and reduce the thermal conductivity of the floor. However, it is often used in conjunction with other materials for heat, noise and water protection.
In rooms where there is sufficient headroom, floor insulation can be done in a more complex way. In this case, a system of beams is laid on foamed polyethylene. Between them you can lay roll insulation, for example, mineral wool, as well as lay foam boards or fill in expanded clay. The type of insulating material in this case is not of fundamental importance.
The main selection criterion in this case is the selection of the correct thickness of the insulation layer, which is influenced by the height of the logs, as well as the individual characteristics of the material. Cover the insulation layer with slabs of plywood, gypsum fiber board or OSB. Next, you can produce any type of flooring.
If a dry screed is chosen as the basis for flooring in an apartment, you can be sure that it will provide reliable thermal insulation and noise protection. In addition, this option allows you to level the subfloor. To install a dry screed, the floor is covered with a film on which beacons are placed.
Next, a layer of expanded clay sand or any other insulating material is poured. The last layer is gypsum fiber boards. This type of base is also optimal for laying any finishing floor coverings.
Such modern soundproofing materials as ecowool with a cellulose base, as well as noise-plastic, which includes polystyrene foam, rubber and acrylic impurities, have proven themselves to be quite good.
Expanded polystyrene allows you to insulate the floor quickly and efficiently, especially if the ceiling height allows you to lay this material in several layers. Its strength characteristics allow this material to be laid directly on concrete, and hard floor coverings can be installed on top of it.
Note that the most effective way to insulate a floor is to install a “warm floor” heating system. There are options with water or electric heating circuits, as well as infrared heated floors.
Cork floor
Cork floors can also be classified as wood flooring, since cork is also wood.
Benefits of cork flooring:
- environmental friendliness;
- increased noise absorption;
- saves heat;
- non-slip, hypoallergenic and antistatic material;
- durable surface, heavy objects can be placed;
- not afraid of insect pests;
- It is not necessary to wash, just vacuum it.
Laying requires a flat and hard surface; laying on plywood is allowed, but not on bare concrete. Cork covering is produced in rolls or slabs with locks. A moisture-proofing compound is applied on top, and a ready-made adhesive is also applied to the slabs.
Cork is also used as a subfloor under linoleum and laminate.
Disadvantages: expensive, afraid of moisture and sharp objects.
Finishing the floor in a wooden house: pros and cons of popular options
Expanded clay as floor insulation in a house, bathhouse, on the balcony, owner reviews, prices
Proper finishing of the floor in a wooden house will significantly affect your comfortable stay in it and save you from unnecessary costs. Each room requires a certain look. Properly chosen flooring material will serve you for many years.
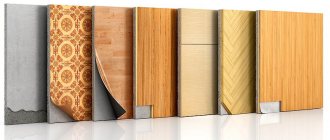
The modern market offers a lot of options for flooring: from simple to elite, but four types are most widespread:
1. Laminate
2. Tongue board
3. Linoleum
4. Parquet board
Let's take a closer look at these options.
Laminate
Today, finishing the floor in a wooden house with this type of coating is the most popular. Outwardly it resembles parquet, but consists of a fiberboard board, several layers of paper and laminated film. The film is made of acrylic or melamine resin, which protects against external factors.
Advantages of laminate:
1. Attractive appearance; 2. Ease of installation; 3. Durability; 4. Affordability; 5. Durability (with proper care).
The disadvantages are:
1. Low moisture resistance of some classes of laminate; 2. High level of sound reflection (falling something on the floor will be accompanied by a loud sound).
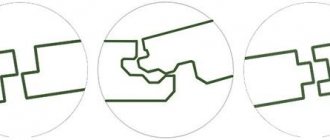
tongue and groove board
A material that has a tenon on one side and a groove (tongue) on the other. Thanks to this technology, the coating becomes gapless and even. Made from pine, spruce, oak, larch and ash.
Currently, you can purchase a board with a length of 1 to 5 meters. The average width is 85-100 mm, and the thickness is 25-35 mm.
The advantages are:
1. Environmentally friendly (made from solid wood); 2. Durability (withstands heavy loads); 3. Ease of installation; 4. Durability; 5. High heat and sound insulation; 6. Attractive appearance.
Disadvantages of this type of coating:
1. Periodic treatment with protective compounds (paints, varnishes, antiseptics); 2. High cost.
Linoleum
It is one of the most popular options for finishing the floor in a wooden house. There are 3 types: household, commercial and semi-commercial. Consider household linoleum.
Advantages of linoleum:
1. Moisture resistance (often used in the kitchen and bathroom); 2. Affordability; 3. Wear resistance; 4. Easy to care for; 5. Ease of installation; 6. Possibility of combination with underfloor heating; 7. Variety of textures.
Minuses:
1. If installed incorrectly, it may swell; 2. Scratches remain from black shoes.
Parquet board
This option is also often used for flooring. It is a board 2 m long with different thicknesses depending on the type. The top layer is made of natural wood.
Advantages of this option:
1. Environmentally friendly (the top layer is made of wood); 2. Easy installation (boards are fastened with grooves); 3. Combination with “warm floor”; 4. Possibility of replacing the damaged area; 5. Large selection of textures.
The material also has disadvantages:
1. Low moisture resistance; 2. Susceptibility to temperature changes; 3. Incompatibility with some chemicals (not every product is suitable for care); 4. Replacement of the damaged area is possible only with the dismantling of the entire board.
Floors are subject to the greatest impact. Therefore, finishing the floor in a wooden house requires a thorough approach. Choose the right material.
Wood imitation
Popular, in demand and fashionable laminate flooring today. It's not exactly wood flooring, but it contains wood. Structurally, it is wood waste pressed into boards with a characteristic pattern applied on top and a layer of laminating film. The durability of the material depends on this layer.
The floor lasts for ten years and does not fade in the sun. Some types are so similar to the texture of wood that they are difficult to distinguish visually, and the length corresponds to a wooden board (width 25 and length 150 cm). It's not difficult to install.
The laminate board is glued together from several durable layers:
- The bottom one is hard.
- The next layer is 5-9 mm fiberboard with increased density to withstand mechanical loads. This is the place of castles.
- Paper with an image of the surface of a wooden board, stone, or other materials is pasted on top. Melamine is used for impregnation.
- A layer of protective film is applied to the paper - melamine or acrylate resin.
For increased loads, choose class 34 or 33, for residential premises - from 21 to 23. Laminate boards do not require special care, are fire resistant, and do not change with temperature changes.
More: Repair and arrangement of a loggia or balcony
Laminate flooring is not recommended for use in children's rooms and bedrooms due to the formaldehyde contained in the film. It is better to lay it in the hallway, living room or kitchen; this requires a flat surface. A polyethylene foam backing is laid on top of the concrete slab.
Materials for heated water floors
Subfloor in a house made of foam blocks, types of flooring, and step-by-step installation instructions
Most often they make a water heated floor in a screed. We will talk about its structure and necessary materials. The diagram of a warm water floor is shown in the photo below.
Scheme of a warm water floor with screed
All work begins with leveling the base: without insulation, heating costs will be too high, and insulation can only be laid on a flat surface. Therefore, the first thing to do is prepare the base - make a rough screed. Next, we will describe step by step the order of work and the materials used in the process:
- A damper tape is also rolled out around the perimeter of the room. This is a strip of thermal insulation material, no more than 1 cm thick. It prevents heat loss from heating the walls. Its second task is to compensate for the thermal expansion that occurs when materials are heated. The tape can be special, or you can also lay thin foam plastic cut into strips (no more than 1 cm thick) or other insulation of the same thickness.
- A layer of heat-insulating materials is laid on the rough screed. For underfloor heating, the best choice is polystyrene foam. Extruded is best. Its density must be at least 35 kg/m2. It is dense enough to withstand the weight of the screed and operating loads, has excellent characteristics and a long service life. Its disadvantage is that it is expensive. Other, cheaper materials (foam plastic, mineral wool, expanded clay) have a lot of disadvantages. If possible, use polystyrene foam. The thickness of thermal insulation depends on many parameters - on the region, characteristics of the foundation material and insulation, and the method of organizing the subfloor. Therefore, it must be calculated in relation to each case.
- Next, a reinforcing mesh is often placed in increments of 5 cm. Pipes are also tied to it - with wire or plastic clamps. If expanded polystyrene was used, you can do without reinforcement - you can fasten it with special plastic brackets, which are driven into the material. For other insulation materials, reinforcing mesh is required.
- Beacons are installed on top, after which the screed is poured. Its thickness is less than 3 cm above the level of the pipes.
- Next, the finished floor covering is laid. Any suitable for use in a heated floor system.
These are all the main layers that need to be laid when you make a water-heated floor with your own hands.
Pipes for heated floors and installation schemes
The main element of the system is pipes. Most often they use polymer ones - made of cross-linked polyethylene or metal-plastic. They bend well and have a long service life. Their only obvious drawback is their not very high thermal conductivity. The recently introduced corrugated stainless steel pipes do not have this disadvantage. They bend better, cost no more, but due to their lack of popularity, they are not yet used often.
The diameter of the pipes for heated floors depends on the material, but usually it is 16-20 mm. They are stacked according to several schemes. The most common are spiral and snake; there are several modifications that take into account some of the features of the premises.
Schemes for laying pipes for a warm water floor
Laying with a snake is the simplest, but as the coolant passes through the pipes it gradually cools down and reaches the end of the circuit much colder than it was at the beginning. Therefore, the zone where the coolant enters will be the warmest. This feature is used - installation begins from the coldest zone - along the external walls or under the window.
The double snake and spiral are almost free of this drawback, but they are more difficult to install - you need to draw a diagram on paper so as not to get confused during installation.
You can use a regular cement-sand mortar based on Portland cement to fill a water-heated floor. The grade of Portland cement should be high - M-400, or better yet M-500. Concrete grade - not lower than M-350.
Semi-dry screed for heated floors
But ordinary “wet” screeds take a very long time to gain their design strength: at least 28 days. You can’t turn on the heated floor all this time: cracks will appear that can even break the pipes. Therefore, so-called semi-dry screeds are increasingly being used - with additives that increase the plasticity of the solution, significantly reducing the amount of water and the time for “aging”. You can add them yourself or look for dry mixtures with the appropriate properties. They cost more, but there is less hassle with them: according to the instructions, add the required amount of water and mix.
It’s possible to make a heated water floor with your own hands, but it will take a decent amount of time and a lot of money.
Concrete floors
Most often, concrete floors in a private house are installed in utility rooms, but this option is also possible in residential areas. The floor is poured according to the following scheme.
If there is a need, a small pit 10 cm deep is first dug in the area of future filling. Then a sand cushion at least 5 cm thick is made, which is carefully compacted. A reinforcing mesh is laid out, beacons are placed, which will help you monitor the evenness of the surface.
It is recommended to lay the concrete solution from the corner of the side opposite the door, and it is advisable to avoid joints and do the pouring in one go.
The concrete will reach its nominal strength in 28 days, after which it will be possible to begin finishing. Options for such finishing are tiles or linoleum on a thick base.
Linoleum is used in living rooms, tiles are laid in the hallway, bathroom and toilet, and in the kitchen. Linoleum is glued to concrete with special mastics, or it simply lies freely, secured along the walls with plinths. A special adhesive is used to lay the tiles.
The advantage of laminate is environmental friendliness
Laminate is a popular floor covering, which is why many people have questions about the environmental friendliness of this material. The laminate is based on a slab of wood chips, so it is more than 90% natural. The gluing of wood elements is carried out using natural resins (sometimes varnish is used). Melamine or acrylic resin is usually used in the production of laminate topcoat. Melamine itself does not have the necessary viscosity, so it must be mixed with formaldehyde. But formaldehyde is a toxic substance, and therefore dangerous, and esters are harmful to health (if the percentage of the norm is exceeded). But it is harmful only at elevated concentrations, but only at temperatures that are significantly higher than room temperature.
Laminate is a floor covering material. With its help today it is customary to replace fragile linoleum or expensive parquet
Advantages of laminate laying technology:
- Laminate fits well on almost any base, the main condition is the evenness of the base;
- The coating is easily insulated from moisture;
- Provides heat and sound insulation using special substrates.
Laminate flooring is divided into several safety classes, depending on the concentration of formaldehyde resin in the laminate. Most often you can find laminate with a class no higher than E1. This particular material is considered absolutely harmless to humans, since the proportion of formaldehyde resin in its composition is minimal. But classes E2 and E3 have a high degree of concentration. Laminate of this class is not recommended for laying at home. There is a laminate with emission class E0, which is even more environmentally friendly. It contains almost no toxic substances, but the price of this coating is much higher.
Advantages and disadvantages of two types of design
The quality of a floor is determined by such aspects as its service life, resistance to damage, and surface smoothness. According to these parameters, concrete, of course, outperforms wood. It seems more reliable and durable, is not afraid of high humidity or fungus, and is quite difficult to deform.
In defense of wood, I would like to note that if operating conditions are carefully observed, it can last as long as concrete... But ensuring that all these conditions are met is not so easy. As for the smoothness of the front surface of the floor, here too concrete is undoubtedly far ahead.
Factors of complexity, price and installation time also play a huge role. How expensive will all the necessary work cost, how long will it take, and will an amateur be able to do everything well and beautifully on his own?
It is believed that working with wood is more difficult and takes longer, and the cost will be considerable. However, do not forget that concrete requires a more powerful foundation, as it has significant weight.
And yet, despite all this, people very often prefer wood. Why? The answer is extremely simple - because of the excellent aesthetic properties of this material and the feeling of warmth that it gives.
Ceramic tiles and porcelain tiles
Note that for other rooms it is advisable to use tiles only as decorative inserts, or in combination with preliminary installation of a heated floor, otherwise it will be cold to walk on such a floor.
The base for the tiles can be either a leveled concrete screed or a prepared wooden base made of plywood, OSB, gypsum fiber boards or waterproof plasterboard.
The advantages of tiles are:
- aesthetics and decorativeness - a variety of colors and textures;
- wear resistance;
- durability;
- ease of maintenance and hygiene;
- low cost.
Here are some useful tips:
Concrete floor construction
Here soil is used as the base. A heat-insulating layer consisting of sand or fine gravel is poured on top. It is recommended to lay a vapor barrier film below and above this layer. And only then the concrete mixture is poured onto this entire structure.
After its hardening, which takes about three weeks, comes the turn of a layer of cement-sand screed. Then a decorative front covering is installed on it - tiles, parquet, laminate, linoleum... Any option from a wide range of flooring materials that you like.
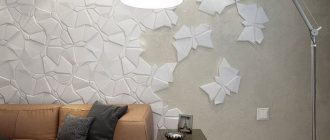
Adhesive fastening method - easy DIY installation option
A simple option for installing wall parquet is to use an adhesive base for fixation. It is most convenient to carry out work in a room with bare concrete
It is important that there are no traces of former splendor on the surface of the walls in the form of glue, old screed or bitumen
In order for the parquet board to “lay down” perfectly, the coating must also be impeccable, much higher quality than for “floating” installation. A simple way to level the base is to use leveling mixtures and a primer; in advanced cases, the only solution may be a new plasterboard base.
If you can’t decide what exactly to do with the wall, ask a professional or watch training videos
Gluing parquet boards directly onto a concrete base is allowed, but only in cases where it is truly perfectly level and prepared with a residual value of no more than 5%. If the possibility of increasing the moisture level of the concrete base cannot be ruled out, it makes sense to additionally install a layer of waterproofing, thus protecting the parquet flooring from interaction with moisture
A vapor-waterproofing film 0.2 mm thick will be sufficient to completely solve the problem.
If a waterproofing layer is installed, then for reliable adhesion of the parquet board to the base, an intermediate layer of plywood sheets with a thickness of up to 12 mm, or of chipboard with a thickness of up to 19 mm, is used. A good level of screed preparation allows the use of chipboard with a small thickness of up to 16 mm.
Rolled polyethylene is laid over the screed with an overlap and not a single waterproofing primer can compare with the film in terms of functionality.
To increase the level of sound insulation, sheet rubber or pressed cork is additionally used. In some cases, laying parquet boards is limited to the additional use of construction cardboard for sound insulation, but the effect of this material is almost invisible.
Cork backing option in a convenient roll
It is worth noting that the soundproofing material is laid not overlapping, but end-to-end to avoid the formation of seams that can affect the height of the board. Chipboard sheets or plywood are cut into squares and fixed to the rough base with screws or dowel nails
Parquet boards are glued onto a finished base made of plywood sheets with a compensation gap of 10 mm.
In conclusion, we note that it has become fashionable to install parquet boards on the wall in a wooden house, partly due to the possibility of creating a unique interior, but mostly due to the ability of wood to create a special atmosphere of peace, comfort and warmth in a room.
Construction of a foundation in a wooden house
The quality of the subfloor determines how difficult the installation of the flooring will be and how good the result will be. The base can be made by installing logs or using a concrete screed. Moreover, for the lower floor, as a rule, a concrete floor base is made.
Fig1. And for the construction of floors on the second floor, logs are usually used.
Fig. 2. Concrete screed will provide an almost 100% flat floor surface, which is especially important when you plan to make the floor from solid boards, laminate, or block parquet. In wooden construction, a foundation on logs is often used. However, making such a base is not as simple as a concrete screed. Additional insulation will be required, and the joists also need to be strengthened so that the floor does not subsequently wobble. You should not rely on your own strength if you do not have sufficient experience. Entrust the construction of the log base to professional builders.
Accessories for floor coverings, types of adhesives
In addition to the floor coverings themselves, you need to purchase modern components. Today there is no shortage of components; The main thing is to navigate the new products on the market and purchase really high-quality glue, primer and plinth.
There are several varieties of modern adhesive compositions for different types of floor coverings in the apartment.
Aerosol glue. Originally used in carpentry, today it is widely used for installing floor coverings. Aerosol glue has many advantages. Since this composition is sprayed rather than squeezed out of a tube, it is possible to save up to 80% of glue. It's convenient to use. It allows you to lay coatings much more quickly, since this glue sets faster than regular glue.
If an aerosol is used, the floor covering will be ready for use immediately after installation; You can even install furniture in such a room - there will be no harm from it. Contrary to popular belief, aerosol adhesives are safe for the environment and humans. You can immediately move into a room where installation has just been done using this adhesive. Aerosol glue is easy to learn how to use. The main thing is that the base underneath is perfectly clean. You can even use the composition while standing at full height, and not on your knees.
Adhesive for cork coverings. Due to the wrong choice of glue for the cork, you can often see its deformation after installation. Among all the adhesives for cork floors, you should choose a water-based contact adhesive mixture. The main thing when using it is to follow the instructions exactly and not exceed the open time of the glue. This period is not very long, and if you do not hurry up with laying the tiles, in the future it will swell at the edges. Glue should be applied both to the prepared base and to the material itself. Then the cork is placed in its place and beaten with a mallet. As a result, the adhesive films adhere firmly to each other.
Adhesive for rubber floors and PVC-free floors. Floors that do not contain vinyl or PVC, which have recently been increasingly used in our homes, cannot be glued to the same compounds that were used to install floors previously. For such coatings, it is recommended to use acrylic-based glue. For rubber coatings, it is better to use two-component epoxy adhesive. When using porous materials, cement-based adhesive is suitable, and for non-porous materials, neoprene contact, epoxy and polyurethane adhesives are suitable. The latest acrylic-based adhesives can be used for porous and non-porous substrates. In addition, some developments in this area concern the creation of environmentally friendly adhesives that can be used even in children's.
Adhesive tape. It is a high-strength tape that is coated with glue on both sides and rolled out on the floor. After the floor covering is ready, the protective layer is removed from the tape and it is firmly glued to the material. The adhesive tape is reinforced with fibers. It cannot be removed from the surface being pasted. Using this material, you can fix carpeting, anti-slip profiles on the corners of steps, etc., and the surface can be used immediately after installing the covering.
Another type of adhesive tape is a woven material that is used in conjunction with a dry acrylic-based adhesive mixture. The woven material is laid out on the floor, the paper is removed from the sticky part, after which the coating rolls are glued. The use of tape systems assumes that the base underneath will be perfectly clean. In addition, the room should not be humid.
How to care for wood flooring
Of course, a wooden floor most often has to be protected from water, which is somehow absorbed into the wood. Because of this, it is recommended to use only engineered or solid wood in the kitchen or hallway. Traces formed as a result of water ingress can be removed by restoration.
Also, you should not drop anything heavy on a wooden floor, and if this does happen, then there is simple advice: treat small dents and scratches on the wood calmly. A wooden board acquires its truly natural appearance during use. True, not everyone shares this opinion, so whether to put a wooden floor in your apartment or not is up to you to decide.
Manufacturers recommend treating wood with oil, since in case of damage it will be enough to restore only the damaged fragment of the floor. If you cover the board with varnish, then during restoration you will have to remove all the varnish and re-treat the entire surface of the floor - for a uniform coating.
Photos: cover, 3 – Katya Zaklivenets, 1 – Olya Shangina, 2 – Yasya Vogelgardt
Waterproofing
Wood is an environmentally friendly material; it is afraid of moisture and can become deformed under its influence. So waterproofing is a critical part of the bathroom process in a timber home. For maximum protection of the wooden frame of a building, it is recommended that the waterproofing be attached or applied in two layers.
Floor
Installing a bathroom floor in a wooden house begins with installing protection against water penetration. Waterproofing your bathroom will prevent moisture from spreading to other rooms. To begin with, the floor is covered with cement mortar or bitumen mastic. The choice of subfloor depends on the load-bearing capacity of the floor. If the structure is not sufficiently reinforced, it may not be able to support the weight of the mortar, flooring and plumbing fixtures. In such a situation, it is better not to take risks, but to use bitumen mastic.
It is better to use ceramic tiles for the bathroom floor
After the material has completely dried, a waterproofing layer, usually rolled material, is laid. Modern waterproofing films are strong and durable. They reduce heat loss in winter, allow air to pass through and at the same time completely retain steam and moisture. The floor covering is laid on top of the rolled film. The process of building a bathroom in a wooden house with your own hands can be seen in the video.
In addition to the popular waterproofing film, the following is used to insulate the floor in the bathroom of a wooden house from water:
- Cast insulation. The material is melted to a liquid state, then the entire floor is poured with it. This option provides soft protection; it is not suitable for rooms with high loads.
- Paint. This is a simple and economical way to protect your floors. The paint does not allow moisture to pass through, but it must be renewed periodically.
- Impregnation. Increases the strength and moisture resistance of wood.
- Coating materials. The main component of waterproofing mixtures is bitumen. Coating mixtures are applied in layers, with a certain time interval maintained between each approach.
Coating waterproofing of shower cabin
Many people cannot decide how to protect wood in a bathroom in a wooden house. The best option is a combination of materials. For flat areas of the floor you can use rolled film, and for hard-to-reach areas - paint.
Shower drain in bathroom floor under tiles
Walls
How to cover the walls of a bathroom in a wooden house to protect them from moisture? To waterproof vertical surfaces, you can use one of the following options:
- Sheathing with polyethylene film. Easy to do with your own hands. The owner only needs to cut the required amount of film and attach it to the wall using a construction stapler. In this case, it is necessary to take care of creating a high-quality ventilation system.
- Treatment with water-repellent solution. Performed on a wooden surface. Allows you to maintain the original appearance of the walls.
- Installation of plastic panels. This is the easiest and most inexpensive way to protect walls from moisture. The main disadvantage is that the design is not unique.
Treating wooden walls with a water-repellent solution in the bathroom
Laying a wooden floor
To lay a wooden floor, the first thing you need to do is waterproofing; this is a crucial moment, since the appearance of your floor depends on it. It is located at the base of the flooring. It is better to use materials that do not allow noise to pass through.
Next, you need to decide how and from what to make the insulation of a wooden floor. For this purpose, polystyrene foam, sawdust and cotton wool are often used. After the floor is insulated, you need to start working on the base of the floor.
Three types of flooring are used for the base: plywood, concrete, logs. All types differ in cost. Also, logs are not suitable for low rooms; they are best used in houses with high ceilings.
Plywood is an economical and durable option, but it is suitable for rooms where there is no moisture, otherwise it will deform. If you want a warm floor, it is recommended to use logs.
The floor in the house is made of block parquet
Piece parquet is completely natural. These are small rectangular tiles made from oak, maple, ash, beech and some other hardwoods.
Fig. 6. Parquet tiles are manufactured in such a way that, using their tongue-and-groove profile, they are easily and very tightly mounted with adjacent tiles. Moreover, the installation of piece parquet can be done in various patterns (“deck”, “Christmas tree”, “square”, “wicker” and many others). The photo shows several installation options.
Fig 7. Agree, this “drawing” looks very impressive and respectable. By the way, a specialist can custom-make almost any design option, laying out parquet tiles the way you want. However, this is not easy and requires special knowledge, additional time and, of course, finances.
Fig8.
Specifics of laying solid boards
As we discussed earlier, the base for a solid board can be made of concrete or logs. There is only one requirement for the base - ideal surface evenness (no more than 5 mm difference is allowed). This can be achieved with special mixtures, of which there are many in building materials stores. Once the mixture has dried, you can begin laying the boards. According to the technology, first place plywood under the solid board. To do this, prepare pieces of plywood 0.5 - 1 m in size. Since plywood easily absorbs moisture, the pieces should not be laid tightly to each other, but at intervals of 5 - 15 mm (this will prevent deformation of the material when the humidity and temperature in the room changes).
Fig. 5. Laying solid boards is done from the longest wall (stepping back 8 - 15 mm from it) to the window. It is clear that the board is laid along this wall in order to visually increase the space and minimize the number of joints. The board is attached to the plywood laid on the base using nails or special glue. By the way, nails are installed to the surface only at an angle of 450. The pitch between nails is 0.3 m. When laid correctly, adjacent rows are joined to each other in increments of 0.3 - 0.4 m (i.e. the joints are not in one line ). Now about laying on the joists. On such a base you need to put thermal insulation and waterproof it. Only after this we lay the plywood, as with a concrete screed, and attach a solid board to the plywood using nails or glue.
Laying laminate flooring - studying the features
The laminate is packaged in bundles and sold in this form so that it does not absorb moisture from the environment. You can start installing the floor immediately after purchasing the material, without pre-conditioning the slats in the room. A vapor barrier material is laid on the base of the floor, on which the lamellas are actually installed. There is no additional need to nail or glue the laminate to the base floor. Do not use regular film as insulation. Remember that only material specially designed for these purposes, 1-3 mm thick, will perform its function efficiently. You can buy it at any building materials store - rolls of different thicknesses will allow you to choose the material according to the size of your room. Strict requirements are imposed on the surface of the main floor: it must be level, otherwise the slats will become deformed, crack, and become unusable. If the laminate is laid on a “warm floor” system, you need to choose one marked “environmentally friendly”. The installation process begins with attaching the first row of lamellas. Please note that laminate flooring may expand linearly during use. Therefore, there should be a small space between the wall and the outer rows of lamellas (gaps 7-17 mm). The next row is always slightly shifted compared to the previous one; fastening is done using locks located on each lamella. As a result, each lamella fits tightly with the neighboring one - a flat and smooth surface is obtained.
Figure 11.
Cork flooring
Cork is one of the very popular materials for flooring. Cork has excellent heat-insulating and sound-proofing properties, is very durable and reliable. Cork flooring is not only resistant to destruction under the influence of moisture (cork does not rot), but is also fireproof and does not support combustion. In addition, excellent aesthetic characteristics and spectacular appearance are attractive to many property owners. Cork flooring is made in the form of boards, parquet or slabs. In structure, it has several layers: cork agglomerate is laid on the bottom, and cork veneer is placed on top, which performs a decorative function.
Figure 12.