Spray gun device
Before repairing any device you must:
- Get acquainted with its design.
Correctly diagnose the problem.
The spray gun contains:
- The body of the gun, with a handle, a barrel for paint, and a trigger for feeding the mixture.
- Solution injection mechanism, which is equipped with a nozzle and an adjusting bolt.
- Spray regulator.
- Air supply regulator.
The injection mechanism consists of several components:
- A needle that opens and closes the hole for supplying air and coloring composition.
- The regulator bolt, when it is turned, paint consumption is controlled.
- A locking nut used to hold the needle.
- The sealing ring and the hole in it allow air to be evenly distributed around the circumference of the nozzle.
- Spray nuts, the part has one hole in the center and two small ones at the edges, which allows you to adjust the size of the “torch”.
Tip: Each product comes with detailed instructions, in which the tool is shown in section. Before work, you should carefully study the design so that after repair there are no “extra” parts left.
How to diagnose the device and possible breakdowns
The table shows the main breakdowns of the spray gun and the reasons leading to this: Name of the fault Reasons for the breakdown The spray torch is oval-shaped and does not respond to changes in the position of the adjusting bolt
- The shutoff valve in the adjustment unit has broken off. This problem often occurs with low quality instruments.
- The side holes in the supply nozzle are clogged.
- The sealing rubber in the control unit needs to be replaced.
The paint flow is uneven and spits out in chunks
- The consistency of the paint is too thick and is not intended for this type of spray gun.
- There is an accumulation of condensate in the air hoses; it needs to be drained. This occurs very often during the cold season.
- The holes in the outlet nozzle are clogged.
- A large amount of solid particles has accumulated in the paint container and cannot pass through the needle. You should drain the composition, rinse the instrument thoroughly and pour in a new composition, but passed through a sieve.
The trigger does not return to the reverse position when released
- The piston located on the feed needle is ignited. The instrument is disassembled and thoroughly washed, and the spraying is repeated.
- The spring located under the bolt that adjusts the feed needle has sagged.
- Due to rust, the moving mechanisms of the trigger stopped moving.
- The rubber seal located on the needle has dried out and the piston has moved from its place.
Paint drips from the nozzle when it is closed
- The needle became sharp and stopped blocking the nozzle.
- The sagging spring does not press the needle.
- Solid particles have entered the assembly and interfere with the correct movement of the needle.
- The trigger does not recline to the desired position.
The spray pattern constantly changes direction
- The hole in the nozzle is clogged.
- There are clots or foreign objects in the feed mechanism or ink tank.
- The bolt that adjusts the torch has broken.
The spray gun does not spray paint after pressing the trigger
- The needle is not moved by the trigger mechanism.
- The feed unit is clogged with paint or foreign objects.
- Very thick paint
Tip: Usually a repair kit for such a tool consists of several bolts and rubber seals, which are supplied with it, but if there are no parts, you should immediately purchase several rubber seals, which quite often deteriorate.
How to maintain and repair a spray gun
For example, a low-pressure pneumatic spray gun is taken. The main problem with many units is the use of alkyd paints. After finishing work, the sprayer must be cleaned and rinsed well.
- It will get clogged.
- It will spray unevenly.
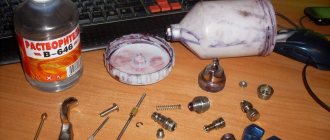
Advice: All elements for spray guns should be cleaned and washed - they are all practically “overgrown” with paint, the layers of which must be washed off with solvent or gasoline. When servicing the spray gun:
- The most problems arise with the valve drying to the cylinder, as a result of which it cannot be moved. The use of solvents in this case weakens the dried coating layer and allows the unit to be cleaned. All actions are done very carefully so as not to damage such a small part.
- The injectors and nozzle become clogged no less than the valve. In this case, the main part of the unit is the needle, which participates in the formation of the torch and determines the quality of the painting work. To clean such small parts, use a brush with a solvent. Here everything must be done very carefully, as can be seen in the photo, in order to prevent the formation of scratches in the nozzle itself, which can cause the paintwork to settle in the grooves and lead to distortion of the torch shape.
Procedure for cleaning the nozzle A few recommendations for caring for the instrument:
- When cleaning equipment, it is better to use specially designed SATA needles and brushes that do not scratch the nozzle.
- If the moisture separator for the spray gun, which is a filter for the tool and paintwork materials pass through it, is very clogged, then it can be cleaned with the same tools and materials as the nozzle.
- It is very important to use paint materials entering the spray nozzle without lumps, for which the paint container must always be clean. This is due to the fact that the paint that has hardened on its walls will peel off and then mix with the liquid and get into the conductive parts.
- If there is a pressure gauge for the spray gun and a pressure regulator, they must be cleaned of dried layers of paint, which can lead to malfunctions in their operation and, therefore, to poor-quality finishing.
After all the cleaning activities have been completed, the sprayer must be reassembled in the same order as disassembly, but after the components and parts have completely dried. You can dry them with a hairdryer. Rubbing elements, including the gun trigger rod and needles, must be lubricated with silicone-free lubricant. Proper operation will make any spray gun a good, inexpensive, reliable assistant when carrying out repairs in the house, and the video will tell you how to do it correctly.
Tips and possible tank malfunctions
The operation of a spray gun with a tank is quite simple and intuitive, but has certain nuances.
In this topic, we will not analyze all the subtleties and tricks of using a pneumatic spray gun, but will focus only on its paint container. Let's start with advice
Cleaning the tank after work.
Should be done as soon as possible. Preferably before the paint has had time to dry. It is recommended to use a comfortable brush with nylon bristles. It is not advisable to use metal brushes, sandpaper or pick at the dried mixture with a knife. This aggressive cleaning method scratches the surface of the container, making subsequent cleaning more difficult.
Leak in the lid area.
If the connection between the lid and the tank is not tight enough and allows drops of the mixture to pass through, the best option would be to install a new gasket. If one is not available, you can put a piece of fabric or a nylon stocking between the container and the lid, which can also serve as a filter for the mixture being poured.
The air goes into the spray gun tank.
A fairly common problem associated with insufficient tightening of the air cap or its deformation. Also, this phenomenon may be a consequence of a torn gasket between the nozzle and the head of the tool. The problem is eliminated by replacing the damaged head, gasket or nozzle.
To uniformly spray various paints and varnishes, primers, liquid putties, protective compounds and impregnations, painting devices called spray guns are used. This equipment may differ from each other not only in design, but also in its operating principle, which affects the quality of the applied coating.
Popular breakdowns and repair methods
But, most likely, the reason is not a factory defect, but the inexperience of the user. Try adjusting the device using the adjusting screw. Attach a small sheet of whatman paper to the wall and try to improvise with paint, gradually opening the screw. Adjust the feed of paintwork without squeezing the trigger of the gun. The screw creates barriers to the movement of the needle, preventing it from opening the outlet for the paint composition.
If adjusting the pressure supply does not change the situation, you need to check whether the needle is dirty. Try cleaning the needle and nozzle, repeat the test on whatman paper. If the reason is a damaged mesh, it must be replaced.
Sometimes the spray gun refuses to work when the outlet for the paint composition is fully open. This may mean that you may be using a substance that is too viscous. If large lumps are visible in the mass, grind the coloring composition, then strain on a vibrating sieve. Try applying paint to the Whatman paper in the new consistency, adjusting the pressure with the screw.
Also check the condition of the air supply. After pouring paint into the tank and connecting to the air line, gradually add air pressure. In parallel with the increase in pressure, make periodic short “sprays” onto whatman paper.
Carefully read all instructions for storage and maintenance of the device of a particular brand. Try to wash all specified elements of the device immediately after use. Use materials recommended by your spray gun manufacturer.
Construction and painting tools are gradually being improved. The usual brush and roller are being replaced by a spray gun, which allows you to evenly paint large areas in a short time. The device is easy to use, but, like any equipment, sometimes it breaks down and stops performing its functions. What to do if the spray gun does not spray paint properly? Why, instead of a uniform release of paint, does “spit” fly out of the nozzle or just air blow?
Performance tests
To properly adjust the spray gun, it is necessary to carry out a number of tests, which are not very complicated. This will increase productivity and minimize paint consumption.
Such tests include:
- checking the quality of paint spraying;
- checking for the torch imprint, its correctness;
- checking the uniformity of paint distribution.
The spray quality test is simple. It is necessary to apply a strip of paint using a spray gun to a piece of drywall. After this, you can evaluate the size of the droplets and the uniformity of the stripe application. The stripe itself will be most intense in the center, and towards the edges it will become less uniform.
The shape of the imprint for a torch is determined differently. You need to hold the spray gun on at a distance of 15-20 cm from the surface for a second. If the paint print is smooth and well defined, then the equipment is adjusted normally. If there are numerous splashes around, then the pressure is too high and needs to be reduced. If the spot is uneven, then the pressure is insufficient or the holes are clogged.
Even distribution of paint is also important to avoid drips during application. If they are, then most likely the pressure is insufficient. The spray gun is configured as follows during testing:
- It is necessary to ensure that the nozzle and all holes are free of paint and correspond to the type of paint composition.
- After this, a sheet or piece of drywall is attached in a vertical position (a piece of 50*50 cm is sufficient).
- The pressure is set as required by the instructions.
- After this, a test strip is painted so that it can be evaluated and adjusted.
- Vertical and horizontal stripes are carried out to determine the uniformity of the applied paint and the quality of the surface.
After the assessment, the following conclusions are drawn:
- The torch is adjusted properly if the spot is symmetrical and even. The height and width of the resulting spot must fully comply with what is stated in the instructions. The paint is distributed evenly without splashing.
- The torch produces crescent-shaped stripes. This indicates that the nozzle is dirty or damaged, as is the center hole or side holes of the air special head.
- When turned on, the torch takes the shape of a figure eight. This means that the paint is liquid or high pressure is applied, it must be reduced.
- Intermittent torch. This is a sign that there is little paint left in the tank; the level needs to be checked. Air may have gotten into the channels that supply paint. In this case, they need to be cleaned. The tank vents are dirty and need cleaning.
- The torch is supplied in the form of a drop. In this case, the spray gun is held incorrectly relative to the surface. The nozzle may also be dirty.
- The torch is issued in the form of an ellipse. In this case, thick paint is used or the supply is large and the operating pressure is too low.
Operating principle of an electric spray gun
The operating principle of such a device is simple:
- A torque is generated in the crankshaft, which oscillates the diaphragm of the device.
- When the diaphragm is at the bottom, rarefied air forms in the gap above it. At this point, the suction valve opens, forcing paint through the hose into the space above the diaphragm.
- As soon as the diaphragm rises, the valve closes and the pressure valve acts on the solution and delivers it to the fishing rod. The remaining paint ends up in the supply container.
- The device includes a bypass valve that protects the diaphragm from blockages by controlling the operating pressure.
- A switch button is installed on the electric motor, which is used to activate the device.
How to use an electric spray gun
Before using the spray gun, you need to check how tightly the hoses and screwing elements are fixed, and make sure that the electrical cable is in good condition. If no defects are found, you need to turn on the idle speed of the device:
Press the “Start” button and hold for 2-3 seconds.
After this, you need to configure the bypass valve:
- First, you need to remove the threaded plug in the sprayer and attach the pressure gauge.
- Then loosen the locknut in the bypass valve and turn off the engine.
- Unfold the rod valve and place the suction hose into the paint can.
- Set the pressure of the bypass valve to 0.5 MPa and tighten the lock nut.
- Next, stop the engine.
- Now you need to adjust the pressure in the pressure hose and close the screw.
- All that remains is to remove the pressure gauge and put the plug in the sprayer in place.
How to use a spray gun? Holding the device at a distance of 1 meter from the surface of the product, you need to make circular movements. If the solution is viscous, the number of layers decreases and vice versa. This factor is also influenced by the quality of the surface being painted. It is advisable to stir the paint occasionally so that the homogeneous composition does not separate into layers.
spray gunOnce the work is completed, you need to turn the screw near the fishing rod, blocking the passage of paint. Remove the suction hose from the cylinder, and point the sprayer into a container with paint and pump out the remaining residue. To clean the sleeves and fishing rod, place the spray gun filter in a deep vat of water. After this, the electric motor is disconnected from the network, and the sleeves and fishing rod are separated from the device.
Expert advice
If you use the spray gun frequently, it is necessary to properly care for it so that the device lasts not only the warranty period, but also much longer. To do this, you should follow the following recommendations from experts:
- be sure to clean all elements of the device from paint, using only the appropriate solvent after each use, it is advisable not to allow the material to harden;
- It is prohibited to use conflicting solvents, since as a result of such an action the paint will curl, harden and clog the passages, rendering the tool unusable;
- for complete evaporation of the solvent, it is necessary to dry it in an open (disassembled) form before assembling the spray gun for storage;
- if a break in work is required, then you should not leave the gun in the paint or do it only with the lid on the tank tightly closed, and carefully tighten the needle-regulating bolt;
- To prevent accumulated condensation and dust in the tank from spoiling the device, it is necessary to blow out the compressor before using it;
- spray guns of various brands, such as Hammer, Mastak, Zubr and others, have their own operating nuances that must be studied before starting work.
Attention
As practice shows, most often spray guns break due to improper use. Also, in the absence of original components, it is quite difficult to achieve proper performance and quality of painting.
A spray gun is a tool for painting various surfaces, which provides not only higher speed of work, but also thorough painting of defects and complex terrain without drips and paint accumulation. In order for a tool to serve for a long time, it must be kept clean at all times, and its functioning must be diagnosed in a timely manner. Do not neglect the operating rules, since even improper storage can cause serious damage.
DIY spray gun from a can
An aerosol can-based device is a variant of an airless sprayer. It perfectly paints any surface.
To make such a spray gun, you need to take:
- plastic bottle;
- an old bicycle tube;
- empty can;
- pump for inflating bicycle wheels;
- scissors;
- hacksaw for metal;
- glue for rubber products.
A spray gun from a spray can is made according to the following scheme:
A nipple with a cap, 3 cm in diameter, is cut off from the bicycle camera; Create a hole in a liter bottle (you can take a container with a volume of 1.5 liters); A nipple is attached to the glue to the inner walls of the bottle, which will play the role of a discharge valve; A device that sprays paint is carefully cut out of an aerosol can;
Removing the spray element from the can
- Apply Cold Weld glue to the bottle cap and attach the valve to this place. The connection must be strong so as not to violate the tightness of the device, which operates under high pressure;
- They wait for the glue to harden and try the made spray gun in action. For this, only water is used.
A ready-made homemade spray gun is used in the same way as a reusable aerosol can.
Spray gun breakdown: do-it-yourself repairs
Why doesn't the spray gun work? Many people, most likely, when faced with such a problem, take wrenches, screwdrivers of different sizes, disassemble the device and try to figure out what could be the cause of the breakdown, and most importantly, how to put it back together correctly, without the remains of the parts that make up the device.
This article invites you to get acquainted with what types of spray guns there are, the reasons for their frequent breakdowns, and how to troubleshoot problems yourself.
- What are the types of spray guns?
- The structure of the spray gun How to diagnose the device and possible breakdowns
- How to maintain and repair a spray gun
What is needed for repairs
Regardless of the operating principle of the inking mechanism, before you begin diagnosing and troubleshooting, you need to prepare the following tools and spare parts:
- a set of wrenches of various sizes;
- pliers;
- screwdriver;
- repair kit and other sets of spare parts.
A spare parts store for repair and construction equipment will be able to offer several options for repair kits to troubleshoot problems with spray guns. It could be:
- A standard repair kit consisting of several bolts and rubber seals (it is better to stock up on such repair kits in advance due to the fact that seals quickly become unusable when exposed to dyes).
- Specialized repair kit. The set includes spare parts for spray guns necessary to fix a specific problem or replace a failed part.
Read also: Marking of Soviet ceramic capacitors
How to use a spray gun correctly
The entire process of surface treatment can be divided into several stages: preparation for painting, preparation of the compressor, painting, cleaning.
Preparatory work
First you need to decide on the tools and materials for the work:
personal protective equipment: respirator or mask (since painting walls with a spray gun is accompanied by a mist of paint that does not reach the surface), goggles, gloves and overalls;
- masking tape to protect areas from painting;
- film or cover for furniture if it cannot be taken out;
- compressor with the ability to regulate pressure;
- couplings and air hose;
- spray gun;
- paint and varnish material with solvent;
- primer;
- sandpaper.
First you need to choose a solvent and paint. Oil paints are easiest to use, although latex and acrylic paints can also be sprayed. They are safer and better quality. To give the composition the optimal consistency, a solvent is used, depending on the type of paint.
The next step is surface preparation. All furniture is protected with film or covers, the floor is covered with newspapers. Unpainted surfaces are protected with masking tape. It is necessary to create high-quality ventilation inside the room. Personal protective equipment is used.
When everything is ready, the wall is prepared. The old layer, if any, is removed, the surface is sanded, grease stains, dust and dirt are removed. If oil paint is used, the wall is treated with a solvent; if acrylic or latex paint is used, the wall is treated with soapy water. The final stage is priming the walls.
Compressor preparation
The compressor is turned on to supply the test fluid. While the paint is being prepared, let the device build up pressure. To avoid pressure drops during operation, you need a pressure regulator on the compressor. Indicators are set from 1 to 1.7 atmospheres. The exact data is written in the instructions for the spray gun.
A pneumatic coupling is connected to the equipment. The connection must be reliable. Sometimes you have to use a fume. A little solvent is added to the paint container. It is needed to cover the siphon tube. The dispenser control opens slightly (usually one of the lower screws on the handle). The equipment is tested, only the nozzle is directed into a trash bin or onto an unnecessary surface. Spraying does not occur immediately, the system is filled with liquid, so air will come out of the nozzle, and only then the substance. If the solvent is not supplied, this may indicate a blockage or leak in the siphon tube. Finally, the solvent is removed from the tank.
Coloring
The required amount of paint and varnish material for the wall is mixed. After opening the jar, the contents are mixed. If the substance has been stored for a long time, it is better to strain it so that the clots do not clog the spray gun and the coloring quality is high. By adding solvent, the paint is brought to the optimal consistency.
How to properly dilute paint for a spray gun? The ratio depends on the type of paint, but is usually in the range of 15–20% solvent by volume. Then the flow will be uniform. The paint container or tray is two-thirds full. Everything is ready for painting. The handle is held at a distance of 15–25 cm from the wall. The paint is applied evenly, using movements from top to bottom or from side to side. If you have no experience in applying the composition with a spray gun, it is better to practice on an unnecessary surface.
A jet is released from the nozzle when the trigger is pulled. To prevent drops from forming on the surface, you should not linger in one place for a long time. Each pass should be slightly overlapped with the previous one. Then translucent areas will not form. When the paint runs out, the tank is filled again.
After application, the paint must dry. If necessary, apply one or more layers. Although modern paints are made in such a way that one layer will be enough. But to be on the safe side, add extra. If glossy paint or varnish is applied to the surface, then to improve the adhesion of the first layer and the subsequent one, the surface is treated with sandpaper.
Cleaning
Unused paint is discarded. If there are a lot of leftovers, everything is returned to the original container. You just need to write or remember that the composition is already diluted. There is an exception: epoxy compounds or two-component ones cannot be reused.
The siphon tube and container are washed with solvent, and the remaining paint material is washed off. The reservoir is filled 25% with solvent, shaken and everything is passed through the equipment until it is washed out. Masking tape and newspapers are removed from the floor after the paint has dried.
Tips for extending the life of your spray gun
A spray gun is a complex tool that requires careful handling. In order for it to work for a long time without breakdowns, you must follow the following rules for caring for the device:
- Clean immediately after finishing painting work. For this purpose, the tank of the device, after removing the coloring material, is filled with a solvent having a composition similar to the dye used, and after that the device is turned on and used on the unnecessary surface. The contents of the tank released under pressure will give a good cleaning of all valves and hoses.
- Never use a solvent that may cause a “chemical conflict” with the staining solution used. Curled paint residue may cause mechanism failure.
- After finishing washing, the device must be thoroughly ventilated, and the container must be left open for a short time to evaporate the remaining solvent.
- The spray gun with the coloring composition inside can only be left for a short time, but before that, take the following measures to prevent the composition from drying out: tighten the needle adjuster all the way and tightly close the hole to prevent air from entering the tank.
- Before refilling, the spray gun must be thoroughly blown out to remove condensation or accumulated dust.
Most paint sprayer breakdowns can be prevented by using the device correctly. But if breakdowns occur, many of them can be repaired yourself using repair kits, which include various sets of spare parts and components. Timely maintenance and proper care will help the instrument to serve its owner well for many years.
So this is the case. I was making repairs in the entrance (for noble aesthetic reasons and because I was sick of disgusting) the wall there was covered with such “lumpy” plaster. I'm tired of using rollers and brushes. Well, it’s inconvenient, the consumption is high and most importantly it takes a long time! I painted it with some kind of Tex acrylic paint - it's thick and non-opaque, but cheap and waterproof - just right. I read the forum - there is little information and it is fragmentary. The spray guns say you can't coat a piano with bullshit varnish. Well, we don’t need that, but that’s what we need for “fence” work. Although opinions mostly agree on “wasted money.” From the answers I found out that the driver is a green BOSCH with a ruby nozzle. Yeah. It currently costs 3000 rubles. No, this is not necessary, especially since the price is on average from 1000 to 2000. Then I came across the miracle of the Fiolent spray gun. And the description on the site really inspired me. And 2 ruby nozzles and not Chinese junk and adjustments and in general - the fiolent is still not a stern (their jigsaw made me very happy). For medium-precision work, their tools are usually strong and reliable. Moreover, it is written that you can work with thick acrylic paints with a 0.8 nozzle. The only alternative is a pneumatic spray gun, but this, of course, is no longer necessary because a compressor is needed. There is also some kind of homemade one, or one that a guy sells for 900 rubles, you can power it from an inflated chamber. In general, I’ll scour and find out here » > it’s in stock and costs only 1300 rubles. Hooray! I get ready and rush there with the thought of trying it out right away. The seller takes it out, offers to check it, fill it with water, I say, okay, let’s do it, although it’s not necessary (because somehow I’m not afraid of marriage, etc.). In general, it pours water and collects it and nothing splashes. It squeals like a wounded boar, grunts and barely spits. Assembling, disassembling, fiddling around, the seller doesn't care - he's completely stopped. Okay, give me another one - anything can happen; another similar piece of crap is taken from the display case. Almost no splashing. He pokes around and jokes (and I note that the sales guy is excellent and cheerful - not like the idiot from infracom) - apparently you will have to paint the fence with a brush. In short, nothing works. “I’m upset,” Elmos suggests, “I’m not enthusiastic, although the equipment is richer and more powerful. more and, most importantly, it sprays superbly into fog and the price is the same. But the nozzles are not ruby! But I want ruby and not made from China at all (but Elmos - xs (I mean spray guns - obviously not a spark)) and it’s a shame for the fiolent. As a result, the Elmos regulator gets jammed and neither here nor there. I brush “yes, apparently with a brush. " and I leave. I ended up painting the wall with a roller (acrylic 18mm pile). But I still have some kind of unpleasant aftertaste and I want a spray gun (because I still need to paint). I found this mega spray gun on the Elmos website (of course it’s far from pneumatic, but still)
Read also: How to make electric heating in a private house
model PG-65 Voltage (V/Hz) 220/50 Productivity (cm3/min) 400 Rated power (W) 120 Capacity (l) 1.2 Nozzle (mm) 0.8-1.2 Weight (kg) 1, 9 Standard equipment: Spray valve, bowl for determining paint viscosity, oil, 0.8 mm nozzle, bendable nozzle, double one and a half meter hose, fasteners
It can even suck straight from the bucket.
and fiolentushka is an asshole. here you go" >
Airless paint sprayer KR-260 Power 60 W Maximum output 260 g/min Viscosity up to 80 DIN-sec Nozzle diameter 0.6 and 0.8 mm Container capacity 0.7 l Power cord length 3.0 m Weight without nozzles 1.2 kg Equipment: nozzles 0.6 and 0.8 mm, viscosity meter
Type of tool: household The KR-260 paint sprayer is designed for AIRLESS spraying of a wide range of paints and varnishes of varying viscosity (up to 80 DIN-sec) for household and industrial purposes. Features: The plunger pair is made of high-strength, wear-resistant alloy, which increases the service life of the product. The metal swivel joint gives reliability and durability to the product. The nozzles have ruby wear-resistant nozzles, which significantly increase the service life of the product. Equipped with replaceable nozzles (0.6; 0.8) with ruby nozzles allows you to spray materials of various viscosities. Smooth adjustment of the amount of sprayed substance ensures dosage accuracy. The nozzle extension makes it possible to paint horizontal surfaces and hard-to-reach places. The suction filter prevents large paint particles from clogging the nozzles. Double insulation of the electrical part of the device allows you to avoid grounding, which makes it possible to connect the device to a household network. Consumer analysis: the KR-260 paint sprayer can work with modern construction paints, the manufacturer of which recommends an airless paint sprayer as one of the methods of applying paint, such as: 1. Modern water-soluble paints, which are currently widely used in construction for finishing the facades and interiors of houses. 2.Car body paint 3.Enamels, paints and varnishes for wood and metal 4.Polishing and glaze 5.Oil paints 6.Silver and bronze paint 7.Oils, preservatives and pesticides 8.Disinfectants Airless spraying eliminates the formation of air bubbles on the surface of the painted part, which gives a uniform, glossy surface. No special training is required to operate the product, which allows it to be used at home.”
In short, comrades, what is the further path of my electrical painting development? Pneumatic is all clear, but it is also clear that a compressor and an electric spray gun are different things. Maybe try fiolent or take this elmos?
Spray gun breakdown: do-it-yourself repairs
Why doesn't the spray gun work? Many people, most likely, when faced with such a problem, take wrenches, screwdrivers of different sizes, disassemble the device and try to figure out what could be the cause of the breakdown, and most importantly, how to put it back together correctly, without the remains of the parts that make up the device.
This article invites you to get acquainted with what types of spray guns there are, the reasons for their frequent breakdowns, and how to troubleshoot problems yourself.
- What are the types of spray guns?
- The structure of the spray gun How to diagnose the device and possible breakdowns
- How to maintain and repair a spray gun
What are the types of spray guns?
Any paint sprayer is a very delicate device and is not suitable for neglect, and breakdowns are not always the reason for the low cost of the tool; this can also happen with a well-known, well-established brand.
Very often the causes of breakdowns can be:
- Incorrect operation of the spray gun (see How to use a spray gun: advice from professionals).
- Neglect of basic rules when caring for an instrument.
Before disassembling the spray gun into components and parts, you need to become familiar with the types of these tools.
Manual (see How to choose a manual spray gun). Such designs with a manual supercharger, in appearance and principle of operation, resemble a conventional pump. Here, pressure is injected into the cavity with paint independently, and then enters the nozzle.
Such a tool is most suitable for spraying liquid whitewash or a water emulsion of liquid consistency, and with a fully inflated tank it will only last for a few minutes of painting, after which you will need to pump up the pump again.
The main disadvantages of such a tool:
not high working pressure, unable to lift paint of a thicker consistency; low efficiency and efficiency; a rapid drop in the working pressure in the tank, which requires constant pumping.
The significant advantages of a spray gun with a manual supercharger are its simple design and not too high price. This allows any damage to be repaired with electrical tape.
Electric.
Battery powered spray gun
Tip: An electric spray gun is a specific tool. When choosing it, you must clearly understand for what tasks it will be used.
Electric spray guns differ in the power of the motor that delivers the paint to the nozzle.
Repairing an electric spray gun is most often associated with a burnt-out engine, which you are unlikely to be able to repair yourself. In addition, the price of a high-quality device is not too low, and it is not always rational to take risks by performing repairs yourself; it is better to pay for repairs to specialists working in the service center.
Pneumatic. This is the most professional tool when painting walls (see Painting walls in an apartment: what to use and how to do it). It is the most difficult to repair.
This device consists entirely of mechanical components. There are no complex electronics here, but it often breaks down due to prolonged or not entirely correct use.
Advantages of pneumatic tools:
the ability to adjust the operating pressure, limited only by the power of the compressor and the size of the device’s receiver; with a pneumatic spray gun you can spray all types of paints, even with a thick consistency, which depends on the settings of the tool; repairing the unit is quite easy to do independently, without the help of specialists;
Electric spray gun - selection, device, application, repair + video
When you have to cover many square meters with enamel, experienced comrades, of course, will advise using an electric spray gun. This section will help you get started with this tool or expand your existing knowledge.
It’s hard to imagine large-scale renovations, much less construction, without painting. Moreover, today more and more surfaces are being trusted with paint. There are many reasons for this. For example, thanks to modern materials, the walls are easy to clean and are always ready for your creativity. It is this type of finish that vinyl stickers or artistic painting fit well on. Even wallpaper today is covered with paint. Ceilings are also less and less likely to be whitewashed, and if it is not a suspended structure, then most likely you will prefer to paint it.
Covering wallpaper with paint
What else could require a fair bit of brushwork? Of course, the floor! If you have flooring made of good wood, then it would be a sin to remove it and lay parquet or laminate; restoration is usually done. This is a troublesome task: sanding, sanding, etc. - but it all ends with nothing more than painting. Whether it's varnish or paint, you'll have to go over the entire area repeatedly. Agree, it’s not easy to do this with your own hands. During the renovation, not only the wooden floor is subjected to restoration, but also the solid wood doors. Here the task is further complicated by the fact that the finish needs to be applied evenly, because you see all this every day and uneven brush strokes or pile forgotten in the thickness of the paint do not cause delight at all.
As you can see, the renovation is burdened with a huge amount of painting work, and if you turn to specialists, you will not find a single team that would do it with a brush. Even paint rollers are rarely used, except for decorative finishing, when you need to create a certain surface texture. And if you are planning to do everything yourself, then even more so, a paint gun that has been adopted by professionals for a long time will significantly facilitate your task. Our goal is to tell everything about it and its capabilities, as well as the features of the device and repair.
Naturally, the first thing you did when you decided to buy yourself such an assistant for renovating a house or apartment was to open a catalog or go to a store. The first thing you have to deal with is a large assortment, and these are far from just different manufacturing companies. It's okay, all types of devices lend themselves well to classification, and we have done it for you. In our articles you will find information about all types of spray guns - from manual to powerful electric. Publications do not contain advertising, we do a balanced analysis, consult with professionals, and try a lot ourselves.
This section will tell you not only about the principles of operation, but also give valuable advice on how to optimize the use of a particular unit. For example, you will learn why a manual spray gun consumes more material, and an electric one is so expensive, how to choose a device for your needs and not overpay for unnecessary functions, and what else it may be useful for in the future.
Manual spray gun
Our authors will discuss the types of spray guns not only by type of drive, but also by other criteria; detailed photographs will make it easy to disassemble the structure of such devices for finishing, and videos will help you evaluate the ease of use of them and set up the work yourself.
We will list everything that a paint gun can do, as well as how to master these functions, because not everyone is ready to cope with a powerful directed jet of intensely sprayed paint the first time. Are you already overwhelmed by the amount of information you have to master? Don’t rush to panic, our articles are written easily, can be read in one breath and are devoid of meaningless digressions, so you will spend your time very efficiently, and your skills will not keep you waiting. Our authors describe each type of work in a separate article; a convenient search will allow you to quickly open the publication you need and begin to master the basics. We describe in equal detail the painting of large areas and the restoration of small items, and all the repair tricks are on the surface.
The more complex the unit, the more complex its design - this is an obvious thing. That’s why you don’t want to spend a lot of money on a paint gun with a sophisticated design, even though it can do more than a team of painters. But don't rush to conclusions. Since you have decided to do the repairs yourself, then mastering the device and repairing an electric spray gun yourself, and even more so a mechanical one, is a task within your capabilities. True, you need a reliable adviser... And we offer you a large series of articles not only about the use of such equipment, but also about its repair. It’s not in vain that our authors scrupulously collected information bit by bit, leafing through numerous forums and instructions for a huge number of painting equipment. Now there are repair manuals for all standard designs; anyone can handle a broken spray gun with their own hands.
Electric spray gun
As you can see, the new technology is designed to facilitate and speed up the finishing process, especially for those craftsmen who dare to start a large-scale project and work with their own hands. Check out our section and all fears will disappear, you will feel at ease holding a spray gun in your hands. You will know its structure, the technique of use, too, this will help you avoid annoying breakdowns, and if such happen over time, you will not need the help of a paid service. We have collected all the information you need to calmly and efficiently paint any number of square meters.
- Author: Mikhail Malofeev
remoskop.ru
Test Spray
Having prepared the surface, paint, room and protective equipment, it’s time to move on to painting. If you have previously had positive experience working with a spray gun, you can proceed to the main surface. If there is no previous experience or it is unsuccessful, it is recommended to carry out a series of test sprays on waste paper (cardboard, newspaper) in order to calibrate the air supply, material and torch size (so that the spray gun can work most effectively).
Calibration of a pneumatic spray gun is a rather delicate process with many features, to which we have dedicated a separate topic on our website. If you want to make your work easier and get a decent result, we recommend that you read the detailed guide “ How to set up a pneumatic spray gun
Essentially speaking, you must obtain the correct shape of the spray torch (an elongated oval) by rotating the tool's controls. This process, with commentary, is clearly demonstrated in the video below.
Why doesn't my perfume sprayer work?
There are several reasons that can cause a spray bottle to break down. The most common are the following:
- clogged holes in the spray nozzle or spray tube;
- sticking or displacement of the ball inside the mechanism;
- air entering the tube, which takes the perfume from the bottle.
Don't fall into despair and throw away your favorite perfume. For any of these problems there is a correct solution. There are several ways to fix perfume if it doesn't spray. So let's try to fix the spray gun ourselves.
Clogged spray holes
The most common reason why a perfume atomizer does not work is that it is clogged. Most often it occurs in perfumes that are already several years old. The components of the aromatic liquid, passing through the spray nozzle, can settle inside. This oily substance eventually clogs the narrow opening of the spray.
What to do if the perfume stops spraying as a result of a blockage? To resolve this problem, you need to do the following:
- remove the spray button;
- soak it in alcohol, cologne or hot water to dissolve the blockage;
- clean the holes in the spray with a very thin needle;
- clean the tube pin with a wooden toothpick;
- Thoroughly blow out the mechanism or flush it several times.
After the cleaning procedure, you can return the nozzle to its place and check the operation of the sprayer. If it doesn't work well enough, repeat the cleansing process.
Ball sticking inside the dispenser
Another reason for the spray bottle to not work may be the sticking of a tiny ball located inside. This small part can get stuck and block the flow of perfume into the opening of the atomizer. Let's see what to do if the eau de toilette doesn't splash.
In this case, you can use the following effective method:
- place the perfume in the freezer for 1-2 hours;
- then check the operation of the sprayer.
It often happens that sub-zero temperatures have a positive effect on the ball. As a result, the sprayer begins to work obediently.
Air getting into the tube
If the perfume does not spray, there may be air in the spray tube. To restore the functions of the bottle you need to:
- remove the sprayer by pulling it up. Below it is a short plastic pin;
- turn the bottle over and place it on a hard surface;
- Gently press the pin to the surface so that it is pressed into the bottle. Repeat several times if necessary;
- a few drops of perfume will flow out, but the air bubble should leave the tube;
- then put the spray bottle back on.
If all restoration work is unsuccessful, the sprayer may have broken completely. Then it is better to replace it by removing it from another used bottle.
What to look for when choosing a paint sprayer
In order to choose the right electric spray gun, you need to pay attention to the following characteristics:
Diagram of the operation of an electric spray gun.
- Torch width. Before purchasing a tool, you need to know what areas it is supposed to process. If you paint a large surface with a small stream, then you will spend a lot of time on it. If the torch is wide, then you can paint a small part with it, but the consumption of the dye will be large. If you often need to work with large and small areas, then it is best to purchase 2 models with different torch widths. This will save you not only your time, but also money.
- Nozzle size. This value will depend on the grain size of the material used. For metallic base coats, the size should be 1.2-1.3 mm, for acrylic paints and varnish - 1.4-1.5 mm, for primers - 1.5-1.7 mm, for liquid putty - 1 ,7 or more. For the first painting, you can use a spray gun with a 1.4 mm nozzle. It can also be used for priming the surface by adding a little more solvent to the primer than normal. There are replacement nozzle sets on the market with different sizes. By purchasing such a kit, you will make your tool universal.
- Nozzle cover. To ensure that the product serves you for a long time, you should choose models that are equipped with a stainless steel lid.
- Material for making the tank. The paint container can be made of metal or plastic. Metal tanks are much easier to clean from paint after finishing work, but they are opaque, so it is quite difficult to control the remaining paint in them. Plastic products are transparent, so it’s easy to control paint consumption, but it will be difficult to clean such a tank of paint. In this case, only you can decide what is more important to you: control or ease of care.
- Case material. The best option is a spray gun made of high-quality plastic, which is quite durable and lightweight, which will greatly facilitate its operation.
- Place where the tank is fixed. The paint container can be installed from below or from above. You need to choose the option that will be convenient for you. However, experts recommend purchasing a tool with an upper tank. In this case, it will be easier for you to work with thick paints.
- Availability of adjustments. Most models are equipped with a minimum number of options (roughly setting the paint supply volume and nozzle shape). More modern models may have the ability to preset operating pressure, electronic adjustment of the supply of dye, several spray modes, etc. Here the choice will depend on your financial capabilities, since the cost of more equipped models will be much higher.
- Possibility of autonomous operation. Some models can be battery operated, which is very convenient in the absence of a stationary power supply.
Design and proper use of a spray gun
To apply paint, varnish or primer in an even layer, special painting equipment is used - a spray gun. The device is selected to work with different compositions, with large and small areas. With the correct use of the tool and the correct selection of paint, the surface will be even and smooth. The choice of the right type of spray gun depends on the professionalism of the artist, the type of work and the quality standards of painting. Choose good painting equipment
Spray gun design
Apparatuses for spraying paint are available mechanical and electrical. The device of a manual mechanical type spray gun includes:
- A cylindrical piston pump that doubles as a paint container
- Fishing rod from which paint is thrown out
- Hoses
The electric spray gun consists of the following parts:
- The body is made of aluminum coated with nickel. This avoids corrosion
- Nozzle - a cone-shaped element made of stainless steel, brass or aluminum, which is located in the place of the body where the paint comes out of it
- The needle is made of aluminum. It opens or blocks the paint outlet
- The tank is a container for paints and varnishes. A metal cup is easier to clean; a plastic cup is more convenient for controlling paint consumption. The spray gun device comes with an upper tank and a lower
- Adjustment screws to control paint and air flow
Paint tank location
The design of a spray gun with an upper tank assumes the flow of paint materials under the influence of gravity. If thick paint is applied, it is better to use just such a sprayer. This is the only difference between the device and a pistol with a lower glass. The design of a spray gun with a lower tank assumes the supply of paintwork materials after the liquid has been discharged by air currents.
A device with an upper tank is used for short painting work. When there is little paint, its pressure decreases - this causes some difficulties in use. Since the principle of operation of an electric spray gun with a lower tank does not depend on gravity, it is easier to work with it. The container located below interferes much less with painting, but the spray bottle must be held strictly vertically.
Schematic representation of the paint sprayer device
Principle of operation
All devices for spraying paintwork materials work on the same principle - the paint, escaping from the nozzle, disintegrates into tiny particles and lays on the surface in an even layer. The design of the spray gun is such that it is either crushed by passing through a nozzle, or split into small particles using compressed air.
To use a gun with a built-in electric motor, you just need to fix the paint canister on the device, plug the device into an outlet and smoothly pull the trigger. If you have a compressor, you need to connect it correctly and set the required operating parameters. A mechanical device requires manual air pumping.
Regardless of the type of device, you need to use the spray gun carefully, having first studied the instructions. Protective equipment must be used, because when spraying paintwork or other materials, a paint haze is formed. The liquids being poured are pre-filtered and checked for viscosity.
Painting the main surface is carried out after testing the operation of the spray gun - practice controlling the supply of the composition, its application, and understand the pressure adjustment.
Types of spray guns and their applications
Paint sprayers are divided into two groups - household and industrial use. The production uses an automatic spray gun, which has a reinforced design. Household appliances are further classified according to the method of creating pressure to eject paintwork materials. They are electrical, pneumatic and mechanical.
Airless paint sprayer runs on electricity (mains or battery)
They only require a standard outlet to operate. An electric vibrating spray gun delivers paint to the nozzle using a built-in pump without the use of air.
Airless paint sprayers are available in hand-held and floor-mounted types. Devices with a built-in motor are compact, inexpensive, easy to use, but vibrate strongly during operation. An example of a simple and reliable spray gun is the Foreman electric spray gun. There are models with built-in mini-compressors - their color quality is slightly higher.
The transfer of paint to the surface reaches 60%, since the paintwork material is crushed only when passing through the nozzle. The quality of paint application is high, but worse than that of pneumatic models. When choosing a manual electric spray gun, you need to pay attention to the material used to make all parts of the spray gun. The less plastic there is, the longer the device will last. Water-soluble paints and coatings for cars, wood, and metal are used.
Pneumatic
An electric pneumatic spray gun runs on compressed air, which means it requires a compressor to use it. This makes the spray gun expensive, but the coating is of high quality. There are several types of pneumatic systems:
- HVLP – low pressure uses a large volume of air. A manual sprayer for paint of this type creates losses of paintwork materials of about 30%, there are difficulties when applying varnish, but the devices are excellent for creating metallic and pearlescent coatings. For tools operating with a large air supply, it is necessary to install a filter for the spray gun to clean the air from moisture and oil particles
- LVLP – low pressure uses a small volume of air. The device is easy to use, creates a minimum of aerosol haze, and transfers 75% of the paint. Even beginners can use it successfully
- HP - the operating principle of the spray gun is based on high pressure. The devices produce a thick aerosol haze, which is very harmful to humans and the environment. Losses of coatings amount to 45-50%. The advantages include high productivity and quality of painting
When deciding to buy a pneumatic spray gun, first select its type, and then select a compressor for it.
Pneumatic systems are the most economical. They are popular with professional craftsmen. The LVLP machine is considered the best for painting cars. Before starting work, you need to study the drawing of the spray gun and the connection diagram.
Mechanical
The difference between an electric and a mechanical spray gun is that when working with a mechanical device, the pressure to release the paint is created manually. When using electrical appliances, breaks are not necessary. A piston pump forces paint into the fishing rod and then sprays it onto the surface. An inexpensive hand-held spray gun with mechanical paint supply is suitable for processing small surfaces. In one working cycle of a few minutes, up to 4 square meters are painted.
Water-based paints, chalk and lime mortars are used for work.
A manual mechanical device will save your budget, but will force you to work hard
How to repair
Sometimes you have to repair your spray gun, but you don’t always need to contact a service center. There are a number of breakdowns or operational defects that you can fix yourself. DIY spray gun repair is done if:
- The sprayer does not turn on - check the mains voltage
- Paint does not come out of the nozzle - clean the nozzle or blow out the paint supply tubes with compressed air, spray solvent
- Paintwork is dripping - clean the nozzle, replace it or the seal
- Coarse Spray - Tighten tank, thin paint, replace air filter
- The jet is pulsating - add paint or replace a clogged air filter
- Paint flows from the surface - reduce the amount of paint
- The cloud is too large - reduce the distance to the object when painting or reduce the flow of solution
If you repair an electric spray gun yourself, then there are a number of problems in which the device is sent only to a service center:
- Malfunction of electrical parts - switch, cable - if there is voltage in the network, such a spray gun does not turn on
- Engine damage
- Burnt winding
To avoid overheating and burnout, the electric tool must be turned off for 10 minutes after every 20-25 minutes of operation. The painting session always ends with a thorough cleaning of the device from paint and varnish.
DIY spray gun and its use
Using a homemade spray gun does not guarantee high quality painting and takes time to get used to working with it. The simplest airbrush, made from a ballpoint pen, is suitable for painting small surfaces. It will require:
- Plastic ballpoint pen, wine stopper, bottle with cap and wide neck
- Syringe, alcohol, toothpick
A homemade manual paint sprayer is made as follows:
- Heat the syringe nozzle and insert a toothpick into it to widen the hole.
- Disassemble the handle, cut off one side of the body with a cone - this is where you will blow to spray paint
- Disassemble the rod and blow the paste out of it using a syringe, rinse the tube with alcohol in the same way
- Cut a corner (about a quarter) in the cork, make a small hole in the round part for the rod, and make a hole in the side for the plastic case. In the place where the plug is cut, the holes of the plastic tube and the rod should meet
- Make a hole in the lid of the vial for the rod and insert it there, glue the cork device to the lid
- Pour paint into the bottle, tighten the cap
A good application of paint and varnish will be obtained by using thin paint with a density slightly higher than that of water. Air from exhalation flows through the plastic body from the pen, and drops of paint rise through the rod. Spraying occurs from the impact of air into the paint.
Above was the simplest example of an airbrush, but it can be improved. If a homemade spray gun consists of metal tubes, then it will last much longer. Instead of using your own lungs to supply air, you can use a vacuum cleaner that has a blowing function or a pump.
WATCH VIDEO INSTRUCTIONS
Summing up
Using a spray gun allows you to save time and effort when painting any surfaces, making the coating even and smooth. Affordable electric models with an airless operating principle are suitable for use at home. For professional use or if financial capabilities are available, sprayers with a compressor are purchased. Low-pressure spray guns with a low volume of incoming air have proven themselves better than others. Timely and proper care of the device will avoid its breakdowns.
krasimavtomobil.ru
The spray gun spits. The airbrush spits paint: why and how to fix it?
Why does the airbrush spit and what to do?
An airbrush is a convenient tool, suitable for both painting large areas and making artistic drawings. But if it begins to splash out the paint, it lies unevenly on objects, this defect must be eliminated.
Airbrush device
Various types of sprayers come with more than 20 parts. However, they all have elements such as:
- A tank is a container for paint.
- Needle – regulates the amount of paint.
- Trigger - a starting lever for control.
- A nozzle whose diameter affects how wide the painting line will be.
- Air valve. Allows air to enter the atomizer.
- Guide needle. Fixes a simple needle inside the atomizer and allows it to move.
- Paint supply regulator. Affects needle mobility.
Causes of failure and methods of correction
The sprayer is the simplest mechanism in which serious breakdowns rarely occur. Minor faults can be fixed yourself.
Got clogged
The airbrush may spit because the check valve spring is flooding or moving too slowly as a result of:
- presence of paint particles in the valve design;
- clogging of the spring and parts near it.
You need to remove the needle and nozzle and clean them. Parts can also be immersed in solvent for a few minutes.
Paint that is too thick or uneven
If, during the spraying process, dense spots appear in the middle on the object being painted, this may indicate that the paint is too thick or has an uneven consistency. To prevent this from happening, you need to use only fillers with the consistency recommended by the device manufacturer, and regularly clean the airbrush after previous use.
Pressure failures
Figure-of-eight colored spots indicate too high pressure.
The pressure rises because the compressor outlet is completely open.
If you cover it, the pressure will drop to normal and the sprayer will not spit.
Loose connections or worn parts
If the airbrush spits or a gurgling sound is heard in its tank, this means wear on the structural elements or their damage.
- nozzle destruction;
- cracks appear in the nozzle and air enters the tank through them;
- depressurization of the material nozzle or its tightening is not complete.
If the device is damaged or cracks appear, we can only advise you to buy a new structural element. The problem with depressurization can be solved by replacing the gaskets or tightening the clamps more tightly.
Prevention
To extend the life of the sprayer and prevent its breakdowns, all its parts must be cleaned immediately after the procedures.
If you use it frequently, you should disassemble it completely and wash it.
The parts of the spray gun must be periodically treated with lubricant and the needles and seals must be changed once a year.
Other care tips:
- The device can be cleaned from acrylic with alcohol or a special product;
- The device must be disassembled and washed immediately after use;
- Clean the tank when changing paint.
Most airbrush problems arise due to poor maintenance. They can be solved and prevented by regularly cleaning the tool and replacing its functional elements.
75 messages
1. The nozzle is broken, but the threads inside the airbrush are still visible. Often this breakdown occurs due to the fact that when washing, many people unscrew the material nozzle (often on Fengda, Jas, TNT airbrushes, rarely Aero-Pro, Iwata, RichPen, but never Harder & Steenbeck, Paasche, Iwata in the Eclipse line), and during reassembly they tighten nozzle. The screwed-in part of the nozzle remains inside the airbrush, and the nozzle itself falls into the hands of the owner. This breakdown can be solved in two ways. using the method “as advised on numerous forums” - sharpen the match, pour glue on it (necessarily strong and so that it adheres to the metal) and press it harder into the place where the thread remains. Wait. Wait a little longer... Wait a little more... Just about there, a miracle will happen... And if it does happen (the moment of FAITH is important here), then starting to rotate the match you will unscrew the nozzle or completely finish off the airbrush.b
give us your airbrush (in the first point we talked about the power of FAITH, in this point TRUST is important). If necessary, we will provide you with a model to complete your order during the repair, but most importantly, we will REPAIR (we have special tools and equipment for this), lubricate, give a guarantee and return your airbrush within a day (the work takes approximately 15 minutes, and this will require payment for necessary spare parts)
What to do if the spray gun stops spraying paint evenly?
Construction and painting tools are gradually being improved. The usual brush and roller are being replaced by a spray gun, which allows you to evenly paint large areas in a short time. The device is easy to use, but, like any equipment, sometimes it breaks down and stops performing its functions. What to do if the spray gun does not spray paint properly? Why, instead of a uniform release of paint, does “spit” fly out of the nozzle or just air blow?
Types of spray guns
To deal with these issues, you need to decide on the types of devices. There are two types of spray guns.
Manual (mechanical)
Powered by compressed air. Air is pumped into the paint gun manually using a piston pump.
They can be produced:
- with an upper location of the tank, when the dye enters the nozzle under the influence of gravity and its supply is regulated by changing the air pressure;
- with a bottom tank, when the container is attached from below, the solution is forced into the nozzle using compressed air.
Airless
Also called electric. Sprays the dye using a built-in pump.
Both of these varieties are very different from each other, and with outwardly identical faults, repairing a manual spray gun will be very different from repairing an electric spray gun.
What is needed for repairs
Regardless of the operating principle of the inking mechanism, before you begin diagnosing and troubleshooting, you need to prepare the following tools and spare parts:
- a set of wrenches of various sizes;
- pliers;
- screwdriver;
- repair kit and other sets of spare parts.
A spare parts store for repair and construction equipment will be able to offer several options for repair kits to troubleshoot problems with spray guns. It could be:
- A standard repair kit consisting of several bolts and rubber seals (it is better to stock up on such repair kits in advance due to the fact that seals quickly become unusable when exposed to dyes).
- Specialized repair kit. The set includes spare parts for spray guns necessary to fix a specific problem or replace a failed part.
Malfunctions and how to fix them yourself
With your own hands, using a set of improvised tools, you can eliminate most problems with spray guns by simply cleaning the nozzle or installing replacement parts instead of those that have become unusable.
Handheld device
The following malfunctions may occur with manual paint sprayers:
- The color mixture begins to bubble in the tank, but is not supplied to the nozzle. This can happen if the suction valve is clogged. In this case, you can disassemble the unit with your own hands, rinse, clean the valve, and after cleaning, install it in place. Or install a new valve from a set of replacement parts.
- Dye is supplied but not sprayed out of the nozzle. There may be two reasons in this case:
- The paint has large particles that clog the needle and nozzle. To eliminate this problem, you can clean the parts or install new spare parts, and grind the coloring solution using a paint grinder.
- The filter for the spray gun has failed. To fix this problem yourself, you need to remove the damaged filter and install a new one in its place.
Manual paint sprayer device
- The suction valve rises under pressure, but no paint comes out of the tank, and the unit does not spray the solution. This occurs because the suction valve is not seated tightly in its seat due to a clogged filter. To eliminate the malfunction, it is necessary to clean or install a replacement valve and filter.
- Paint under pressure is not supplied to the nozzle; it overflows through the pump cylinder. This indicates wear of the pump rod packing. Depending on the condition of the packing, it is necessary to either tighten the fastening nut or install a new packing.
- Weak pressure of the coloring solution during stable operation of the pump in a unit with a lower tank. The reasons may be:
- A small residue of material in the lower container when, when tilted strongly, the suction hose captures air and delivers the air-color mixture to the nozzle. There is no need for repairs, you just need to add material to the tank.
- The hole in the container through which outside air enters is clogged. Then you need to clean not only the air supply hole, but also additionally clean the pump hoses.
- The pump has stopped sucking paint. The reason for this can only be a pump cuff that has lost its quality. It can be softened in oil (if it is dry) or a replacement one can be installed (if it is worn out).
- The spray gun spits uneven streams of paint. This occurs when the spray gun nozzle has an outlet hole that is too large (more than 0.7 mm) due to a worn-out washer. To fix the problem, the washer must be replaced using a repair kit.
- Paint is leaking from the fishing rod faucet. There may be two reasons for the malfunction:
- The tap is poorly lapped. It’s easy to fix this problem with your own hands - just grind the faucet using tools.
- Weakening of the spring on the tap. It must be tightened or a replacement one installed using the necessary tools from the repair kit.
electrical appliance
With electric spray guns, unlike manual ones, not all problems that arise can be fixed with your own hands.
Some of them will require the services of an electrician to repair.
You can fix the following problems with your own hands:
Electric spray gun device
- The withdrawal of dye from the tank has stopped. As with a manual paint sprayer, to eliminate this problem you need to clean the suction valve.
- The solution is not supplied from the tank to the nozzle. To restore the flow of dye, you need to clean or replace the needle, nozzle and filter on the suction hose. Spare parts can be purchased separately or purchased as a ready-made repair kit.
- The pump does not supply the paint mixture to the nozzle sometimes due to incorrectly adjusted air pressure or paint supply; after adjusting these parameters, the device begins to paint normally.
- Excessive “bubbling” of the material in the container can be caused by air entering it due to improper operation or breakdown of the paint head. Using a set of spare parts, it must either be installed correctly or replaced.
- An extraneous knocking sound is heard in the tank when the pump is running, which can be caused by a foreign object getting into it or a piece of metal breaking off from a moving part (for example, a tooth broke off from a gear transmission). The container will have to be cleaned, and the object causing the extraneous noise will have to be carefully examined. If this is not a part of the mechanism, then you can put the tank in place, fill in the dye and continue working. But if you suspect that a part of a moving mechanism has broken off, it is better to seek the services of a specialist for inspection and preventive repair of the spray gun, rather than trying to fix the breakdown yourself.
Cleaning the spray gun nozzle
To eliminate the following problems in the operation of the electric spray gun, you will need to contact the services of an electrical equipment repair specialist:
- When the device is turned on, there is no noise from the electric motor. This happens if the fuses are blown or the switch is broken.
- When touching a unit connected to the network, current discharges are felt. Using the device in this case is life-threatening; it must be sent in for repair immediately. The cause of the breakdown is most likely the short circuit of the parts responsible for conducting current.
- If the body of the device becomes very hot during operation, timely repairs will prevent wear of the electric motor parts that occurs due to insufficient lubrication between them.
- The unit works, but the pressure gauge does not show that there is pressure. The cause may be a malfunction of the electric pump or pressure gauge.
Tips for extending the life of your spray gun
A spray gun is a complex tool that requires careful handling. In order for it to work for a long time without breakdowns, you must follow the following rules for caring for the device:
- Clean immediately after finishing painting work. For this purpose, the tank of the device, after removing the coloring material, is filled with a solvent having a composition similar to the dye used, and after that the device is turned on and used on the unnecessary surface. The contents of the tank released under pressure will give a good cleaning of all valves and hoses.
- Never use a solvent that may cause a “chemical conflict” with the staining solution used. Curled paint residue may cause mechanism failure.
- After finishing washing, the device must be thoroughly ventilated, and the container must be left open for a short time to evaporate the remaining solvent.
- The spray gun with the coloring composition inside can only be left for a short time, but before that, take the following measures to prevent the composition from drying out: tighten the needle adjuster all the way and tightly close the hole to prevent air from entering the tank.
- Before refilling, the spray gun must be thoroughly blown out to remove condensation or accumulated dust.
Most paint sprayer breakdowns can be prevented by using the device correctly. But if breakdowns occur, many of them can be repaired yourself using repair kits, which include various sets of spare parts and components. Timely maintenance and proper care will help the instrument to serve its owner well for many years.
5.00 / 4 Victor Golovin
kraska.guru
Technique for painting complex surfaces
Complex surfaces include surfaces that require painting on 2 or more sides and objects that have a complex surface with breaks, bends and transitions from one surface to another. Most often in everyday life, such situations occur when there is a need to paint a porch with railings, columns or pillars, or paint walls with wooden paneling.
In such cases, the work technique has its own characteristics. Square posts and surfaces with a clearly defined bend angle are painted in three steps - the bend line is painted in the first pass. The second pass is one of the sides, the third is to paint the remaining surface.
Round columns are conventionally painted with lines according to the cardinal directions - first the southern side is passed, then the eastern, then the northern and finally the western. If the column has a large diameter and approximately ¼ of the surface of the column cylinder is not painted in one pass, the surface is divided into a larger number of sectors.
Bends and transitions with soft lines are painted with maximum accuracy and meticulousness - the spray gun is slowly moved along the bend line, repeating all the bends and turns as much as possible.
Painting gratings is usually done in two stages - first from the front side and then from the back.
Popular brands of electric spray guns
The modern tool market is often replenished with new models of electric spray guns from well-known manufacturers - large global companies. Thoughtful design, reliability and high quality are the criteria that global brands strive to improve. Today you can find models of electric spray guns made in America (grago), and Italian (larius), and Swiss (wagner), and Japanese (iwata), and Russian (“Foreman”) and German (hammer, sata, bosch).
Regarding the technical characteristics, we can note electric spray guns from the Bosch brand. They are universal in use, working with both liquid and thick paints. The maximum paint collection capacity is 260 grams per minute. The pump cylinder is made of solid metal. This sprayer also has a system that allows you to quickly replace the pump, as well as the paint filter. Among Bosch brand spray guns, the most popular models are pfs 65 and pfs 55.