Artificially aged wood is a unique finishing material. Practical, inexpensive, fully retaining its strength characteristics, but at the same time possessing original beauty and antique charm. The scope of application of such wood is wide: interior design, furniture manufacturing, finishing of facades, gazebos, stairs, even fences are made from it. The most important thing is that wood processing does not require special knowledge or experience, and anyone can do it. Let's take a closer look at how to age wood on your own, and what you need for this.
Artificially aged wood
Wood aging methods
There are three effective ways to age wood - mechanical, chemical and thermal. Depending on the chosen method, the end result has certain differences.
The mechanical method includes two types of processing - brushing and patination. Both types can be used together or separately, depending on the material and the desired result:
- brushing - the surface is treated with a wire brush to remove soft fibers and expose the annual rings. As a result of this treatment, the top layer acquires a pronounced relief, which is further emphasized by applying glaze compounds. This method is the most labor-intensive and is used mainly for hard wood - pine, larch, spruce, oak, walnut;
Wood brushing
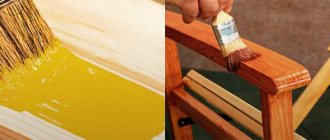
- patination – surface treatment with coloring compounds followed by polishing. It is used for soft species, as well as wood with a weak texture - maple, cherry, beech and others. Wood wax and stain can be used along with paint to give a brighter pattern.
Patination
The chemical method involves treating the top layer of wood with various compounds that change the color of the fibers. Ammonia and products containing alkali, such as stove or drain cleaner, are suitable for this. This method can only be used for species containing tannins, that is, deciduous. Chemical treatment of coniferous wood will not give the desired effect.
The thermal method involves burning wood with a gas torch or blowtorch. The type of tree does not matter. They do not burn it too much, just so that the texture of the fibers appears more clearly, and then remove the carbon deposits with a metal brush. Next, cover the surface with stain or varnish to give the wood a more decorative appearance. In general, the process is not complicated, but it requires caution and compliance with safety precautions.
Burner-aged wood
How to age paint on metal
When painting metal products, two goals are pursued: protection against the formation of corrosive areas and giving the metal an aesthetic appearance. When implementing the last task, sometimes it is necessary to cover the surface in 2-3 layers.
But the end result may not always be just painting. Sometimes metal products need to be given original decorative effects, for example, the appearance of an aged object. For this purpose special technologies are used.
Let's try to figure out how to paint antique metal and what is required for this.
Aging materials
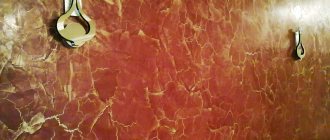
You can achieve the effect of aged metal by using the main method - aging through the creation of a patina and the formation of abrasions.
Patina is applied with special paints, but for metal, acrylic-based metallic compounds are more often used.
In stores today there is a wide range of such paints; in addition to their decorative function, they also perform a protective function.
There is a choice of acrylic paints for aged metal, namely:
Thanks to modern technologies, an aged effect can be given not only to metal surfaces. Often this painting is performed on plastic, wood and plaster products.
The aging process is completed by applying a final protective layer. For this they often use:
- acrylic-based varnish, which has a high degree of gloss;
- very durable polyurethane-based varnish with a gloss level of up to 50%;
- polyurethane-based varnish with a matte effect.
How to age metal yourself?
The choice of method for creating an interior style, which assumes the presence of traces of antiquity in the design, is quite wide. For connoisseurs of this style, it is not always affordable to purchase real old items. The way out of this situation is to imitate ancient metals. How to properly paint antique metal with your own hands? Coloring is carried out in stages:
- Preparing the surface for painting. We get rid of dirt, rust and traces of grease by grinding and solvent treatment.
- Metal priming. In this way we achieve the formation of roughness on the surface for better adhesion of the paint. We choose a primer special for metal.
- Application of selected metallic paint. Experts advise performing the process using a regular brush, this way aging is achieved in the best possible way.
- Aging stage. When the paint has dried, coat the surface with a special craquelure varnish. It is after this step that the metal object becomes covered with cracks, which create the effect of an old product.
Important! If non-metallic surfaces are being processed, then it is necessary to take a responsible approach to the choice of primer composition to achieve reliable adhesion with metallized paints.
On video: master class on applying patina to forged metal.
Bronze painting
In the old days, many objects were made of bronze. Therefore, painting products in bronze will help to decorate the interior of the house in an old style. There are several technologies for coating metal with bronze. Let's consider the simplest options.
Giving a monochromatic effect
You can perform a single-color coating of metal with bronze as follows:
- First of all, we clean the old surface from dirt and rust. To do this, you need to clean it with sandpaper and then degrease it.
- To increase the adhesion of the dye to the surface, we perform a metal priming process. In addition to adhesion, the primer will help further protect the product from corrosion.
- At the final stage, we begin painting with bronze paint. It is necessary to apply 2-3 layers evenly. But each subsequent layer is applied only after the previous one has completely dried.
Achieving the effect of antique bronze
Decorative antique painting with a bronze effect is suitable for lovers of rare things. To do this, follow these steps:
- Preliminary preparation of the old surface is carried out according to the same rules as in the previous case. Also, do not forget to coat the product with a primer.
- After priming, one layer of bronze paint is applied to the surface. It is desirable that the composition be applied evenly, but for an antique effect it is better to use a brush.
- After drying, the bronze painted surface becomes covered with patina (paint of a darker color). It is applied to the recesses. Experts advise using a translucent patina. This allows you to adjust the shade of the bronze coating.
- The next stage is glazing, that is, processing with a brush that is barely moistened with light paint. The process is carried out on all protruding edges and corners. This aging method allows you to give the product the effect of wear and tear, which usually appears on metal over the years.
- Next, we wait a while, allowing the applied materials to dry completely, and finally we coat the product with transparent varnish.
Brushing technology
Brushed wood
Tools and materials for processing
During the work you will need:
- hand plane;
- chisel or small hatchet;
- steel brush;
- Angle grinder with brush attachments;
- sandpaper, coarse and fine;
- paint brushes;
- dense sponge;
- tinting antiseptic for wood (for example, Pinotex);
- white azure;
- soft bristle brush.
Wood brushing machine with two support rollers
Brushes for three-stage wood processing
Necessary materials
Prices for cordless drill/driver
Cordless drill/driver
Rough cleaning should be done with a steel bristled nozzle, but for finishing, nylon and copper are better suited. There is a special attachment called “Piranha”. It is a polymer-abrasive brush that can effectively remove soft fibers from the surface and leave hard ones. The grinder can be replaced with a drill; such attachments are also available for it. As a last resort, you can get by with hand tools, but this is time-consuming and tedious.
Piranha brush
The wood should be dense, strong, not damp. Resinous boards should also not be taken, as the resin makes processing difficult. The presence of knots is welcome, as they make the design more pronounced and decorative. If you have no experience in such work, take a small piece of unplaned board or timber, up to half a meter long.
Wood processing
During such work, a lot of fine dust is always generated, so it is best to do it in the fresh air. If the weather does not allow it, take care of the possibility of ventilating the room and be sure to prepare a protective mask or at least goggles.
Step 1. The workpiece is laid on a flat surface and processed with a hand plane. It is better not to use an electric tool, as it leaves small transverse stripes, which reduces the naturalness of the design.
Wood processing with a plane
Step 2. Using a chisel or the corner of an ax, you need to make chaotic chips across the entire surface, shallow and shapeless, to give the material a rougher appearance.
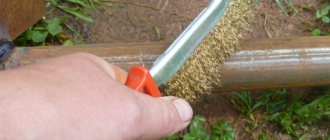
Step 3. Now you need to remove the soft fibers with a wire brush. The brush should only be moved along the grain, pressing the tool firmly against the board.
Brushing
This is what wood looks like after brushing with a wire brush.
Advice. To reduce dust formation, it is recommended to slightly moisten the surface of the workpiece with water. But before sanding and impregnation, the wood must be dried.
This is what it looks like after intermediate sanding with a polymer brush.
And this is how it looks after final sanding and polishing with a sisal brush
Step 4. When the relief begins to appear, the hand brush is replaced with an angle grinder with a metal brush, and work continues. The nozzle should be positioned perpendicular to the surface being treated, movements should be made strictly along the fibers. If you don’t need too rough a texture, immediately take a Piranha brush or a nylon-bristle attachment and do not press too hard on the tool while working. Go around the perimeter of wormholes and knots in the tree to emphasize the contours.
Wood processing
Process the ends of the board
Step 5. Use a soft brush to sweep away the resulting dust, and then begin sanding. You can sand the wood manually or using a grinder, the main thing is to remove protruding fibers and sharp protrusions. Finally, clean the workpiece from dust again.
Step 6. Now the material needs to be given color. To do this, the surface is first coated with Pinotex primer, which is applied with a brush along the grain. You can use both stain and dark azure - any coating with color that will not hide the texture.
The photo shows an example of the coloring composition used
Step 7. Having applied the composition to the workpiece, give it a few minutes to absorb, and then carefully wipe off the top layer with a sponge. There is no need to rub hard, just smoothly move it 2-3 times along the fibers. After this, all the recesses will remain darker than the protruding edges, and the relief will appear more clearly.
Avoid drips
A distinctive feature of good quality stains is that they reveal the texture of wood
Rub the composition into the workpiece
After drying, the painted surface looks like this:
Then there are two options: leave this color and cover the wood with a transparent varnish, or add another layer and give the material the appearance of old bleached wood. The second option is suitable for processing elements in the Provence style. To do this, you need to wait until the impregnation is completely dry and apply a very thin layer of white glaze with a brush. After it has dried, the wood is lightly sanded with the finest sandpaper, cleaned of dust and coated with colorless varnish.
Do-it-yourself aging of wood
This method is also used: after brushing, the workpiece is covered with a dense layer of white glaze, dried and brushed again with a metal brush, but now not so intensively. Finally, a layer of clear varnish is applied.
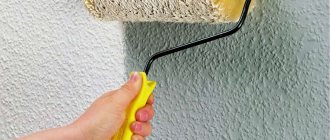
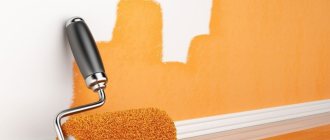
Applying white paint
Brush sanding
Brush sanding
To make dark wood rather than bleached wood, instead of white glaze, the surface is thickly covered with stain or Pinotex, and the layer is made uneven. Next, use a brush or sandpaper, depending on the finish you want. Sanding produces light, blurry abrasions, but after brushing, rough grooves remain and the wood looks more brutal.
Aged wood, well-emphasized ax grooves
Prices for different types of stains
Stains
Preparing the basis
Before you paint the lining white, you will have to prepare it. If you miss an important step in this process, the result will be below average, the paint may lie unevenly, the boards may soon begin to rot, etc. A step-by-step examination of the process will help you understand the nuances of this work and find out all the technical aspects of finishing with clapboard.
Cleaning the panels
First of all, you need to start by cleaning the surface of the panels from various types of contaminants. You can use sandpaper in this process. You should walk in a circular motion over the entire surface, from all sides. All irregularities and minor deformations will be removed in this way.
Panel surface treatment
Today, the painting process is not difficult, because there are special bleaching substances that will help you quickly and easily paint the lining with your own hands.
If there is already a layer of paint on the surface, then you should check how well it adheres. If there are any deformations or the paint has simply begun to peel, it is better to completely remove its layer from the panels.
Tip: If the paint sticks well enough, simply wash the surface with a soda solution (2%).
Apply protection to the surface
- If the process of processing the lining is completed, we proceed to applying protective compounds to it. First you need to putty the surface, the instructions will help you with this;
Important! For wooden lining, it is better to use a plastic spatula so that the surface remains undamaged during processing.
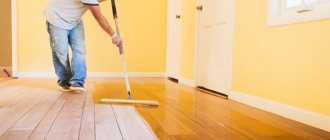
- After puttying, we treat the panels with drying oil. It will protect the material from negative chemical influences. To maximize the result, you can also add red lead to it;
- After the material has completely dried, we move on to the primer. This process will fix the putty and protect the material from changes in temperature in the room. The correct application of the primer layer can be seen in the video.
Advice! When choosing a primer, check the possibility of using a composition for painting.
The antiseptic composition is applied to the surface only after the primer layer has completely dried. Antiseptic substances help protect the lining from mold, moisture, as well as the appearance of fungus on their surface over time.
How to do patination
Primary processing is carried out using the technology described above: soft fibers are removed, relief is given and the surface is polished. Only after this the workpiece can be patinated.
Step 1. Take any wood primer and carefully apply it to the wood with a brush. The primer should penetrate well into all grooves and recesses. Allow the workpiece to dry.
Apply primer
Step 2. Apply the first coat of paint. Acrylic paint is best suited because it is not prone to peeling, adheres well to the surface, and does not leave streaks.
We apply paint on the photo composition of smoky color)
You can choose any shade of paint you like
Application of white paint, example
The choice of color depends only on your preferences; you can take any shades, the main thing is that they are rich and contrast with the patina shade. The paint is applied with a brush, evenly distributing the composition in a thin layer. The base coat must dry completely, so take a break from working for a day.
Take a break from work
Step 3. Sand the workpiece with fine sandpaper. Wipe off the dust and apply a layer of patina with a brush. It is best to choose a patina for wood in the color of bronze or gold, with a metallic tint. Here it is not necessary to distribute the paint evenly; on the contrary, the difference in coating density will only emphasize the aging effect.
Grinding
Sanding emphasizes the texture of the wood
Wood after processing
Step 4. When the patina begins to set, you need to take a dry cloth and wipe down individual areas. After the paint has dried, the wood is coated with clear varnish.
Applying varnish from a spray gun
Effectively aged wood
Types of patina for wood
| Type of composition | Characteristics |
Acrylic patina | Water-soluble composition, characterized by slow drying, odorless and a wide variety of shades. Easy to apply and shade, ideally highlights the surface texture |
Wax patina | A very thick composition with a pearlescent sheen. Apply to protruding areas with a dry brush, and into recesses with a sponge. Easy to rub and gives maximum antique effect |
Bituminous patina | The composition is dark brown, most often used to shade relief. Easy to apply with a brush, does not smear, wipes well with a soft cloth |
Oil patina | It has a paste-like consistency and is applied with a dry brush or thick cloth. It is considered the most optimal option for patination of wood |
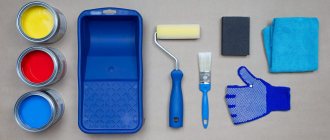
Wood and necessary materials:
Different painting methods will show how much of a difference the appearance of wood can make, whether it's a smooth pine board or an unsanded pallet . All three methods are very easy, fast and with wonderful results!
- White water-based paint for interior and exterior use
- Paint mixing container
- Rag
- Brush
- Scraper or piece of hard plastic for method #2
- Candle for method No. 3
Thermal aging
First of all, take care of safety precautions. When burning wood, there should be no flammable objects or liquids nearby, and it is better to generally carry out such work in the fresh air. Be sure to check the serviceability of the burner or blowtorch.
Prices for various types of gas burners and blowtorches
Gas burners and blowtorches
Step 1. The workpiece is placed on a non-flammable surface or placed vertically, after which it is fired with a burner. The material is processed as evenly as possible, the top layer should be charred approximately 2-3 mm in thickness.
Processing wood with a torch
Technique for burning wood with a blowtorch
Thermal aging method
Step 2. After cooling, the charred carbon deposits are removed manually with a brush or using a grinder. The intensity and duration of this treatment depends on the desired texture.
Sanding burnt wood
Step 3 . Having formed the desired relief, take the grinding attachment and process the workpiece again. Here it is important not to overdo it and not remove excess, otherwise the aging effect will be insignificant.
Step 4. Since the color of the wood changed during firing, dark and light areas appeared, there is no need for painting. Now all that remains is to coat the material with colorless varnish or protective impregnation.
Thermally aged wood
Chemical aging method
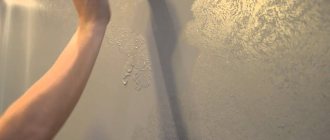
The use of chemically aggressive substances requires special care and precision in work. Protective gloves must be used and the room must be well ventilated. The workpiece is pre-treated with coarse sandpaper and wiped from dust. Then apply alkaline agents or ammonia with a brush and leave for several hours. To slow down drying, you can cover everything on top with film. Under the influence of ammonia and alkalis, the surface acquires a gray tint, characteristic of old weathered wood.
Chemical aging method
When the color of the workpiece has completely changed, it is rinsed with water and then wiped with a vinegar solution (a tablespoon per glass of water) to remove the remaining alkali. If ammonia was used, a vinegar solution is not needed. After drying, the wood is brushed, sanded and a protective coating is applied. There is no need to paint such material, because then there is no point in chemical processing, and it is easier to do everything mechanically.
Artificial aging
External use of aged wood
This decorative material is perfect for decorating rustic-style facades. First of all, this is the German half-timbered style: the original decoration of the walls involves the use of wooden beams of rough texture, giving the building a characteristic appearance.
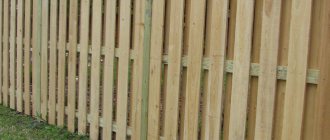
Country-style finishing also allows for the use of aged wood: the cladding itself, shutters, entrance doors, as well as decorative elements.
Half-timbered
Aged door leaf
Aged shutter fabric
Railings, steps, support pillars at the porch - all this can also be made using the described wood processing methods. After practicing on small pieces, you will be able to handle any surface without much effort. Of course, large-volume elements, such as house trim, are not so easy to process manually, but there are special machines on sale for this purpose. The most important thing is to have the desire, and then everything will definitely work out.
Video - How to age wood
Video - Patination of wood
Video - Aging wood by firing
What paint is suitable and is varnish needed?
There is no need to buy expensive paints to age furniture. An inexpensive water-based emulsion for ceilings is quite suitable. It dries quickly, does not cause difficulties during work and is easily mixed with colors (dyes). Choose pastel colors, giving preference to gray, blue, cream, and white shades.
Inexpensive water-based paint is quite suitable for aging furniture.
Before painting Provence style furniture, coat the surface with an acrylic wood primer. It will increase the adhesion of paint to the surface and reduce its consumption. Any pigment lies smoothly on the primer. To create an artificial patina, use bitumen varnish and silver. The first option is suitable for aging light surfaces, and the second - for dark ones. When choosing a topcoat for furniture in the Provence style, it is preferable to use matte rather than glossy varnish. It emphasizes the effect of antiquity, preserves color and texture without highlighting smudges or unevenness.