What kind of plastic can be painted?
There is no point in painting some of its types. Even after careful preparation of the surface, the coating will quickly come off. It is impossible to determine the type of plastic by external signs. To find out on what basis it is made, you should study the markings:
- ABS plastic: styrene copolymer based on impact-resistant resins; opaque, soluble in esters, acetone, dichloroethane; easily tolerates low (up to -40°C) and high (+90°C) temperatures; used in the production of housings for household appliances, furniture, electric lighting devices, large auto parts, batteries; when painting, use special plastic paint for cars or regular acrylic enamel; requires preliminary priming;
- PVC: colorless transparent material based on vinyl chloride; resistant to acids and alkalis, due to reduced frost resistance (can withstand temperatures not lower than -15°C) is used only for products used indoors, wires and cables, pipes, suspended ceilings, linoleum, window profiles, furniture; Before painting with special enamels for plastic, it must be primed;
- polystyrene (PS): thermoplastic, can be used at temperatures down to -40°C; chemical resistance is low; used for the manufacture of formwork, sandwich panels, cladding, ceiling tiles; cable supports; painting is not possible;
- polycarbonate (PC): transparent impact-resistant material, with prolonged exposure to UV rays it becomes cloudy and becomes brittle; frost-resistant, melting point 150-300°C; used in the production of headlights, lenses, glasses, cellular polycarbonate used for the manufacture of canopies, greenhouses, road fences; it is impossible to paint this plastic;
- polyethylene (PE): good dielectric, high chemical resistance; can soften when heated; used in the production of packaging (film, bottles); sewer pipes, electrical insulation; equipment parts, denser low-density polyethylene in the improvement of children's playgrounds; its foamed modification in the production of thermal insulation; it is impossible to paint such plastic;
- polypropylene (PP): chemically resistant, soluble only in benzene and toluene; melts at a temperature of 175°C, not resistant to ultraviolet rays; used in the production of packaging materials, pipes, equipment parts, road surfaces; painting is not possible.
Thus, only ABS or PVC plastic can be painted. The coating will peel off quickly from soft surfaces.
Preparing plastic parts for painting
When starting to repair a plastic part, the first step is to determine what part we had to deal with. It could be:
- new part;
- old defective coating.
New plastic elements, in turn, can be supplied with factory primer already applied or in a “pure” form.
If you can't tell whether a part is primed or not, rub a small area of the part with some rough sandpaper such as P500. If there is sanding dust, then the part is primed.
There are minimal problems with primed parts, but we'll talk about that later. Now we are interested in the procedure for working with “clean”, unprimed plastic elements.
New unprimed part
Plastic parts are made by injection molding, and special lubricants are used during the production process to ensure that the part can be correctly separated from the mold after casting. Naturally, remaining on the surface of the plastic, they do not contribute to the adhesion of the paintwork.
There are two types of such lubricants:
- external,
- internal.
External lubricants are used in diluted form and sprayed into the mold before each new production cycle. They are not always applied, but every 3-4 times, so some parts have more lubricant, others have less. All these greases can be removed in a workshop environment with a suitable degreaser.
Internal lubricants are introduced into the composition of the plastic itself, so there is no need for separate spraying into the mold. Such plastics are more difficult to paint, since they themselves are “greasy”. The same polypropylene belongs to representatives of fatty plastics. Internal lubricants do not dissolve and are not removed by water, and they can be completely removed from plastic only by heating.
But one way or another, the first step to remove dirt from the surface of the plastic should be washing.
Washing
The ideal option in this case would be a high-pressure washer, but if it is not available, you can get by with a bucket of hot water with any active detergent (liquid soap, car shampoo) and some kind of brush or hard paint brush.
The part must be washed both outside and inside, and then rinsed with plenty of clean, warm water.
Evaporation
To be sure that no lubricants or dirt will interfere with the creation of strong adhesion with the future paintwork, according to the technology, the unprimed part must be heated in a chamber at a temperature of +60°C for 30-40 minutes. During this time, the lubricants located in the pores of the plastic will rise to the surface, where we will remove them with a cloth moistened with a degreaser. This should be done quickly, while the part has not yet cooled down.
If the part has a rough textured surface or is heavily soiled (for example, an old bumper), then it is advisable to repeat the evaporation process, and then repeat the procedure with a cloth and degreaser. To better clean such parts when degreasing, you can use Scotch Brite (gray).
In addition to removing lubricants, heating helps reduce internal stress in the plastic, which in the future can lead to unexpected cracking of the paintwork. Evaporation also helps to identify shrinkage cavities (air inclusions) and then remove them by puttying.
To save time and energy resources of the camera, you can load several plastic parts and warm them up at the same time.
In garages, doing the warming up trick can be quite problematic, so in such cases it is best to work with already primed parts.
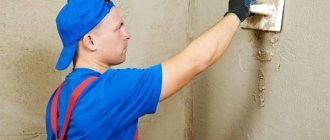
Degreasing
Before the first grinding operation on plastic parts, whether preparing for priming or puttying, the surface of the part must be degreased.
In addition to cleaning the surface, this procedure also removes static charge from the part. This is important because when applying the primer, the dust, which usually flies off the surface, will quickly stick to the “charged” plastic, as a result of which the primer will not be placed on a dry, cleaned substrate, but on an already dusty one.
For degreasing, it is advisable to use only branded degreasers, preferably special antistatic degreasers for plastic. They are not aggressive towards plastic and are excellent at removing static charges.
It is recommended to degrease a new plastic element both from the outside and from the inside.
Matting
To prepare a new, undamaged plastic element for priming, it is enough to matte it with Scotch Brite or a similar material. For hard types of plastic, red (Veryfine) Scotch-Brite is recommended, and for soft/elastic types, gray (Ultrafine) is recommended.
Matting can be done both dry and with water. If a matting paste is used, after it you need to thoroughly rinse the part with plenty of warm water - the remaining paste can interfere with normal adhesion to the paintwork material (and this is exactly what we have been struggling with so far).
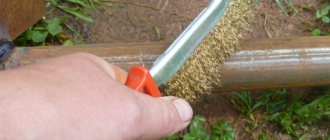
If the surface has minor damage received during transportation (for example, shallow scratches), then they are sanded using a grinder and abrasive wheels P320-P400-P500, after which the rest of the surface is treated with Scotch Brite.
After grinding, the part is degreased again.
Padding
A simple rule will help us solve the problem of paint adhesion on plastic surfaces once and for all. As a primary primer, a special adhesive primer for plastic (also known as a primer, adhesion activator) must be applied to clean (unprimed) plastic.
This primer is most often a very liquid transparent material with small metallic additives (to control application). It is usually made on the basis of polyolefin resins. The thickness of the layer of such soil is minimal - only a few microns. Most of these primers are single-component, although there are also 2K primers.
Such primers have been developed primarily for use on plastics of the polypropylene group (PP/EPDM, PPC, PPE, PPO, etc.), but most of them can also be used on many other types of plastics: ABS, PA, PC, PVC, PRO , PUR, fiberglass (GFK, BMC, SMC), etc. Modern primers have virtually no restrictions on types of plastic, with the possible exception of pure polyethylene (PE).
To improve properties and guarantee paintability, plastic body parts (fenders, hoods, bumpers, etc.) are produced in a modified form, which means they can be painted, despite the fact that they are sometimes labeled as PP and PE. In fact, unmodified polyethylenes (PE) and polypropylenes (PP) can only be dyed after activation by a gas flame or corona discharge. Otherwise, adhesion will be very weak! Various tanks and other expansion containers, disposable tableware, etc. are made from “pure” PP or PE.
Primers are available in both cans and aerosol cans. Aerosol primer is very convenient for minor repairs, for example, when, when sanding a bumper, small areas were sanded down to plastic. The release form in a can allows you to avoid wasting time on preparing the soil for spraying from a spray gun and on its subsequent washing. Just remember to shake the can vigorously before use.
The primer is applied in one or two thin, even layers with a wide spray over the entire surface of the part. Be careful when applying! Since the soil is very liquid, beware of the possible excess of the application thickness and runoff of the soil (this is most likely at the ends and stiffeners, along the perimeter of the part). A significant excess of the layer thickness can impair the adhesion of the entire coating and lead to “compression” of subsequent layers of paintwork.
Also keep in mind that after application, the primer changes the chemical state of the substrate only for a certain time, during which time you need to apply the next material. Therefore, to achieve the best adhesion, subsequent layers of the system should be applied after 15-20 minutes.
Most primers can be immediately covered with topcoat, but to increase resistance to chipping, it is recommended to additionally apply a layer of acrylic leveling primer to the surface, after adding the required amount of plasticizer to it, depending on the hardness of the plastic.
Just remember that it is not advisable to apply such thick layers of filler primer, as when repairing metal surfaces. Plastic is an elastic material, so a layer that is too thick may not withstand the effects of deformation and mechanical stress during operation.
After applying the filler - painting. Either “wet on wet”, if the soil allows it, or with intermediate grinding of the soil.
By the way, in addition to classic primers, many lines also contain universal primers for plastics, combining the properties of both a primer and a filler with a plasticizer. They have good adhesion to plastic and at the same time allow you to level out minor irregularities (for example, small marks from abrasive grinding). Such primers do not require the preliminary use of an adhesion activator, and thus allow, in some cases, to save an entire layer and operation.
About epoxy primer
By analogy with the repair of metal parts, where anti-corrosion primers act as an adhesive intermediary between the surface and subsequent layers of coating, an appropriate adhesive primer is applied to plastic for the same purpose.
In this regard, I would like to say a few words about epoxy primer.
Although epoxy primer is intended primarily for application to metal, its high adhesive properties make it possible to use this material as a primary material on some types of plastics. But only on some, since this soil does not have sufficient elasticity, and a plasticizer is not used with it.
But if you are repairing hard plastics, such as fiberglass or Carbon fiber, applying epoxy as the first layer of the system on these plastics is not only acceptable, but even recommended. Its adhesion to the surface will be excellent!
New primed part
Practice shows that the quality of factory primer applied to plastic parts can vary greatly from case to case. There are usually no problems with original parts, but the primer on parts of dubious origin can easily have poor adhesion or increased sensitivity to solvents. It’s easy to check: take a napkin or rag soaked in solvent and apply it to the part for a minute or two.
If the coating has softened, it must either be completely removed mechanically (P150-P240-P320), or a layer of insulating primer must be applied, having previously treated the part with gray Scotch-Brite, and then painted.
If a satisfactory test result is obtained, conventional technology is used. The part is degreased, matted, degreased again and painted. For matting you can use:
- gray scotch-brite (ultrafine);
- abrasive material gradation P400-P500 (when working with a dry grinder);
- material grade P800-P1000 (when working manually “wet”);
Before starting any work, the part must be thoroughly washed and dried, and before the matting operation, as well as after it, it must be degreased.
Damaged plastic element
By repairing a damaged plastic part we mean repairing various scratches, dents, chips and similar minor damage to paintwork. We will talk about more complex cases of restoring plastic parts, such as cracks or significant deformations, in a separate article.
Before starting work, a standard set of procedures is performed: the part is washed, dried and degreased. The next step is to prepare the damaged areas for puttying.
Grinding
Before you start filling damage on a plastic part, the paintwork from the surface of the defective areas should be removed - this will avoid defects such as peeling and sagging of the putty.
An eccentric sander and a P180 abrasive wheel are suitable for sanding damaged areas.
When sanding, try to avoid excessive pressure and high speed. Remember that thermoplastics begin to melt when heated.
Puttying
Filling damage on plastic surfaces is necessary with special plastic putties that have high elasticity and adhesion to plastic surfaces.
These putties are fine-grained, dry quickly and are easy to sand. Due to the fact that the putty itself already contains plastic, the two materials (the substrate and the putty) have similar properties, and react equally to sanding and wear out equally. Therefore, the boundaries between them are perfectly zeroed and are not outlined after priming.
The putty is usually applied directly to the sanded surface of the plastic, without requiring the prior use of any primers.
Try to keep the volume of putty to a minimum. Chips, scratches, places of soldering, gluing, small dents are welcome, but completely filling up planes on a plastic part is quite a risky task.
As for large deformations, on most plastics they can be restored quite easily by heating with a heat gun or IR drying and squeezing out. But this is if the part did not crack during deformation. Reinforced fiberglass plastics break in almost all cases.
And one last thing. The use of liquid putty when repairing plastic parts is excluded, no matter how difficult the repair may be.
Sanding putty
Plastic is many times softer material compared to metal. If you process metal and plastic with an abrasive material of the same gradation, say P100, then the roughness parameter on these two surfaces will be significantly different: grinding marks on soft plastic will be more pronounced and deeper, with a larger number of burrs. Therefore, it is obvious that when working with plastic parts it is necessary to use abrasive materials of finer gradations.
For processing putty, suitable gradation wheels are P150 (or P180 for soft plastics) and P240, used sequentially. After the putty is completely leveled, the boundaries of the repair area are treated with P240-P320 materials.
When processing plastic elements, whether removing paintwork or sanding putty, it is not recommended to use an abrasive coarser than P150-P180. If the plastic begins to fray during the sanding process, this indicates that the gradation used is too coarse.
Let me remind you once again that you cannot work on plastic parts at high speeds and with strong pressure when using a grinder - this entails overheating and subsequent deformation of the plastic.
Padding
It all depends on the materials used. There are two options: either we apply an adhesion activator, and then a 2K primer-filler with the addition of a plasticizer, or immediately a special universal primer for plastic (1-2 layers).
Before priming, do not forget to remove dust and degrease the surface.
Soil grinding
When processing the primer, standard technology is used: first, the primed area is leveled by hand with a sander and an abrasive strip, for example P320, after which final processing is carried out using a grinder and P400-P500 wheels. When working in wet conditions, materials graded P600-P800-P1000 are used respectively.
In the case of partial painting, the area around the repair area (or the entire remaining element in the case of complete revarnishing) is treated with gray Scotch Brite using matting paste or P800-P1000 material using a dry sander. Read more about this here.
Hard-to-reach areas are treated with an abrasive sponge (P600-P800) and/or gray scotch-brite (Ultrafine).
Types of paints for plastics
Special requirements are imposed on compositions for coloring plastics. They should adhere well to the surface and have increased elasticity.
The industry produces special solutions designed specifically for coating polymer products. Acrylic enamel also has good adhesion. It can even be used to coat some soft plastics.
You can also use compositions intended for covering the skin. It is allowed to process plastic with oil paints. However, they hold up worse.
It is better to paint plastic using aerosols. When sprayed, the paint adheres better, without streaks. Using a spray can you can cover even hard-to-reach surfaces.
How to paint plastic chairs
Clean them up
: In the example, the chairs were simply washed with a hose under low pressure. If you have the opportunity to wash them in the bathroom with dishwashing detergent, it won’t be superfluous.
Dry them
: We let the chairs dry completely in the sun.
Prepare your surroundings: I don't like to clean up after myself after a project, so I try to avoid getting dirty beforehand. It is better to paint directly on the lawn (before mowing, because traces will still remain) or line the balcony/veranda with newspapers, protective film or old rags.
Paint them
: Apply a thin coat of paint to each chair. Hold the can at a distance of about 25 centimeters from the surface of the chair and do not let the can direct the paint to one point for a long time. It must be constantly moved while spraying. Don't worry about getting full coverage during your first coat of paint.
- Advice
. It is better to start with the part of the chair that is hidden from view to practice on it. But you don't have to paint the bottom at all.
Second layer
: The first coat should be allowed to dry for 30 minutes before applying the second coat. (I believe the instructions say to wait a little longer, but we're all impatient here).
Final coating
: You may have a few spots or bumps here and there, and a second coat is the time to touch it up. Paint the chair, then walk around it and inspect it from all sides to make sure all visible parts are painted.
Let them dry COMPLETELY.
: The only thing worse than the original dull color is smudged paint. So I let them dry for the rest of the day and then waited a couple of days before letting anyone sit on the freshly painted chair.
This is what the chairs looked like after a year. The green paint had faded (this was in Southern California and these chairs were exposed to the sun a lot).
In response to the question, “Can plastic outdoor furniture be painted?” We answer “Yes!” It works and is considered a great way to freshen up your backyard.
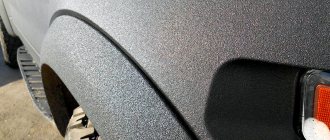
The need to restore or repaint the decorative coating on plastic parts and PVC cladding arises much more often than it might seem at first glance. This could be the surface of metal-plastic veranda windows, the housing of home appliances, a soft inflatable boat, plastic body parts on a car, and even protective fabric covers. Painting PVC plastic is not particularly difficult, but on one condition, if you have special paint for PVC.
Is it necessary to apply a primer?
For this material, acrylic-based enamel primer is used. For better adhesion, after drying they can be treated with fine sandpaper.
Some types of interior plastic used in cars may not be primed. Such materials are not flammable. Therefore, it is easy to check whether they require a primer. It is enough to set fire to a small piece of plastic. If it starts to smoke, it means a primer needs to be applied.
Before painting plastic car parts, you can also dip them in water to check. If they sink to the bottom, there is no need to prime them.
Utilities
Procedure for repairing plastic parts
Designations of the most common plastics
Classification of plastics depending on hardness
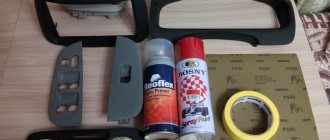
Materials and tools
To work with plastic you will need:
- white spirit, alcohol or other solvent;
- primer;
- putty for filling irregularities;
- fine-grain sandpaper: after processing the primer and the plastic itself with it, the paint sticks better;
- aerosol can, for covering large objects with a spray gun, roller or brush;
- rags or wipes for wiping;
- masking tape to cover the surface that is not being treated;
- sealant.
If you plan to use plastic in outdoor conditions, choose a special heat- and water-resistant paint for plastic. Such compositions should also not be afraid of ultraviolet rays.
To obtain an even, smooth surface, it is better to apply them using an aerosol. To coat large plastic objects, it is more convenient to use spray guns or rollers. When using brushes, choose products with the softest bristles that do not leave streaks.
How to paint plastic from a spray can
The technology for coloring plastics in this case is no different from processing other materials:
- The surface to be painted must be covered around the perimeter with construction tape, and adjacent areas must be protected with paper or oilcloth.
- The can should be shaken well (according to the instructions on the label - from 30 seconds to 3 minutes).
- The paint is sprayed onto the prepared surface from a distance of 20–30 cm.
- Apply the composition with smooth, even movements in one thin layer. Keep the can upright.
- Aerosol paint goes on thinner, so you need to apply two to three layers.
- Each coat must dry before the next is applied (spray paint usually takes 15-20 minutes to dry).
- Immediately after applying the last layer, the construction tape must be removed from the plastic.
Advice! If you need to paint large surfaces, it is worth purchasing a special tip for the spray can. It will help adjust the amount of spray composition and distribute it more evenly.
When the enamel is completely dry, it can be coated on top with acrylic varnish (glossy or matte). This technique is suitable for any method of applying paint. The varnish will protect the coating from damage and extend its service life, as well as additionally level the surface. It is applied in the same way as paint and then dried.
Thus, it is quite possible to paint the plastic with high quality with your own hands. You just need to be careful about the choice of paint and carefully prepare the surface.
We don’t know about you, but we at the editorial office want to spend good summer evenings on the lawn near our house. Imagine how great it is to sit in a garden or country house with a drink in your hand and look at nature... Are you sure that you have a beautiful place to sit? Lots of people have these cheap plastic chairs. Before you get rid of them, you can try to fix them! Who knew you could spray paint and have chairs looking beautiful in about an hour? It took about an hour to completely make 6 chairs. So here's how it went:
- We need spray paint that says it's suitable for plastic. You choose the shade yourself, to your taste, of course. Consumption is approximately 1 can per 1 chair. In the example, paint from Painter's Touch was used in the colors Cote d'Azur and Apple Green. If the chair has minor defects, you can choose paint with a hammer effect, this will slightly refresh the surface.
Don't worry too much about shine. Here two different coatings were used: gloss and satin - but the surface turned out to be approximately the same. So just choose the paint according to its shade.
Surface preparation
Even if you know what paint to paint plastic with, that's not all. It must be properly prepared.
First of all, the plastic is dismantled and then disassembled into its component parts. Steel screwdrivers are not acceptable. Only special blades made of polyurethane. All parts are laid out on a soft surface - sheets of cardboard, chipboard. You should not use fabrics for these purposes - even the smallest lint can ruin the whole thing.
To avoid confusion during reassembly, the bolts and nuts are placed in separate boxes and labeled. When disassembling complex units, you can take photos of the initial state and individual stages.
Then the plastic must be degreased with white spirit, anti-silicone, gasoline or another type of solvent. Small irregularities and chips are repaired using putty. It is better to first smooth out large cracks and cracks with sandpaper and then fill them with sealant. To avoid scoring, use fine sandpaper first, and then coarse-grain sandpaper.
To improve adhesion, the plastic is matted - rubbed with fine sandpaper up to No. 180. To avoid dust, it is better to do this in water. After removing dust and drying, the surface is degreased again.
The last stage is coating with a primer. Without it, the paint will quickly crumble. The primer is applied in as thin layers as possible three times, drying well each time. To avoid drips, use aerosols or a spray gun.
Polyurethane-acrylic paints
These dyes fully comply with all the necessary characteristics, these compositions are made on a water basis, they are often used to paint PVC, for example, plastic windows or other structures. Polyurethane-acrylic mixtures create a uniform coating that is resistant to scratches and other defects. The dye dries quickly enough on the PVC surface; if desired, you can tint the composition yourself. Thanks to these dyes, you can easily and quickly paint PVC, and it is possible to create any textured effects if you add special ingredients to the base paint.
Polyurethane-acrylic paints are made in a huge range of colors; the catalog contains more than two thousand different shades. In addition to traditional colors, manufacturers offer:
- pearlescent paints;
- with sparkles;
- metallic
Using such extraordinary dyes, you can paint any PVC surface in a unique and original way.
Painting step by step
Let us describe in detail the process of painting with acrylic paint for plastic:
- Places that cannot be painted, especially when using aerosol cans, are best sealed with paper tape.
- The paint is applied in a very thin layer twice or thrice, each subsequent layer only after the previous one has dried.
- When using aerosols, shake them first.
- We'll tell you how to properly paint plastic from a spray can. It must be kept at a distance of 2-3 cm from the surface. Aerosol kits often include attachments to make the application process easier. To get a high-quality result, it is better to first practice on a small fragment.
- When using a brush, you need to put a little paint on the tip of the brush and carefully, pressing firmly to the surface at one angle, draw a stripe. As a result, the thinnest possible layer should be formed.
- Painting plastic car parts is not much different from regular painting. To achieve an aesthetic appearance, it is better to use a spray can or spray gun for these purposes.
- The last stage is polishing. It is produced by wax paste.
- To secure the paint layer, it is advisable to coat the plastic with acrylic varnish.
Aerosol cans
If you need to paint a small area of a window or other PVC product, you can purchase paint and varnish material in a can. This form of release is very convenient, thanks to it the paint is reliably protected from air penetration, so that a film never forms on the surface of the composition. Aerosol cans have many advantages:
- ease of transportation;
- You can easily and effortlessly paint small parts and hard-to-reach areas;
- no need to use any additional tools, such as a spray gun or brush;
- dyes in cans have an increased adhesion rate.
Aerosol paints are often used to process PVC automotive parts. In order for the paint coating to be uniform, without drips or gaps, certain skills and dexterity are needed, so first it is important to practice for a few minutes on some unnecessary product, after which, having gained a little experience, you can begin the main painting.
Expert advice
There are certain subtleties in working with this material:
- paint and plastic adhere better to each other if they have the same temperature, ideally 20-23°C; required air humidity 65-80%;
- You can paint a plastic surface with your own hands using oil paint; in this case, you should not skip the priming process;
- coating thickness should be 60-120 microns; if it is too thin, it will quickly peel off; if it is too thick, it will look sloppy;
- Painted plastic should be protected from dust during drying, otherwise the surface will become rough;
- dry it for at least 2-3 days; but it will finally gain strength only after a week;
- for quick drying of the surface, a temperature of at least +17°C is required;
- car parts covered with small scratches do not need to be painted, but can be updated using an abrasive polish; For processing large surfaces, it is more convenient to use a drill with an attachment.
So, we have described in detail what and how to paint the plastic in the car interior. To do this, it is not necessary to contact specialists. It is enough to stock up on acrylic enamel and carefully prepare the surface.
Paint requirements
The main requirement for PVC paint is a high adhesion rate (adhesion to the surface). Polyvinyl chloride differs from wood, brick and concrete in that it has a very smooth and slippery surface, the structure is quite dense and hard, as a result of which plastic cannot be painted with any type of composition. The paint must have the following characteristics and properties:
- resistance to moisture, water;
- high strength;
- resistance to mechanical damage;
- preservation of the shade throughout the entire service life;
- resistance to ultraviolet rays;
- the composition must be environmentally friendly, safe for humans, without toxic, poisonous components that could be released into the air during heating;
- resistance to temperature changes;
- long service life;
- large selection of shades;
- the ability to give the object being painted some kind of texture.
In addition to all the above properties, it is important to choose a composition that you can easily paint with your own hands at home.
Method 1: Painting with a brush
Best for: PLA, ABS, PETG plastics.
If you paint a 3D printed model with a brush, you will definitely achieve a unique “handmade” effect.
Try a few brushes first because it's easier to get good results with a comfortable brush. As a rule, it is enough to use only 1 or 2 different flat brushes.
Brush
- Choose a quality brush that is stiff enough to handle the viscosity of the paint you choose to work with.
- Experiment with different bristle types and handle shapes to find the one that works for you.
- Pause painting to clean your brush once the paint begins to dry. Naturally, the brush must be cleaned after each use. Do not leave paint drying on the bristles of the brush.
- After cleaning, the brush should be stored on the handle, not on the bristles.
Dye
When it comes to painting with a brush, you are better off using acrylic paints.
Painting process
- Clean and sand your 3D printed model.
- Apply paint in thin, even layers.
- Give the individual layers time to dry.
Technology for painting household items made of PVC
High quality of the painted surface can be obtained only if specially developed products are used for painting surfaces made of polyvinyl chloride of any modification. Simpler materials, such as frames and cladding of metal-plastic windows, can even be painted with acrylic materials, but to obtain an exemplary glossy surface you will need paint containing modifiers and polyurethane varnish.
Therefore, to obtain a high-quality, perfectly smooth texture from PVC, the following is most often used:
- Polyurethane paints and varnish compositions, Switzerland;
- Acrylic-urethane paints “PaliPlast RP Base”, used for industrial painting of PVC plastic.
For your information! Painting compositions "PaliPlast" are produced both on a water and varnish basis.
Despite the fact that after drying, water-based PaliPlast compounds are not washed off with water and can withstand repeated washing of windows and frames, it is periodically necessary to restore the protective layer using varnish, for example, PaliPlast RP 022 Varnish.
Painting PVC plastic surfaces at home
The most popular procedure for painting PVC plastics is painting the frames of metal-plastic windows. Not everyone likes the white color of standard PVC cladding, or the owners want to make the windows of their store or salon more expressive; in any case, painting windows does not present any particular difficulties if you use PaliPlast RP Base PVC materials.
You only need to cover the window, slopes, glass and rubber frame seal with plastic film and masking tape, and you can start painting according to the method described above. The easiest way to apply paint to a PVC profile is with a brush or roller, but the best quality is obtained when using a low-pressure spray gun. The viscosity of the paint is low, but the presence of mineral fillers can sometimes lead to clogging of the nozzle or poor atomization, so the paint solution must be cleared of films and mixed thoroughly before use.
More difficult is painting decorative and protective elements made of PVC plastic on a car. Most often these are moldings and linings inside the car interior. The parts are small in size, so it is best to use aerosol cans for painting PVC plastic. The composition includes an activator and a solvent, which ensure good adhesion to the plastic and rapid drying of the applied layer.
Small PVC parts can be painted either with preliminary dismantling from the car interior, or directly inside the car. In the latter case, you will need to install a fan to remove the flow of aerosol from the interior and make an apron from polyethylene film, which will cover the space around the PVC part to be painted.
Full-size parts made of polyvinyl chloride must be dismantled, cleaned of dust with alcohol or window cleaner, and then painted with an aerosol in thin layers, 50-70 microns thick.
Complex options for painting PVC plastic
On large body parts or spoilers, paint can be applied using a spray gun or spray gun. Initially, you will need to matte the surface using thick paper and micron-sized abrasive powder. Next, the plastic is thoroughly washed and dried.
Before applying paint, the surface will need to be wiped with a PVC cloth moistened with P646 solvent, and it can be painted. If the item is very thin and soft, then the first layer is best done with Feyco polyurethane varnish, after which you can apply the required number of layers of paint.
In a similar way, you can paint PVC pipes, structural frames, even glass and furniture. To enhance the adhesion of paint to an absolutely smooth and inert glass surface, he suggests adding a special reagent “Fey (N) Vetro Zusatz 501” to the paint. Polyurethane and epoxy compounds can be used to paint metal, stone, plastic, and wooden surfaces quite easily, while the quality of adhesion to the base is much higher than that of acrylic and water-dispersed materials.
Special mention should be made of painting soft PVC fabrics, for example, covers or the hull of an inflatable boat. Most polyurethane paints can be used on thick PVC fabrics under one condition. Painting is carried out using a barrier sublayer of FEYCO Universalprimer 2159 primer diluted in a solvent in a ratio of 1:3, with the addition of Fey (N) Vetro Zusatz 501. The sublayer is applied using a spray gun in a thin layer of 20-25 microns. Subsequent painting is carried out with conventional polyurethane paints.
If there is no particular desire to look for optimal recipes for painting soft tissues, the barrier layer can be made using aerosol paint for cars.
Coloring plastic at home
You can handle painting plastic materials yourself; this will greatly save your budget. Turning to professionals is very expensive. To carry out the work at home yourself, you will need to take care of your own safety by preparing protective equipment, also prepare all the necessary tools (listed above), and perform all stages of the work. They will be discussed in detail further.
You can handle painting plastic materials yourself; this will greatly save your budget.
Painting methods
The paint coating is available either in cans or in aerosols. Which option to choose depends on the size of the product and the experience of the person who will carry out the painting work.
- Spray cans are more appropriate for a small painting object; they are not difficult to work with, but before you start, you should try it out by spraying a little paint on an unnecessary surface, this will help you understand how best to spray to get the desired result. In general, the aerosol method will give a good, even coating. This method does not allow you to mix tones, and thus it will not be possible to apply clear color boundaries.
- The jar is larger in volume than the can, but storage in it is only possible for a short time. For this reason, it is often used for large volumes of work. It should also be taken into account that working with a brush is much more difficult and requires skill. Otherwise, unsightly traces of bristles and stains may remain on the product, the coating will be uneven and aesthetically look untidy.
Using a spray gun can make the process easier; a roller is rarely used. For a beginner, the spray can method would be more suitable.
Preparing plastic for painting
As mentioned earlier, you should carefully prepare the product before starting work in order to get an excellent result. This stage includes the following steps:
- To get rid of the previous cladding, you can use sandpaper, solvent, or a hair dryer.
- Get rid of contaminants.
- The product must be degreased using a solvent.
- Treat the product with antistatic agent.
- If required, use putty.
- To ensure good adhesion, the surface is treated with sandpaper no more than No. 180; after completing this stage, the object is cleaned and dried again.
- Degreasing is carried out again.
- Carry out priming work if required.
- Grind and clean again.
The product must be degreased using a solvent.
Plastic coloring technology
Having chosen the type of coloring agent, it is worth understanding the working method. The article will discuss two technologies: painting with a brush and applying with an aerosol.
They work with the brush, making wide, straight strokes, initially moving the brush softly, then pressing harder, so the coating will become thinner, and the finishing touch is also done softly to level it out. If everything is done correctly, then a one-time brush job is enough.
General recommendations:
- You don’t need to dip the whole brush, just the tip is enough;
- You should strive to make the layer as thin as possible by pressing on the bristles;
- Maintain the slope of the working position of the hand.
They work with a brush, making wide, straight strokes, initially moving the brush gently, then pressing harder.
The spray can process:
- Place the product on a flat surface, for example on a chair, mark the part to be painted with paper tape, cover nearby objects (with film, newspaper, paper);
- You must first shake the aerosol;
- There should be 20-30 centimeters left to the object;
- Spray the paint smoothly in one layer, holding the can straight;
- For complete coloring it is worth doing two or three layers;
- Between applying layers, wait the time indicated on the packaging until dry;
- After completing the work, remove the tape immediately.
After waiting for it to dry, you can coat the item with varnish to increase wear resistance. Acting in the same way as when painting.
Spray the paint smoothly in one layer, holding the can straight.
Paint for plastic is a great option to refresh old items and give them new life. The presence of a wide variety of colors allows you to come up with various solutions for decoration. Before painting the plastic, use all your imagination, take on board the tools necessary for this process, and as a result, you can perfectly decorate your home yourself.
Types of colorful aerosols and tips for choosing
The range of aerosol paints is very wide: from universal to specialized, as well as those creating special decorative effects.
Universal
Among the most popular are universal alkyd-based and acrylic decorative enamels. They are suitable for both external and internal work. The finished coating protects the painted surfaces from atmospheric influences for a long time, and in addition, it is highly resistant to impacts, bends and other mechanical influences. The manufacturer tints enamels (matte, glossy, metallic) in accordance with the European RAL color standard. They are applied to a previously prepared and primed base.
ShutterStock
If you spray water in the room before painting, dust particles and other airborne debris will not settle and remain on the painted surface. To avoid clogging the sprayer head, after use the container is turned upside down and the composition is sprayed until clean propellant gas begins to come out.
"Range"
When choosing heat-resistant aerosol paint, pay attention to the range of operating temperatures of the coating and the anti-corrosion properties of the composition, which are especially important for metal products operating in high humidity conditions.
Vixen
Kudo
Heat resistant
Heat-resistant aerosol compositions are intended for painting heated metal surfaces: elements of automobile exhaust systems, pipelines and steam lines, various parts of water heating and boiler equipment, fireplaces and stoves, barbecues. The heat resistance of protective and decorative film starts from 80°C, like “Alkyd enamel for radiators” (Kudo), and reaches extreme 1000°C, like matte enamel Certa (“Spectrum”) for barbecues, stoves, fireplaces and metal structures.
With an unusual effect
Among aerosols with unusual effects, we note luminous ones: phosphorescent and fluorescent. The former absorb light energy from ultraviolet rays and incandescent lamps and then slowly release it, which is manifested by glow in the dark. Moreover, it is resumed an unlimited number of times after repeated exposure to the light source. Such paints are useful for decorating Christmas tree decorations, toys, watches, etc. Fluorescent aerosols have a high reflective ability. When exposed to sunlight or ultraviolet rays, their brightness increases many times. And this is often used by designers when decorating interiors and exteriors.
ShutterStock
The brightness of phosphorescent paint will be maximum if applied to white ground.
Bosny
Paints with reflective properties are used to obtain signaling effects on steps, fencing elements, and for original decor.
Vixe
Kudo
Decorix
Aerosol paints with a craquelure effect will add a touch of noble antiquity to pieces of furniture and architectural decor. It is obtained by sequential application of two coatings. The base coat is applied first, which will subsequently show through in the cracks, and after it dries, the finish coat is applied. A network of small cracks appears on its uniformly thin layer. To form larger craquelures, without waiting for the first finishing layer to dry, apply a few more (one to three).
KUDO fluorescent enamel
Among the unusual decorative effects that aerosol paints can create are many others. This is, for example, an imitation of an aged metal surface, with natural oxides, as well as a chameleon effect, when the coating changes color depending on the angle of incidence of light (it is especially pronounced on objects with smooth curves), or the effect of frost, which is very useful on the eve of the New Year. of the year.
"Range"
Think in advance about how to turn the object while painting and in what places to intercept it.
"Range"
Lightweight products, including picture frames, can be hung for ease of handling.
"Range"
The Cobweb effect aerosol (Condor Foto) will help create a dramatic sense of mystery. Thanks to it, any objects and surfaces will be covered with thin dusty threads. They look so realistic that they cannot be distinguished from a genuine web. To get a more cheerful, festive picture, artificial snow Snow Spray (Kaemingk) will come in handy. It lies volumetrically, like a real snow cover, and looks impressive on spruce branches and in decorative compositions.
Condor Photo
A “good” web is obtained by pressing the spray and vigorously shaking the Cobweb effect balloon (Condor Foto).
Condor Photo
The creamy texture of Snow Spray (Kaemingk) becomes crumbly over time.
Kaemingk
Subtleties of wood processing
Due to its characteristics, wood requires special processing. The safety of the material during operation depends on a number of factors, including:
- precipitation;
- temperature changes;
- exposure to sunlight, etc.
Without proper treatment, such aggressive exposure can cause wood to deteriorate: crack, dry out or rot. To provide a reliable hydrophobic coating on lumber products, oil or alkyd enamel paints are usually used.
Recently there has been a trend towards painting wood with spray paints. This is due to the fact that when working with spray paints you will not have to deal with the application problems inherent in conventional compositions:
- the difficulty of applying a layer of the same thickness over the entire surface of the product;
- smudges;
- long drying time;
- the need for special painting tools (rollers, brushes, etc.)
In addition, when choosing paint in spray cans, there is no need to select a special composition for wood, since most aerosols are suitable for processing wood materials.
Types of primers for plastic
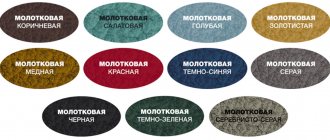
Primers for plastic are divided into several types according to composition, color characteristics and marketable form.
Based on their composition, as noted above, soils are divided into two types:
According to their commercial form, soils are:
- In aerosol cans for application without additional equipment;
- In cylinders for use with spray guns.
The second type of primer is usually called professional, since it can only be applied using special equipment. However, both types of soils do not differ in composition and characteristics (with rare exceptions).
Finally, today two types of soils are produced:
- Transparent - colorless primers that do not mask the plastic surface;
- Painted - can be white, gray, black and other colors.
The use of colored primers helps to realize various decorative effects when painting a plastic part. However, most often such primers are used to save the main paint coating - a white or gray primer can mask the plastic surface, and fewer layers of paint will need to be applied to completely cover its “native” color.
Composition and technical characteristics
White spray paint or another color can be produced with slightly different compositions. It all depends on the material for which it is intended. Typically, the difference is the addition of special components that create the necessary protection for the material. For example, aerosol paint in cans for metal must have anti-corrosion properties. The following popular components that are included in aerosol paints can be distinguished:
- Acrylic;
- Epoxy resins;
- Oil elements;
- Water components;
- Dyes, fillers.
Technical characteristics of paint and varnish products in sprays may also vary. The following inherent characteristics are noted:
- Resistance to moisture, vapors, chemical elements;
- High temperature resistance;
- High degree of wear resistance;
- Resistance to abrasive effects;
- Environmental friendliness;
- The average consumption is 150-200 grams per square meter of surface.
Aerosol paint in cans for metal must have anti-corrosion properties.
Types of primers for plastic
Primers for plastic are divided into several types according to composition, color characteristics and marketable form.
Based on their composition, as noted above, soils are divided into two types:
According to their commercial form, soils are:
- In aerosol cans for application without additional equipment;
- In cylinders for use with spray guns.
The second type of primer is usually called professional, since it can only be applied using special equipment. However, both types of soils do not differ in composition and characteristics (with rare exceptions).
Finally, today two types of soils are produced:
- Transparent - colorless primers that do not mask the plastic surface;
- Painted - can be white, gray, black and other colors.
The use of colored primers helps to realize various decorative effects when painting a plastic part. However, most often such primers are used to save the main paint coating - a white or gray primer can disguise the plastic surface, and to completely cover its “native” color, fewer layers of paint will need to be applied.