Is it even possible?
Of course, no one can forbid you to paint your own ceiling or walls however you like, but what will be the result? Let's consider several scenarios in order to decide when you should absolutely not paint a whitewashed ceiling with water-based emulsion, and when you can still make an exception.
Option #1
There is a smooth and beautiful, but thick layer of lime or chalk on the ceiling. The hand does not rise to wash away, and the water is on the meter. Decided to paint it. Water-based paint applied to whitewash will soak it, and, since the coating is very thick, it will begin to:
- exfoliate,
- crumble,
- swell and fall in large pieces.
The ceiling will look miserable, and you will have to remove two layers of material, wasting time and money.
Conclusion: densely applied whitewash must be removed in order for the new coating to be of high quality and presentable in appearance; and if the whitewashed ceiling is clean, smooth and looks fresh, then maybe you shouldn’t touch it yet?
Option No. 2
The old coating was cracked in places, crumbled, and in some places swelled with bubbles. It was decided to clean the problem areas with a spatula, rub them with sandpaper and apply water-based paint over the remaining whitewash. Eventually:
- the ceiling will look like an abandoned battlefield: irregularities will immediately catch your eye;
- Surely, under the weight of fresh paint, the old, barely adhering layer of whitewash will begin to leave the surface.
- You will not like the result, and everything will have to be redone, and thoroughly.
Conclusion: if the old coating begins to deteriorate and crumble, then repainting it will not save it; You can paint with water-based paint only after the unusable layer has been completely removed.
Option No. 3
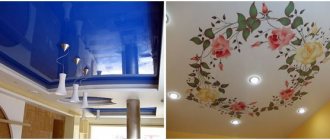
The ceiling is smooth, the painting material holds firmly, is not applied very thickly, but there are stains and stains from water on the surface (including traces of rust), sooty areas or signs of mold. You decide to simply paint with water-based paint to make the ceiling look clean. More likely:
- spots will appear even through two layers of paint, that is, the color in these areas will still be different from the rest, so the effect of “purity” will not work;
- the mold will “grow” and feel great, gradually developing new territories on the ceiling (and not only!);
- You may want to paint it again, but applying water-based paint on lime more than twice is a real provocation; the coating will crumble.
Conclusion: whitewash with traces of emerging life and dirt must be decisively removed!
Option No. 4
The ceiling was whitewashed only once, so there is little chalk on the surface; The coating is clean, smooth and does not crumble anywhere. Try this experiment: apply a little primer to a small area and let it dry. Now lightly scratch this area. Doesn't it fall out? This means you can paint with water-based emulsion!
Dyeing process
Any surface needs preparation before finishing; in this case, you need to do the following:
- clean the ceiling from accumulated dust; This can be done using a vacuum cleaner or a well-wrung out damp cloth;
- put a layer of primer on a dry surface; it is possible to use a water-based emulsion diluted with water at least five times as a priming composition, but it is better to purchase a special deep penetration composition; let dry;
Now it's time to start painting. Tools to choose from: brushes and paint roller, spray gun.
Masking tape will be required in any case. Paper tape should be used to cover the perimeter of the walls just below the ceiling to protect them from paint.
Attention: before use, the water-based emulsion must be thoroughly mixed using a construction mixer or drill with an appropriate attachment.
If the household does not have a paint sprayer, then use a brush to paint the corners and joints (along the glued tape). Paint is poured into a special tray and the coat of a roller (with short pile or foam rubber) is soaked with it; excess liquid is removed by rolling it along the grooved surface of the tray.
The material must be applied with careful, quick movements, without smearing the paint and preventing the formation of streaks and drops. Small areas should be painted, square by square.
It is very important to wait a few hours for the first coat to dry completely before applying the paint a second time.
Important: initial painting should be done by moving the roller parallel to the wall with the window opening. When applying the second layer, the roller must be rolled perpendicular to this wall, that is, in the direction of natural light entering the room. A ceiling painted this way usually looks immaculate; visual defects in the form of stripes and spots do not appear on the surface.
If you decide to work with a spray gun, it’s even better, since when painting the surface will come into contact exclusively with the paint, without being subjected to additional “stress.” In addition, in skillful hands the sprayer works just perfectly: the layer of material is as thin and even as possible, excess moisture does not accumulate on the ceiling, and the coating dries quickly.
Note: if you have little experience in handling a spray gun, it would be good to practice a little on a piece of cardboard or plywood. After finishing, the tool must be disassembled and thoroughly washed every part that came into contact with the paint.
Ceiling painting
Even in the case of a perfectly smooth and durable whitewash, experienced builders advise priming the ceiling surface and only then applying a water-based composition. This important action largely determines how the coating will lay down and how durable and smooth it will be.
During the painting process, you should follow some recommendations.
- Painting is carried out using a roller or spray gun by spraying. Using a paint brush and a narrow brush, difficult areas, joints and corners are painted, as well as the necessary correction. If a roller is used, it must have long pile.
- When painting, good lighting is desirable to help avoid the appearance of streaks on the surface from hand tools. Processing always begins with corner areas and joints connecting the walls and ceiling; in a living room this is the central (far) corner from the entrance opening.
- Use a roller to apply the water-based paint back and forth so that it is distributed evenly, so careful rolling is important. Excess paint is first removed from the roller using a ribbed surface.
An electric spray gun will help in uniformly painting the ceilings. In addition to the fact that it significantly reduces the labor intensity of the process over large areas and saves processing time, it can be used to achieve a minimum layer thickness, and therefore faster drying. Painting by spraying does not leave drips, streaks and streaks that occur when working with a brush and roller. When finishing the ceiling, you only need an extension cord for the sprayer.
You can also use the manual option for water-based paints, which is more affordable and easy to use. The device uses lower pressure than electric models, but you can get around this by choosing higher quality paints and adjusting the consistency of the solution.
If a layer of another coating is applied over water-based paint, maximum surface strength will be achieved.
It turns out that water-based dyes themselves can perform the task of a primer. Such materials are the fastest drying; the maximum drying time for most types is two hours. This is an advantage of these paintwork materials, but it also poses some difficulty during the work process, because the correction of stains and other defects must be done quickly.
What difficulties might arise?
The question of whether it is possible to paint a ceiling over old whitewash with water-based paint is difficult to answer unequivocally. When making a positive decision, one cannot be absolutely sure of the success of this enterprise. Here are some arguments against:
- There is no guarantee that the seemingly strong old layer will not weaken in some places; The risk of getting a short-lived result still remains.
- Whitewash tends to get wet very quickly, becoming sticky; You may have to deal with such an unpleasant phenomenon as its smearing and small fragments sticking to the roller or brush.
- On a whitewashed ceiling it is difficult to see small irregularities or cracks under a layer of lime, but they will certainly make themselves felt after painting (the paint will highlight them).
Note: it is better to take a water-based emulsion with a matte effect; This coating smooths out and masks surface imperfections.
Surface painting
After the ceiling is ready for painting, it is necessary to prepare in advance all the tools and consumables for high-quality and quick painting. To do this you will need:
- finishing putty;
- putty knife;
- primer;
- dye;
- roller with fine or medium pile;
- corner brush;
- safety glasses and gloves.
To paint the ceiling you will need certain tools
If there are scratches or gouges on the surface, they must be covered with putty and, after drying, rubbed with sandpaper. After this, the ceiling must be treated with a primer and left for 12–15 hours until completely dry. Finally, apply paint to the ceiling using a roller or brush. The paint is usually applied in two layers, with the last layer applied from the window towards the opposite wall. To paint corners and hard-to-reach places, we use a brush, after which the main area is covered with a roller or spray gun.
If the walls are covered with lime
Of course, it will not be possible to obtain a perfectly smooth coating without first removing the previous layer and plastering. But as a temporary measure, this method is quite suitable.
If the whitewash layer is small, and the surface is fairly smooth and does not crumble, you don’t have to rush to clean it. Water emulsion works well on lime. But it’s still better to play it safe and, to prevent the paint from crumbling, coat the wall with a primer. Cracks and potholes must first be plastered. You can get the desired color by adding colored pigment to the water emulsion.
Do I need a primer?
If you want to get a strong and durable coating, you should not skip this step. Moreover, the primer is inexpensive. Its main purpose is to strengthen the base and improve the adhesion of paint to the wall. After treatment with a similar composition, a loose wall turns into a monolithic and durable coating.
The primer is able to fill the smallest pores, and the surface after its application looks smoother. The fact is that such compositions form a thin, durable film that prevents moisture from being absorbed from the paint. As a result, it lies flatter. Therefore, before applying water-based paint to lime, be sure to prime the surface.
Since it is sold in concentrated form, dilute it with water according to the instructions on the package. If the composition is too thick, streaks may form on the walls. It is better to add a little more liquid and treat the surface twice.
You can replace the primer with regular PVA glue. It is added to the water emulsion in a ratio of 1:10. The result is a waterproof composition, similar in properties to acrylic. A wall covered with this paint can even be washed.
Cleaning chalked walls
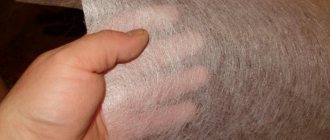
It is not recommended to apply water-based paint to chalk whitewash. It will not stick, and after application the paint will simply crumble.
It is not difficult to check whether the walls are whitewashed with lime or chalk. It is enough to run your hand over the surface. If there is a significant amount of white residue left on the palm, the walls are covered with chalk. This means that it will not be possible to paint them with a water-dispersed composition without first removing the old whitewash.
If the layer of whitewash is thin, you can try to go over it with a primer, and only then paint over it. It is better to do this in a small area. Is the paint still peeling off? You will have to completely remove the old nabel. Wetting the surface with one of the following compounds will help speed up the cleaning procedure:
- Dilute grated soap without fragrance into 10 liters of water and add 4 tbsp. spoons (handful) of baking soda or soda ash;
- You can add 1 tbsp to the same amount of liquid. a spoon (18-20 mg) of ammonia;
- 5 liters of water are mixed with a spoon of 70% vinegar and a small amount of dishwashing detergent.
You can also use wallpaper remover to soften the stain. The surface must be moistened with any of the specified solutions using a spray bottle. After 10 minutes, the lime will soften and can be easily removed with a spatula. To avoid having to wash the floor in the future, it should first be covered with film.
Water evaporates from the walls quite quickly, so there is no point in wetting the entire surface at once. Once a small area has been cleaned, move on to the next one. Next, the surface is puttied and then primed.
What can be applied to whitewash. Is it possible to whitewash the ceiling using old whitewash?
Whitewashing the ceiling involves carefully removing the old decorative layer. But wanting to speed up repair work, craftsmen sometimes skip the labor-intensive and lengthy preparation process by applying new whitewash over the old one.
Having learned in advance the secrets of how to whitewash a ceiling over an old finish, you can get the desired result of a renewed surface as quickly as possible with minimal labor costs.
In what cases can old whitewash be left and in what cases not?
Unfortunately, it is not always possible to refresh a previously whitewashed ceiling.
There are a number of situations in which such work is not recommended.
So, it is prohibited to whitewash the ceiling using old whitewash:
- if cracks, peeling areas of old whitewash, stains, traces of rust and mold are found on the ceiling;
- The ceiling is uneven, covered with a very thick layer of old whitewash.
Ignoring such moments will lead to the fact that the new layer of paint will very quickly lag behind and all the work will have to be repeated again.
Whitewashing over an old decorative layer is allowed if:
- there are no cracks or other defects on the ceiling;
- the previous decorative layer is quite thin and firmly adheres to the rough surface.
How to prepare for whitewashing correctly
Before starting work, it is necessary to ensure protection of hands, eyes and respiratory tract (prepare goggles, respirator and rubber gloves). This is very important, since whitewash particles entering the body can provoke allergy attacks.
Furniture is removed from the room, or anything that could not be gotten rid of, and the floor is covered with polyethylene or thick canvas.
Attention: during the whitewashing process, the windows in the room must be closed, otherwise streaks may appear on the renewed surface.
The surface of the flow is inspected for the presence of cracks and chips, all irregularities are puttied and rubbed with sandpaper.
The cleaned, prepared surface is thoroughly primed, after which you can proceed directly to applying new whitewash.
The main question is: how can you cover a ceiling that has already been painted with lime whitewash? The answer is simple - new lime mortar. It's not difficult to prepare. It is enough to mix 2 kg of dry lime, 1 tsp in a clean container. blue and 10 gr. salt (pre-mixed in water), 10 liters of water.
It is easy to check the desired consistency of the prepared solution. To do this, lower a knife into the whitewash, and if the solution does not drain from the blade, then you can safely get to work.
Algorithm of actions:
- Whitewash is poured into the tray.
- The roller is dipped into the paint, rolled out slightly onto the tray and begins to paint.
- The strokes are perpendicular to the window
- After the first layer is applied, the second is applied.
- The joints with the wall are carefully painted with a brush.
An accelerated option is to whitewash the ceiling using a spray gun. The process has its own characteristics:
- The solution should be more viscous than for a roller or brush.
- The whitewash is filtered through a sieve before being poured into the spray gun.
- Using a spray gun, the ceiling is whitewashed in three or four layers.
Worth remembering
- Chalk is never used to cover a ceiling previously painted with lime (the paint crumbles very quickly).
- Never whitewash with chalk or lime a ceiling that was previously covered with water-based paint (the whitewash will turn yellow very quickly).
- If the room has a high level of humidity, then a special composition with antifungal components is used for whitewashing.
- If the old whitewash has turned yellow, before applying a new one, the ceiling must be wiped with a rag soaked in whitewash.
- In order for the new whitewash to stick better, you need to add wood glue to it (2-3 tablespoons per liter of solution).
Strict adherence to all recommendations will help you whitewash the ceiling using old whitewash with your own hands quickly and efficiently.
Painting technology
All work is carried out at temperatures above +5°C. You should not start painting in hot weather - the liquid will evaporate too quickly and streaks will appear.
If the water-based paint has dried out during storage, you need to add a little liquid. Please note that paint dissolves very slowly in water. It must be mixed until a homogeneous composition is obtained. It is more convenient to do this with a construction mixer or a drill with a special attachment. If color is required, add it before stirring.
So, step by step, how to paint a ceiling with water-based paint over whitewash:
- You will need a long nap roller or spray gun. To treat small areas, you can take a regular paint brush. When using a roller, you will also need to purchase a special tray for pouring paint.
- First, hard-to-reach places in corners and niches behind radiators are painted. It is impossible to do this with a roller. Use a small brush.
- Don't use too much paint. Be sure to press the brush or roller against the edge of the tray or jar.
- No chaotic movements. The strokes are made strictly in one direction, away from the window. (Stripes running across the room will be noticeable.)
- Unlike lime, water-dispersed compositions do not form joints. Therefore, accidentally unpainted areas can be reworked the next day.
- Water-based emulsion has a high covering power, so most often one single layer is enough. If a second application is required, this must be done after 6-8 hours. Otherwise, the undried water emulsion will peel off.
- For re-painting, it is better to use a short-nap roller. Paint will be used more economically. And the surface will be smooth, without streaks.
So, we found out that it is allowed to paint with water-based paint over lime. Walls covered with a chalk composition should first be cleared of buildup. If you follow the above recommendations, you will be able to put your home in order in a short time without significant material costs. Violation of the painting technology may lead to repeated repairs. The crumbled layer will have to be removed and all work done again.
Dyeing technology
The technology for painting the ceiling includes instructions on how to prepare the base and how to paint the ceiling with water-based whitewash paint with your own hands.
Preparing the surface of the walls and ceiling
In the process of preparing for painting, a problem always arises: is it possible to apply water-based paint to the whitewash, how will the mixture adhere, and will it be necessary to repaint the walls and ceiling after some time?
If the layer of whitewash on the wall or ceiling is thin, the mixture holds tightly and does not fall down, the surface can be painted without removing the previous layer. Will the water-based emulsion adhere to the whitewash, and how smooth will such a coating be? Yes, it will; in addition, this approach will save time and money, not requiring lengthy preparation of the base for painting.
However, is it possible to apply water-based paint to whitewash if the latter is covered with rust stains and traces of water stains? It is not advisable to use poor quality whitewash for painting , since in contaminated areas the water-based emulsion will not have sufficient adhesion to the base.
In addition, if the master answers in the affirmative to a question about whether water-based emulsion can be applied to whitewash with stains, his qualifications should be questioned. Even if the whitewash lies in a beautiful and even, but thick layer, it is better to remove it in order to prevent subsequent peeling and shedding - this is done with a spatula on a ceiling previously moistened with warm water.
To clean the surface from whitewash with a grinding machine, you must wear a respirator, glasses, open the windows and lay wet pieces of cloth on the floor - lime is poisonous and hazardous to health. After cleaning, the surface is puttied and primed , using as a primer either a composition purchased in a store, or a mixture of wallpaper glue or water-based emulsion, which is diluted 1:5 with water. The primer must dry on the base for at least a day , after which you can already paint the walls.
Is it possible to paint with water-based paint over whitewash?
Each of us at least once in our lives has had or will have to make repairs in our homes. And this process, as you know, requires a lot of investment not only in time, but also in effort, not to mention the financial side of the issue. Therefore, I want the result to be as good as possible, and spending time at home always brings pleasure and contributes to good rest.
Sometimes, to make your favorite bedroom or office feel cozier and fresher, all you need to do is change the curtains and paint the walls a different color. However, you also need to approach this wisely, thinking through everything down to the smallest detail. For example, now many are wondering whether it is possible to apply water-based paint over lime and whether the whitewash will begin to peel off over time.
Is it possible to paint a whitewashed surface with water-based paint?
Surely, when renovating an apartment or any other room, many people wonder whether it is possible to paint a whitewashed surface with water-based paint. Recently, lime finishing is becoming less and less common, because the fashion for this type of whitewash has long passed. In addition, the process of removing it is accompanied by a lot of dirt and debris. Therefore, there is often a desire not to remove the old coating from the walls, but to immediately paint it with water-based emulsion. We don’t argue that this option is possible, but only if:
- The surface of the ceiling or walls is not covered with defects in the form of pits, since the paint will only help to emphasize them;
- There is no fungus or mold on the old coating, because soon after painting these “guests” will make themselves felt again, and then it will not only be necessary to wash off the whitewashed walls, but also treat them with a special antiseptic solution;
- Traces of rust or water stains are visible on the whitewash, since the painting will not be perfect, and in those places covered with lime the color will again become darker (those who apply three or more layers are trying in vain);
- Lime, applied in a very thin layer, lies perfectly on the wall, while the painting over the entire surface is even and has no cracks or bumps;
- It holds tightly and is not prone to sagging or falling off, so painting will not be in vain.
Otherwise, if you pass water-based paint at least once over a whitewash that has the above-mentioned errors, it will simply get wet, become sticky, and during painting some particles of the wall will begin to attach to the roller, which will not only spoil the aesthetic appearance of the finish, but also your mood.
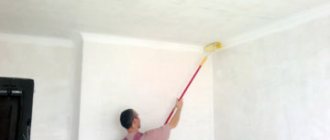
do not forget to prime the ceiling with a deep penetration primer
In order to avoid this, it is necessary to prepare the surface for repair work. First you need to use a spatula or scraper to remove all those places of whitewash that can be removed without any effort. Next, you should loosen the lime coating by soaking it with warm water, and then easily scrape off all the remaining fragments.
The next step in this process should be to completely clean the walls (ceiling). This can be done using a wrung out damp towel or a vacuum cleaner. And finally, the surface must be covered with a layer of primer, because then the water-based emulsion adheres more firmly to the whitewash. Only after doing all of the above is a positive result of the repair possible. Now apply water-based paints and don’t be afraid that soon all this will need to be redone.
How to properly apply water-based emulsion to lime
You can use any water-based paint for whitewashing, however, be sure to pay attention to where you will use it. For a bathroom or kitchen, paint with a waterproof composition is best, and for other rooms all types.
Before starting work, the water-based emulsion is thoroughly mixed and, if necessary, water is added. To begin with, using a brush, you should apply water-based paint to the corners of the room, as well as other areas that cannot be reached with a roller. After this, you should paint the remaining areas, carefully distributing the paint to avoid the formation of drips. To satisfy you with the result, you need to apply at least two layers of water-based emulsion. However, the first layer must be completely dry before recoating.
As recommended by professionals, the best option is matte water-based paint, since it can easily mask all surface imperfections, and at the same time always looks impeccable in any color.
Paint selection
Many people ask, is it possible to apply water-based paint to whitewash? In fact, this finishing material is the only adequate way to paint such a problematic surface. Moreover, such paint does not require the use of a primer, having the function of the latter itself. But, again, it is necessary to ensure the strength of the whitewash layer.
If you plan to apply oil paint or enamel to the whitewash, then it is better to refrain from this step, as the result will be disastrous.
What are the advantages of water-based emulsion compared to other paints?
Water-based paints contain, in addition to water, varnish, drying oil, various resins and much more. They differ from acrylic, oil and other types of coloring agents, but are superior to them in many ways.
The main advantages of painting with water-based emulsion:
- It is easily applied to surfaces when painting and can also be easily removed;
- Does not cause harm to health, as it is absolutely non-toxic;
- It tightens cracks, hides uneven walls and ceilings and is not afraid of water (depending on the type of paint, it can be washed or not);
- Has a wide range of textures and colors;
- It is known for its hypoallergenicity, and can last a very long time (of course, this depends on whether the paint is applied correctly).
Thus, whitewashing with water-based lime paint is possible, but it is still better to clean it, because you cannot be one hundred percent sure that even a very thin and strong layer will not fall off after some time. Be that as it may, with the help of this option you can completely improve your home in a short time and with small investments and enjoy the result of the work done. Comfort and warmth of home to you!
Features of water-based paint
Water-based paint is significantly different from other types. It dries much faster. The fastest drying paint takes only two hours. The water emulsion will not cause harm to health; it contains no toxic substances. You can work without a mask; there is no need to close the room until it dries completely. Due to the absence of harmful substances, the paint has no odor.
There is no need to ventilate the room after this.
- The choice of colors is unlimited. Using a color scheme, you can make the shade you want yourself. The paint is sold primarily in white form.
- The paint is easy to apply and anyone can do it themselves. The water emulsion will serve you for 15 years without shedding. At the same time, it is inexpensive.
- There are also disadvantages to water-based emulsion. The operating temperature should not be below 5 degrees. Painting is possible only in the warm season or in a heated room.
- The paint does not like direct mechanical influences; over time it will wear off and be washed off due to frequent cleaning. She doesn't really like water.
Is it possible to apply putty to whitewash? Putty-whitewash
Putty-whitewash
There is a ready-to-use oil-adhesive putty-whitewash. It is used to correct defects in concrete, brick, plastered, wooden and other surfaces before painting them.
When diluted with water, it is used for whitewashing ceilings and walls indoors in dry conditions.
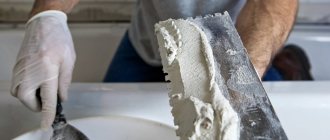
Apply oil-adhesive putty with a roller, brush or spatula (Fig. 2).
The basis of the putty-whitewash is high-quality oil drying oil and adhesives.
Rice. 2. Applying oil-adhesive putty with a spatula
Since the whitewash putty contains rheological additives, it has excellent performance properties:
– does not flow off the surface or spatula;
– glides over the surface, easily filling small defects;
– does not reach for the spatula;
– does not contain harmful substances;
– environmentally friendly;
– easy to use;
– thanks to the biocidal additives introduced into its composition, it prevents the proliferation of microorganisms.
Specifications. Appearance: thick white mass, free of foreign impurities and inclusions.
Consumption: for puttying work you will need 0.3–1 kg per 1 m2, for whitewashing – 0.1–0.15 kg per 1 m2.
Drying time for a single layer coating: 4 hours at 20 °C.
Storage: 6 months at 20 °C in packaging.
Recommendations for use. Before use, mix the putty thoroughly.
If the layer is thicker, the putty will crack after drying and will require correction of defects.
The ceiling surface is cleaned of dust, dirt, and peeling old coating.
For preparatory work, putty is applied with a spatula in a thin layer. The dried coating is sanded.
For whitewashing work, the putty is diluted with water in a ratio of 1: 1, thoroughly mixed until a homogeneous mass is obtained and applied with a brush or roller to a previously prepared surface.
When working with whitewash putty, precautions must be taken, as it is a flammable substance.
This text is an introductory fragment.
Types of water-based paint
Water emulsion is divided into 4 types according to composition: acrylic, silicone, silicate, mineral. Some will cost more, others will cost less. Let's take a closer look at them.
Acrylic paint. It is used most often, but therefore it is not cheap. It has the highest quality set of characteristics. Suitable for painting inside and outside. Due to the acrylic content, the paint is waterproof.
It can be washed without risk of abrasion and used in rooms with high humidity. It is the easiest to apply; it does not absorb into the surface. If the paint contains latex, it can cover small cracks. Acrylic paint is not subject to fading: the sun is not afraid of it. At the same time, it is safe and does not emit unpleasant odors: you can paint a nursery or kitchen.
Silicone. The paint is suitable for rooms with high humidity. Better suited than acrylic. The structure of silicone is much more elastic than latex, which means that it can hide larger cracks. The paint allows steam to pass through, which will save you from the appearance of mold and mildew. There is no need to additionally impregnate with antifungal compounds. Good for the bath or kitchen. Repels dirt - you don't have to clean the surface often.
Silicate. Ideal for finishing the outside of a house. Not suitable for interior decoration. Can be used for outdoor work or in extensions without heating. Long service life and resistance to any weather conditions make it the best among paints for exterior decoration.
Choosing acrylic paint for the ceiling
The best option is a water-based composition based on acrylic resins. The main advantage is the elasticity and good covering ability of the layer. There is a large selection of water-dispersion, vinyl acrylic, acrylic silicone, and other mixtures on sale, the components of which are various copolymers.
You need to choose the composition according to its intended purpose - this is indicated on the packaging of the material. There is also information on product consumption per 1 m2 of surface, and other data necessary for the master. Colored compositions are sold ready-made, but the owner does not always know the shade in advance, so it is easier to buy white paint and tint it with the chosen pigment. To ensure perfect coloring, the pigment is purchased in liquid form.
Based on the type of mixture, they are divided into matte and glossy:
- Matte acrylic paint has the property of visually enlarging a room. Hides minor defects and surface imperfections.
- It is more convenient to cover large areas with a glossy composition and to highlight areas of the ceiling space for zoning the room. In this case, it is important to perfectly level the surface, since gloss emphasizes but does not hide defects.
What else to consider when choosing products:
- The compositions vary in density, decorative, and performance qualities. It is necessary to pay attention to the manufacturer's instructions: paints for dry, wet rooms, rooms with variable humidity.
- The degree of whiteness is determined: super white, white, milky white. It is customary to paint ceilings with a super white composition, but each manufacturer has its own shade of white. To avoid mistakes, you can ask the seller to open the lid slightly and look at the tone; it should match the tone of a sheet of office paper.
Advice! Colored ceiling coverings look advantageous in a glossy version.
Time-tested product manufacturers: Tex, Innetak, Dulux, Tikkurilla, Caparol, Supermatt.
How to paint a ceiling with water-based paint over whitewash
It is still not recommended to apply paint to whitewash. It must first be removed. Painting over whitewash is possible only if it is in perfect condition: if it does not crumble or crack. Try running a clean roller over it. If the whitewash does not remain on the roller and does not begin to fall off, then you can paint directly on it.
If the whitewash is swollen or cracked, then you cannot apply paint to the whitewash. Otherwise, it will begin to crumble right in the process of work. The paint will lie unevenly, and your ceiling will be hopelessly damaged.
If you still plan to apply paint to the whitewash layer, then all you need to do is simply prime the surface of the ceiling. After this, try to disturb the surface again, and if there are no falls, then go to work.
Water-based paint on chalk whitewash – is it worth applying?
When painting walls, we must take care to create the highest quality adhesion of the paint coating to the surface. Therefore, whitewash, which clearly does not contribute to such adhesion, according to the rules, must be removed.
Experts do not recommend this type of painting, since the whitewash will simply peel off the wall and remain on the roller. The only exception is that the whitewash layer is very thin and adheres very firmly.
Ceiling preparation
The first thing you need to do when working with paint is to remove all the furniture. Of course, you can cover it with film, but there is no guarantee that there are no holes in it or that it will not tear. It's better to endure everything. When working, use gloves and a mask. Lime is not good for health.
Whitewash is easier to remove when wet. Use warm soapy water. Apply it around the entire perimeter of the ceiling. Change the water when it gets dirty. Treat the entire ceiling thoroughly.
If you have a thin layer of whitewash, then when soaked, you can remove it with a regular roller. Also moisten it periodically with water. Instead of a roller, you can use a brush. For ease of work, you can use a spray bottle and wet the ceiling with it, and remove the coating with a sponge.
If the whitewash is not removed in this way, you will have to work with a spatula. Use it to scrape off the whitewash from the ceiling.
Another way to remove it is with a paste. It simply sticks to the whitewash and, after drying, turns into a film that is easier to peel off. You can make the paste yourself. Add flour or starch to boiled water. Stir gradually to prevent the formation of lumps. Cool the mixture slightly and apply it to the ceiling with a roller or brush, spreading evenly. Then wait until the mixture dries and forms a crust. Remove it with a spatula.
If this does not help, the whitewash can only be removed with a sanding machine. There will be enough drinking, so close the door and put on a protective suit. Then you will need to thoroughly clean the entire room. Preferably several times with special means.
And the most radical way of getting rid of it is removal with acid. You need to work with full protection: glasses, mask, gloves and suit. Add acetic acid in small portions to water. There should be no more than 3% acid per volume of water. The order is exactly this: water, then small portions of acid, otherwise it will react. Apply the solution to the ceiling with a brush and then remove the coating with a spatula or brush. The ceiling surface must be washed with soapy water.
After removing the whitewash, fill all cracks and holes. Prime the surface. Choose a primer specifically for the paint that you will be applying. Preferably from the same manufacturer.
Surface preparation
So, upon visual inspection of the wall, you determined that the old coating needs to be removed.
To carry out preparatory work, proceed according to the following plan:
- Remove loose areas from the surface. It is convenient to carry out such work using a construction spatula or scraper. Remove only those areas that easily “lag” behind the wall. If the layer is thin, you can use a roller or brush to remove it.
- Soak off any remaining limescale with hot soapy water. This is the most effective method of loosening whitewash. To remove the coating, dampen the wall with a soft, damp cloth. Treat the surface until the chalk or lime begins to “come off”.
- Remove the remaining layers with a spatula.
- After the wall is dry, seal the cracks with putty and level the base.
- Cover the surface with primer.
Painting the ceiling
Before application, you need to add color. The main difficulty is to dilute at once as much as is needed for coating, otherwise it will be very difficult to get exactly the same color.
Pour some paint into a measuring container. Inject the color through the syringe. It is important to use measuring containers, since these measurements will guide you when adding color to the main container. Remember your results and calculate how much color you need for the volume of your paint bucket. After you have mixed them, try spreading a little on a small area and see if it is the color you want.
The instructions for the paint describe in detail how and in what quantities to dilute it. The paint is mixed before application and water is added. The composition is mixed and poured into the paint bath. Periodically dip the brush into the bath and wipe off any excess. So paint the entire ceiling. If your finish has absorbed a lot of paint, apply a second coat.
How to paint with a roller
Following some simple rules will help you paint the ceiling with a roller. Before you begin the main work, you should use a brush to paint the corners and joints of the ceilings and walls. Then a little paint is poured into the painting tray, the roller is dipped into it, and the excess is removed from the coat on the ribbed part of the tray.
You should start applying the first layer from the window opening in the direction perpendicular to the incidence of the sun's rays, and the second layer is applied after the first has dried in the transverse direction. In this way, it is possible to avoid the appearance of weakly painted areas that are invisible at first glance, but which will appear over time. Work should begin early in the morning, since the sun's rays at this time highlight all the irregularities well. Small defects in the dried coating detected during visual inspection are cleaned with fine-grained emery cloth.