Causes of leaks
There may be one reason, or maybe several at the same time. When painting any surface, the following factors should be avoided:
- The thicker the coating, the harder it is to spread over the wall or ceiling. Before starting painting work, the paint must be sufficiently diluted, this is most important for the very first layer.
- Manufacturers of paints and varnishes often indicate on the cans that the paint is ready for use or that it can be diluted no more than 10%. However, any coating needs to be thinned. Water-based paints are thinned with water, while oil-based paints and enamels are thinned with a solvent. The amount of liquid may exceed 10% of the paint volume, but at the same time you should not add more than 20%.
- After dilution and thorough stirring, you need to check the thickness of the coating. Dip the roller into the paint and lift it up. If the paint flows off it slowly (it flows, not flops), then the viscosity is normal.
- You need to apply and roll the paint over the surface quickly, without interruption. Otherwise, the painted areas will dry before you roll the boundaries between them. And after complete drying, the walls will become striped.
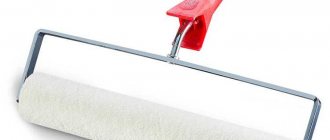
- It is best to paint a smooth surface with a short-haired roller. Using a long-haired roller is advisable only if you are working with a textured coating. In all other cases, such a roller will certainly “decorate” the ceiling and walls with smudges.
- The problem of poorly painted areas occurs when there is insufficient lighting or poor vision of the painter. On a wet surface it can be difficult to see areas that have not been completely painted. Therefore, you need to take care of a bright, but not blinding lamp, or don’t be shy about wearing glasses.
- If you apply paint to a plane in stripes, their boundaries become very clearly visible after drying. The coating should be applied in a W-shaped motion, which will be discussed in more detail below.
- A poorly puttied, sanded, or cleaned surface after painting will certainly expose the defects to everyone. Hoping that paint will hide some imperfections is deeply mistaken. On the contrary, she will show them “in all their glory.”
Preparation
The procedure for removing whitewash from a ceiling is not particularly complicated and can be done on your own. The main thing is to initially adopt some techniques that will help you clean quickly and efficiently. There are several cleaning techniques, and each of them will suit a specific situation. Initially, you need to be prepared that we will be talking about fairly dusty and dirty work. Therefore, before starting renovations, it is advisable to empty the premises as much as possible from furniture.
Objects that are too heavy to lift must be carefully covered with polyethylene or thick paper. The same applies to the floor surface: it also needs to be protected as much as possible using film or old wallpaper. To work at height, you will need a construction sawhorse or a table of suitable height. You also need to put on work clothes, rubber gloves, a respirator and safety glasses.
You need to prepare for the fact that even furniture covered with film will suffer from dust. Therefore, it is advisable to empty the closets of clothes. Having a second worker who, during cleaning, will move a large basin across the floor into which the old chalk will be poured will help reduce the amount of dirt. You can use homemade boxes as a garbage disposal.
This function can be performed by a suitable container. It is important that the width of the spatula used for stripping does not exceed its dimensions. Often, for these purposes, a box of washing powder is used, in which a spatula is placed. This is a fairly simple design, which is made independently by tightly fastening the tool using tape or braid. This method of how to clean a whitewashed ceiling is characterized by low speed, but most of the dust and dirt does not fall on the floor.
You must place a damp cloth near the exit doors. This simple technique is an important part of any repair. As a rule, the procedure for cleaning old whitewash does not take place so quickly (sometimes it takes a whole day). Workers will need to leave the premises occasionally: to avoid spreading garbage throughout the house, it is advisable to wipe their feet on a rag when leaving. During operation, you will need warm water, a small bowl and a spray bottle. A 1.5 liter plastic bottle with a sprayer attached to it performs this role well. This simple device will help to moisten the ceiling with the least amount of time and effort.
If defects have already appeared
It is easier to prevent smudges from appearing than to clean them up later. But still, no one is immune from mistakes, and if this has already happened, of course, there is no point in groaning and aahing. You need to arm yourself with patience and take up the correction.
Firstly, the area must be cleaned of the applied layer of paint using fine sandpaper or a special device. You need to act carefully so as not to remove the putty along with the paint.
Secondly, the cleaned area is sanded until it is perfectly smooth. Then the wall (or ceiling) is wiped with a damp cloth and inspected for possible flaws. If any are identified, a finishing putty is applied to the surface and another grinding is performed.
When the area becomes flat and smooth, it should be primed. The primer is applied in 1 layer, which must dry completely, then 1 more layer. After drying again, evaluate the smoothness of the wall or ceiling again. If doubts still remain, repeat the priming procedure.
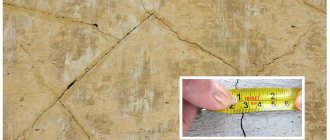
Choice of products: folk recipes for removing stains after flooding
In order to efficiently remove yellow stains on the ceiling after flooding, you should assess the complexity of the leak by color, size and intensity of damage to the ceiling.
Lime, paint, bleaches
If the speck is small, you can get rid of it in low-cost, time-consuming ways:
- applying a new layer of water-based, latex paint or whitewash;
- bleaching stains with chlorine-containing compounds;
- using hydrogen peroxide.
If there is no fungal infection left when the ceiling or roof leaks, the surface can be washed with water, sanded and applied with the coating you like. It is recommended to choose lime or paint that is thick and dense in structure, so as not to paint several times.
Liquid and gel products such as Belizna, Domestos, Comet, ACE stain removers, BOS also have a disinfecting effect. Due to their high toxicity, it is necessary to work with them only in protective equipment: rubber gloves and a bandage.
You can use peroxide to remove stains. The tablets should be dissolved in water or purchased a ready-made solution from a pharmacy chain.
To apply the compositions, use a sponge, woven material, brush or roller. Use blotting or rubbing techniques on the ceiling surface.
Travyanka
Instead of toxic chlorine-based chemicals, you can use homemade solutions. One of them is vitriol primer, which is popularly called grass.
- Dilute 250 g of vitriol in 1 liter of water.
- Dissolve bone meal in a separate container at the rate of 250 g per liter of water.
- Add 40 g of drying oil and 250 g of laundry soap shavings to the adhesive solution.
- Carefully combine both compositions.
Before use, dilute the prepared composition with water in a ratio of 1:10.
Whitening paste
Acidic substances are good at removing any dirt, including yellow stains on the ceiling. Here's what to do:
- Mix 1 part concentrated citric acid with 2 parts crushed chalk.
- Add glycerin and water until a thin paste forms.
- Apply the mixture to the dirty spot on the ceiling and let it sit for an hour.
- Rinse off with clean cold water.
It may take more than one treatment with such a paste to remove the contamination.
Primer, putty, plaster
If the bay area is large, it is not practical to remove it with bleach and paint over it. In this case, you need to remove the plaster from the flood site down to the concrete wall or drywall. The next step is to apply primer and let dry. Then putty the ceiling.
Rub the dried surface, smoothing out any unevenness with fine sandpaper. Next, coat with water-based or other selected paint, whitewash or stick on decorative tiles.
Each previous layer must dry before a new coating, otherwise peeling will occur.
What to do with old stains
There are long-term stains that appear from long-standing leaks and are not eliminated. No matter how much you make repairs, they will show through the paint again and again.
To remove these unsightly places, they should be thoroughly cleaned and washed. Then the problem areas need to be treated with any biocidal solution (a means for destroying fungus, mold, etc.). There is no need to rinse off the solution!
Be sure to wait until it is completely dry to ensure that re-cleaning is not necessary.
Next, a blocking primer is applied to the areas. It is waterproof and will reliably protect your walls and ceiling from stains and smudges. After drying, you can begin painting.
Should know
When stains appear on the ceiling, the most important thing is to find the cause of their occurrence . Because if you think that your neighbor is flooding you, but in fact the leak is caused by a burst of pipes in the interfloor ceiling, no cleaning and finishing work will help you until representatives of the housing office repair the pipes.
In a private house, yellow spots on the ceiling may form due to a leak in the roof. Then you should also find out the place through which water penetrates inside and carry out waterproofing work.
Likewise, if, tired of fighting the yellow stain that constantly appears as a result of leaking rusty pipes, you decide to make a stretch ceiling, this will not lead to anything good. Sooner or later, a fungus will appear at the site of the leak, which has the ability to quickly grow and spread.
Probably no one will be pleased if you know that behind your stretch ceiling there is a blooming space. You will still have to find out the reasons for its appearance and eliminate the leak.
Secrets of excellent results
- Lighting. Paint in daylight. You should be able to clearly see the painted areas and their boundaries.
- Humidity. The humidity level in the room should be above average (45%). That is why painting work carried out in the summer gives better results. In winter, the air in the room is very dry, which speeds up the drying of the paint. You simply won’t have time to distribute it over the entire area. During the cold season, it would be advisable to use a humidifier.
- Order. Agree that painting walls and ceilings when you always have to step over something is uncomfortable. Before finishing work, you should remove all objects from the room, or, in extreme cases, move them to the middle of the room. Instead of a stepladder, use a roller extension, this way you won’t waste time going up and down, and you won’t have to lift your head too much when working with the ceiling.
- Paint consistency. Be sure to dilute the paint with water or thinner and mix well so that it is uniform. It happens that a film forms on oil paint. In this case, it must be filtered through tulle fabric or nylon stocking.
- Roller squeezing. The painting cuvette has one wall located at an angle and covered with protrusions. This is necessary to evenly distribute the paint over the coat of the roller, and not for squeezing. The roller should not be dry. Dip it in paint and “walk” without pressing along the ribbed slope. The paint will be distributed throughout the coat, and its excess will flow into the ditch.
- Zeal. When moving the roller along the work surface, you do not need to put pressure on it. It should roll easily.
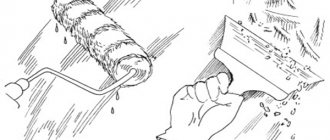
- Coating. As noted, paint over large areas should be applied not in stripes, but in W-shaped movements. Divide the area into squares and paint each one in turn. We made a zigzag, distributed the coating over the square and moved on to the next one. We rolled out the boundaries of the plots and moved on. And paint drips will not appear. If you are painting walls that have been previously plastered, spread the paint in a vertical motion. In log rooms, paint is rolled out horizontally - in the direction of the wood fibers.
- Control inspection. The surface must be inspected immediately after painting. To make possible imperfections more visible, illuminate yourself with a bright flashlight. If there are unpainted areas, roll them immediately.
Wet cleaning
In cases where there is no sanding machine, you can clean the whitewashed ceiling by simply washing it off.
The procedure for how to properly wash off whitewash from the ceiling:
- To wet the ceiling, use warm water and a foam sponge. This procedure can also be carried out using a brush or spray bottle, spraying water from a distance of 60-70 cm to the ceiling.
- To prepare the solution for washing, in addition to warm water, use 3 tablespoons of washing powder and 5 tablespoons of soda. Powder and soda can be replaced by ordinary table salt. To apply the finished solution to the base, use a textile roller. Difficult and hard-to-reach areas are treated with a paint brush.
- It should be borne in mind that the process of absorption of water into whitewash occurs very quickly. To quickly remove chalk from the ceiling, as a rule, soaking the whitewash several times helps: this will give the old finish a chance to spread out well. To avoid excess dirt, place a prepared container under the whitewash to be removed.
- Next, a short pause is made until the whitewash softens and becomes pliable.
- A durable spatula or scraper is used as a tool for cleaning the surface. It is necessary to initially prepare for the fact that this method will not solve the problem of how to quickly wash off the whitewash from the ceiling. In this case, you will have to work hard. Once the old layer has been peeled off, the clean surface is treated with sanding paper. Next, a layer of primer is applied.
- All surface defects discovered during grinding must be eliminated using a repair mixture. The most convenient way to do this is to use gypsum putty or plaster. Every hardware store has a large selection of similar materials.
As you wet the ceiling, it is recommended to soak it in small areas, immediately removing the soaked layer. This will make it possible to achieve the maximum goal of how to quickly wash off chalk from the ceiling. In this case, the wetted whitewash will not have time to dry. If the whitewash layer is small, then the procedure can be carried out by simply washing it out. To do this, you will need a stiff brush or rag. However, in this case, the load on the worker’s muscles increases noticeably, since rubbing the surface with a brush requires considerable effort. The process is characterized by a fairly large amount of water that ends up on clothes and the floor.
Other things to consider
Stains appear more often when working with glossy and semi-gloss finishes. If you are not confident in your skill, use matte paint. Follow the link to learn how to make matte paint from glossy paint.
Flaws are best shown in white. To protect yourself from possible failure, do not take a snow-white coating or add a little color to it.
Over a large area, there are more defects. The larger the surface to be painted, the more responsible you need to approach the work.
To paint the walls, take the paint that you like best. For the ceiling, take the highest quality one. The ceiling is the most finicky of all planes, especially since you cannot cover the flaws on it with furniture or paintings.
The main components of an excellent result: a well-prepared base, a non-viscous coating and adherence to painting technology. But at the same time, know that the ideal does not exist, which means you shouldn’t squeeze all the juice out of yourself to achieve it.
How to remove condensation on the ceiling
Condensation can form on the ceiling in a bathhouse, in a garage, on a loggia, and even in a living space if there is an unheated non-residential space above it. This is not a particularly good phenomenon and causes gradual corrosion and structural failure, which must be dealt with.
Condensation usually appears in poorly ventilated areas and, first of all, the ventilation system should be checked or installed. Ceiling insulation will help eliminate condensation. Insulation can be done with mineral wool insulation or extruded polystyrene foam.
If condensation appears on the ceiling of a cellar or garage and there is access from above, then you can sprinkle the floor with expanded clay, sawdust, or spread the same mineral wool material to insulate the floor.
The same method also applies to the case if condensation appears on the ceiling of a room in a private house, and there is an unheated attic above. In this case, it is enough to insulate the attic floor.
Products for stretch, glossy, fabric, plasterboard ceilings
Caustic and harsh compounds in the form of acids and chlorine bleaches are not suitable for glossy and other delicate coatings. After flooding, it is recommended to entrust such ceilings to professionals to dismantle and remove the liquid. However, traces of flooding left on the material will have to be removed yourself.
Light stains from dried water on drywall can be removed with peroxide and bleach diluted with water. Difficult and rusty stains are a reason for major repairs.
It is practically impossible to remove yellow stains on the ceiling after a leak from suspended fabric ceilings You can try washing it with water and ammonia, but it’s easier to repaint it. The base allows you to do this up to 5 times. Each time it is recommended to select the paint a tone darker than the previous one.
For glossy stretch ceilings, special care compositions are provided. However, you can get by with home remedies. For example, mix ammonia with water in a ratio of 1:9, respectively, and with this alcohol solution, use a sponge to wipe away traces of smudges. Then wipe with a damp, clean cloth and finish with a dry cloth.
Fabric material for treating the surface of ceilings must be selected without lint, so as not to spoil the appearance of the coating.
The causes of flooding can vary, as can the types of building materials from which ceiling coverings are made. Properly selected products to eliminate the consequences of a flood will help keep your home in perfect order.