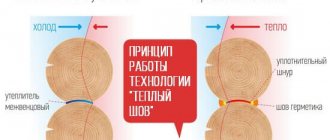
And everything would be fine, but “in a barrel of honey, there is a fly in the ointment.” It is environmentally friendly, beautiful, and even warm. But, here are the seams... Indeed, seams are the weak point in a wooden house. Separately, we have already talked about the choice and use of inter-crown insulation. But, recently, do-it-yourself warm seam technology for wooden houses has been increasingly used. What is her role? Here's what experts say from one
. [flat_ab id=”33"]
So, we had several questions and the first of them: what is Warm Seam technology?
The essence of the method
Conventional methods of thermal insulation of seams in a wooden house have 3 significant drawbacks:
- Allow moisture and insects to enter the room;
- Requires regular replacement;
- Being pulled apart by birds.
How to improve the insulation system of the inter-crown space? This is why the “Warm Seam” system has been developed.
Its essence is that a special sealant is applied over the insulation and a special cord at the junction of the logs. It smoothes out beautifully and after painting (even colorless) becomes invisible. However, it protects seams well from blowing and moisture.
Insulation of a wooden house using Warm seam technology
Sealing with an acrylic-based polymer composition is performed once and does not require periodic restoration work.
Unlike other types of insulation, joint sealant is resistant to changes in humidity and temperature. This allows the “Warm Seam” to be used even in extremely low temperatures.
Characteristics of a warm seam for a wooden house
1. Sealing with an acrylic-based polymer composition is performed once and does not require periodic restoration work.
2. Unlike other types of insulation, the sealant is resistant to changes in humidity and temperature. This allows the “Warm Seam” to be used even in extremely low temperatures.
3. The elastic and durable composition exactly repeats the natural “movements” of wood, while maintaining its heat-saving properties.
4. Acrylic rubber-based sealant is an environmentally friendly material and also does not have an unpleasant odor.
5. In many cases, treating crown joints with a sealing compound allows you to hide their visual defects that could have arisen during the construction stage.
6. Acrylic sealant prevents wood from rotting and does not allow dampness into the house.
7. The relatively short period of insulation work should also be considered an advantage of the “Warm seam” technology.
Professional sealing eliminates the need for additional insulation of the walls of the facility: sealing the inter-crown seams and eliminating the so-called “cold bridges” will be quite sufficient. But the result will delight and “warm” the residents of a wooden house for many years!
“Warm seam” - stages of work
Sealing using the “Warm seam” method consists of several stages and is carried out after the frame has shrinked (one and a half to two years after the construction of the house). It is recommended to carry out work at “plus” air temperatures.
- At the preliminary stage, it is necessary to prepare the insulated surface for sealing. The space between the logs is cleared of dust, and the existing paint coating is also removed. This will ensure better adhesion of the sealant to the wooden surface and will not allow the composition to peel off. In some cases, a special acrylic-based impregnation is used, which will improve the adhesion and quality of the seam.
- The next step is to lay the sealant in the prepared seams. Its function is performed by a heat-insulating polyethylene cord. The diameter of the cord must correspond to the dimensions of the gap. To secure the insulation in the crown joints, you can use a special spray adhesive or small nails. The use of glue is considered more preferable, since the cord is fixed along its entire length and there is no possibility of it breaking.
- After laying the insulating cord, you can begin applying the sealing compound. The procedure is carried out using a special tool - a pneumatic gun for spraying sealant. The thickness of the laid seam should not be less than 4 mm. The optimal width is within 4-6 mm. In accordance with this, the attachment for the tool is selected.
- Immediately after applying the sealing joint, its surface is treated with a spatula moistened with water for better sliding. Air bubbles and excess sealant fragments are removed. Then the seam is smoothed with a damp sponge and acquires its “marketable” appearance.
- At the last and longest stage of work using the “Warm Seam” technology, polymerization of the sealant occurs. Depending on the characteristics of the seam, this process can last up to seven days. The sealing mass acquires its real color only after hardening.
When insulating inter-crown seams, specialists use some know-how to simplify the work a little and ensure better quality of the final result. So, before applying the sealant, it is recommended to mark the boundaries of the future seam with masking tape. Another technical technique is to use a plastic tube with a diameter of about 5 cm. This unusual tool forms a perfectly even seam edge without leaving behind excess sealant.
Sealing using the “Warm Seam” technology, performed by qualified specialists, always gives the ideal result - warmth and comfort in your home!
Required materials and choice of sealant
How much and what will be needed to carry out such work with your own hands? Taking into account the above quote, we will take into account that the initial insulation of the seams has already been done. And that means we need the following materials:
- Acrylic sealant for wood;
- Thermal insulation cord.
From the tools:
- Gun (manual, but preferably pneumatic);
- 2 spatulas (small - for the size of the seam and large for ease of removing excess from the first one);
- Brush (to remove excess);
- Possible: sponge and spray bottle (water sprayer)
Warm seam technology
The “warm seam” technology for wooden houses involves several stages of work.
Materials used, tools:
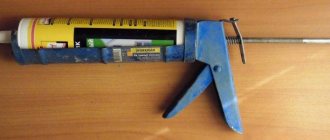
- Putty knife.
- Special construction pistol. During the work process, lubricant may be required for better operation of the gun mechanism.
Important!
The cut size of the spout allows you to adjust the amount of sealant released and the size of the seam.
- Primer for impregnation of the most absorbent parts of wood.
- Special insulating cord made of foamed polyethylene, for laying in wide cracks from 1 cm, to save the amount of sealant and improve the finishing of the seams.
- An industrial stapler with an elongated spout, or a hammer and small furniture nails, for possible fastening of insulation in cracks.
- A soap solution that moistens the surface of the spatula when leveling the seam.
- Construction tape may be needed for home owners who do not have experience working with sealant.
Preparatory work:
- Cleaning the wood surface from dirt and the top flaking layer.
Note!
Sealing should be done before covering the wood with an antiseptic, as the solution may interfere with the adhesion of the material.
- Drying the surface.
Basic operations:
- To simplify the work, stick special industrial tape onto the logs, which will protect the wood of the joint from contamination by sealants outside the application area.
- The sealant is applied to all seams between the logs and any cracks formed. If the gap is larger than 10mm, it is recommended to lay a special cord.
Cord installation diagram
- The cord can be installed using a chisel; in some cases, additional fixation of the cord along its entire length with small nails or a stapler may be required. The seam size should be within 4÷12 mm.
- Apply the composition using a gun or chisel. If using sealant in the form of a cord, remove the film and install the sealant into the gap.
Applying a seam using a gun
- Level the surface and remove excess elements from the seam using a chisel or sponge soaked in water. It is also allowed to work with only one spatula.
Working with a spatula
- Removing the tape.
- After the polymerization process is completed, the seam can be treated with acrylic-based paints and varnishes.
Carrying out the “warm seam” technology for wooden houses with your own hands, using a gun or spatula, is not a difficult task, but requires a certain skill and patience. Since for a beginner it will be problematic to apply a professional, even seam from the start, especially to do it quickly.
Using a sealant in the form of a cord will speed up the procedure, but this technology requires subsequent coating of the joint surface with an alkyd-based varnish.
Reviews
Well, in conclusion, we will listen to those who have used this method of thermal insulation of a wooden house.
Alexander Skopets
Two years ago I used sealant in a bathhouse. The humidity rose and it became stuffy. This summer I removed everything and used moss. Result: almost like a sauna, hot, but easy to breathe.
Vasily Egorov
This year I finished a house of one hundred square meters. I used Eurotex sealant, 20 kg in buckets. I did all the work myself. The process took 15 days (well, purely working days, so more time passed, of course). Large cracks were punched with the remains of tow and jute. I colored the sealant with regular toner. The house has become much more beautiful. The heat is retained much better. All the fun cost 15 thousand.
Alekseev Iglushin
The advantage of acrylic sealant is that it is one hundred percent airtight and does not allow moisture to pass through. (I'm talking about external insulation). For me, the best option is German Remmers, sausage 0.6 costs 300-400 rubles. Consumption depends on the professionalism of the finisher. Don't forget about the size of the seam. If the layer is too thin, the sealant may come off the wood. If it is too large, the sealant will no longer be elastic. In our region, the price of caulking and “Warm seam” is 2 times higher than the materials for this matter.
To carry out work on sealing the walls of the log house you will need the following:
- Sealant in vacuum tubes for a construction gun
- Construction gun for sealant in vacuum tubes
- Vilaterm (foamed polyethylene without holes)
- Construction spatulas
- Brushes (regular paint brushes) 25-30 mm wide.
- Waffle towels
- Masking tape
- Water
Instructions for sealing seams
Proper insulation of a wooden house can only become possible through strict adherence to technology, which will include preparation and the main stage of sealing cracks.
Tools, accessories and materials
To complete the work, you will need to buy sealant in a cartridge or other form that is perfect for mounting the gun.
You will also need to prepare in advance:
- Spray.
- Foamed polyethylene in the form of a cord.
- Primer for wood.
- Narrow spatula.
- Masking tape.
- Paint brush.
- A rag.
- Water.
You can apply the sealant by hand, but using a gun will make the job much better and faster. Moreover, mounting guns help to squeeze out the product in a dosed, beautiful, even strip, and without it it will be very, very difficult to achieve such an effect.
Preparatory stage
It’s not difficult to make a warm seam for a wooden house with your own hands. Old buildings most often have rough caulk, and it is worth removing it in advance to reduce the risk of mold and insect nests. Afterwards, the log house should be cleaned of dust and dirt, the old paint coating should be removed, and if there is an oil-type impregnation, the base should be sanded. The wood must be treated with special degreasing agents, then primed and allowed to dry thoroughly. If you ignore this measure, the sealant will lie unevenly, and adhesion to the base will decrease.
After this, a special polyethylene seam should be placed in the seams between the logs. It is required to fill the inter-crown space, since completely sealing the entire gap with sealant will be ineffective and expensive. Joints that are too large should first be caulked with a rope or tow, and then a cord made of polyethylene foam is secured with metal staples. Both surfaces must be covered with masking tape so that the sealed layer is even.
Applying sealant
The product for obtaining warm seams should be applied using a glue gun. You should act like this:
- Cut the end of the tube at an angle of 45 degrees.
- Insert the tube into the mounting gun.
- Pour the unpackaged product into cartridges into a special gun, which is needed just for such sealants.
- Press the release hook, apply the sealant with an even tape of the required thickness (the layer of the product should cover the logs 1 cm on both sides).
- Spray the seam with water from a spray bottle, then level it with a spatula and remove excess.
- Wet a small brush and finish the joint.
- Use an old rag to remove drips and stains, and then remove the masking tape without waiting for the sealant to dry.
As a rule, for complete polymerization the composition requires from 2 days to 2 weeks - it all depends on the brand, type and weather conditions. Only at the end of the period can the seam be painted.
Consumption of funds
Typically, sealants are produced in tubes of 0.3 and 0.6 kg, as well as in plastic buckets with different volumes. Consumption can vary greatly depending on the depth and width of the joint. For example, with a regular seam 0.5 cm deep and 2 cm wide, each linear meter will require from 0.2 to 0.25 kg of product.
Drying time
The use of “warm seam” technology for wooden houses is allowed in dry weather at temperatures from +5 to +30 degrees. The optimal humidity for work is 60%, and the temperature is from +20 to +23 degrees. Under such conditions, the product will harden at a rate of approximately 0.2 cm/day, and the primary film will appear in ½-1 hour. In rainy, damp weather, it is not worth sealing a house made of wood, as well as during snowfall, as this may adversely affect the quality of the resulting seam.
Cuts and corners
The most difficult work in forming warm seams will be the junctions of wooden walls. In order to seal corners and cuts, a polyethylene cord of the required length and thickness should be inserted into the cracks, and also soaked with a spatula. Typically, such a process takes quite a long time, labor-intensive and painstaking. After applying the sealant, level the layer with a wet spatula and leave. If the corners were previously treated with oil-type impregnations or fire retardants, then you will need to sand the wood with a grinder in advance, since otherwise the composition will not obtain the required adhesion.
Storage conditions
The product should be stored at a temperature from +5 to +29 degrees, there should be no access to the sun, and the room should be protected from moisture. The sealant is able to withstand up to 7 cycles of freezing and thawing (the duration of each is no more than a day, and the temperature is not less than -18 degrees). Before use, the frozen composition should be kept at room temperature for at least a day.
Self-sealing errors
Non-professional craftsmen, when sealing the crown joints of a log house on their own, inevitably encounter problems. To do the job correctly yourself, you need to know certain subtleties and nuances.
Among the typical mistakes that untrained professionals most often make are:
- Wrong choice of sealant.
- Carrying out work in inappropriate weather conditions.
- Violation of work technology.
- Poor surface preparation, as a result of which the sealant does not adhere well and lags behind the wood.
- Careless application of the composition, which is why the warm seam looks rough and sloppy.
To ensure that the warm seam is made efficiently and accurately, and serves you for many years, contact professionals.
has many years of experience in insulating houses made of timber and logs using the “warm seam” technology. In our work, the main priorities are quality indicators. We employ experienced and highly qualified craftsmen. Our company has established a two-level system for checking the integrity and quality of work performed, which is carried out by the construction supervision department and the quality control department.
When you trust us to seal your home, you can be sure of excellent results. You can contact us using the coordinates on the “Contacts” page.
Calculate the cost of painting and insulating your home right now