Stage one: inspect the wall covering
Before deciding what to do next, inspect the walls and try to figure out what kind of paint they were painted with. How to easily remove old paint from concrete walls? This will determine how the putty will lie on the surface and how long it will last.
To smooth out defects in concrete, putty EP 0010 is often used.
As a rule, water-based or oil-based enamel is used to paint walls. To understand what type of paint was used in your case, moisten a sponge with warm water and scrub the wall thoroughly. If foam forms on its surface, it is emulsion paint. It cannot be puttied - the mixture will not last long and will fall off at the first opportunity.
This paint must be washed off.
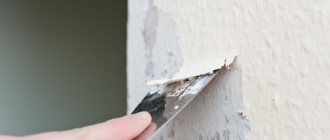
If the paint does not foam or wash off due to water, it is made on the basis of a non-aqueous solvent, for example, drying oil. This paint can be puttied - it will not react. But before you start working, go over the surface of the wall with a wire brush or spatula and remove all flaking pieces of the old coating.
The putty will only hold if the paint does not peel off.
How to paint an old wooden house correctly
You can only paint dry wood, otherwise the paint will curl.
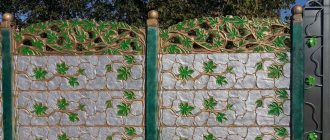
Painting is best done in cloudy but not rainy weather. This is due to the fact that direct sunlight, when hitting a painted surface, contributes to the formation of stains. Before applying the paint, it must be mixed thoroughly. For painting, it is better to choose a wide brush with natural or mixed bristles and dense padding. Work begins with the lower crowns of the frame, applying paint only in a horizontal direction to avoid smudges. To get an even and beautiful coating, you need to apply two or three layers. After repainting the house for the first time, you need to wait for the paint to dry completely, and only then proceed to the next layer.
Step two: remove old paint
Water-based paint dissolves easily with water, so to clean a wall of it, you just need to wet it and scrape it off with a spatula. Ideally, oil paint should also be removed; this can be done in three ways:
- Chemical - using special removers, after application of which the enamel dissolves and is easily removed with a spatula. The disadvantage of these compounds is toxicity: during their use and after, the room must be well ventilated.
- Mechanical - using a regular spatula, sander or iron brush. This method is the dirtiest: there will be a lot of dust, so you can’t do without a respirator.
- Thermal - using heating with a hair dryer, which softens the old paint and can be removed with a spatula.
If the paint sticks tightly and you can’t wash it off, we advise you not to waste your energy. It will be enough to simply clean the areas where the enamel does not adhere well. How to remove old paint from a plaster wall?
Then the wall is primed so that the putty will adhere tightly.
Preparing the wooden surface
Before choosing new paint to cover the old one, you should carefully inspect the entire area to be painted. If the coating has dried out and started to peel off, you should first remove the old paint. This will reveal problem areas that require more thorough treatment and can also show areas where the paint has gone through multiple coats. It is important to do these steps because the inner layers of paint will vary in tone, color and type of paint. In this case, it is necessary to clean this place down to the wooden base so that there is only one shade of paint on all walls.
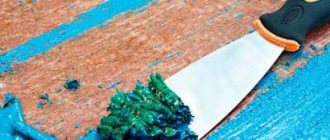
It is also necessary to assess the condition of the old boards on the external cladding of the house. Dilapidated or rotten elements should be completely replaced. Old paintwork can be cleaned using:
- scraper;
- metal brush;
- chemical solutions.
After preparing and cleaning the surface, I begin selecting new paint. It is selected based on the type and shade of old paint. For the best painting effect, choose the same type of paint coating. You can determine the old layer by eye, but this method does not always work accurately. To do this, there are additional ways to help determine the old type of paint.
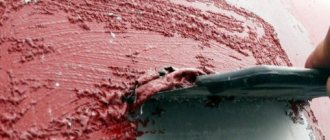
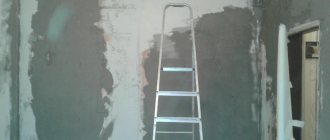
Stage three: prepare the wall before leveling
In order for the putty to adhere well, you need to remove all loose particles, dust, oil stains, etc. from the wall surface. This can be done with a sponge soaked in soapy water. All cracks or holes must be widened using a hammer and chisel until they stop crumbling, and filled with putty.
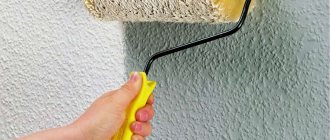
After this, you should apply a primer - it will help make the wall equally porous over the entire surface to be treated, so that the leveling mixture will adhere better. Choose a special concrete-contact primer - it contains small particles (most often quartz sand) that make the surface rough, and its liquid base penetrates deep into the paint, increasing adhesion.
You can do without concrete contact, but then you will have to achieve the roughness of the wall in another way: you can process it with a drill with a special attachment, coarse sandpaper, or make notches in the paint with a sharp object. After this, go over again with a damp sponge to remove dust.
Tips for choosing new paint
The best option for updating an old paint coating is to apply new paint that matches the type and tone of the old layer. In this way, paint blistering or color difference can be avoided after painting the walls. There are several methods for identifying old paintwork:
- Acrylate paint is tactile and has the texture of thin “skin.” The paint layer breaks in the direction of the wood grain, so cracks form in accordance with the direction in which the boards are installed.
- Oil paint fades over time and becomes matte. Cracks in wood run across the grain or spread in a “cell-like” pattern. After touching the old surface, a chalky mark remains on your fingers.
- If the house was covered with a glazing antiseptic, then its layer becomes thinner over time. If the surface retains its gloss, then it can be covered with oil paint.
These recommendations are suitable for houses that have recently been purchased and there is no information on the old paint layer. In cases where it is not possible to determine the type of paint, it is worth choosing a paint that will cover the old layer for sure.
Characteristics of water-based paints
Water-based emulsion is a higher quality and more practical dye than ordinary lime, which crumbles and is harmful during the dyeing process. This material is odorless, easily diluted with water, and tools can be quickly washed after it.
The water-based emulsion is tinted well. The surface color is even and dense, even if it is re-painted with water-based paint.
Before starting work, it is important to consider in which room you plan to finish the ceiling surface. A moisture-resistant water emulsion is suitable for the kitchen and bathroom.
Popular types of water-based paints:
- Latex Its advantage is that it has good coverage and density. For some surfaces, only one coat is sufficient. After drying, such surfaces can be subjected to wet cleaning.
- Silicate It is used mainly for exterior decoration. It is made on the basis of liquid glass. Thanks to this, it can be easily applied to stone or concrete bases. It can be used to paint a garage, garden house, work shop inside or outside.
- Acrylic This coating can hide gaps up to 1 mm. Pure acrylic is used for painting surfaces in dry rooms; it is sensitive to moisture.
- Silicone Has self-cleaning properties. It can be washed. Suitable for rooms with sudden temperature changes and high humidity.
Water-based paint for the ceiling has been selected, let’s figure out how to re-paint the ceiling surface and whether it’s worth doing it without washing off the old coating.
Stages of work
If we paint the ceiling over the old finish, the preparatory stage will take minimal time. You just need to remove the peeling elements of the ceiling and, if necessary, putty it, filling all the cracks, crevices, and potholes. Next, a layer of primer is applied, and after it has completely dried, we can finally start painting the ceiling.
If you applied primer to the ceiling in the morning, afternoon is the time to start painting. By this time the primer will be completely dry. It is reasonable to apply the second layer of water-based paint the next morning.
Sequencing:
- Preparation of the necessary set of tools and devices. Here we need a brush or roller. A suitable brush width is considered to be 3-4 centimeters. Some people also prefer to use a telescopic extension for rollers and brushes. A tray for paint, a tray with water, a can of paint of the required volume, a rag, masking tape and material that insulates the floor from paint drops.
- Covering the perimeter of the ceiling with masking tape. Nowadays there is special polyethylene on sale in rolls of various widths with an adhesive strip along one edge. This is also necessary when working over an old layer of paint.
- Paint preparation stage. Read the instructions carefully and, if necessary, dilute the paint with water in the required proportion. Once you have the desired consistency, you can get to work. If you decide to use tinting agents, follow the instructions on their packaging.
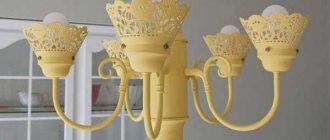
- A small amount of paint is poured into a special ditch for a roller and all corners and the perimeter of the ceiling are painted using a small brush. Plaster decorative elements, if available, are also painted.
- Next begins the process of directly painting the ceiling surface over the old layer using a roller. To do this, the roller is completely wetted in the wide part of the cuvette with paint, then its excess is removed from the flat part. At the same time, the paint is evenly distributed over the surface of the roller.
- The directions of movement of the roller along the ceiling should be parallel. Each new stripe is positioned to cover more than half of the previous stripe. The rules for applying layers recommend applying them perpendicular to each other.
- There are also recommendations for the direction of the finishing coat of paint, which must be done parallel to the source of natural light, that is, the window. Many people prefer to apply the final coat with a new roller attachment, ensuring the surface is as smooth as possible.
Painting the ceiling is not at all as difficult a task as is commonly believed. Going through this process yourself to renovate and decorate your apartment will bring a feeling of deep satisfaction.
A little time spent on choosing a suitable water-based paint, preparing tools and having the knowledge from this article - and a good result is guaranteed. Good luck and enjoy your renovation.
Tools and materials - a complete list for all occasions
To carry out the necessary preparatory work and high-quality painting of the ceiling with any composition of the previous coating and surface condition, you will need:
- wide, durable plastic film or oilcloth to cover the floor and furniture that could not be removed;
- sponge for soaking and washing off old coating;
- steel spatula for removing the previous layer of paint (whitewash) and applying putty when leveling the surface for painting;
- serpyanka mesh for gluing the joints of ceiling tiles;
- main and finishing putty;
- penetrating primer;
- mesh graters for leveling the putty surface - larger preliminary and fine finishing;
- special solutions for eliminating yellow streaks, rust stains, and mold;
- water-based paint of suitable quality in the required quantity;
- a medium-width brush with a fluffy edge for painting corners, joints with walls, areas around ceiling lamps; before use, it is soaked in water; the swollen wood of the handle will tightly hold the bristle hairs, so they will not remain on the surface covered with the coloring composition;
- a narrow brush for eliminating minor paint defects;
- a paint roller in a fur coat with medium-length pile and a handle with a telescopic extension; the width of the roller depends on the area of painting - the larger it is, the wider the roller;
- a rectangular tray with a corrugated inclined surface on which a roller is rolled to remove excess paint.
Necessary tools and materials: 1. Film. 2. Sponge. 3. Spatula. 4. Serpyanka mesh. 5. Putty. 6. Primer. 7. Grater nets. 8. Cleaning products. 9. Paint. 10. Medium brush. 11. Narrow brush. 12. Roller. 13. Special bath.
How to achieve better results?
Observing the following rules helps to obtain a durable, even coating:
- Each layer of coating is thoroughly dried. The painted areas are left for at least 4 hours. During work, the surface is inspected, identifying gaps and defects.
- In the first weeks after painting, the coating is protected from ultraviolet radiation. You should also avoid the appearance of cold air currents in the room. Drafts do not speed up drying, but destroy the structure of the coloring composition.
- Apply the finishing material, applying equal pressure to the roller. Dents and sagging cannot be removed by applying a new coat of paint. The coating is removed and the surface is puttied again. If defects in the form of stripes are detected, the coloring agent is mixed and reapplied.
The quality of the coating depends on the type of compounds used. When choosing products, study the information provided by the manufacturer. It is recommended to use ceiling emulsions that are resistant to wear.
Wall painting design
There are a lot of options for painting walls, because there are no restrictions on quantity
It is important to find the right suitable color combination when painting your walls. The easiest way to do this is to select shades according to the tables that designers use
They contain groups of shades that can be used in one room, while the interior will be harmonious.
Now about the methods of combined painting of walls. There are quite a lot of them, they will look different in the interior. Choose the one you like.
Horizontal division into two or three zones
This method is traditional. Usually the room is divided into two zones. At the bottom they paint with darker shades, at the top with lighter shades. The classic version is divided into three parts by height - the lower third is painted with a dark shade, the upper two are lighter. But this is just a classic; in reality, the dark paint can end in the middle or almost at the ceiling. You just need to be careful with this technique: it visually makes the ceilings lower. The exception is a light strip almost under the ceiling.
Painting a room in two colors: horizontal division
The border between two colors, if you paint the walls in an apartment yourself, is rarely ideal. To decorate the imperfections, you can glue a molding or some even stripes. Another option is to apply masking tape evenly along the border before applying the second shade. After painting, remove it, you will get a perfect line (if you applied the tape evenly).
The molding can be left white - it goes with any colors, or it can be painted in one of the suitable colors
This technique can be used in premises of any purpose, and the style can be of any kind. Only with moldings - this is more of a classic, it is acceptable for country style, for one of the ethnic styles. Just a clear border or a division decorated with a shiny stripe is already minimalism or hi-tech.
Accentuating a wall
A fashionable trend in decorating rooms is highlighting a wall with color. There are two options here:
- a darker shade of the same color;
- another color from a compatible palette.
With well-chosen details in the interior, both methods look attractive. This is the easiest way to make the interior more memorable and vibrant.
A bright color from the same palette is the easiest way to brighten up your interior.
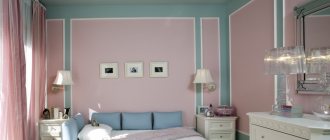
Just keep in mind that in bedrooms, for example, it is better to use less harsh combinations - the atmosphere in such rooms should be softer. Sharp contrasts are good in living rooms and children's rooms. Children generally like bright combinations.
The colors in the bedrooms are calmer
Horizontal stripe
This is a fairly wide strip that runs approximately at eye level
Most often, this type of painting of a room is used if it is necessary to pay attention to some decorative elements - paintings, for example.
A wide horizontal stripe is another way to paint a room in two colors.
This technique looks good in corridors - by lowering the height of the ceiling, it makes it seem wider. Another popular application is children's rooms: children's drawings look very good against a prominent background.
The stripe does not have to be monochromatic - a slight gradient is also good
Striped walls
An interesting technique, but it’s not worth using it for the entire room. This way you can decorate one wall - one of the varieties of an accent wall - or just part of it.
Horizontal stripes can be multi-colored. The main thing is that they are repeated in the interior
An interesting effect is achieved by combining stripes of the same color, but with different textures - matte and glossy. Strictly speaking, these are not two colors, but they look exactly like that.
Combination of matte and glossy paint stripes
Highlighting some interior details
Often, some details are emphasized with a different color - brighter or calmer. For example, niches, frames, placement of an interesting shelf, etc.
Highlighting some elements is another way to combine painting a room.
One option is to outline the walls with a stripe of a darker color, thus highlighting all the corners. This method will help make a small room more spacious: it will appear taller and wider.
A way to visually enlarge a room