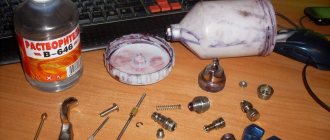
Wood products have remained in demand for many centuries, as they have no equal in environmental friendliness and durability. Wooden furniture is always unique, since it is impossible to find two trees with the same pattern. To preserve and emphasize the natural attractiveness of the wooden palette, wood polishing is used. Polishing is a particularly labor-intensive and highly artistic activity that requires certain skills, patience and time. Polishing is the smoothing of surface irregularities using various tools and reagents.
Benefits of brushing
In addition to the obvious decorative advantages, artificial aging of wood has other advantages.
Firing eliminates many of the defects of wood - blue discoloration, incipient rot, therefore it is recommended to treat such surfaces with fire at least once.
Knots, curls, curls - any defects in wood when brushing turn into advantages. In addition, the firing process compacts the surface, which increases wear resistance.
Burnt wood is not sharpened by insects, so burning has not only a decorative, but also a protective purpose. This method is recommended to treat gazebos, fences, and country benches.
Toning also further protects the surface. Paints, in addition to decorative properties, often have antiseptic characteristics.
Brushing provides an exclusive appearance and makes it possible to transform ordinary pine into an exotic species (for example, wenge). For those who love working with wood, brushing with your own hands brings incredible pleasure with an excellent aesthetic result.
Artificial aging and patination are successfully used to stylize furniture and walls. The resulting structure after mechanical processing may be different.
What is the best way to sand wood?
A wide variety of tools can be used to process wood. In many workshops and garages you can find almost everything you need to carry out such work. There are several tools that answer the question of how to sand wood:
- Drill.
- Bulgarian.
- Belt sander.
- Surface grinder.
Sanding wood with a grinder
The grinder has become quite widespread. It is a universal tool; grinding requires a special flap-type attachment. Other features of the process include the following:
- To make the nozzle you will need pieces of sandpaper. They must be secured to a rigid base.
- There are wheels on sale with different hardness levels, each suitable for a specific case. An example is the use of a No. 40 wheel to remove paintwork. To give smoothness, use a wheel with grain No. 120.
Grinding wheels
Another common question is how to sand wood when using a drill. Such a tool can be equipped with a special attachment, which has a pin for the cartridge in the central part. Among the features of using such a tool, we note the following points:
- All circles have a small diameter, the largest is 125 mm.
- Different grain sizes also allow for various types of work: from roughing to finishing.
There are several types of drill wheels. Most have a hard base, some have a rubber base. An adhesive substance, as well as various Velcro, can be used to adhere the sandpaper to the base. By increasing the flexibility of the disk, the processing quality can be improved.
You can also find a surface grinder on sale. This mechanism is characterized by the fact that the fixed sandpaper quickly performs a reciprocating movement. Many abrasive attachments are designed so that the sandpaper can be quickly replaced if necessary. Compared to a drill, the tool is characterized by high productivity, but it is difficult for them to process a large surface area.
Processing wood with a belt sander
The belt sander is characterized by the highest productivity. It can be used to process a wide variety of wood. The main disadvantage is the high cost, since professional equipment in this category costs 7,000 rubles or more. A special attachment can be used as a working belt, which can have a different grain size.
Mechanical method
The mechanical method involves removing the old coating with coarse fiber nozzles and significantly injures the top layer of the tree. If the varnish or paint comes off in layers, then the old coating is removed with a wood polishing brush with metal bristles, a spatula or a screwdriver. If it is not possible to get rid of the top layer in this way, then special or adapted machines for grinding and polishing are used. When using these tools, eye and respiratory tract protection from dust is required. To reduce its amount, you can wet the surface with water, but then it needs to dry before the next stage of work. For this purpose, surface grinders, angle grinders, belt sanders and drills with an attachment for polishing wood are used.
A drill is used on small areas, a surface grinder is used on smooth and flat surfaces. For larger volumes, belt sanding will be required. Polishing wood with a grinder is universal, and can also be used when processing corners and ends. Grinding is carried out in several stages using different attachments with a gradual transition from coarse to fine. To clean even small products, use cycles. It is important that the tool is well sharpened and does not have burrs that can damage the surface.
Polishing wood at home can be done using available tools. To do this, attach sandpaper to a block of soft wood.
Grinding with a grinder correctly
Before you run for a tool, take care of yourself: you need to put on a respirator and a mask. Without this protection, you will inhale dust and there is a high chance of ending up in the hospital right from your workplace. Especially if the surfaces being treated are protected from paint, have been impregnated, and ordinary dust will not bring health. A good option is to purchase full protection in the form of a mask connected to a respirator.
Do not forget that filters do not last forever in a respirator and must be changed regularly. Keep track of time and have a supply of them for replacement. Don’t forget gloves, clothing should be thick, non-flammable, not soaked in any oils, gasoline, and so on.
What is grinding done?
In cutting theory, when determining a tool to perform the process itself, a cutter is considered. It has cutting edges. They introduce the processed material into the body. The sharpening angles determine the features of the cutter's penetration into the material, as well as the formation of chips.
When it comes to the grinding method of processing, here we observe the work of not one cutter, but several at once. Their number is often measured in the thousands. The more small cutters involved in the work at the same time, the higher the quality of the machined surface. The abrasive grains act as cutters - these are grains of sand with a fairly high hardness, glued to paper or fabric.
To classify grinding tools, the concept of the number of grains of 1 square centimeter was introduced. For example, the designation P36 implies that on average there are 36 grains per square cm. If the abrasive is designated P200, then, accordingly, there are on average 200 grains per square cm.
When roughing of a part is required and a fairly thick layer needs to be removed, abrasive materials with a small number of grains are used. As the quality of the processed surface improves, the size of the grains themselves decreases and their number increases.
The table provides recommendations for using abrasive cloths for their intended purpose.
Coarse grinding is also performed using hard brushes. They are made from spring wire. Using a similar tool, brushing (artificial aging of wood) is performed.
To sand logs, plastic bristles are used instead of wire. It is made from rigid fishing line with a diameter of 3.0...4.5 mm. To increase productivity, such brushes are made on disks.
Polishing
Thanks to polishing, you can achieve a very beautiful wood texture, and at the same time the pattern of natural wood is preserved. The result is a mirror base that can be made easily and quickly at home. However, it is worth considering that not every type of wood can be polished. Wood with a large texture is poorly polished. Typically the polishing process includes the following work:
- The varnish mixture is applied three times as a primer. After the first priming, it is necessary to sand the base, then remove dust, and apply the next two primer coats;
- polishing is carried out using a swab; the polish must be applied to the base in a thin layer. Then drying and sanding is carried out using an electric sander or sandpaper. This process is quite labor-intensive and time-consuming, so it is advisable to use a power tool. After sanding, the product is again treated with polish, dried, and sanded again. After several such treatments, an attractive, glossy, mirror-like surface appears. To prevent the tampon from sticking, you can add a few drops of oil to the mixture;
- Polishing a matte varnish or a glossy finish is done with any type of polish to which you need to add a little oil. Using a tampon, rub the product until a beautiful shine appears. To prevent the previous layers of polish from dissolving, you need to add 1-2 drops of oil for every 10 square centimeters. This treatment is repeated 2 to 5 times to achieve the desired effect. Before each treatment, the product must be wiped with a cloth moistened with a mixture of water and polish.
If polishing is performed using any other technology, and if the above sequence of work is not followed, the result will be unsatisfactory. For the first time, it is advisable to perform polishing with your own hands on a test area. If you follow these recommendations, polishing the varnish will be successful, resulting in a perfectly smooth, shiny surface.
What are the benefits of natural polishing wax?
Today's chairs and tables are rarely made of natural wood. However, antique furnishings and some modern products made from wood materials still require processing, after which they literally “rejuvenate”, returning the lost radiance and color.
Beeswax is used for this purpose due to its unique composition, since this organic compound contains many useful ingredients, among which ester substances, saturated fatty acids and carbohydrate components are especially distinguished.
Due to the content of these elements, the beekeeping product has properties useful for furniture:
- the natural bioactive compound practically does not oxidize, therefore, subject to certain conditions, it can retain its qualities for centuries;
- the wax comes into contact with solvents, which allows it to be used as a base for the preparation of emulsion products;
- the beekeeping product does not interact with water, which helps prevent moisture from penetrating into the deep layers of wood and deforming the products;
- Polishing with natural wax gives wooden structures a pleasant shine and an unusual surface texture that “breathes.”
In addition, the emulsion, which contains this beekeeping product, is an excellent alternative to industrial varnishes containing synthetic compounds of little use and characterized by a persistent chemical odor.
Application of primer
Surface priming is a necessary stage of wood polishing. When priming with the composition, all the cracks and pores of the wood are filled, the surface is leveled, the hygroscopicity of the wood is reduced, which saves the polishing composition and makes its application easier, and the result is of higher quality. Primer mixtures improve adhesion of materials, so the final coating lasts much longer. Primer compounds protect wood from rotting, mold and pests, and increase its strength and smoothness. Depending on the degree of surface treatment and the type of finishing coating that will be applied, several types of soil mixtures are used. If the surface is poorly sanded, you can buy an alkyd primer that forms a dense protective layer, providing a matte and smooth surface. Due to toxicity, it is better not to use alkyd mixtures indoors. The drying time of the product is from 12 to 16 hours. Acrylic primer has the same properties. It is used before painting with latex, water-based and acrylic paints. This primer composition has advantages, as it dries quickly, is diluted with water, and is non-toxic. Before applying parquet varnish, the wood is primed with a polyurethane primer consisting of synthetic resins and a solvent.
Shellac primer is used for treating knots and coniferous wood, as it neutralizes the effect of resins on the finishing coating. Various antiseptic compositions are designed to combat diseases and pests and preserve wood. It is recommended to treat unpainted products at least once every 5 years. If you need a composition that penetrates well into the deep layers, then you can use drying oil or alkyd enamel. Drying oil is a good base for applying oil paints. Treatment with hot drying oil will protect the wood from moisture. This composition is applied in two layers. Putty protects wood from cracking at low temperatures. When polishing wood at home, you can prepare putty yourself from PVA glue and sawdust. This composition is used before applying varnish.
The soil mixtures are applied using linen swabs to small items. Rollers are used to treat large areas, and aerosol spraying is used for hard-to-reach areas. Primer mixtures are applied in two layers, the second layer is primed after the first has dried. After the second layer has dried, the surface is sanded with fine sandpaper.
The best aerosol polishes for furniture
Spray polishes are convenient to apply to large surfaces. Such products are economical, but can sometimes cause an allergic reaction.
Gallus
4.9
★★★★★ editorial assessment
94% of buyers recommend this product
The German furniture care product is suitable for wooden, laminated, varnished or veneered surfaces. The composition has a water-repellent and disinfectant effect. There are no coloring components in it, so it can be used to treat dark and light furniture.
The polish cleans small stains, but does not cope with stubborn stains. Silicone oil nourishes the wood and covers it with a thin invisible film. As a result, the surface is protected from external influences and dust, shines, and scratches are less visible. With regular care, furniture will not fade.
The product is sold in a bottle with a convenient spray. The composition is consumed very slowly. The smell is not strong and almost does not remain on the surface.
Pros:
- convenient sprayer;
- minimum consumption;
- suitable for various materials;
- unnoticeable smell.
Minuses:
- difficult to find on sale;
- no antistatic effect.
The manufacturer claims a dust-repellent effect of the product, but buyers note that dust settles quite quickly after surface treatment.
Chirton “Anti-dust” Sea freshness
4.8
★★★★★ editorial assessment
88% of buyers recommend this product
Chirton polish with a sea-fresh scent removes fingerprints and other minor stains. A mixture of silicones creates a film on the surface that makes it smooth and makes cleaning easier in the future.
The furniture is protected from splashes of water and dust. After treatment with polish, it shines and stays clean longer. The manufacturer recommends using the product not only for wood, but also for chrome, ceramics, marble, some types of plastic and enameled products.
Pros:
- forms a protective film;
- removes minor stains;
- suitable for surfaces made of different materials;
- affordable price (from 70 rubles).
Minuses:
- may leave a residue on light-colored surfaces;
- The spray bottle doesn't always work well.
The sprayer may sometimes spit or leak during application. But due to the low price, buyers turn a blind eye to this drawback.
Waxing
The procedure for coating wood products with wax material is quite easy and simple, at home. Thanks to the treatment with a wax composition, the texture and pattern of natural wood will be much clearer and more expressive, the surface will become velvety and soft. Waxing is often used for hard wood species, such as oak, walnut, ash. You can also wax soft wood, such as linden, alder or birch, but it is advisable to pre-tint these types.
The waxing procedure involves carefully filling all the spaces between the wood fibers, due to which the wax creates a very smooth base, which is subsequently treated with varnish. The wax coating process includes the following steps:
- The wood, previously cleared of lint (using sanding), is covered with a small layer of mastic. When this composition is dried, the wood is wiped with a soft cloth, against the grain. During the application of the first layer, all existing defects and irregularities, such as cracks and pores, are completely filled with the mixture. As a result, the wood has a perfectly smooth appearance.
- The treated product must be kept in a warm room for approximately 2 hours.
- The wax is applied a second time using a soft cloth. While applying the solution, you need to slowly increase the pressure on the wood. After the second treatment, the base should become matte and smooth.
- The applied small layer of shellac furniture varnish is polished.
Although this kind of polishing of varnish on wood at home looks very beautiful, it has one drawback - the protective wax coating after polishing is not sufficiently resistant to moisture and water. Drops may leave marks on the surface of the wood.
How long after applying the last coat of varnish can I polish it?
After applying the last coat of varnish, there is no rush to polish. You can begin work only after making sure that the varnish has completely hardened. Otherwise, stripes or lines may form on its surface. How long should you wait? When calculating the holding time, you need to take into account the drying period indicated on the packaging for a particular paintwork material.
However, the actual polymerization period may be longer than indicated if, for example, the room is cool or the varnish is applied in a thick layer. Experienced craftsmen recommend adding an additional 36–72 hours to the exposure period specified in the instructions, and only after that begin finishing treatment.
Some varnishes, such as piano varnish, have a dark tint. They should begin to be polished at least a week after painting, because if they are not completely dry, polishing defects on a dark surface are more noticeable than on a light one.
Application of oil varnish composition
The varnished oil coating takes a long time to dry, so thin layers of this composition should be applied. It is advisable to prime the base first; to do this, mix the varnish with water in a ratio of 1 to 5. After the varnish layer has completely dried, it must be sanded, then coated again with the varnish mixture. If the solution becomes thick, it can be diluted with turpentine. You need to work slowly with the brush, do not make sudden movements, so that air bubbles do not appear. After the topcoat has dried, the varnish is polished.
How to sand wood correctly?
Sanding wooden surfaces is a complex technological process that requires the use of special consumables and tools. Among the features we note the following points:
- Sanding wood involves careful preparation of the surface for the operation in question. The workpiece must have exact dimensions taking into account the allowance.
- Grinding involves the use of abrasives with different grain sizes. A common question is how to polish a complex product consisting of several planes.
- When working, the workpiece must be securely fastened. Otherwise, the quality of processing is significantly reduced.
Wood is considered an easily processed material. That is why problems with grinding, as a rule, do not arise.
Elimination of paint defects
What defects can occur when applying paintwork to a car? Most often you will find the following:
- particles of debris and dust on the painted surface;
- Orange peel;
- matte areas;
- burst bubbles.
On a freshly painted car, any roughness or inclusions are especially noticeable. If the varnish shines unevenly and in some places has dull spots, this naturally causes dissatisfaction with the vehicle owner with the results of his work. In addition, during drying and polymerization of the car coating, small gaps may form in places where the body geometry is restored, which should also be eliminated. All this makes you want to start eliminating defects as quickly as possible. However, you can’t rush, and before you start polishing your car, you should wait a month so that the paint and varnish have time to completely harden.
The process of bringing the appearance of a car's paintwork to perfect condition includes two stages. The first stage is for grinding, the second stage is for polishing the body surface.
These two operations are within the capabilities of any vehicle owner, so there is no need to be afraid of these works. In order to remove all defects, the surface of the car is first sanded using waterproof sandpaper with a grain size of 2000 to 4000. This work is usually carried out using the wet method.
If you have a grinding machine, then to process the car's paintwork you will need an abrasive with a grain size from 1000 to 4000. In this case, sanding is carried out dry. First, larger abrasives are used, which can quickly remove existing defects. As grinding progresses, a transition is made to increasingly finer abrasive materials. As a result, the varnish acquires a perfectly smooth surface, and the irregularities and inclusions that existed after painting disappear.
Applying varnish
Let's talk about which varnishes are best to use. The best are considered alkyd (Tikkurila Unika-super series), polyurethane and water-polymer (good ones are Swedish Bask).
Despite the lack of odor, water-based varnish is not the best choice for your first varnishing experience. Essentially it is a water-based suspension. But it is far from being as harmless as is commonly believed. Water-based varnishes contain very harmful solvents, albeit in small quantities. It’s just that the usual acetone and others cannot keep such a composition in a stable state. So we have to use much “cooler” solvents.
This is by the way, but the reason is essentially different - difficulties during processing. When applying varnish, water is absorbed into the wood fibers and they rise. As a result, after the first treatment, the surface is far from smooth, but very rough. This effect is especially pronounced on pine products. So after the first layer of water-based varnish has dried, take an angle grinder or a sander, attach 320-grit sandpaper to it and sand it until smooth. If you're lucky, the next layer will lie flat and the pile won't rise again; if not, you'll have to repeat the operation again. The situation is not fatal, of course, but unpleasant. This does not happen with other varnishes.
How to apply varnish
Now a little about how to apply varnish. Professionals believe that the best method is spraying from a spray gun. This may be true, but not all home craftsmen have such a device, and you also need to be able to work with a spray gun. Among manual application methods, a popular method is application with a piece of foam rubber (or a new kitchen sponge) or a fabric swab (soft, white, lint-free fabric). To decide, you need to try what is more convenient for you, how it turns out smoother (if it works out at all).
The next method is with a small foam roller. Suitable if you are varnishing a surface of a simple shape without small details (a door leaf, for example).
Applying varnish with a brush is the most unpopular method
The use of brushes when varnishing furniture, oddly enough, is in last place. The fact is that it is difficult to evenly apply a layer of varnish in this way. You need a good brush with soft, thick, natural bristles, which should not tangle under any circumstances.
Technology
Regardless of the chosen method of applying varnish, its layers should be thin and of uniform thickness. Take a little product onto a brush/sponge/roller/tampon and rub it over the surface as thoroughly as possible. Next time we dip it in varnish only after the “weapon” no longer leaves any traces. In this way we cover the entire surface and leave to dry.
Many coats of varnish may be required
The applied layer of varnish does not dry completely, but the time indicated on the packaging of the varnish in the column “tack-free” or “application of the next layer”. On average, for water-based varnishes it is 1 hour, for alkyd varnishes - 5 hours. The next layer is applied using the same technique. The total number of layers is usually from 5 to 9, depending on the quality of the veneer and preliminary sanding. When the surface becomes absolutely smooth, the varnish is dried until completely dry - 2-3 days. After this, sanding begins again.
Wood polishing tool
Before you start work, you need to stock up on the necessary equipment. For rough processing of volumetric surfaces or removal of old coating, it is advisable to mechanize the process. Professionals use special grinding machines and planes for this purpose.
To polish wood with your own hands, you can use universal tools (grinder, drill) with various attachments. Consumables are selected depending on the types of polishing.
Three, screwing, varnishing
Polishing different types of surfaces - untreated, painted or varnished - has its own nuances. You will definitely need special substances and devices to achieve good results. In general, the process involves applying several layers of varnish, followed by drying and sanding each but the last.
Sand each crevice
A job done brilliantly
Before polishing varnish on wood, you need to prepare polish, pumice, a swab/velor roller (ideally a spray gun), and denatured alcohol.
- Polish is thickly applied to a dry varnished surface with a swab and polished with pumice until shiny.
- After 3 days of drying, a second layer follows to level out roughness and is left to dry for 5 days.
- The third portion of polish is applied.
- Polishing with alcohol is carried out to a mirror shine.
The photo shows how to hold the tampon and what movements to apply the material with
Old beautiful furniture definitely needs, if not repair, then restoration of the varnish layer, which is wiped out and becomes covered with bald patches.
The restoration process includes the following surface treatment steps:
- Removing the old varnish layer using ammonia, denatured alcohol, turpentine or other solvent.
Health comes first
- Processing with coarse and then fine-grained sandpaper.
- Rub in the filler (in a circular motion).
- Treat with stain several times, allowing each layer to dry completely.
- Direct polishing of varnish on wood - with wax, varnish (in several layers, each is dried, sanded; do not sand the last layer).
Technologies from time immemorial
I wonder how, in ancient times, woodcarvers, carpenters, and architects managed to preserve their products from moisture and drying out? The secrets of distant ancestors have survived to this day and naturally fit into modern production.
It has long been known how to polish wood with wax, which gave the product a soft, calm glow and was guaranteed to protect it from the vagaries of the weather.
The waxing procedure looks like this:
- The material is applied to the wood with a cloth or brush.
Liquid wax is easy to apply with a brush
- The wax dries out slightly.
- Rub it in until the grains disappear.
- Final polishing with a clean cloth until shiny.
There are no problems with wax - scoop it up and rub it in
The second way to polish wood without harm to health is to use natural drying oil, the main component of which is linseed oil. It is simply rubbed in until it stops being absorbed. It does not give shine, but protects the surface, making its color more saturated (see also the article “OSB on a wooden floor: preparation and installation of the coating”).
Pros and cons of polishing
Polished wood looks beautiful, whether it's on a coffee table, a cabinet, or small decorative crafts. Polishing wood can be useful, for example, when restoring furniture. However, the operation of polished furniture entails some difficulties, and we will consider them first.
Flaws
- Polished surfaces tend to attract dust; therefore, if you do not care for them properly, they will quickly become dirty.
- On polished wood, marks from fingers, drops of water and other types of dirt are very noticeable, so you will have to wipe them often.
- If a polished wood product sits in the sun, it will fade over time. This can also happen if you use inappropriate detergents or cleaning products.
- Wood polishing has low resistance to mechanical damage and must be handled very carefully. Please note that scratches and chips on polished wood will be very noticeable.
Advantages
- Polished furniture looks elegant and expensive, and will be a wonderful addition to the appropriate interior. In addition, such a product will look original, since now polishing is not used as often as before.
- Pieces of furniture or floors polished to a mirror shine will not only visually expand the space of the room, but also make it brighter.
- If you care for polished furniture correctly, it will last for several decades without losing its shine.
- Nowadays, there are many different products for cleaning and caring for polished wood. Some of them are able to disguise minor scratches. Others have antistatic properties, so dust will not be attracted to the polished surface. Still others create a protective layer when used. In addition, there are several folk ways of caring for polished wood, which we will talk about later.
Turning an angle grinder into a grinder
In general, hand on heart, an angle grinder is an angle grinder, a grinder is something else. But, being a universal tool, it is used for different purposes and the unit should be prepared separately for each task. In order to carry out grinding using a grinder, you will need a support wheel. It is placed on the tool shaft itself.
If you plan to sand the wood, then you need to stick sandpaper on it. What grain size it will be - decide for yourself. It depends on what purpose you are sanding the material for. It is very convenient to use ready-made sanding wheels with a sticky surface on the back side. They can be quickly changed if necessary.
If you need to work with concrete, you will need a dust cover. You can connect a vacuum cleaner to it and there will be much less garbage. On sale you can find special casings that have a sliding part. With such a boot you can sand corners, which is very convenient.
For metals, you will need standard circles for that material. They come in different sizes, thicknesses, and grain sizes. If the metal you plan to work with is very rusty, first work with it with a special brush, and only then connect the angle grinder.
Polishing stages
You will need several types of materials to polish your car's varnish. The work consists of two stages:
- abrasive polishing;
- protective polishing.
At its core, the first stage is a very precise grinding, during which the surface of the car's paintwork becomes completely smooth. How to polish a car depends on the color of its body. Black and dark cars require higher quality processing. In order for polishing the varnish to be as effective as possible, coarse abrasive pastes are first used, then fine abrasive ones, and this stage of work is completed with non-abrasive compounds. The easiest way to polish a car's paint is silver. It is enough for their owners to have coarse and fine abrasive pastes in their arsenal. Further polishing of a car of this color will not bring any visible effect.
Typically, the varnish applied to the car body has a thickness of about 35–40 microns. Standard abrasive polishing results in a loss of 3-5 microns, so a vehicle can withstand 6-8 such treatments on average. Considering this, you should not use abrasive materials unless absolutely necessary. You can polish a car with abrasive compounds either manually or using a polishing machine. In the latter case, you should have your own circle for each type of polish. The fact is that polishing pastes for car coatings that differ in composition require different densities of foam rubber with which its working surface is covered.
Using unsuitable discs can result in paint defects that will be very difficult to repair. The same thing can happen if you polish at high speeds or press the tool incorrectly against the surface being processed.
After using abrasive pastes, the surface of the car will acquire a chic, shiny appearance, but it will not last long if additional protective measures are not taken. The varnish must be coated with a special layer that will protect the car from environmental influences for a long time. This processing method is called “protective polishing”. At this stage, microscopic scratches are eliminated and an additional coating is formed, the durability of which will determine how often such work will need to be repeated. You can polish your car's paint:
- wax and silicone polishes;
- polymer compounds.
All other brands of materials available for sale are, in one way or another, a variety or combination of these main classes of paint protection products.
The advantage of wax and silicone polishes is their affordability and ease of use. They are easy to polish even for a beginner, but keep in mind that after visiting 4-6 washes, the procedure will have to be repeated again.
Wax polishes are the oldest and most proven means of adding shine to a car body. Due to the low price and high quality of the coating that this polish creates, this type of product has many supporters.
Silicone polishes, often sold in the form of aerosols, are less economical, but are attractive due to their ease of use. With their help, you can polish your car in record time, but as already mentioned, the created coating will not last long. If the vehicle is used infrequently and drives on clean streets, then wax or silicone polishes are the optimal solution to the problem of car paint care.
For those who are forced to be on the road every day, and at the same time want their car to look perfect all the time, polymer compositions are perfect. They form a protective layer that can withstand ultraviolet radiation, temperature changes, road chemicals, bird droppings and many other factors that can damage a car's paint for a long time. Their cost is significantly higher than that of wax-based polishes, but the service life of the coating created with their help is much longer. Polymer compositions are the most promising direction in the development of car paint care products. Most of these materials can withstand 10–12 or more washes. The specific result will depend on the chemical composition of the polish, which can be very diverse, and operating conditions.
Grinding concrete
As mentioned above, to work with concrete you need a boot. But, if suddenly you can’t buy it, you can build it yourself. Any paint or putty bucket that is slightly larger in size than the grinder circle is suitable for this. Cut off the bottom, cut a hole for the gearbox and another for attaching the vacuum cleaner. Plug in the vacuum cleaner and start working.
Don't forget about the mask and respirator either. Without this you cannot grind.
Unlike wood, concrete is sanded all the way around. This will allow you to finish the job faster, which means saving effort and time. The circle is selected for working with stone.
If you are processing a concrete floor, do not forget to control its plane, otherwise you will easily make holes due to inexperience. It is enough to simply bring the seams into one level plane. Matrix diamond cups of 125 millimeters are best suited for grinding concrete (provided that the grinder circle is 150 millimeters).
Mechanized wood sanding
Handmade is appreciated. But when using the simplest means of mechanization, wood processing occurs faster. The most widely used for grinding various materials are elastic supports for electric drills (Fig. 6) and angle grinders (Fig. 7) with Velcro. Somewhat later, manufacturers of supports began to sell a similar universal support (Fig. 8).
Rice. 8 Universal elastic support with Velcro for electric drill or angle grinder
When working with such mechanization equipment, safety rules must be strictly observed.
- A lot of wood dust is generated, so a respirator and glasses will protect your vision and breathing.
- Gloves with a rubber working surface will protect the worker’s hands.
- It is advisable to wear an apron, then it is easier to shake out the dust from your clothes.
Special grinding wheels are available for working with elastic support (Fig. 9). They are installed and removed in one motion.
Rice. 9 Replacement abrasive wheels for power tools
Pre-cleaning
Polishing will be successful only if the surface of the wood allows it. Mirror shine will only appear on veneer or solid wood that does not have defects. If the product has been treated with stain, it should be bleached and then evenly coated with stain again. In this case, the color tone should be slightly lighter than before, since polishing slightly darkens the wood. There should be no unevenness on the surface. Small dents can be straightened by treating the defective areas with hot steam (using a damp cloth and iron). Protruding cut fibers are cleaned with fine sandpaper (180 grit). In this case, you need to work only in the direction of the wood fibers so as not to scratch it.
cycle
A scraper gives good results during preliminary cleaning - if it is impeccably sharpened. There should be no burr on it, which could leave scratches on the surface of the wood.
In the direction of the wood grain
The cycles only work in the direction of the wood grain. If, when scraping, the chips are of different thicknesses, then the scraper needs to be sharpened so that its cutting edge becomes evenly sharp.
veneer polishing
Polishing begins with leveling the surface of the wood. To do this, use a sandpaper or fine-grained sandpaper.
Polishing
This technology gives the most beautiful texture, well preserving the wood grain. The result is a surface resembling a mirror. The main thing is that you can do it simply and with your own hands. Not all materials lend themselves well to such processing.
Wood with a large texture does not tolerate polishing well.
Work order
- Prime the surface with three layers of varnish. After the first layer, sand and carefully remove dust. Then apply two layers of varnish over the dried surface.
- Polishing is done with a swab, and the polish is applied in a thin layer. Dry and grind with abrasive materials or a grinding machine. The process is very long, it is better to use technology. After each application of polish, the surface is dried and sanded again. As a result, gloss begins to appear on the surface. To prevent the tampon from sticking during operation, add a couple of drops of oil.
- Polishing is done using polish with the addition of a small amount of oil. Rub the surface with a swab until the desired shine is achieved. In order not to dissolve the previous layers, oil is added in an amount of only 1-2 drops per 10 cm². Repeat the work several times. Between processing layers, wipe the coating with a rag soaked in a solution of polish and water.
Failure to comply with the technology and sequence of work or an insufficient number of layers will affect the result. It is better to do the first DIY work on a test plate. The given recommendations will help to give the varnish a mirror shine and create an even, smooth surface.
Wood polishing paste
When making wood products, the question often arises: “How to polish wood?” using polish to impart a protective finish.
Most often, polishing is used for finishing furniture and handicrafts.
The polished surface allows you to preserve the texture of the wood and gives the product a beautiful appearance.
Wood polishing
Application of primer
The priming process is carried out using a special swab by applying varnish to the wooden surface. The tampon must be made of linen fabric (does not leave fabric lint).
All work processes are performed in the following sequence:
- the swab is impregnated with varnish and with its help the entire surface of the wood is treated until a uniform coating is formed;
- a pause is maintained until the varnish is completely dry, sanded with fine-grained sandpaper and wiped with a clean dry rag;
- apply an additional 2 layers of varnish;
- a composition is prepared consisting of 1 part polish and 1 part varnish, which covers the entire surface;
- The wood is dried for 2 days.
Polishing
The polishing process consists of applying polish to wood and is performed in the following sequence:
- A small amount of vegetable oil is applied to the linen swab for better glide over the surface being treated;
- Using a swab moistened with polish, carefully wipe the entire surface;
- the processing operation is carried out 3 times with pauses after applying each layer until the polish dries completely;
- the wood is treated with fine-grained sandpaper and wiped with a dry rag (after each time the polish is applied).
Guitar Body Polishing
Wood, as one of the most popular materials for the manufacture of furniture, requires a special finishing that will emphasize its natural beauty and extend its service life.
This process is called polishing.
Of course, it is difficult to implement, takes a lot of time, and all actions must be carried out very carefully.
Despite the difficulties, polishing wood allows you to create a glossy surface, the main thing is to know the subtleties of the process.
What is polishing
As a result of polishing, the wooden surface retains its natural color and acquires a mirror shine.
To polish, you need to apply a special compound called polish to the wood several times.
The technology for creating beautiful textures requires high-quality surface preparation, in particular grinding and removal of lint and dust particles. Then the wood is treated with a primer emulsion, polished, and polished as a final step.
What types of rocks can be polished?
It’s worth noting right away that not all breeds are suitable for polishing. For example, loose wood is difficult to polish.
It is more effective to polish dense rocks:
- Red tree;
- birch;
- boxwood;
- nut;
- pear;
- hornbeam;
- apple tree;
- maple.
Beech wood gets a beautiful texture after polishing, although it is difficult to polish.
Oak is characterized by its hardiness, so it is also difficult to polish.
Pine is rarely polished due to the friability of the wood; it is mainly sanded and varnished.
Wood polishing compounds
The market offers a fairly extensive range of products designed for processing wooden products.
You can purchase the composition ready-made at any specialized retail outlet; if desired, it can be made at home using varnish or wax.
To prepare a working mixture for polishing wood with your own hands, you will need crushed shellac resin in the amount of 60 g and 0.5 liters of alcohol.
The components are mixed in a glass container, closed tightly with a lid, and stirred periodically so that the shellac is completely dissolved.
After which the working fluid is filtered and poured into a clean container.
For finishing children's furniture and dishes, it is more advisable to use drying oil or wax paste.
It is prepared from wax, turpentine (solvent) in a 1:1 ratio.
First, the main component is heated in a container in a water bath, and then a solvent is added to it.
To achieve a uniform consistency, the mixture must be stirred constantly. A felt swab is suitable for working with wax. This is a safe type of wood polish that does not emit harmful substances and is absolutely harmless.
Note! Furniture wax for polishing is applied to wood without a varnish coating.
Surface varnishing
The process is to fill all micropores with varnish and prevent new pile from forming. The result is a film that is resistant to water and dust, a surface with a deeper and richer pattern. The treatment is carried out with a cotton swab, which was previously wrapped in a clean canvas cloth that does not leave lint on the surface being treated.
Sequence of DIY work
- Generously apply the varnish in two layers. During processing, all irregularities must be filled with varnish.
- Remove all varnish from the surface using sanding materials. The varnish remains only in cracks and pores.
- Apply a second layer. These two coats are considered pre-primed.
- After secondary coating, dust is carefully removed.
- Apply a third, very thin layer and leave in a closed box or room for a couple of days. During this period, not a speck of dust should fall on the product.
- Apply the final varnish coat once or twice.
All resulting smudges subsequently form stains. To avoid this, the surface is covered with a very thin layer of varnish, while trying not to destroy the film formed during the previous movement. Everything is done evenly, efficiently and quickly, without stopping. It’s better to rehearse on a control copy. The work can be done with either shellac or oil varnish.