by Alexey | Crafts Decor Workshop Furniture Cheap Before and After Accessories | Tuesday, August 08, 2017
| Follow Make-Self.net on Facebook and be the first to read our articles. |
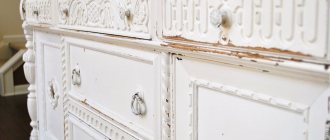
What to do when the appearance of the refrigerator leaves much to be desired? Your refrigerator may be 5-10 years old and, unlike new household appliances, it still works like a clock. We update kitchen furniture, add new accessories, make repairs, and the old refrigerator no longer fits into the modern interior.
Tired of the gloomy look of your refrigerator? It's time to change everything and turn it into a work of art. Make-Self team has collected 25 examples of the transformation of old refrigerators that will inspire you. Enjoy...
DIY refrigerator decor
Having decided to transform the appearance of the refrigerator, you need to carry out preparatory work. First of all, decide how much money you have; perhaps some stylistic decisions are beyond your means. Choose a decoration method that you are able to implement. Don't take on too much, a damaged refrigerator is not a cheap pleasure.
The end result of your efforts should be consistent with the overall interior design. It would be a good idea to familiarize yourself with several master classes before starting work.
The next step is to create a graphic sketch of the future masterpiece, think it over carefully, write down a list of materials necessary for the work, and now it’s time to buy everything you need. Before starting the decorating process, the refrigerator must be turned off, defrosted, washed, and dried. Clean off the old paint and degrease the surfaces on which the color will be applied.
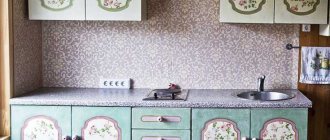
Decoupage
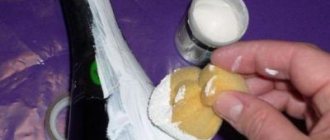
Working with the decoupage technique, which involves pasting over pre-cut designs, requires some skill, so you shouldn’t try to make an expensive thing with your pen. Experience in this matter is highly desirable. When choosing a suitable pattern, make sure that the color scheme does not deviate from the overall kitchen color scheme. Special decoupage napkins can be bought at a handicraft store; designs are offered here to suit every taste. If you don’t find a suitable print, you can easily create it in a graphic editor; all you have to do is print it.
When printing an image from a file, use only laser printing techniques. Inkjet printer ink will blur into ugly spots when exposed to moisture.
The top layer with the pattern is separated from the decoupage napkin and glued on using liquid water-soluble glue; regular PVA will do. After drying, you need to cover the image with a special varnish in several layers. With ordinary paper, things are more complicated - the picture is covered with several layers of acrylic varnish and dried. Then they allow the paper base to acidify in water, carefully clean it off by placing the workpiece on a lined absorbent napkin with the image down. The result of the manipulations is a thin film with a pattern, which is glued to the decorative object.
Stickers
The process of applying stickers does not need a detailed description. If the stickers you purchase are small, and the interior is not pretentious, then your children can also handle their application, it will turn out fun. Plus, it's another way to have a great time together. Just remember to clean the part to be decorated from any dirt.
To avoid the appearance of bubbles under the surface of the stickers, it is better to apply them on a flat surface, without large dents or chips.
It is better not to use this technique to decorate too old equipment. If you plan to apply a more complex sticker, you need to be a little more careful. It is better to apply the sticker by removing the base gradually, smoothing out any imperfections as necessary.
Do not forget about harmony with the overall interior:
| Loft | Strict monochromatic motifs are suitable. |
| Provence | Graceful floral motifs, view from the window of a lavender field. |
| Rustic | Poppies and a wicker fence will become the highlight of the kitchen. |
Artistic painting
Having minimal artistic talent, you can try your hand at artistic painting. The set of materials is minimal - acrylic-based paints, several brushes for painting. The outline of the future image is drawn onto a grease-free background using a lead pencil. Its complexity depends on the richness of your imagination and level of skill - from simple ornaments, funny cats, dogs to landscape compositions and still lifes that are striking in their realism.
For those who master complex types of strokes, a good solution would be to paint with motifs of the national style - Gzhel, Petrikov, Khokhloma. Now all that remains is to paint the preliminary sketch with acrylic paints, apply a protective layer of varnish on it, so the painting will not be erased prematurely. Such a “refrigeration” picture becomes a real work of art.
Airbrush
Due to the complexity of execution, this technique is difficult to recommend as a home decorating idea. Only a professional can decorate household appliances using airbrushing in a paint shop, since the work uses professional equipment for applying paint under pressure. It would be a stretch to classify drawing using aerosol cans and a pre-prepared stencil as amateur aerography. In this case, it is enough to prepare or download a ready-made stencil of the design you like, and cut out the contours with a stationery knife.
Using adhesive tape, attach the sheet with the stencil to the surface, and carefully spray the paint in an even layer. After removing the stencil, use a thin brush to correct the contours of the design or paint it in a contrasting color. By successfully combining several stencils and paints of different colors, you get a simple but attractive composition.
Film
Pasting with self-adhesive film is technically more difficult than applying a sticker. There are several tricks that guarantee a really good result. It is worth cutting out the contours with a margin. The hand can always tremble, the film will slide off, but a sufficient supply will prevent an empty area from forming. All irregularities must be removed, the surface must be perfectly smooth, so an additional layer of metal primer is applied. There should not be the slightest greasy stain left on the surface.
The film is glued in stages from the center to the edges. At the same time, inclusions of air are removed with your hand and a soft spatula. You need to be very careful to ensure that the film lays flat and without wrinkles. When the film is pasted, the excess is removed with a stationery knife. The edges are pressed tightly. A responsible approach to the preliminary preparation of the surface to be glued ensures an attractive, defect-free appearance and long service life of the self-adhesive film.
Magnets
Collections of various magnets are a decorative idea that is almost 100% likely to be found on any refrigerator. It doesn’t matter what model, what size the unit is, where it is located - in the kitchen, in the hallway, in a cramped dorm room, magnets will be the most universal option to hide minor defects. We will not dwell on the little things that are found in every home - roundels with views of cities visited, souvenirs brought from the sea. Such magnets serve rather as a pleasant reminder of a vacation without any particular artistic value.
Creative people prefer to make magnets with their own hands. The materials used for this craft are polymer clay, wood, and salt dough. Needlewomen often embroider magnets with a cross on plastic canvas, sew from thick fabric, felt, and felt a variety of figures from wool. For example, the symbol of the year - Monkey, Snake, Rooster - will be a wonderful decoration. A small magnetic base is glued to the finished product.
Organizer
In large families with a lot of daily worries, the refrigerator is used as an organizer and a way of communication. On a magnetic board you can write good wishes to family members, remind about urgent matters, make a shopping list, and today's menu. Just cheer everyone up by drawing a funny face. Magnetic boards are produced in a variety of shapes, the sizes can be miniature, impressive - for those who like long letters. In order to organize family life, notepads with spring pens, tear-off calendars, and stickers with reminders are attached to the door.
If you want to please your children, turn the facade into a blackboard; a special coating is offered in hardware stores. All reminders can be left here, although this option for designing household appliances is easily soiled. Business people will appreciate the electronic magnet. The gadget is designed for storing short videos and images. It stores a list of today's tasks, a built-in alarm clock, and a calendar. Housewives will find a cooking timer useful.